RSS Feed

Tag Archives: how-to

How to Carve Your Thanksgiving Turkey – Photo Guide

In charge of carving the bird this Thanksgiving?

Most of us carve a turkey once a year, if that, which means that just about all of us could use a little refresher on how to tackle that big golden bird.

With that in mind, here’s a little photo guide to help you get the job done.

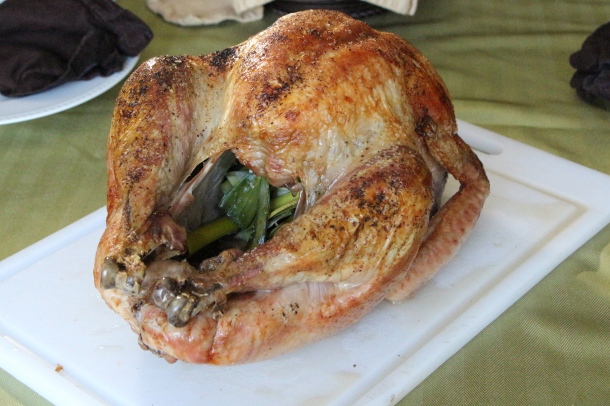
1. Allow your guests to see that gloriously golden, fragrant, tender roasted turkey. Then, bring it back into the kitchen to carve. It’s a hands-on and somewhat messy job. There’s no need to be dealing with it at the carefully set Thanksgiving table.

IMG_1396

2. Start by removing the legs. To do this, use a sharp carving knife to cut the skin connecting the leg to the body. Use your hands to pull the leg away from the body until you hear the joint pop.

IMG_1397

Then wiggle the knife through the joint and pull the leg off of the turkey carcass.

IMG_1402

3. Repeat on the other side. Then, separate the thighs from the drumsticks by inserting a knife between the joint. If desired, slice the meat from the thigh and drumsticks.

IMG_1446

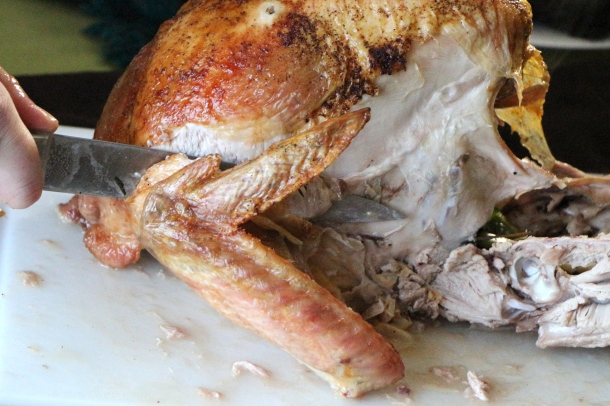
4. Remove the wings in a similar manner, by gently pulling the wing from the body, then using a knife to cut through the skin and joint.

IMG_1419

5. Finally, remove the turkey breasts from the carcass. To do this, make a long, deep cut into the center of the turkey on one side of the breast bone. Carefully glide your knife down along the breast bone to remove the entire breast from one side of the turkey.

IMG_1425

6. Repeat on the other side, then lay the breasts skin side up on your carving board and cut across the breast into slices.

IMG_1434

Save the carcass from turkey soup!!

How to Make an All-Butter Pie Crust

Making a homemade pie crust is not difficult to do. It just takes a few simple ingredients, carefully blended together to create a flakey, buttery crust to be proud of. And it really does make a difference!

The key to making a great pie crust is keeping the ingredients cool throughout the process. You want the butter to remain in solid form, dispersed in small pieces throughout the dough, so that when the dough is baked, the little bits of butter will melt between the flour, creating delicious flakey layers. To this end, work quickly and handle the dough as little as possible (so the butter doesn’t melt by the warmth of your hands). Start with very cold ingredients and refrigerate the prepared dough before using to allow the butter to chill before handling the dough any further. A cold work surface, such as a marble slab, is handy, but not necessary.

Some people prefer to use a food processor to make homemade dough, but it’s very easy to do by hand. The only special equipment needed is a simple plastic or metal pastry/dough blender.

This step-by-step guide will produce enough dough for two pie crusts (or one double-crusted pie). But while you’re at it, make a couple extra and freeze them for the next time you need a quick crust!

You will need:

  • 2 cups flour
  • 1/4 cup sugar
  • 1 cup (2 sticks) butter, cut into small cubes*
  • 1/2 cup ice cold water
  • Mixing bowl
  • Fork
  • A pastry blender/cutter
  • Rolling pin
  • Pie Pans(2)
*I use salted butter and skip the addition of extra salt. If desired, you can use unsalted butter and add a pinch of salt.

Pour 2 cups flour into a bowl.

Add 1/4 cup sugar.

Use a fork to blend the flour and sugar.

Add 1 cup (2 sticks) very cold butter (cut into small pieces) to the flour mixture. (I place the butter into the freezer for just a few minutes after cutting it to ensure that it’s extra cold.)

Use a pastry blender to cut the butter into the flour mixture, until the butter appears like flour-coated pea-sized pieces.

Gradually add the ice-cold water and stir with the fork until a loose dough begins to come together. You may need a little less or a little more than 1/2 cup.

You’ll know you’ve added enough water once the clumps of dough stick together when pressed.

Use your hands to pull the dough together into a ball. Remember, handle the dough as little as possible during this step.

Split the dough into two balls.

Flatten each ball into a disc-shape.

Wrap each disc in plastic wrap and refrigerate for 30 minutes to an hour, or overnight.

Once cool, roll out the dough on a well-floured surface, into a roughly circular shape, large enough for your pie pan. Periodically shift the dough to ensure it is not sticking. Add more flour under the dough, if necessary.

Once the dough is sufficiently large for your pie pan, using the rolling pin to help you transfer the dough into the pan. Carefully press the dough into the pan.

Use a knife to cut off any extra dough, leaving about an inch of dough around the perimeter.

Fold the edge of the dough under and use your fingers to press the edge into a fluted design.

Refrigerate until using. Or wrap in plastic wrap and freeze for later use.

Check out those flakey layers!!

How to Roast Pumpkin Seeds

Got pumpkins?

Perhaps a few small ones destined for fresh pumpkin pie? Or maybe a great big one, awaiting its jack-o-lantern fate?

Whatever the case, save those seeds! Pumpkin seeds, or pepitas, make a delicious and incredibly nutritious snack. Follow this simple step-by-step guide on how to roast your fresh pumpkin seeds.

Step 1: Use a spoon to scoop seeds from the pumpkin.

Step 2: Rinse the seeds under cool running water, while removing any stringy, orange pulp.

Step 3: Dry the seeds on a paper towel.

Step 4: Spread the seeds onto a baking sheet. Drizzle the seeds with a little olive oil and sprinkle with salt and pepper. Move the seeds around to evenly distribute the oil and seasonings.

Step 5: Bake for about 20 minutes at 375 degrees.

Enjoy!

You can have fun with the seasonings for your seeds. I prefer basic salt and pepper pepitas, but you may enjoy cinnamon sugar, parmesan cheese, garlic salt, or even chile flavored seeds!

How to Prepare Fresh Pumpkin

Posted on

Welcome, October! Quite possibly my favorite month of the year. Well, maybe except for December.

Because December means Christmas. And Christmas makes me burst with happiness.

But October means beautiful changing leaves, my birthday, Halloween candy, warm sweaters, soft hoodies, and pumpkins; lots and lots of pumpkins!

As I write, there are a few pumpkins roasting in the oven, making my home smell like autumn. I’m working on a new pumpkin recipe today. Think fresh, roasted pumpkin with rich cream, and perhaps a touch of caramel. Oh, and it’s not a dessert! Look for it later this week.

In the mean time, I thought you may want to brush up on your procedure for preparing fresh pumpkin puree by taking a look back at my no-fuss step-by-step guide. Click HERE to begin your pumpkin journey.

You may also want to check out these delicious pumpkin recipes:

Fresh Pumpkin Coconut Pie

Autumn Harvest Buns

Pumpkin Chocolate Chunk Bread

Pumpkin Gingersnap Parfaits

Fettucine with Pumpkin Alfredo Sauce 

How to Make Cake Pops

Cake pops are all the rage these days…or am I thinking of cupcakes? Or is it macarons?? I can’t keep up. But, you can find cake pop recipes and ideas all over the internet and magazine covers these days. Starbucks even carries these sweet treats right next to the muffins and dessert bars. They’re insanely cute and super fun to eat. The best part is that there are a million possible flavor and design combinations.

Once you’ve got the basic idea, you can have a lot of fun customizing these little goodies with different flavors of cake, frosting, and candy coating! Then, get creative with the decorating! I’m already planning on making bloody eyeball cake pops for Halloween, turkeys for Thanksgiving, and snowmen and trees for Christmas!

For my little guy’s third birthday (and my first attempt at cake-popping), I made a batch of decadent triple chocolate cake pops. It’s a simple, but somewhat time-consuming process, so plan ahead. Here’s how it’s done.

You will need:

  • 1 13×9 inch cake
  • Cake frosting (approximately 1 1/2 cups)
  • Lollipop sticks
  • Candy Melts (approximately 4 cups)*
  • Sprinkles or other decorating candies (optional)

*If your grocery store doesn’t carry the candy melts, check your local craft store. They come in all sorts of colors and flavors!

Bake a 13 x 9 inch cake. Use your favorite homemade recipe or one box of any flavor cake mix. (You can bake the cake a day ahead of time, if desired.)

Once cool, crumble the cake into fine crumbs. This is a perfect job for little helpers.

You’ll end up with a big bowl of fine cake crumbs.

Combine the cake crumbs with any flavor frosting. A container of prepared frosting works fine or use your favorite homemade. Depending on how moist the cake is, you probably will not need the whole container of frosting. About 3/4 of a 16-ounce container should do the trick. You want the mixture to be moist enough to mold, but not too mushy. Mushy cakes will have a harder time staying on the sticks…lesson learned the hard way.

Refrigerate for about 30-45 minutes (or longer) to help firm up the mixture.

Roll the mixture into balls, just over an inch in diameter.

Melt a small quantity of the candy melts according to package directions. Dip the end of each lollipop stick into the melted candy, then insert the stick a little more than halfway through each cake ball. Place each pop upside down on a baking sheet and refrigerate until quite firm.

Once firm, warm the candy melts according to package directions. Use a container that is tall and narrow enough to fully submerge each cake pop into. A 2-cup pyrex measuring cup worked well.

Dip each pop into the melted candy. Gently swirl the pop to remove excess candy. (Skipping the swirl step will result in a candy coated stick. Trust me on that one.)

Decorate with sprinkles or candies, if desired. Then, place each pop into a piece of styrofoam to dry upright at room temperature. (Refrigeration will cause condensation on the surface of your pops. Another lesson learned the hard way.) The candy exterior will harden at room temperature.

The Gourmand Mom

Good food, seasoned with a dash of life