RSS Feed

Tag Archives: chicken

Breaking Bad Dinner Menu

Well, hello friends!

Apologies for my unplanned vanishing act. By the end of Day 1 of summer vacation, I was pretty sure I’d never make it out alive. I fought the chaos tooth and nail for the first week. Then I just I surrendered. Summer swallowed me whole and belched as I went down.

I ran on reserve power for most of the summer, focusing on only my most integral functions, like preventing the boys from maiming themselves during their daredevil play routines and rinsing the mud from their summer bodies three times daily.

I thought that once the school year began, I’d be able to climb my way from the pit of chaos and promptly begin posting again, but I’ve been saying that for three weeks now. Alas, the school year brought upon us its own special kind of insanity and I still find myself with too many balls in the air. If only I knew how to juggle…

IMG_9663

Hear no evil. See no evil. Speak no evil.

I’m going to make it up to you today though, with an entire menu’s worth of recipes. Have we got any Breaking Bad fans out there?

I recently read some comment that watched in reverse, AMC’s Breaking Bad tells the inspiring story of drug lord who cleans up his act, beats cancer, reunites his family, and becomes a school teacher. Sounds like a Lifetime movie. In actuality, for the last five seasons, we’ve watched the tale of a seemingly normal man’s struggle with cancer and providing for his family crumble into the most unimaginable chaos, up to the point where last episode left off, with a suggestion that perhaps there’s nothing left of that kind, normal man. The show is widely considered one of television’s best dramas and for good reason. I’m approaching the series finale with mix of eager anticipation and deep sadness for its ending.

In honor of its finale, the good folks at Cinema Blend asked me to put together a little Breaking Bad themed dinner party menu. Though not in any way a show about food, Breaking Bad gives us no shortage for dinner party inspiration. Many of the shows pivotal confrontations occur over some of the world’s most awkward meals. The following menu, designed with a New Mexican flare for the show’s setting, should give you a few good ideas for hosting your own Breaking Bad series finale dinner party.

Check out Cinema Blend for all of the latest coverage, recaps, and reviews of Breaking Bad.

IMG_0839

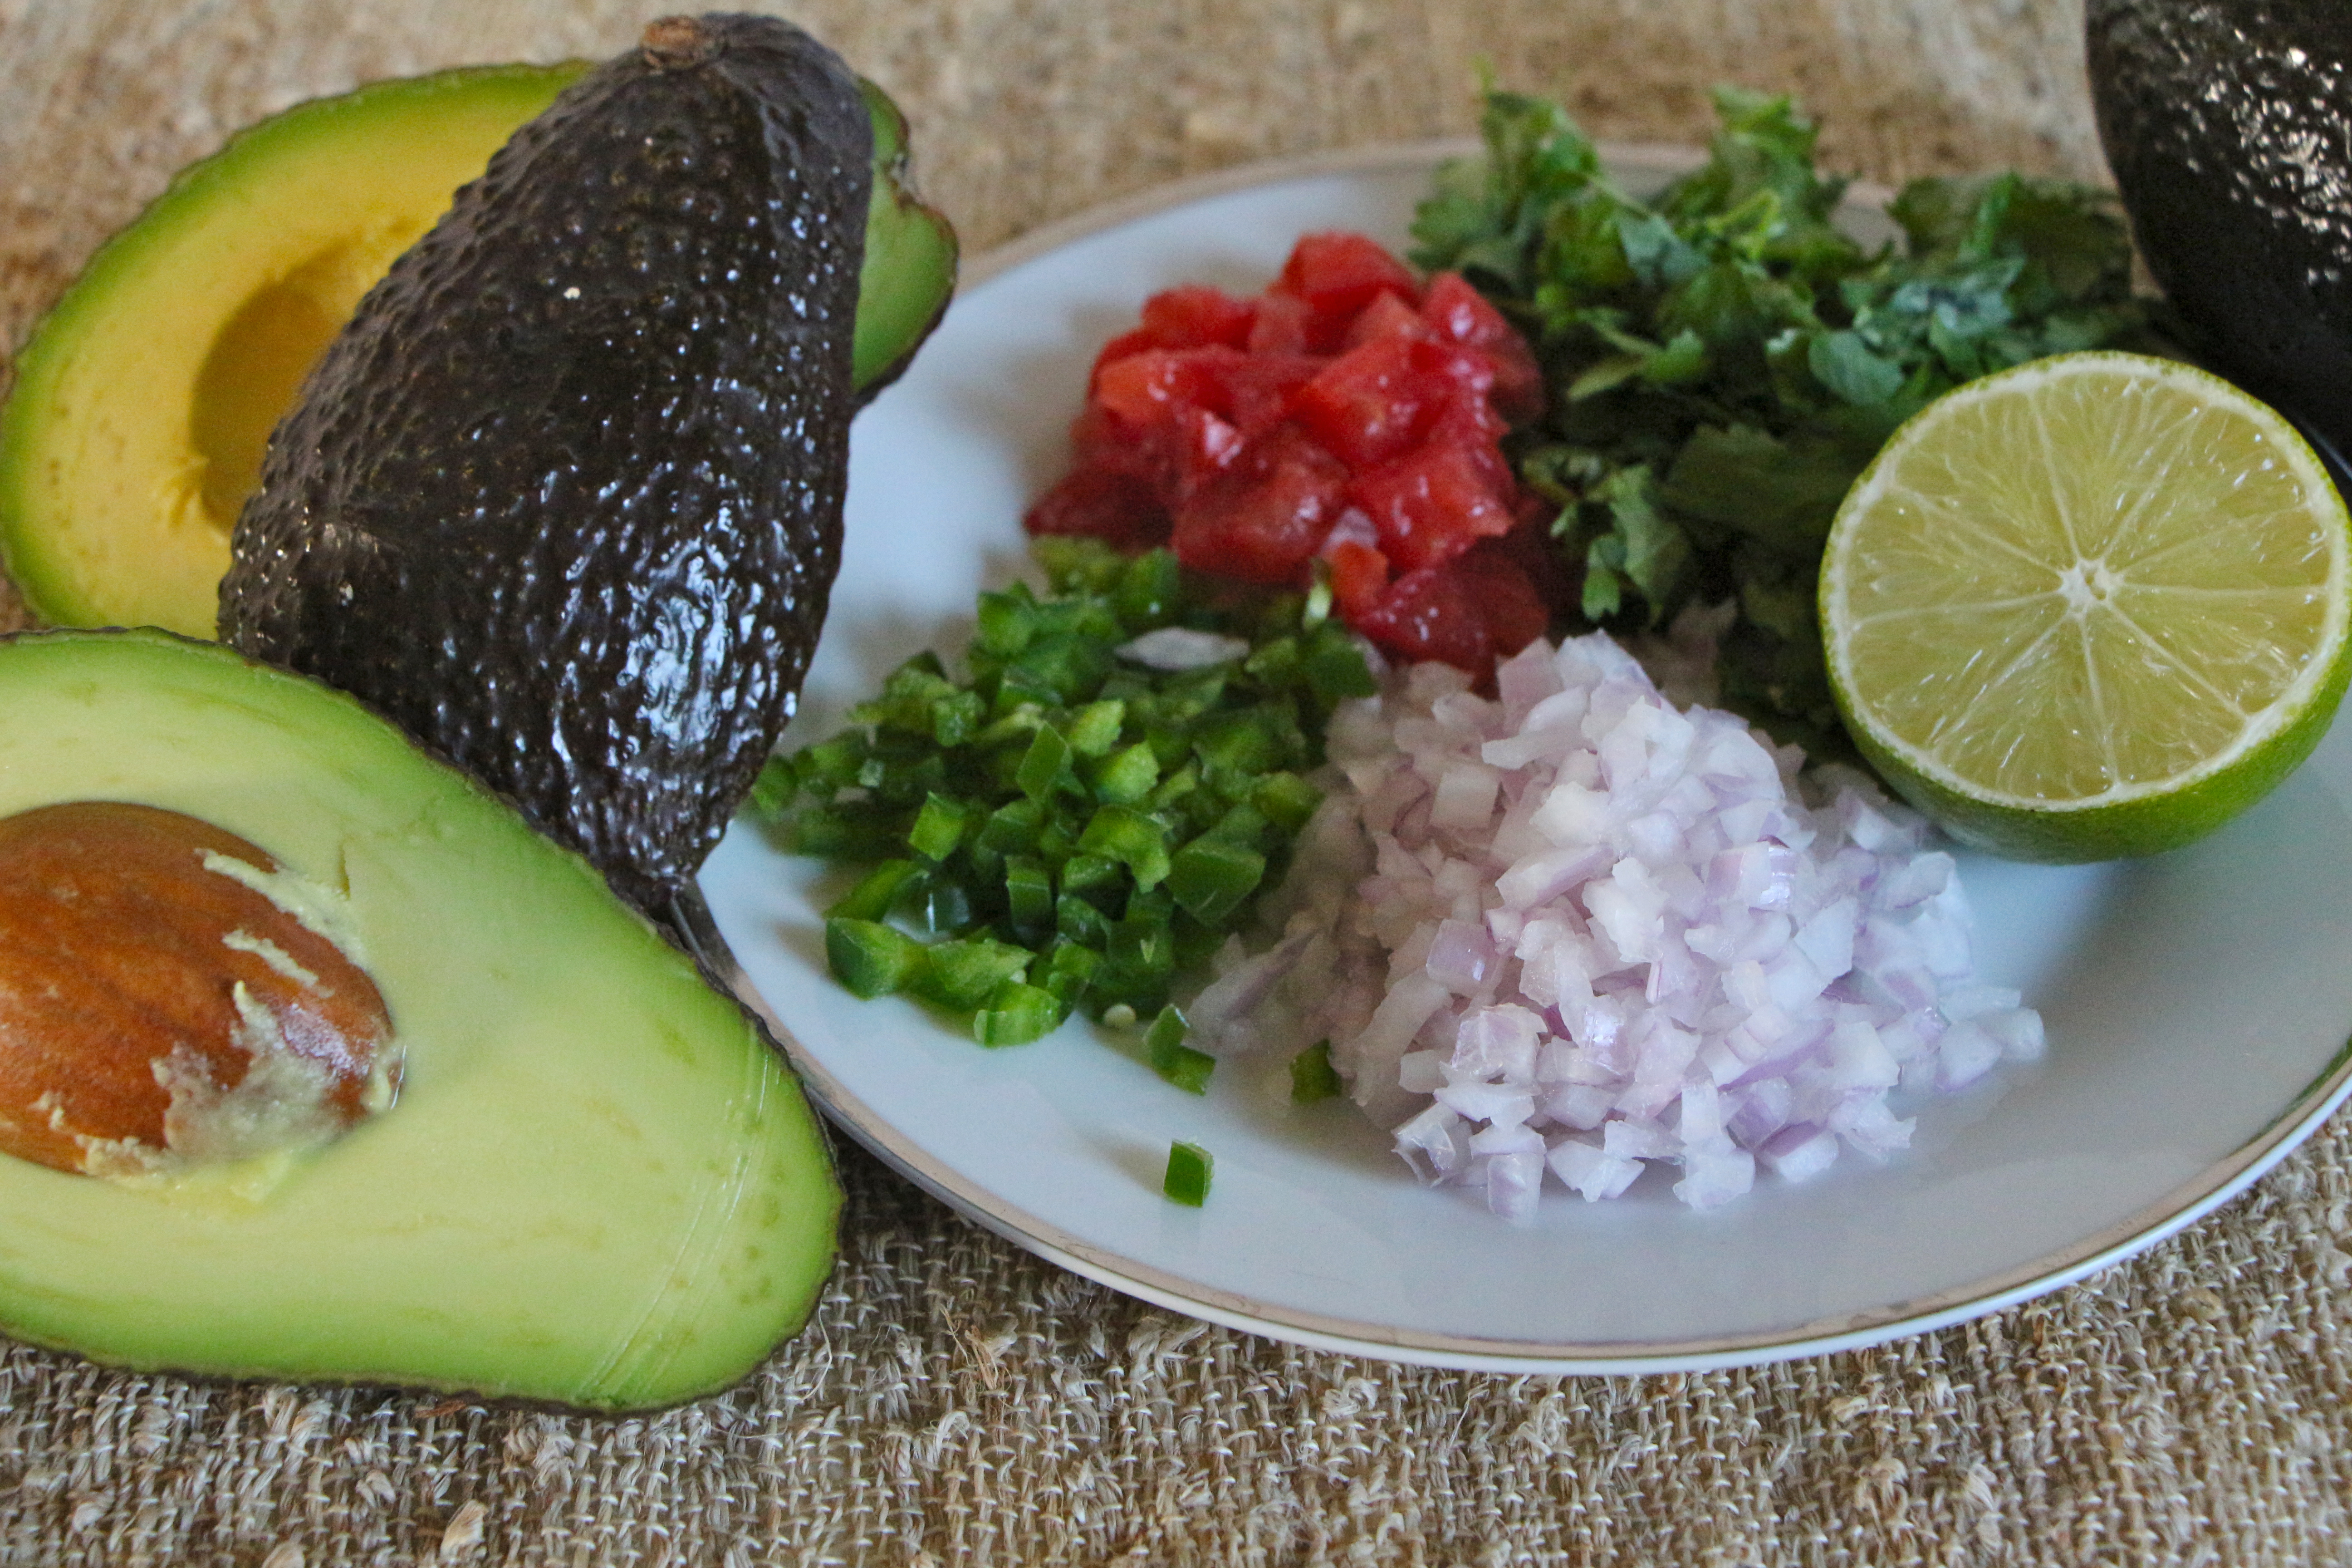
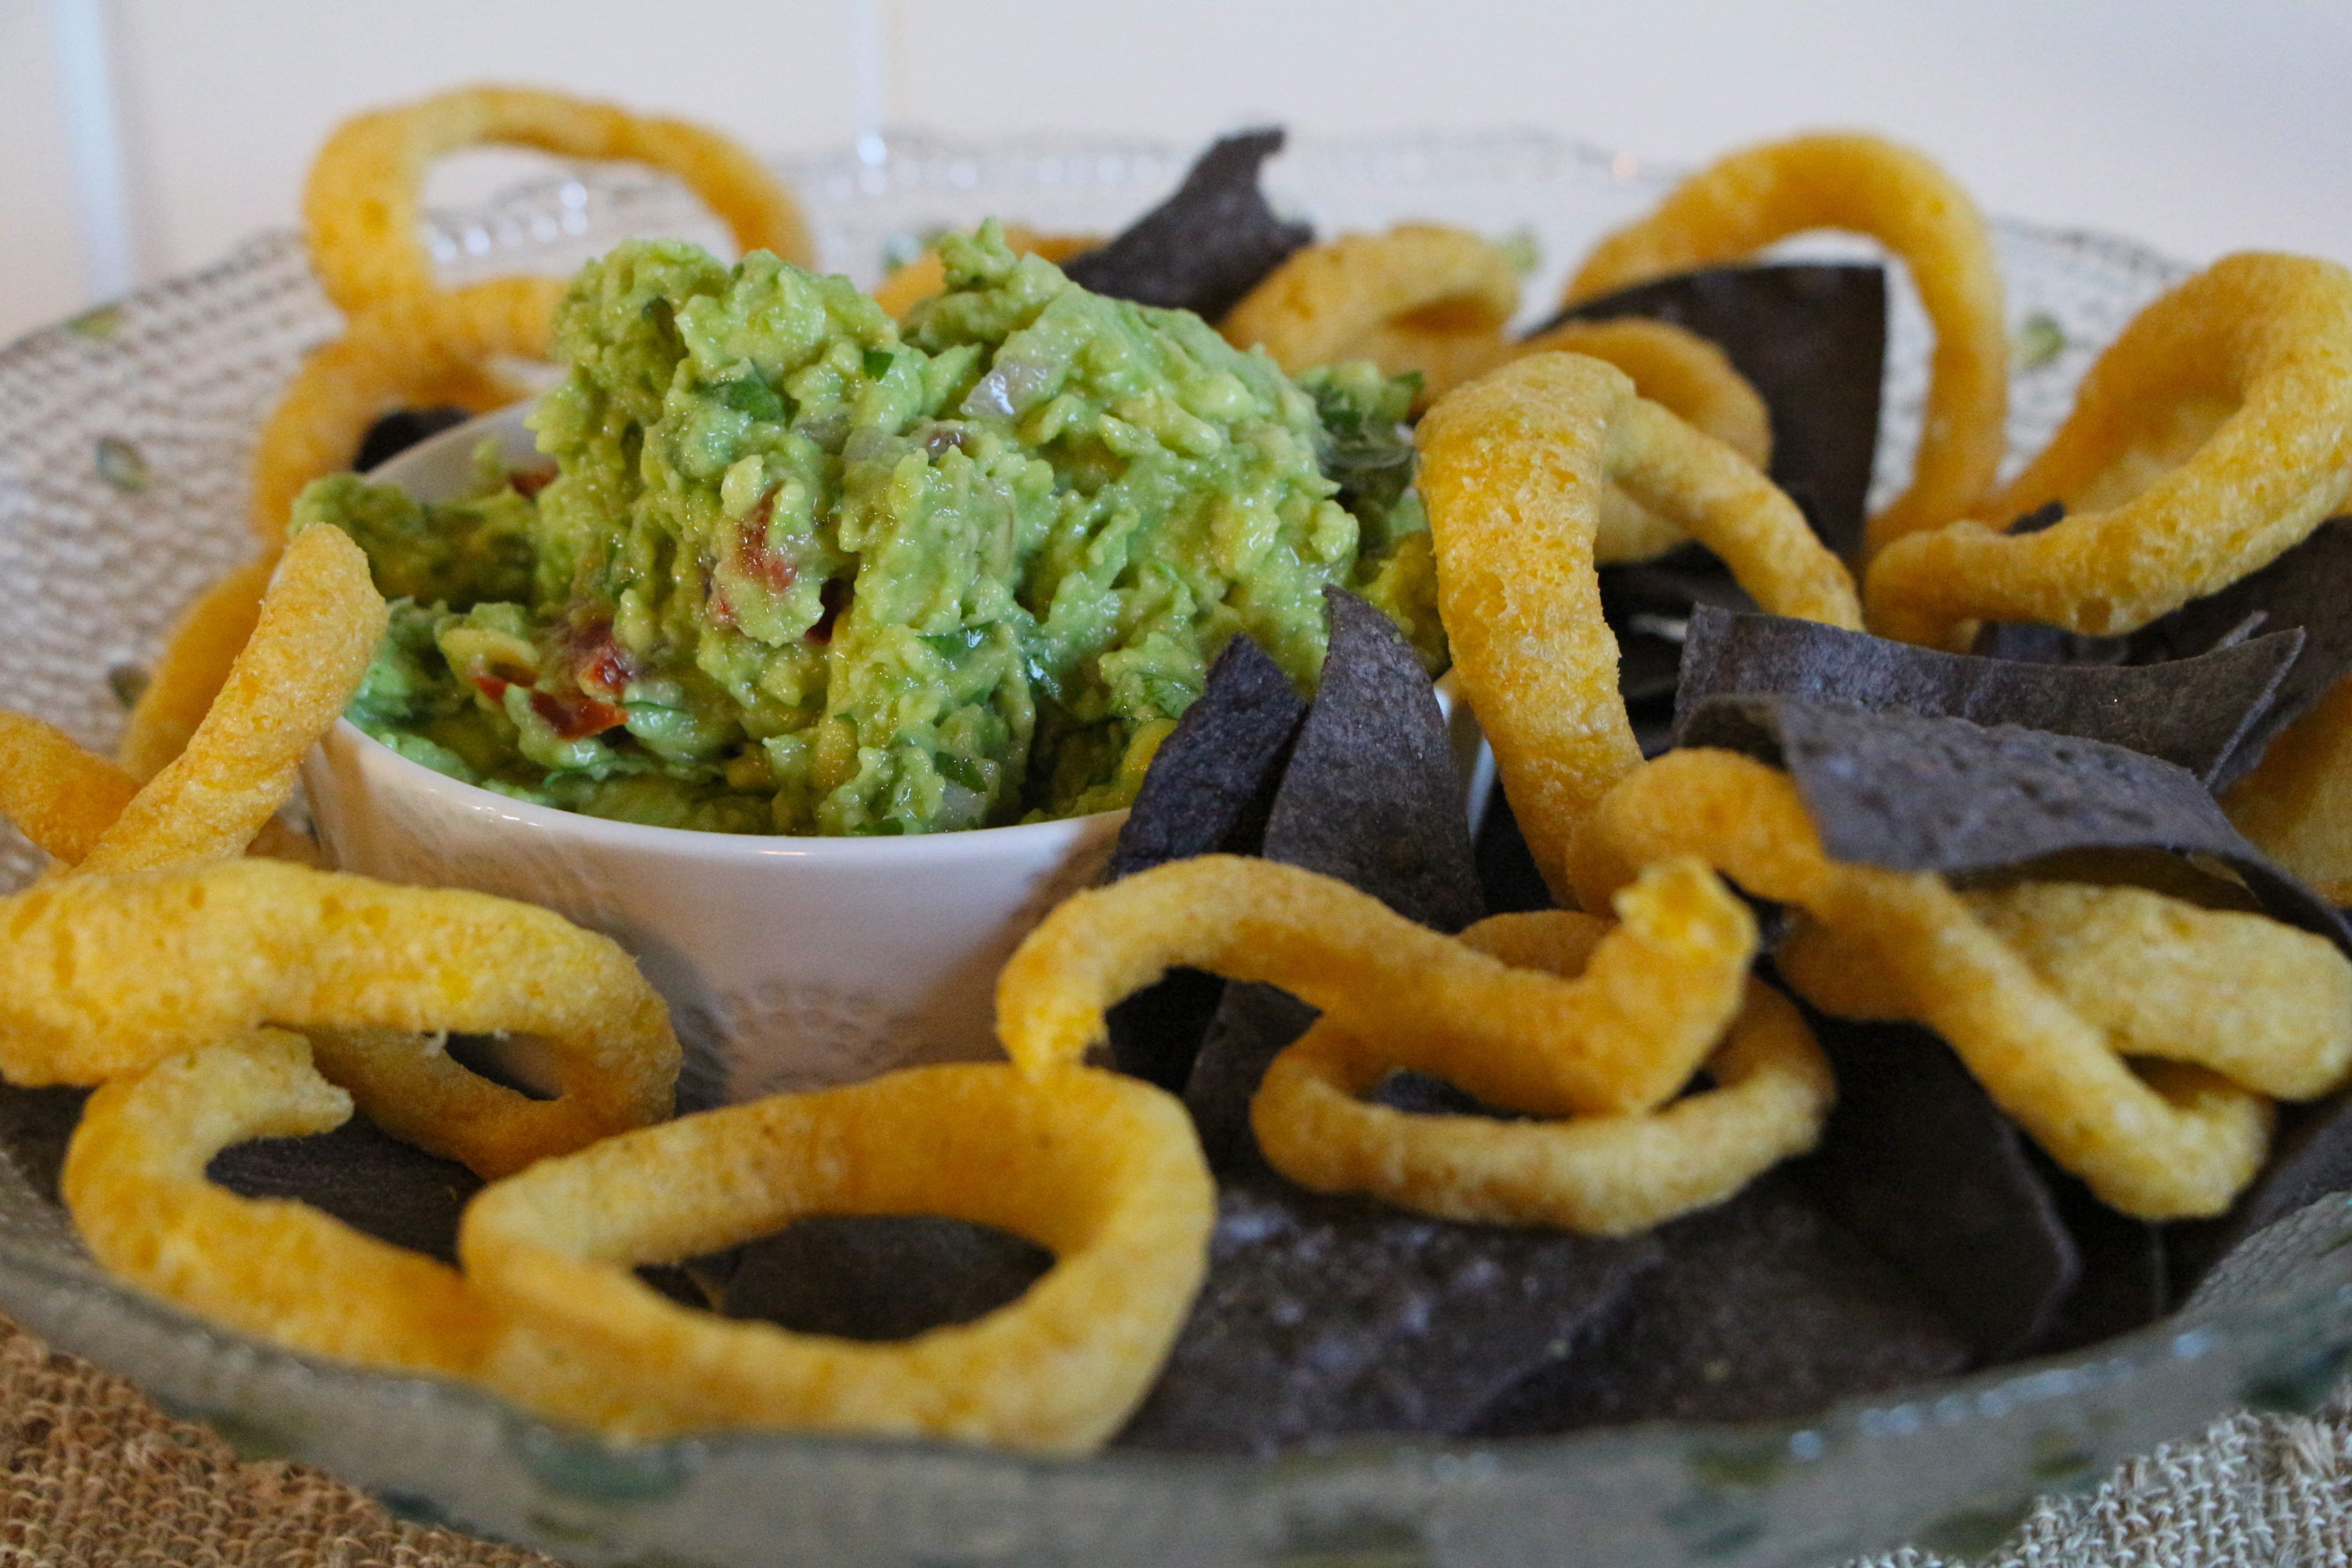
During the past season, Walt, Skyler, Hank and Marie met for the world’s most awkward double date at a Mexican restaurant. At the height of the tension, an upbeat waiter arrives, eagerly pushing the joint’s signature tableside guacamole. (You can see the clip here.)

Make this guacamole tableside to your guest’s liking, or prepare it ahead of time. *Squeeze a bit of lime juice over the top and cover securely with plastic wrap to prevent browning.

Heisenberg’s Tableside Guacamole

Ingredients

  • 2 ripe avocados, halved
  • 1/4 red onion, finely diced
  • 1/2 jalapeño, ribs and seeds removed, very finely diced
  • 1 small tomato, finely chopped
  • 1/4 cup fresh cilantro, chopped
  • Juice of 1/2 lime
  • Salt and pepper

Directions

Smash the avocado using the backside of a fork, a potato masher, or with a mortar and pestle. Stir in the remaining ingredients. Adjust quantities as desired.

Serve with Walt’s signature blue tortilla chips and Jesse’s favorite Funyuns. To go full Breaking Bad style, wait to offer this to your guests during the most tense part of the evening. Orchestrate tension, if necessary.

IMG_0845

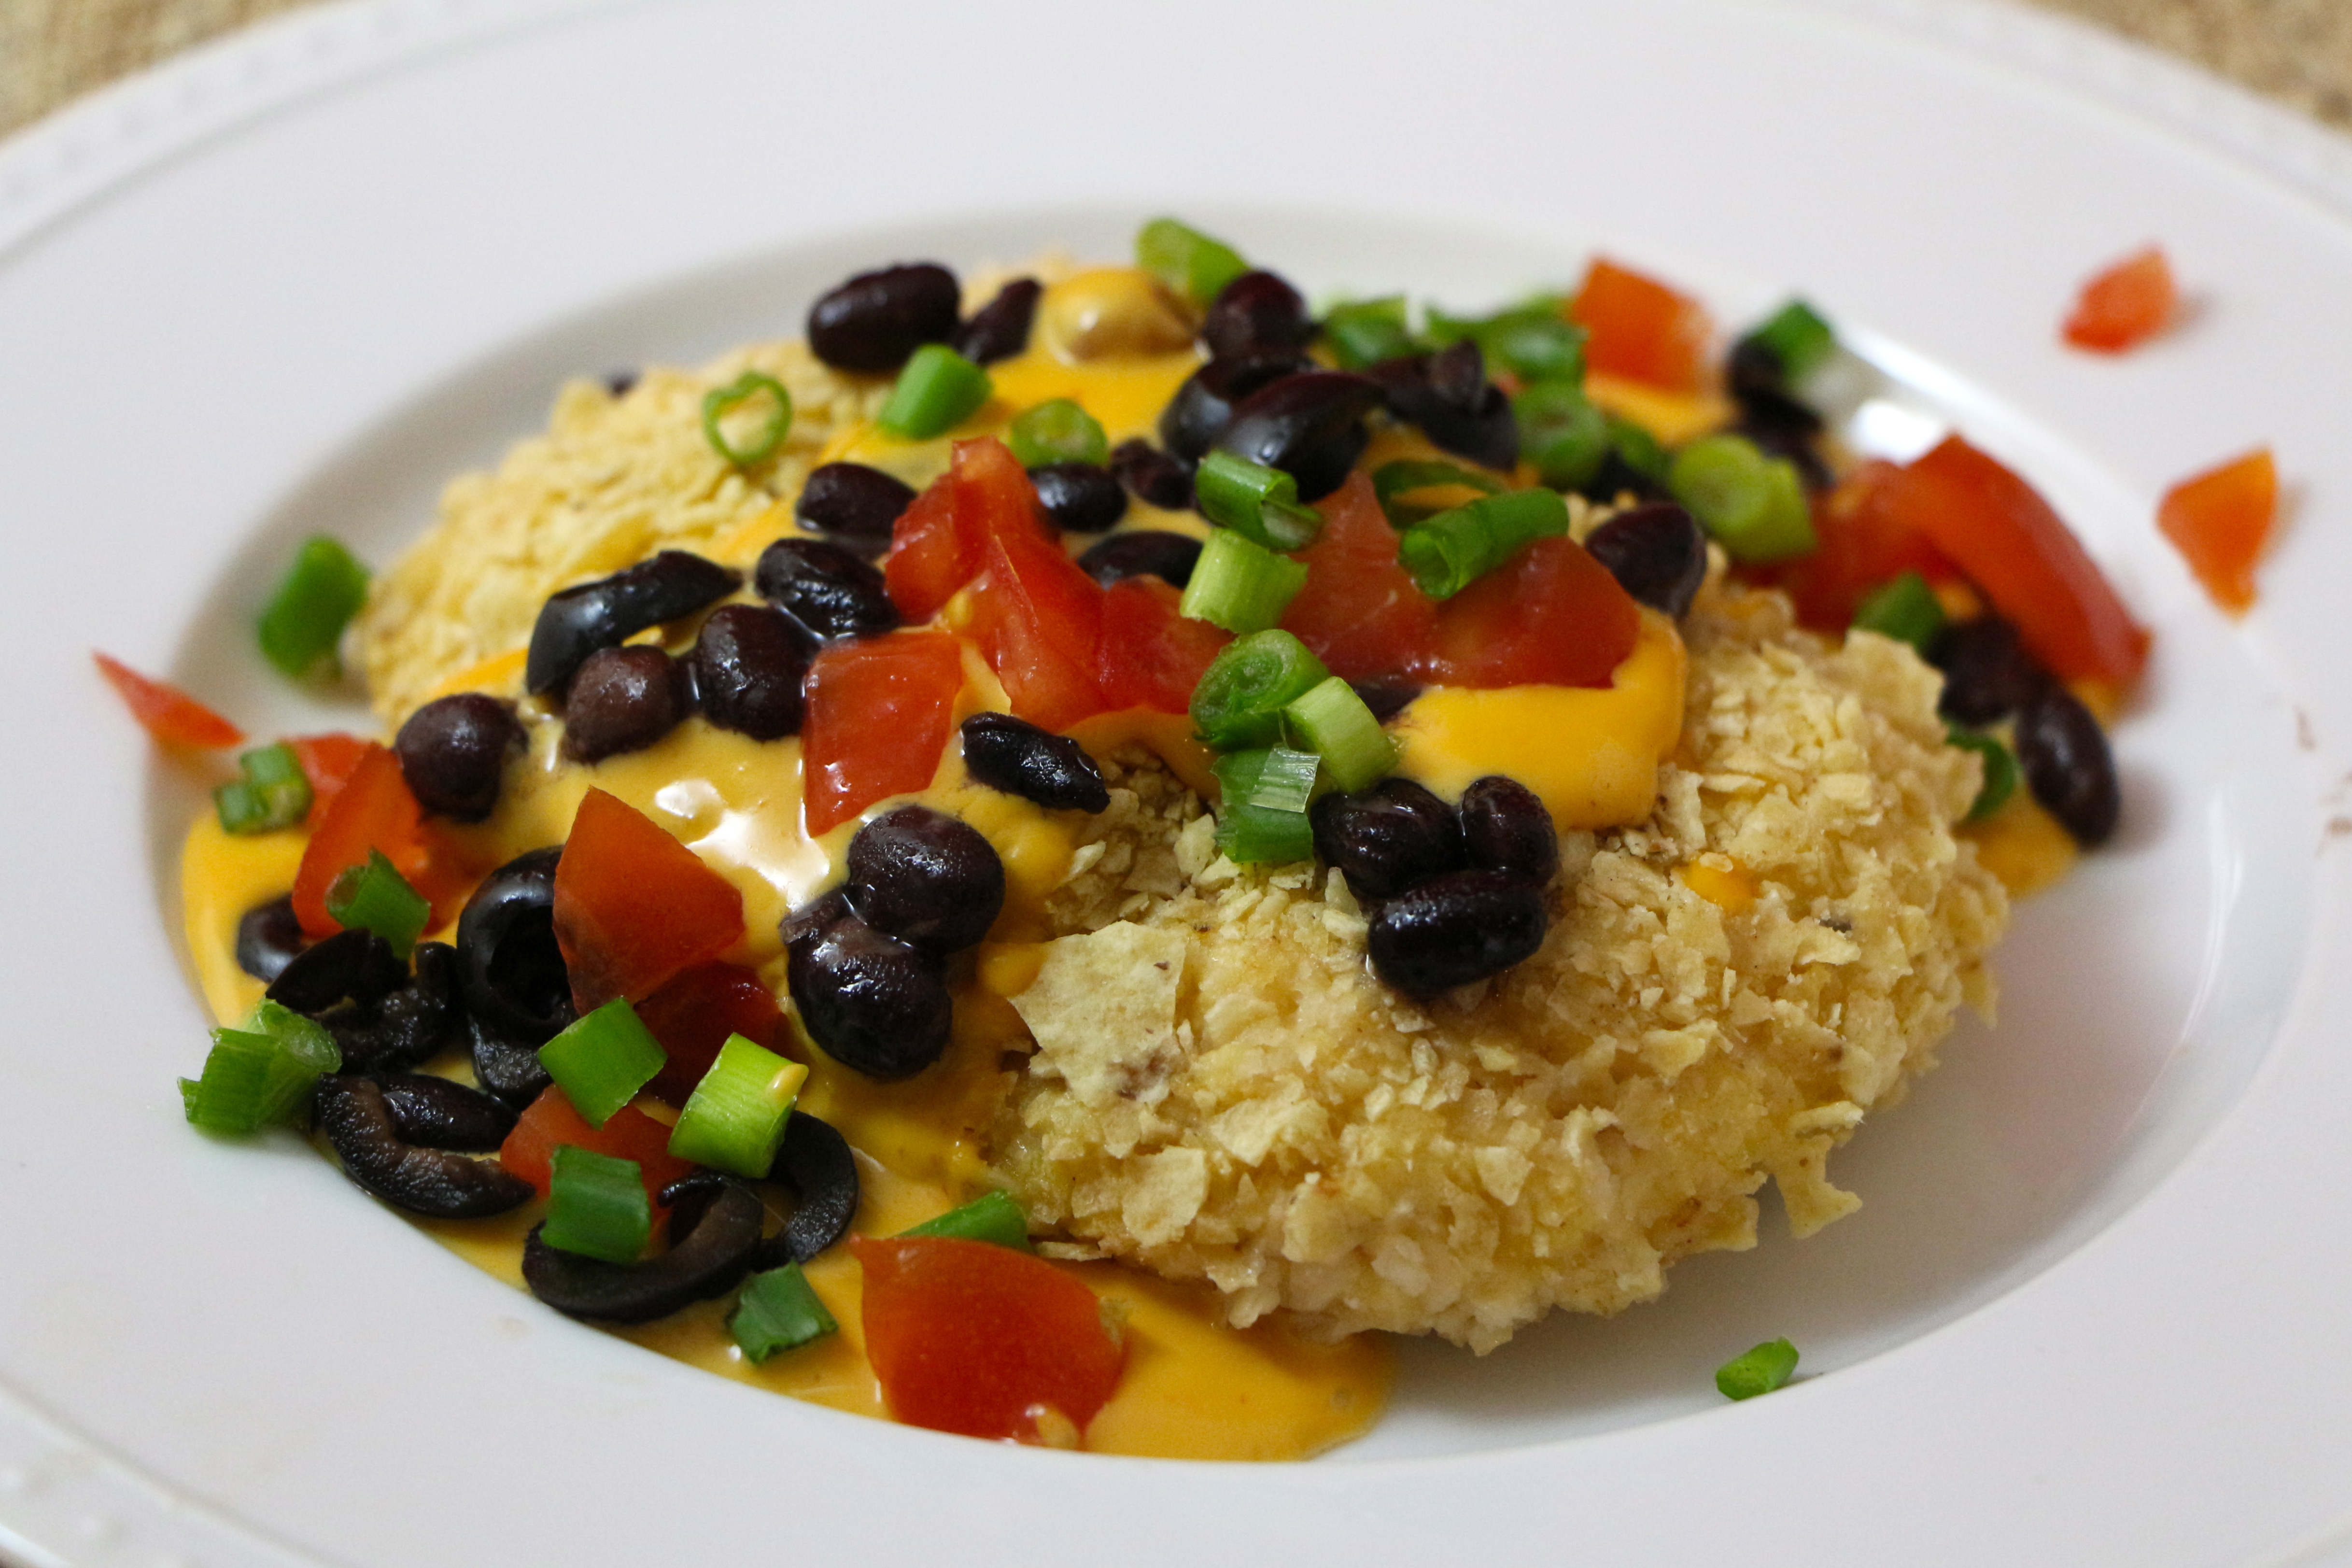
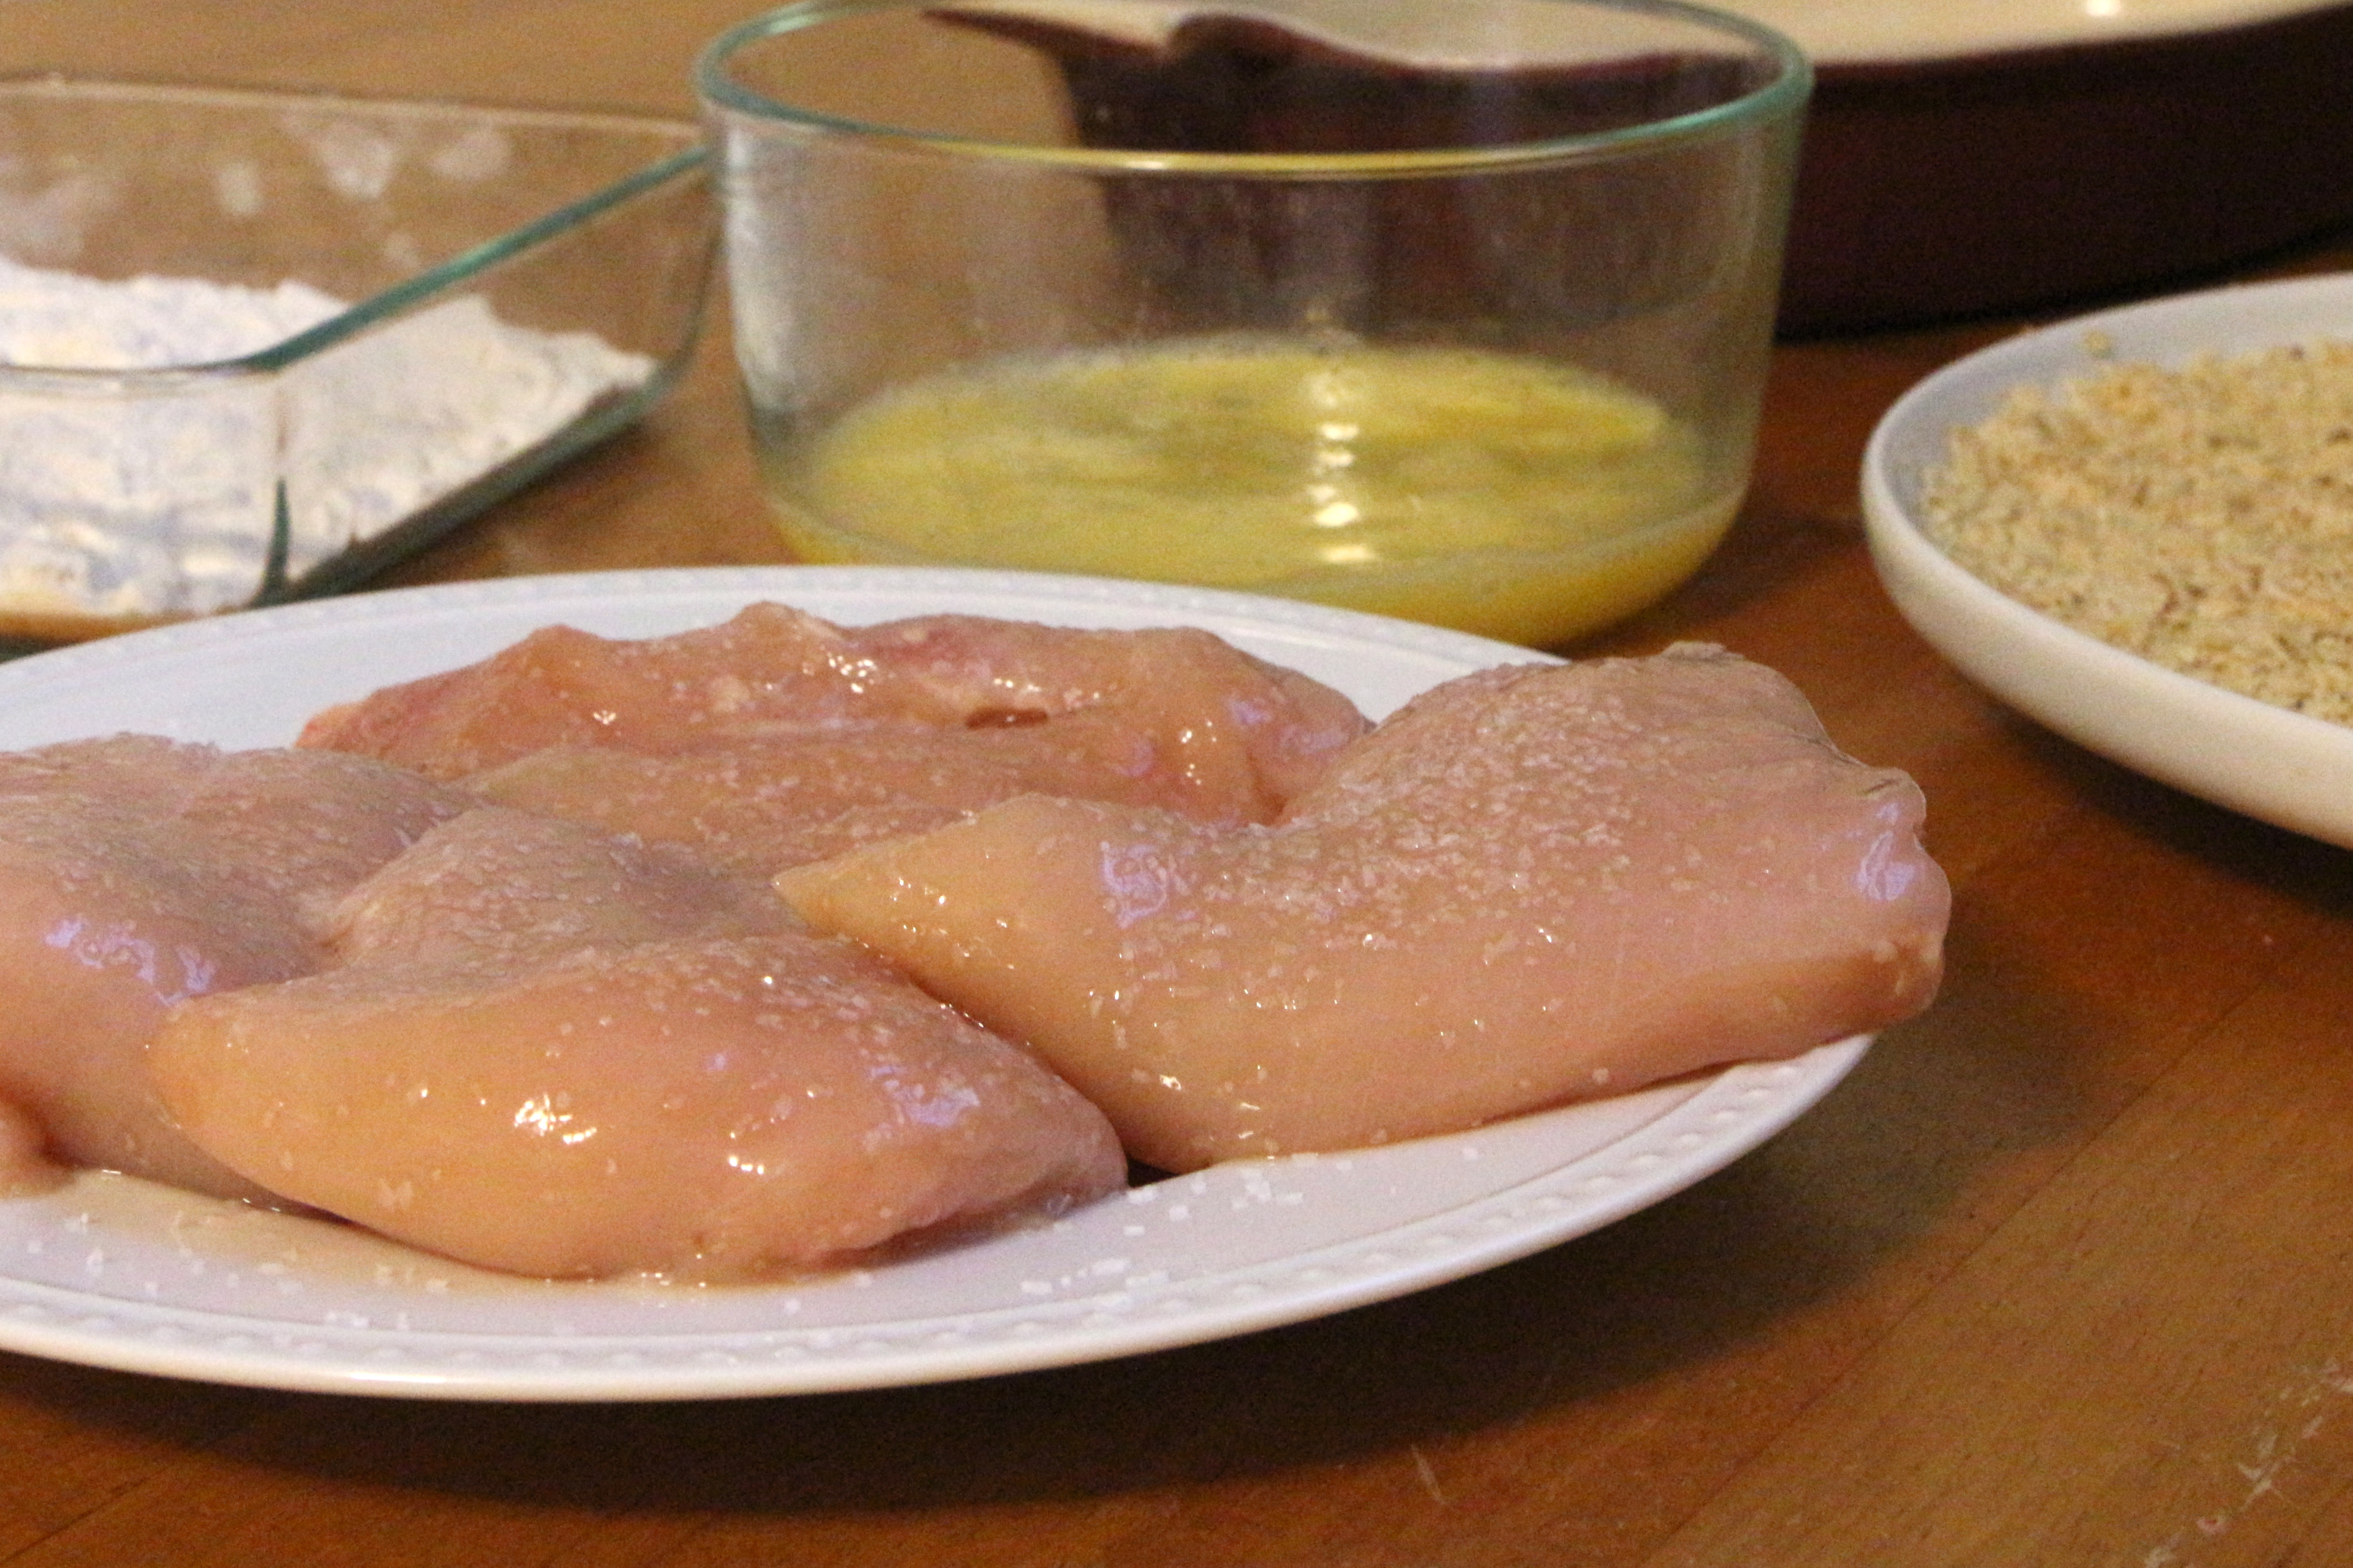
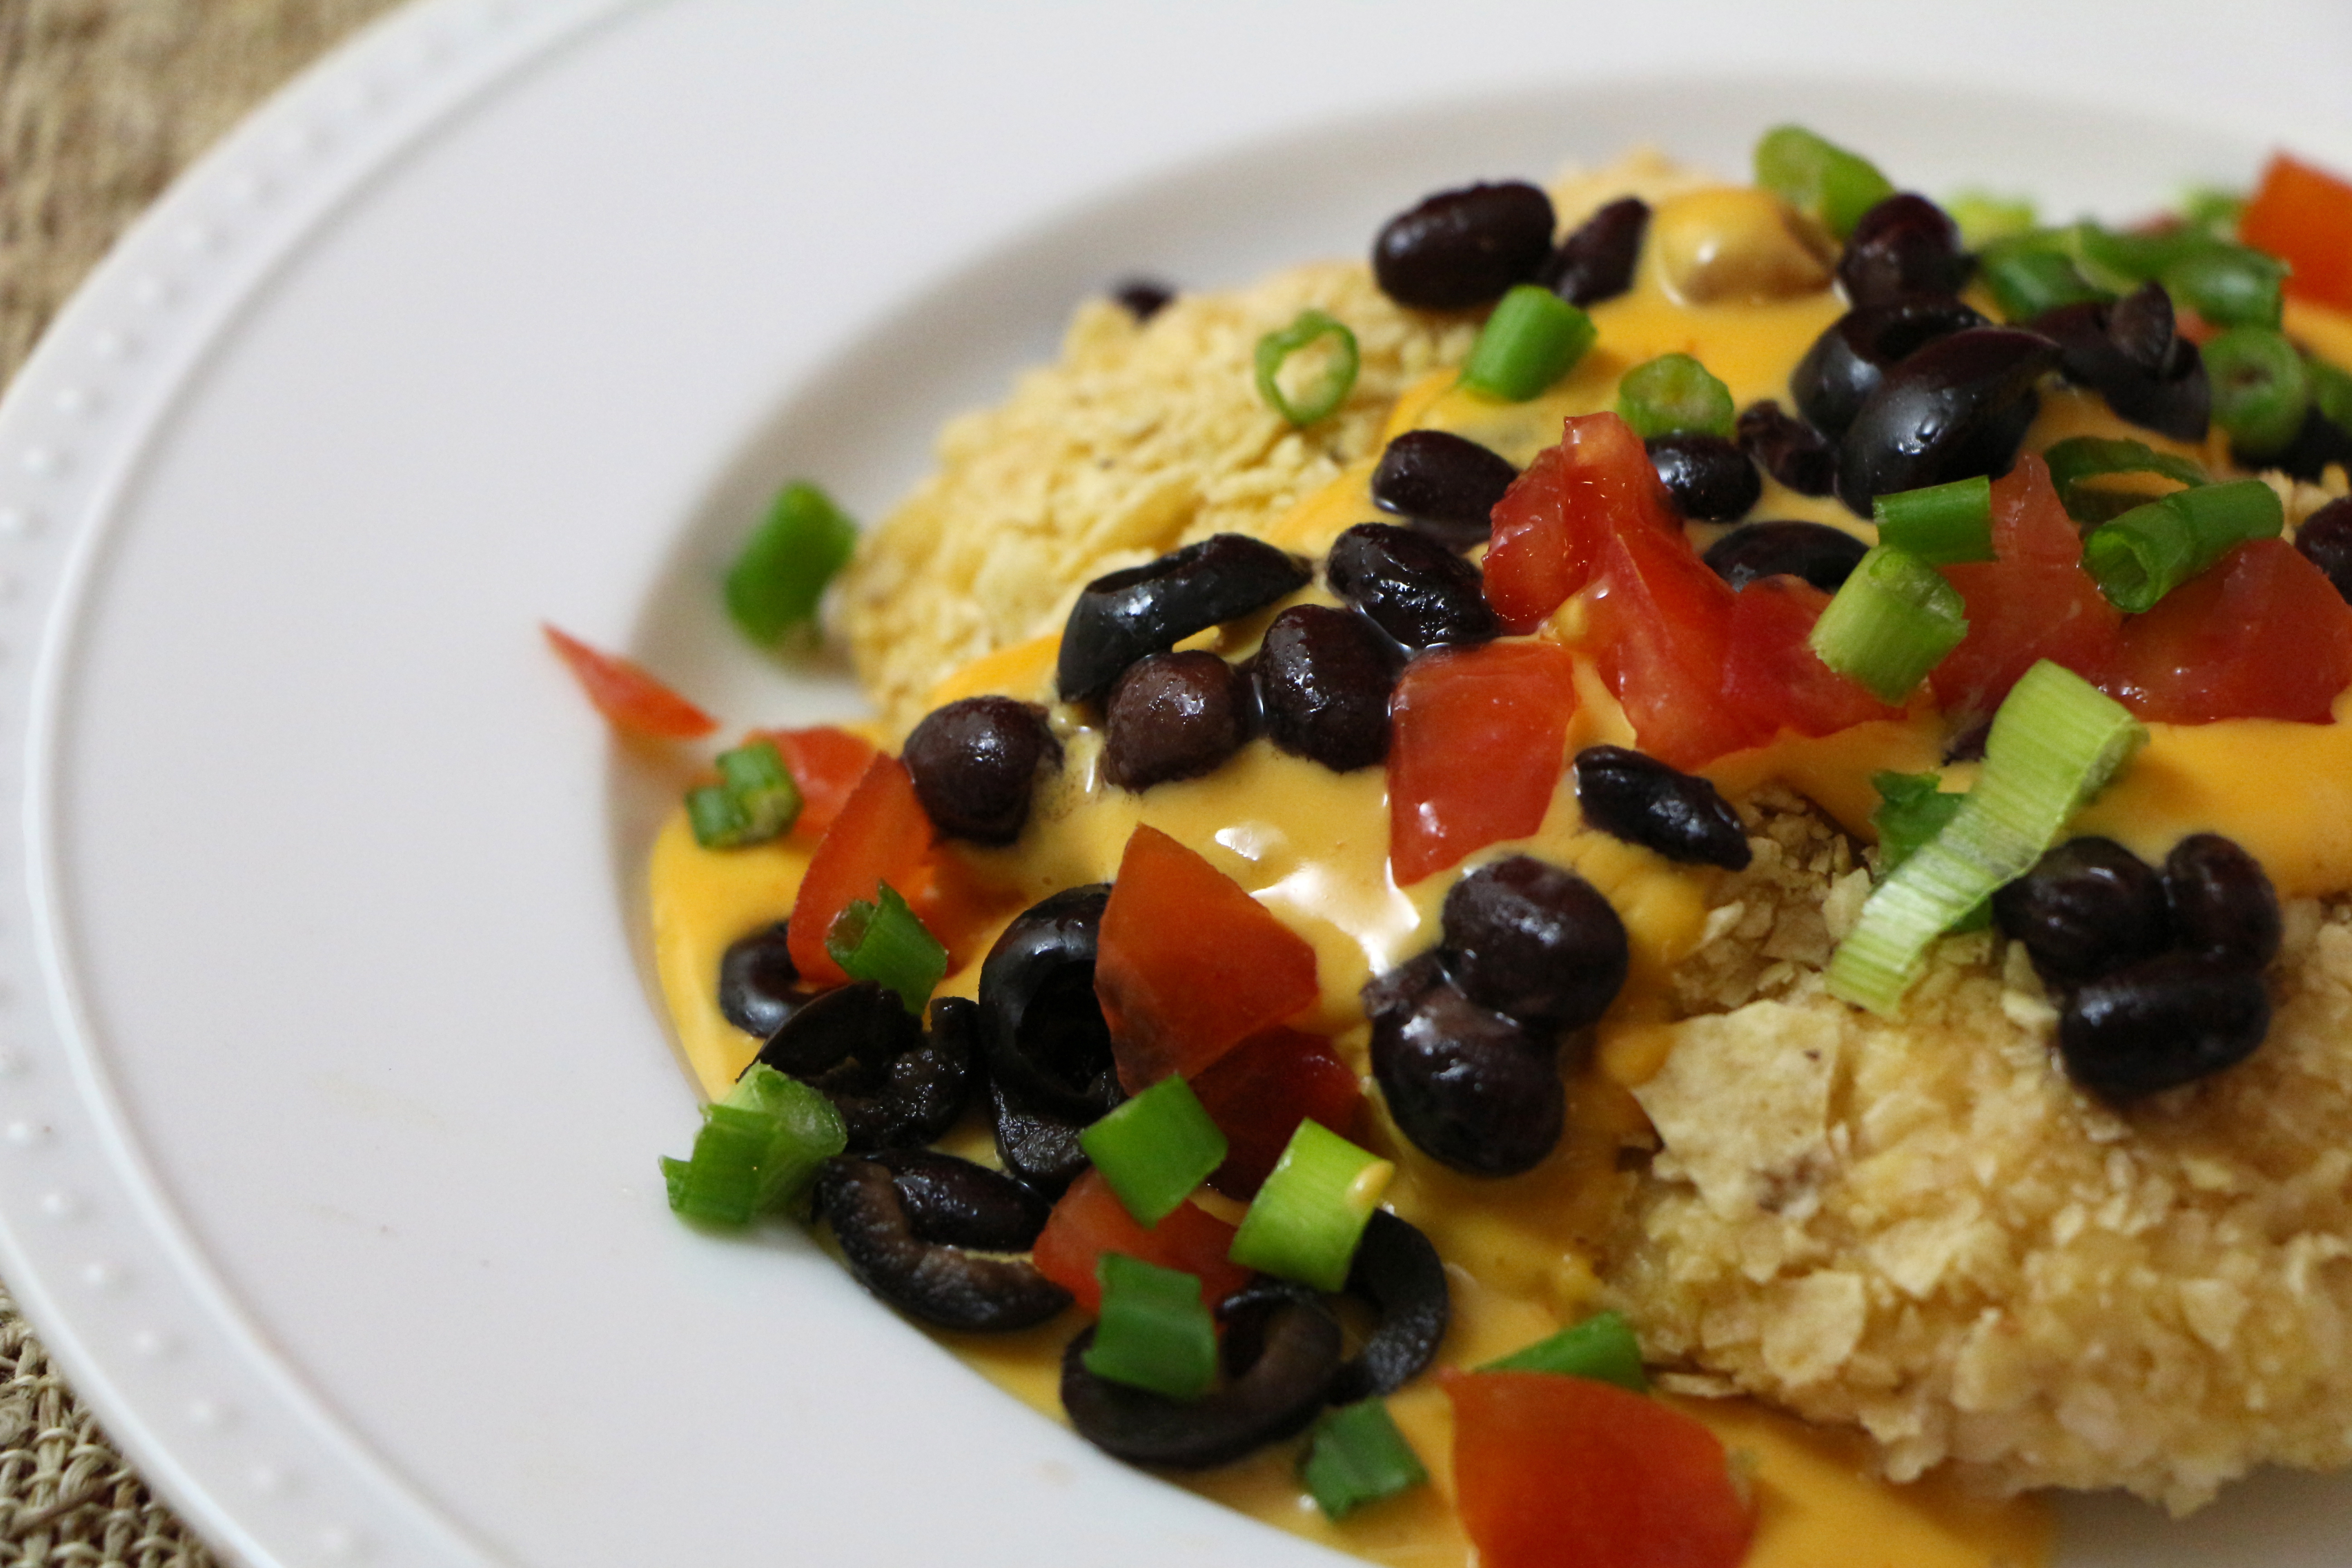
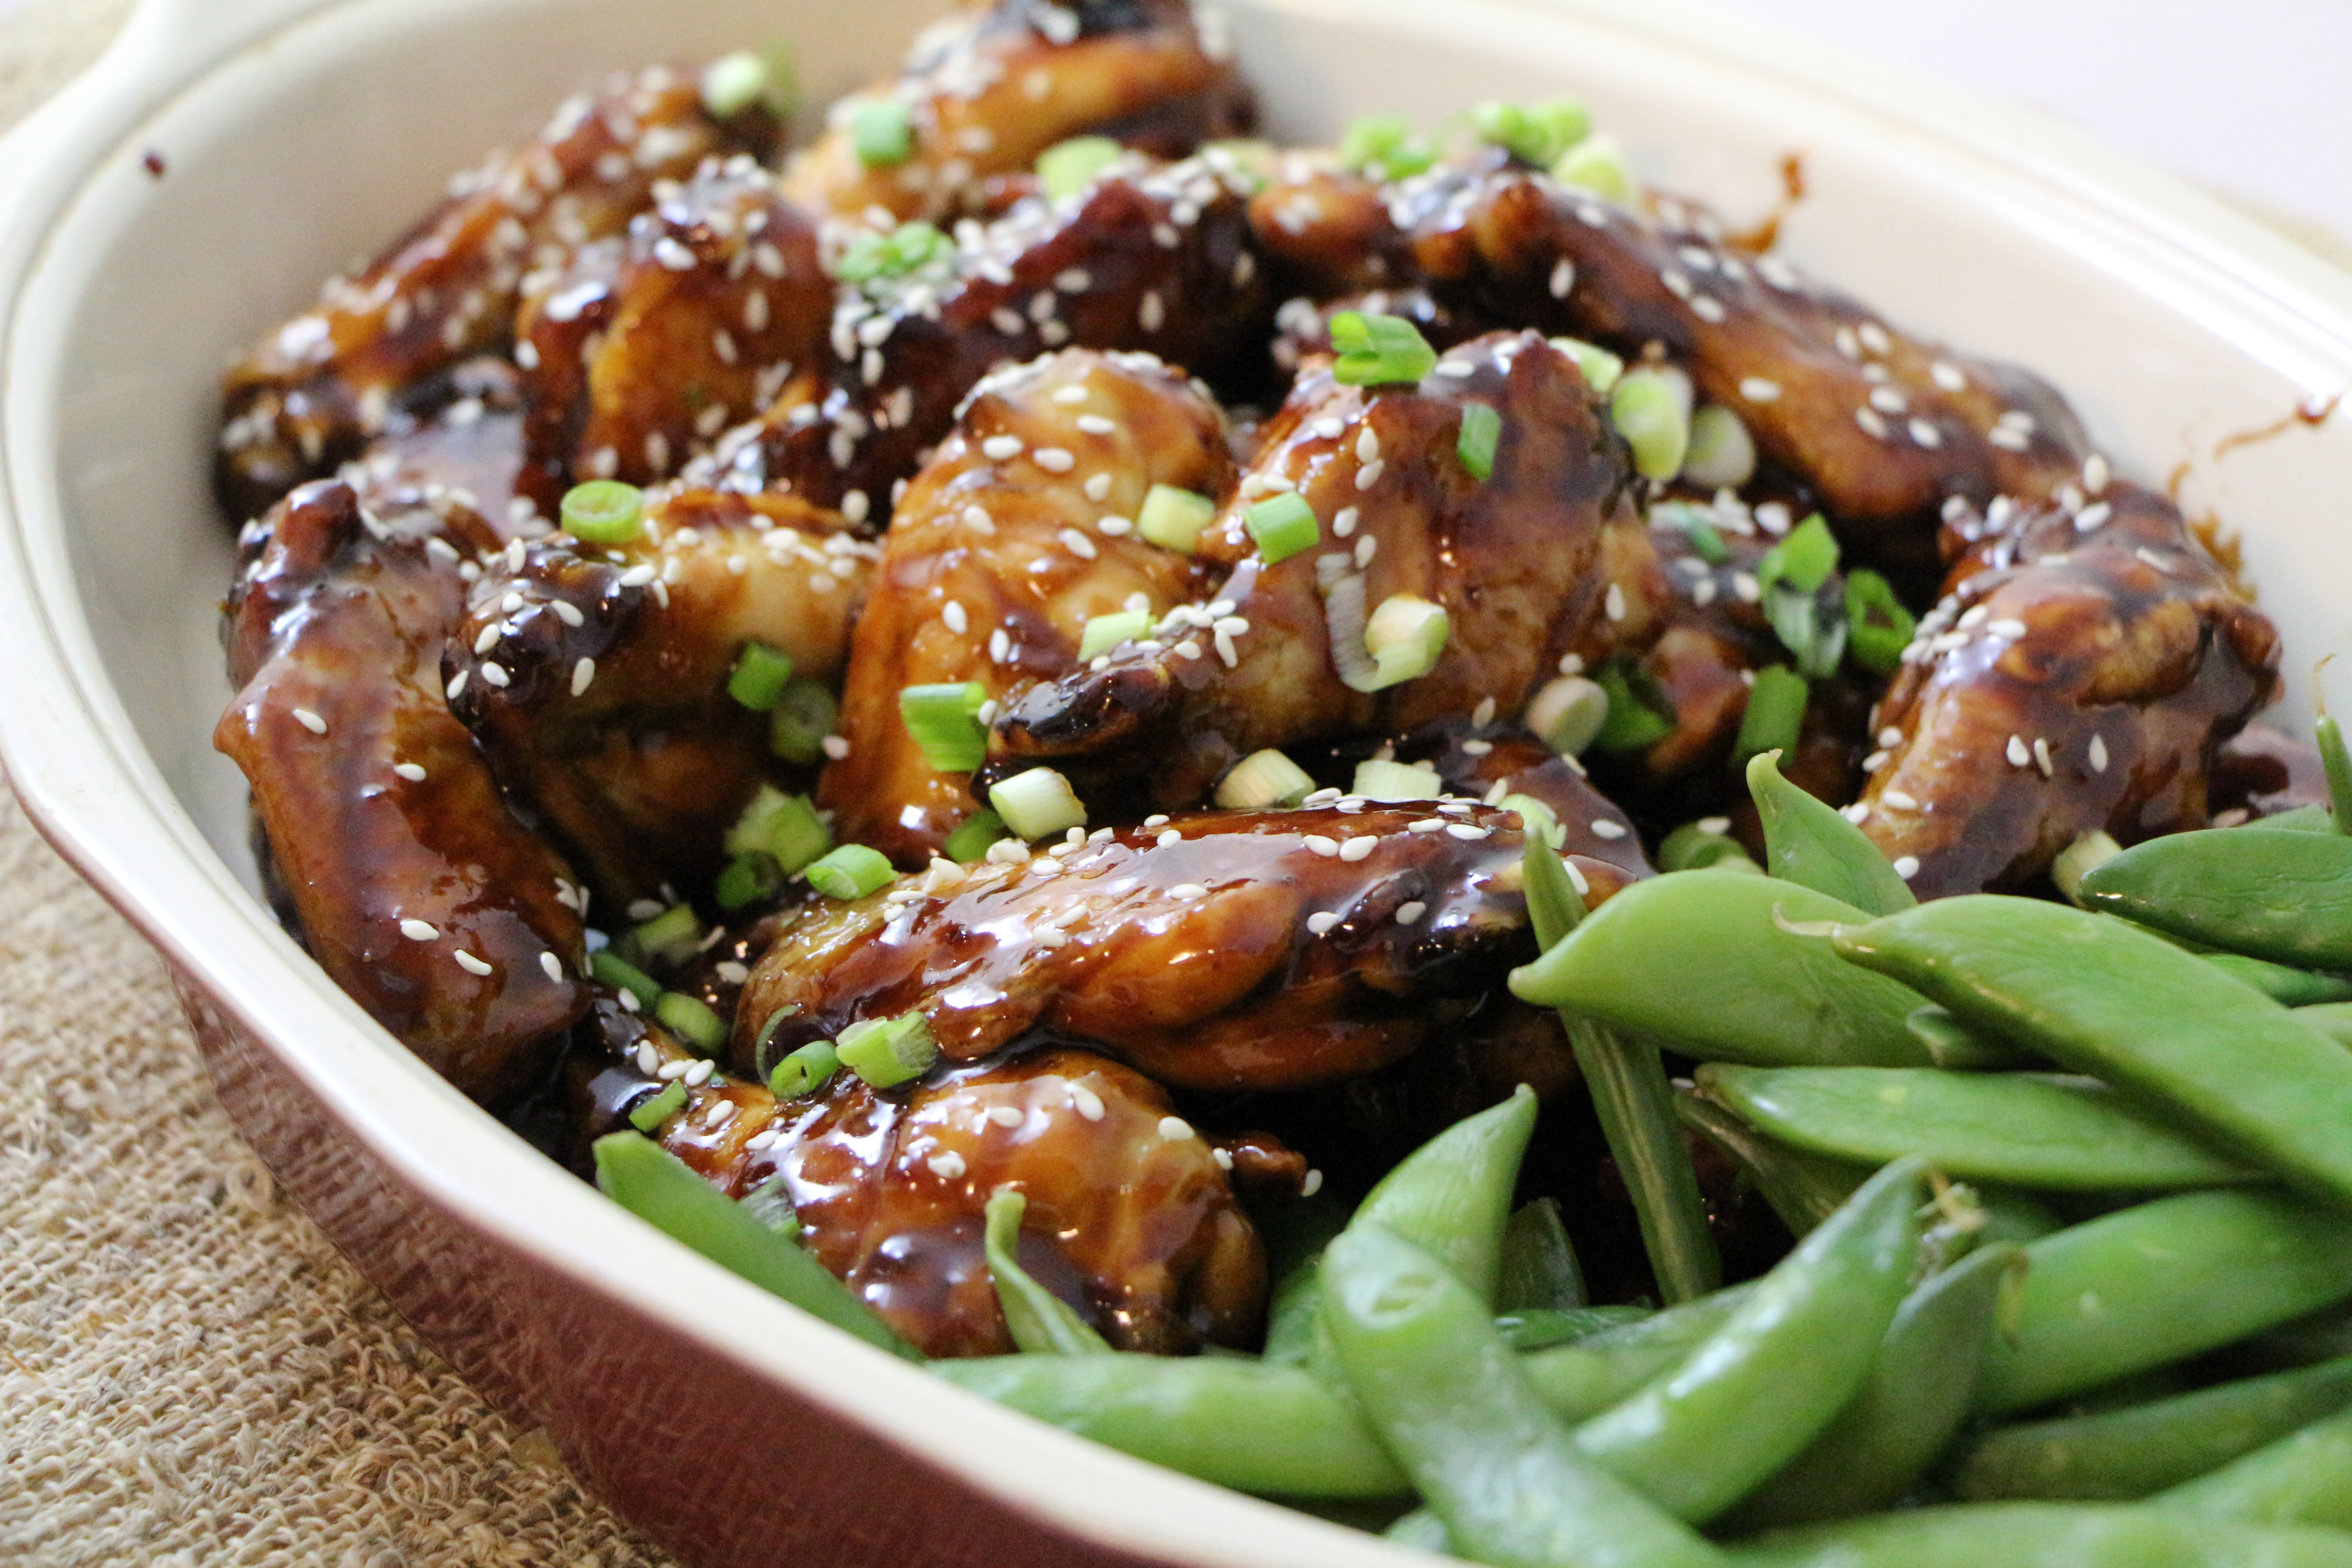
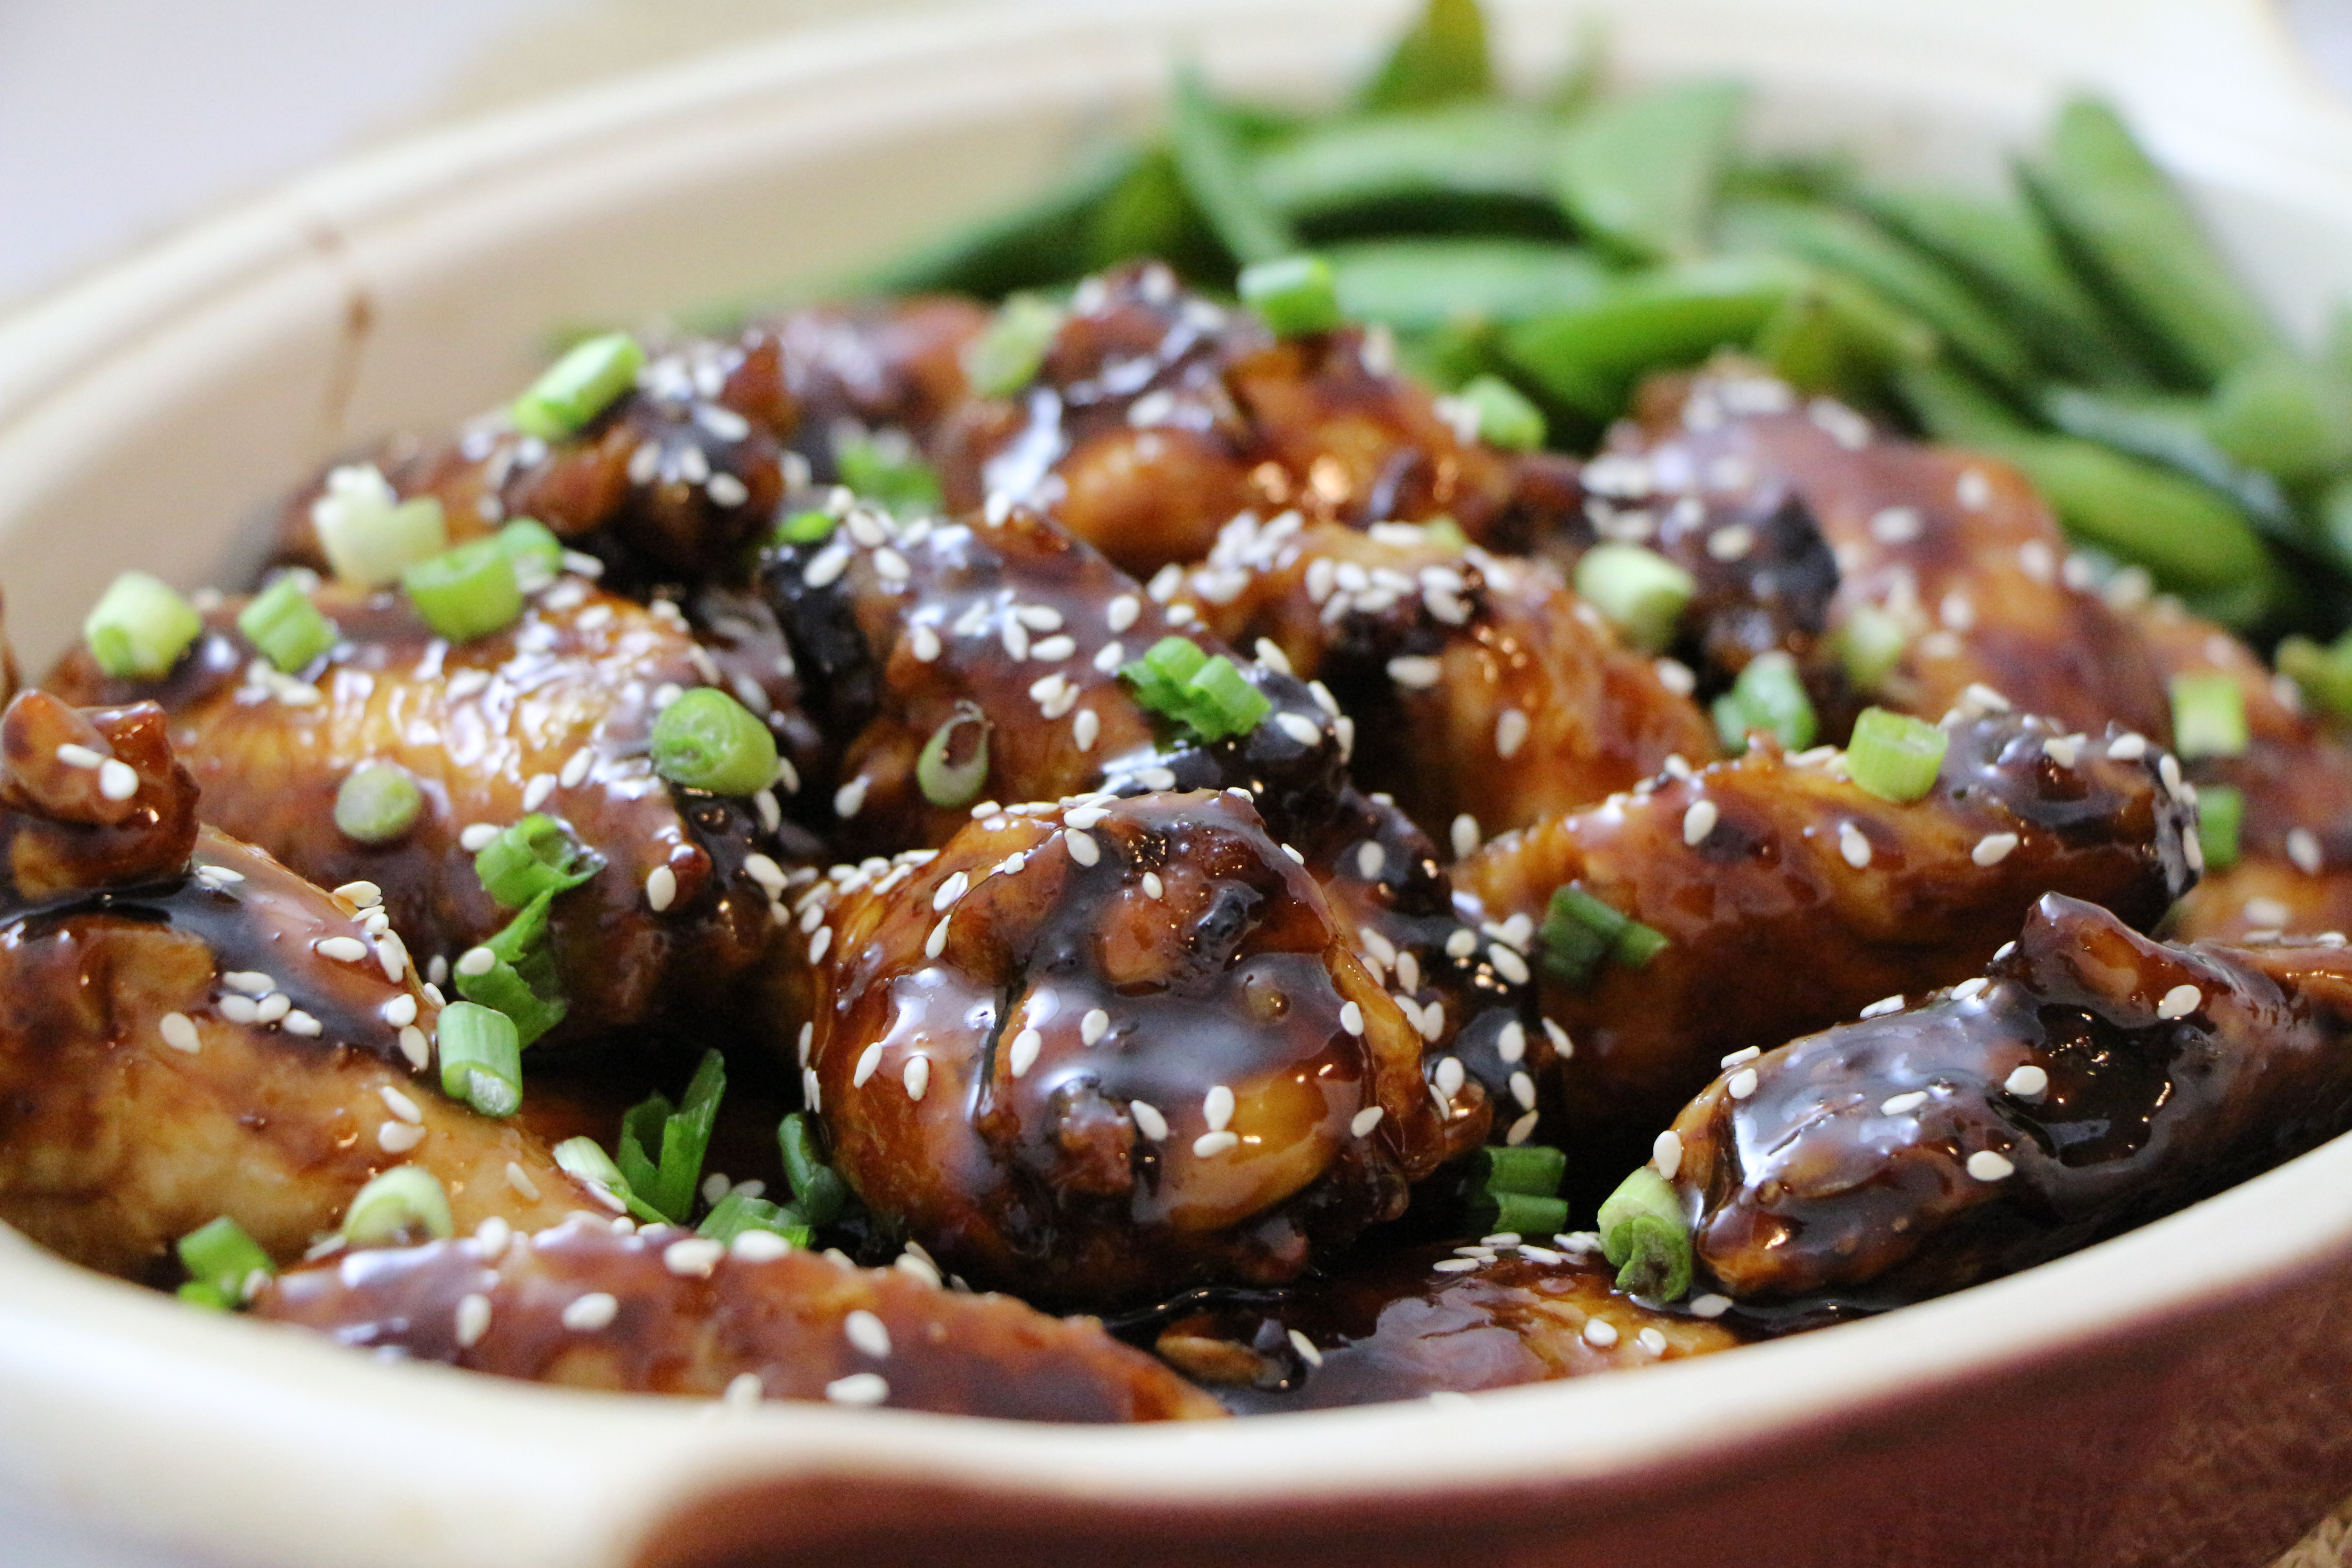
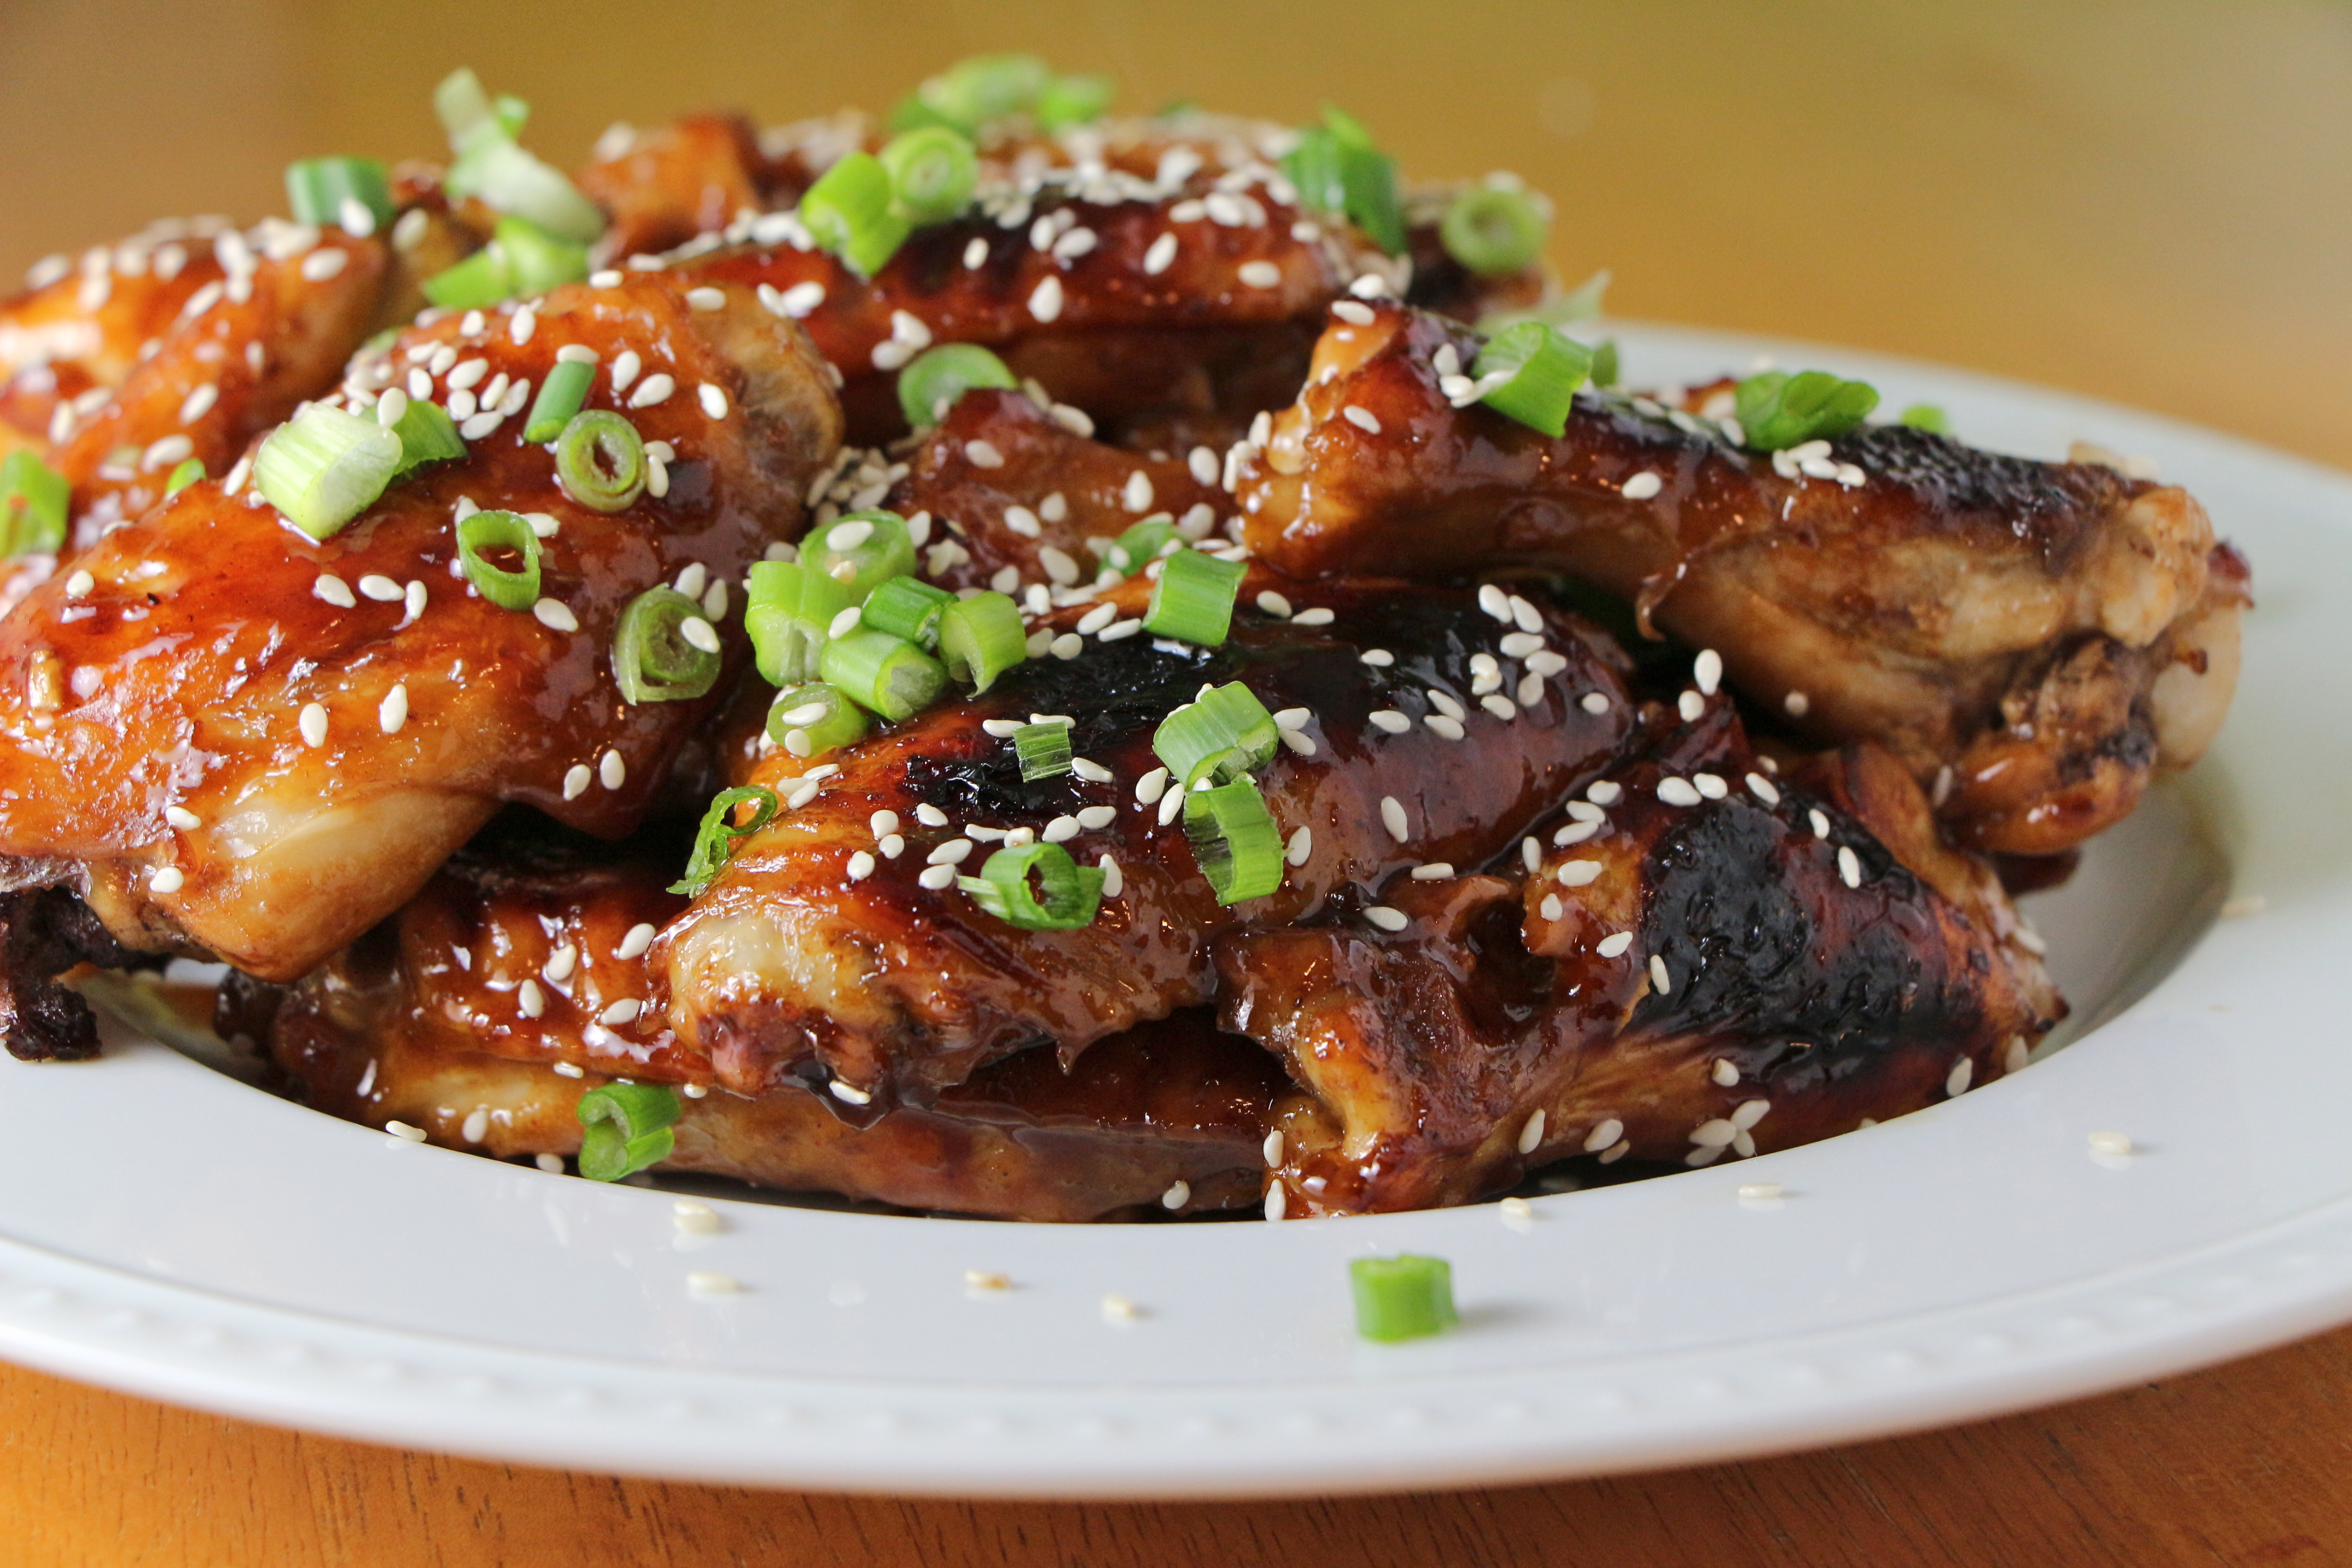
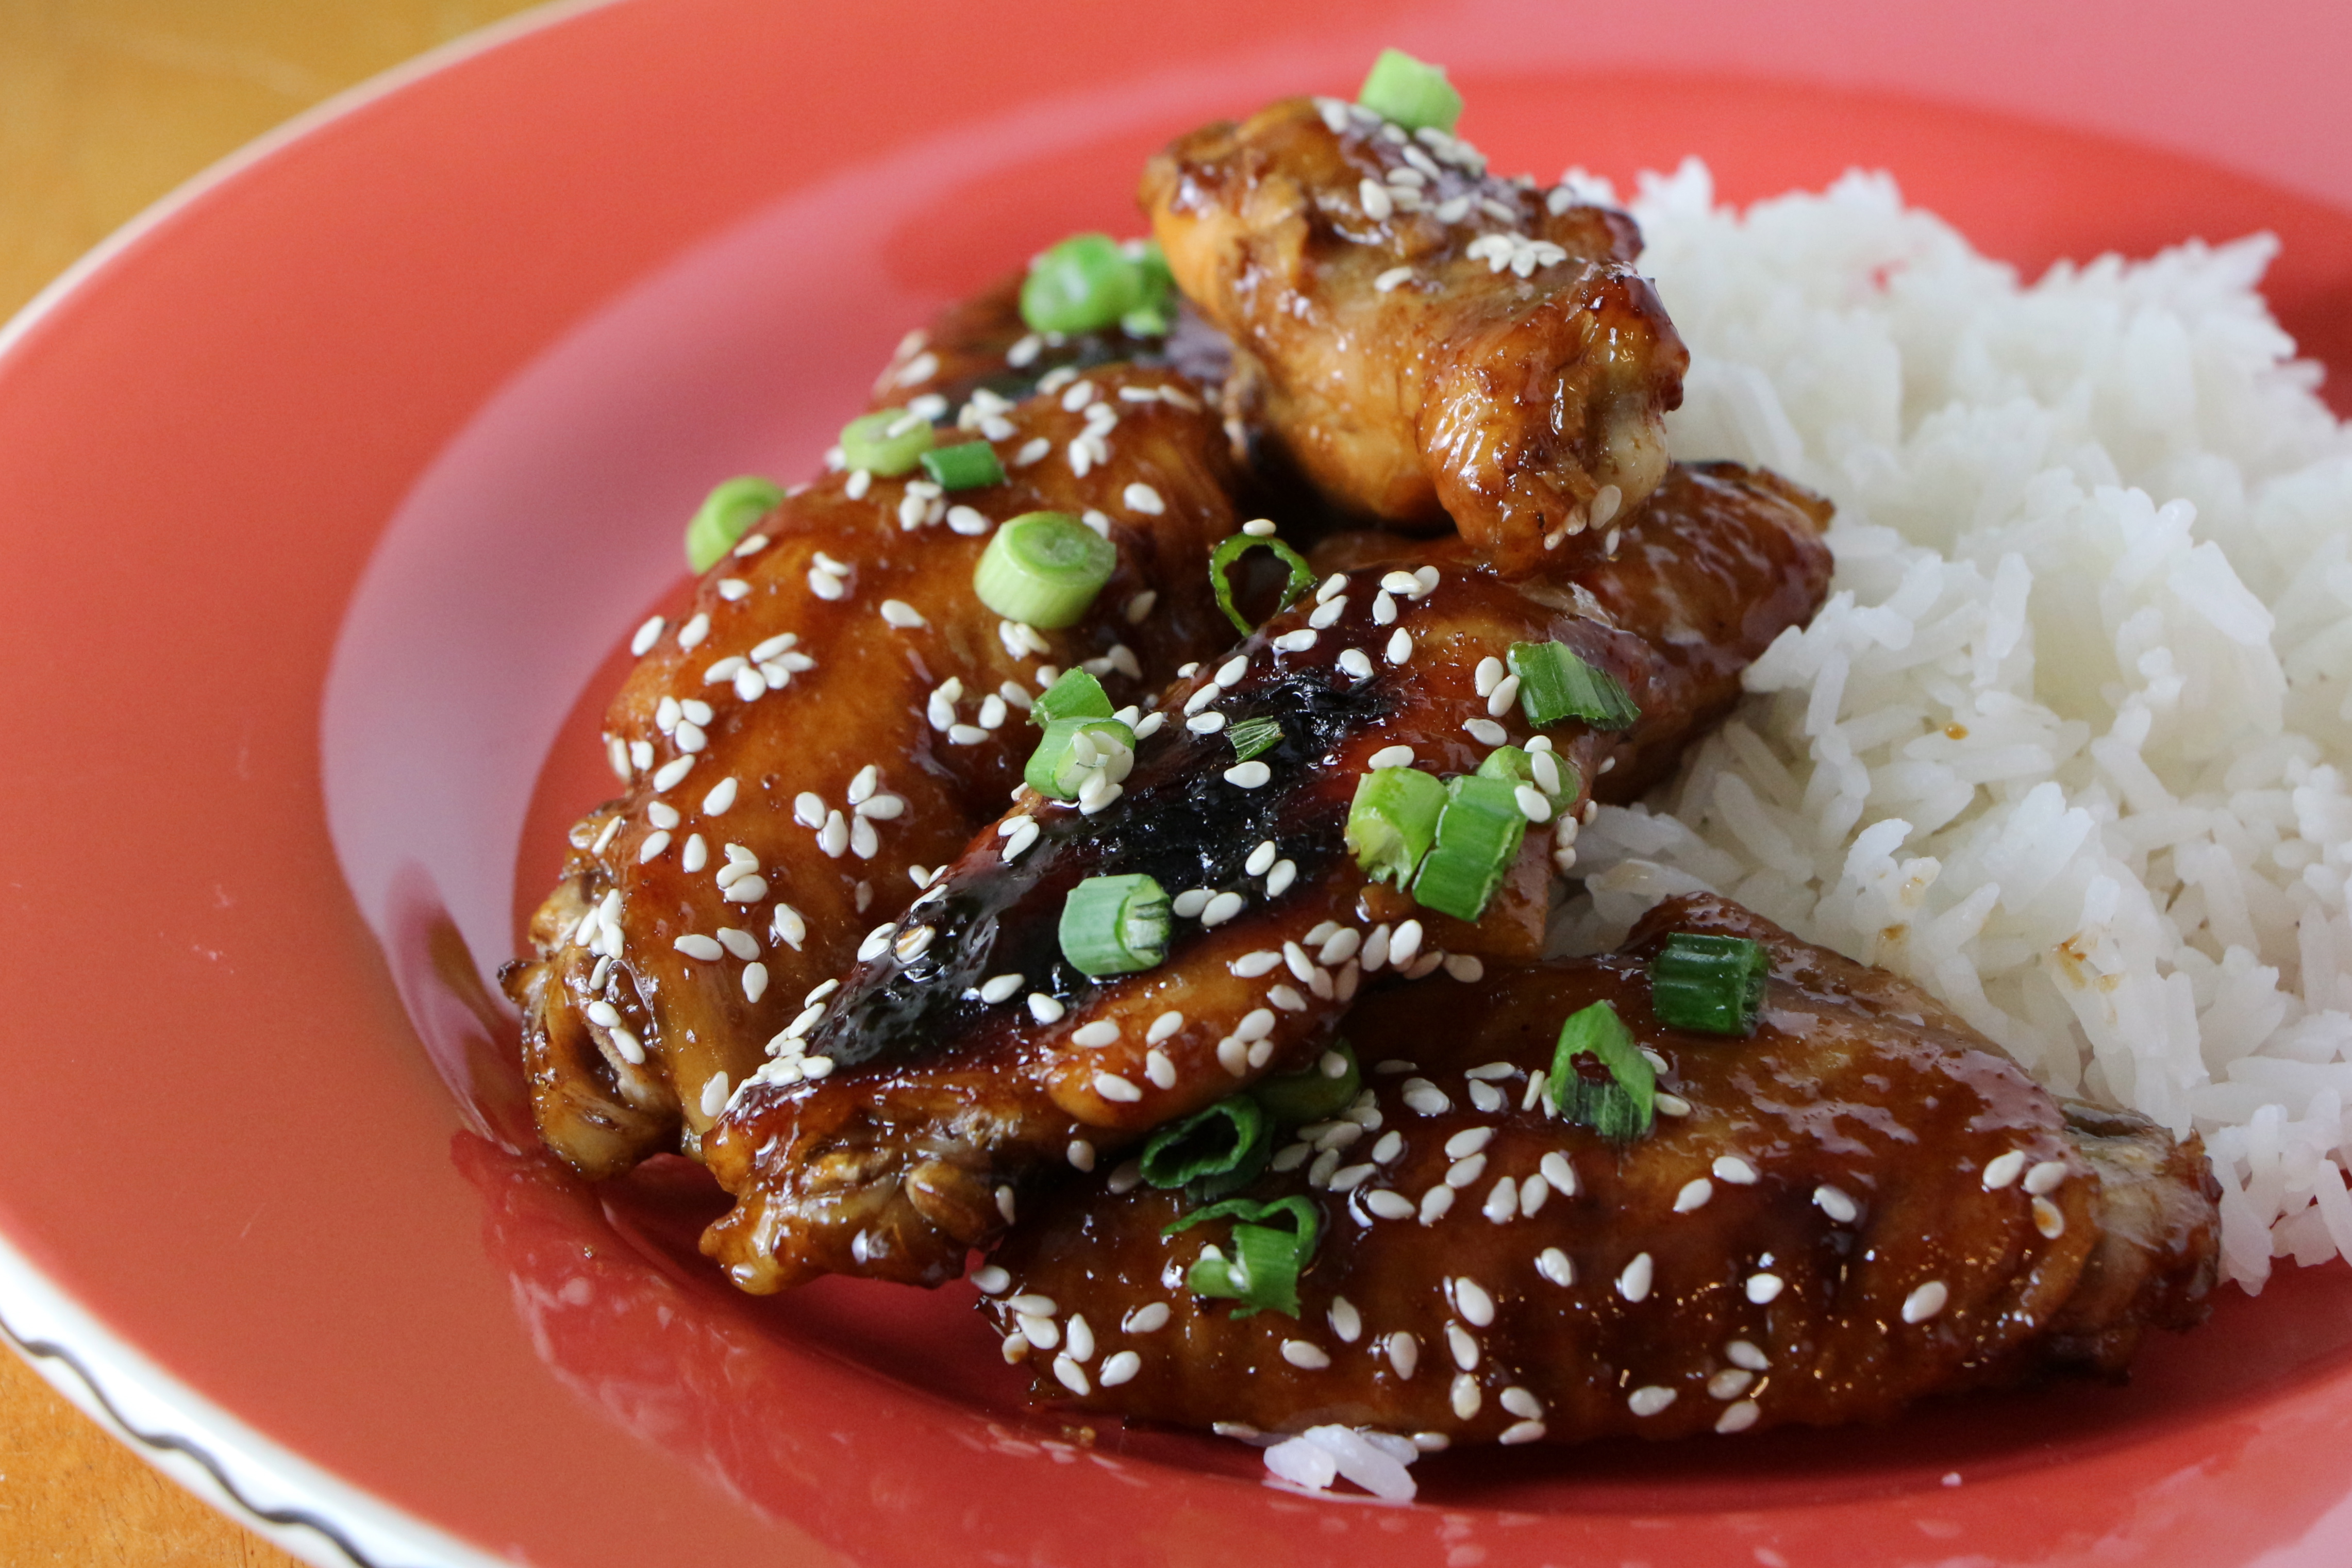
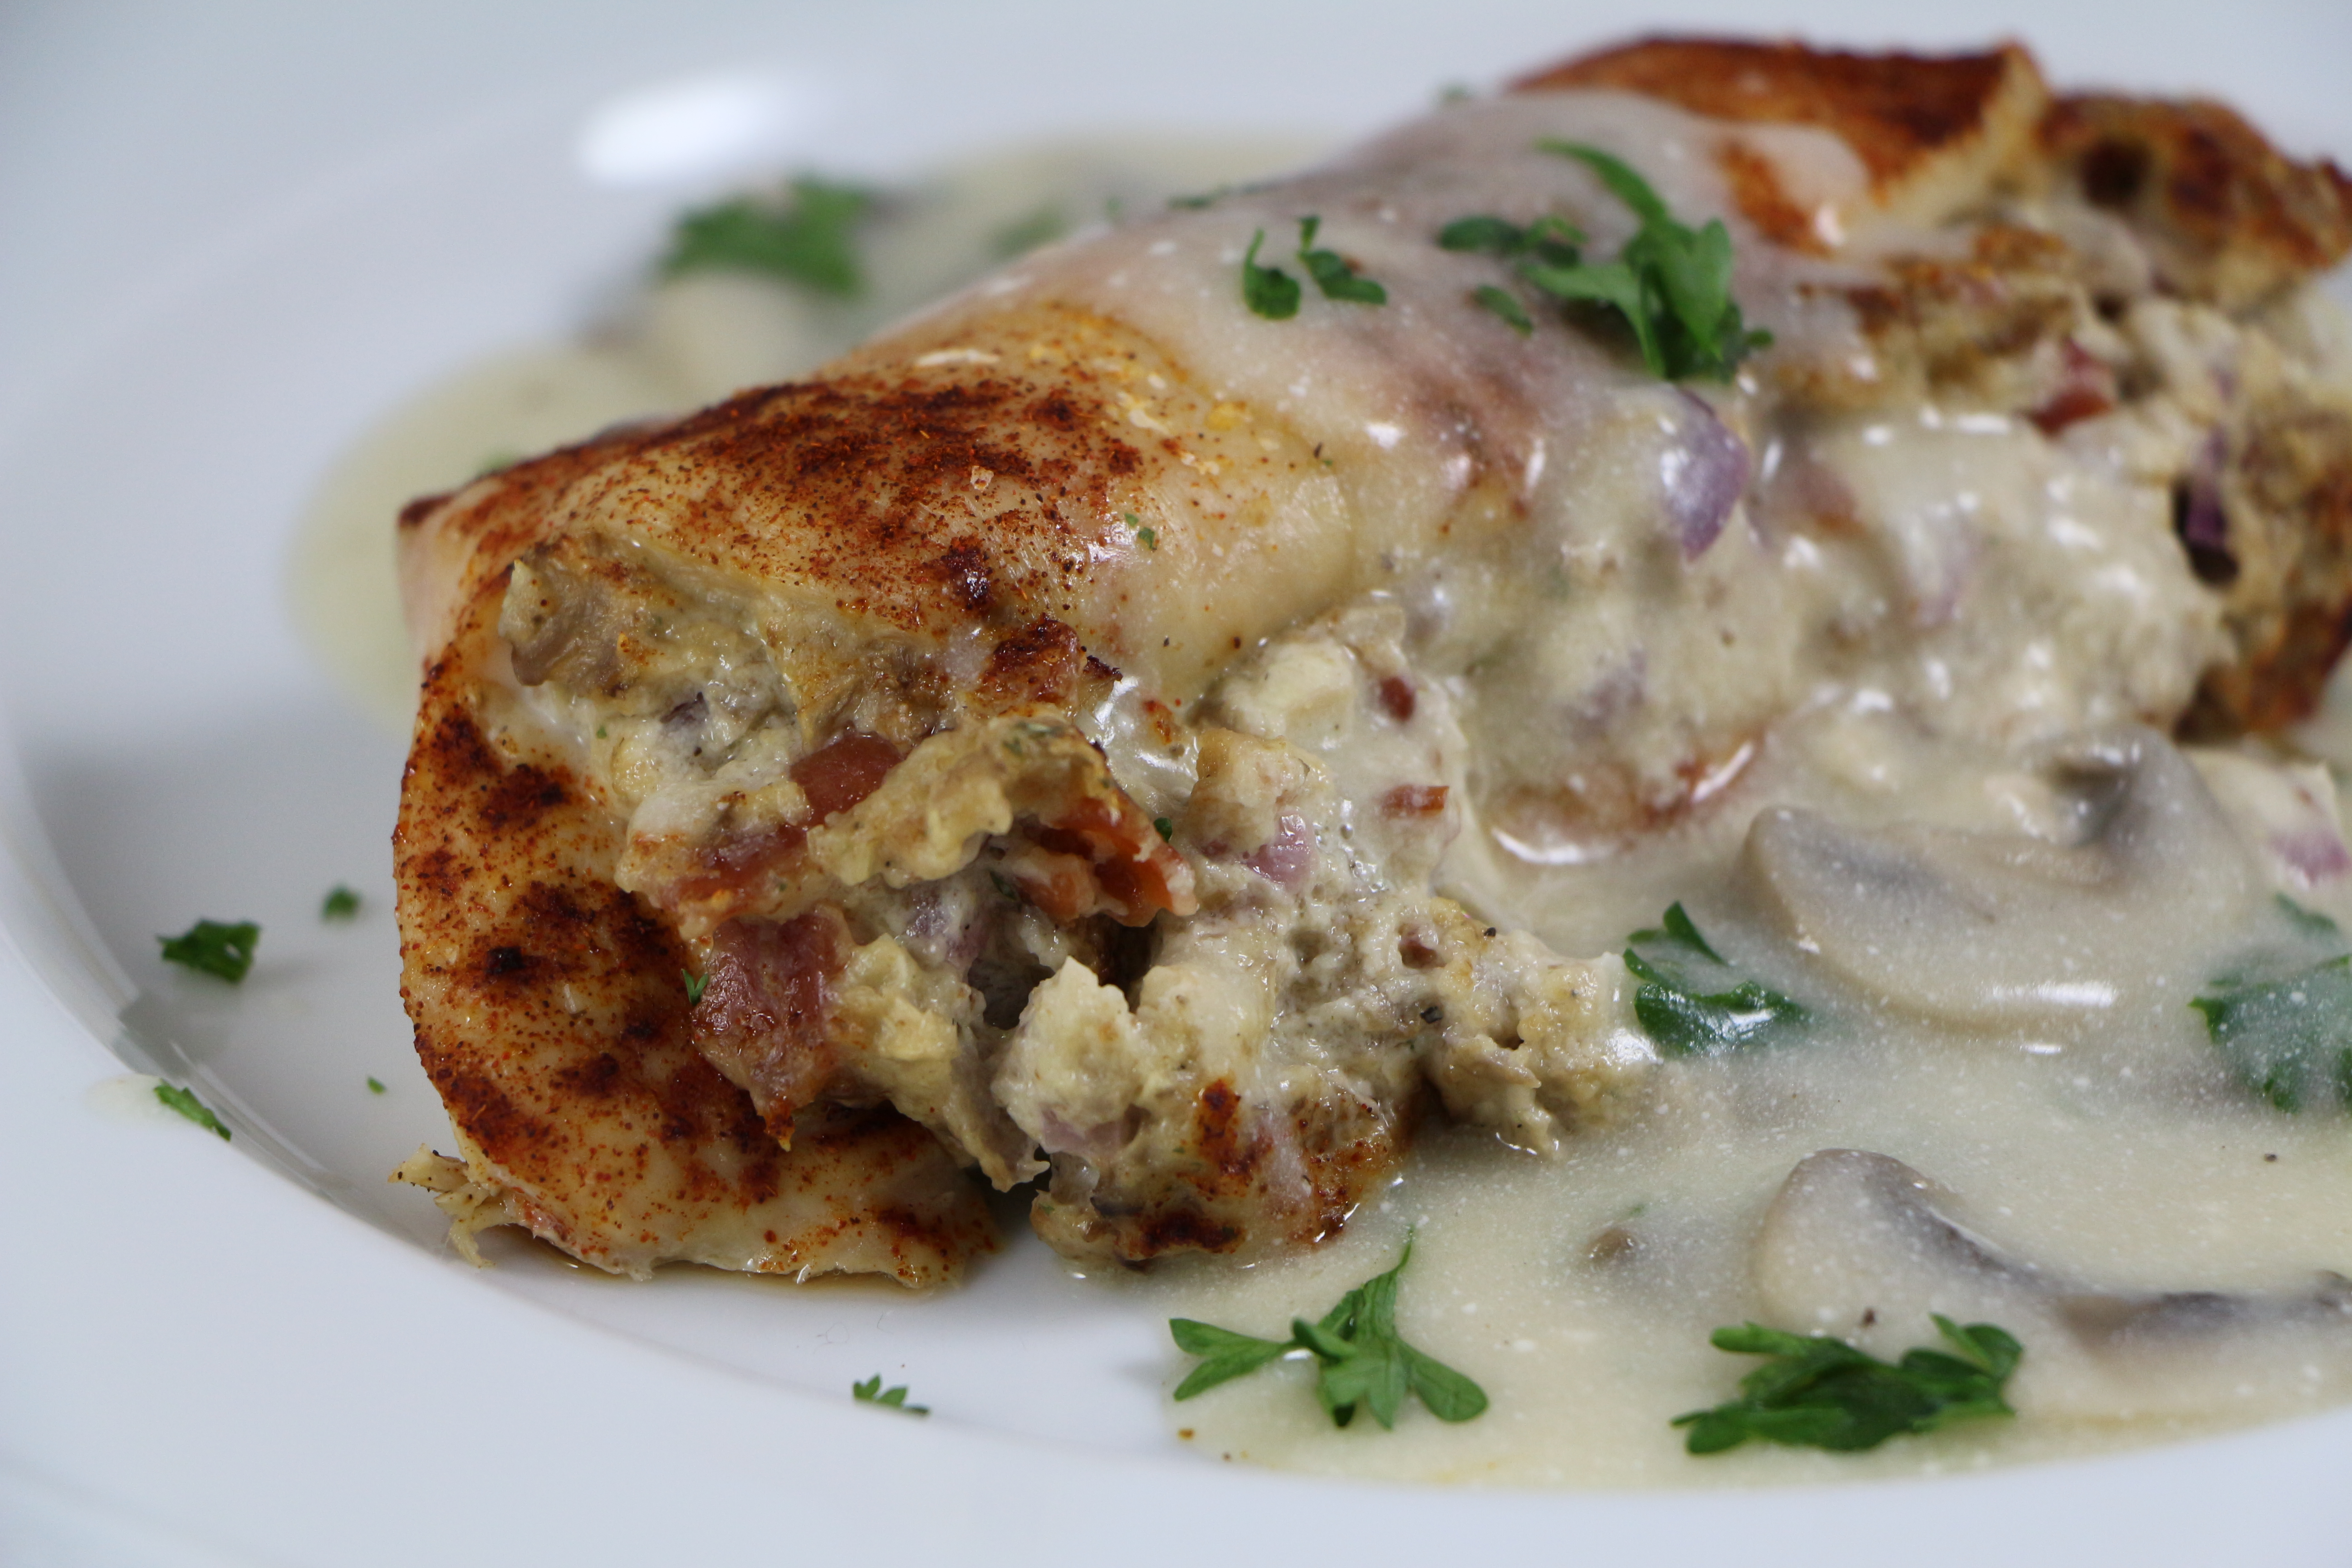
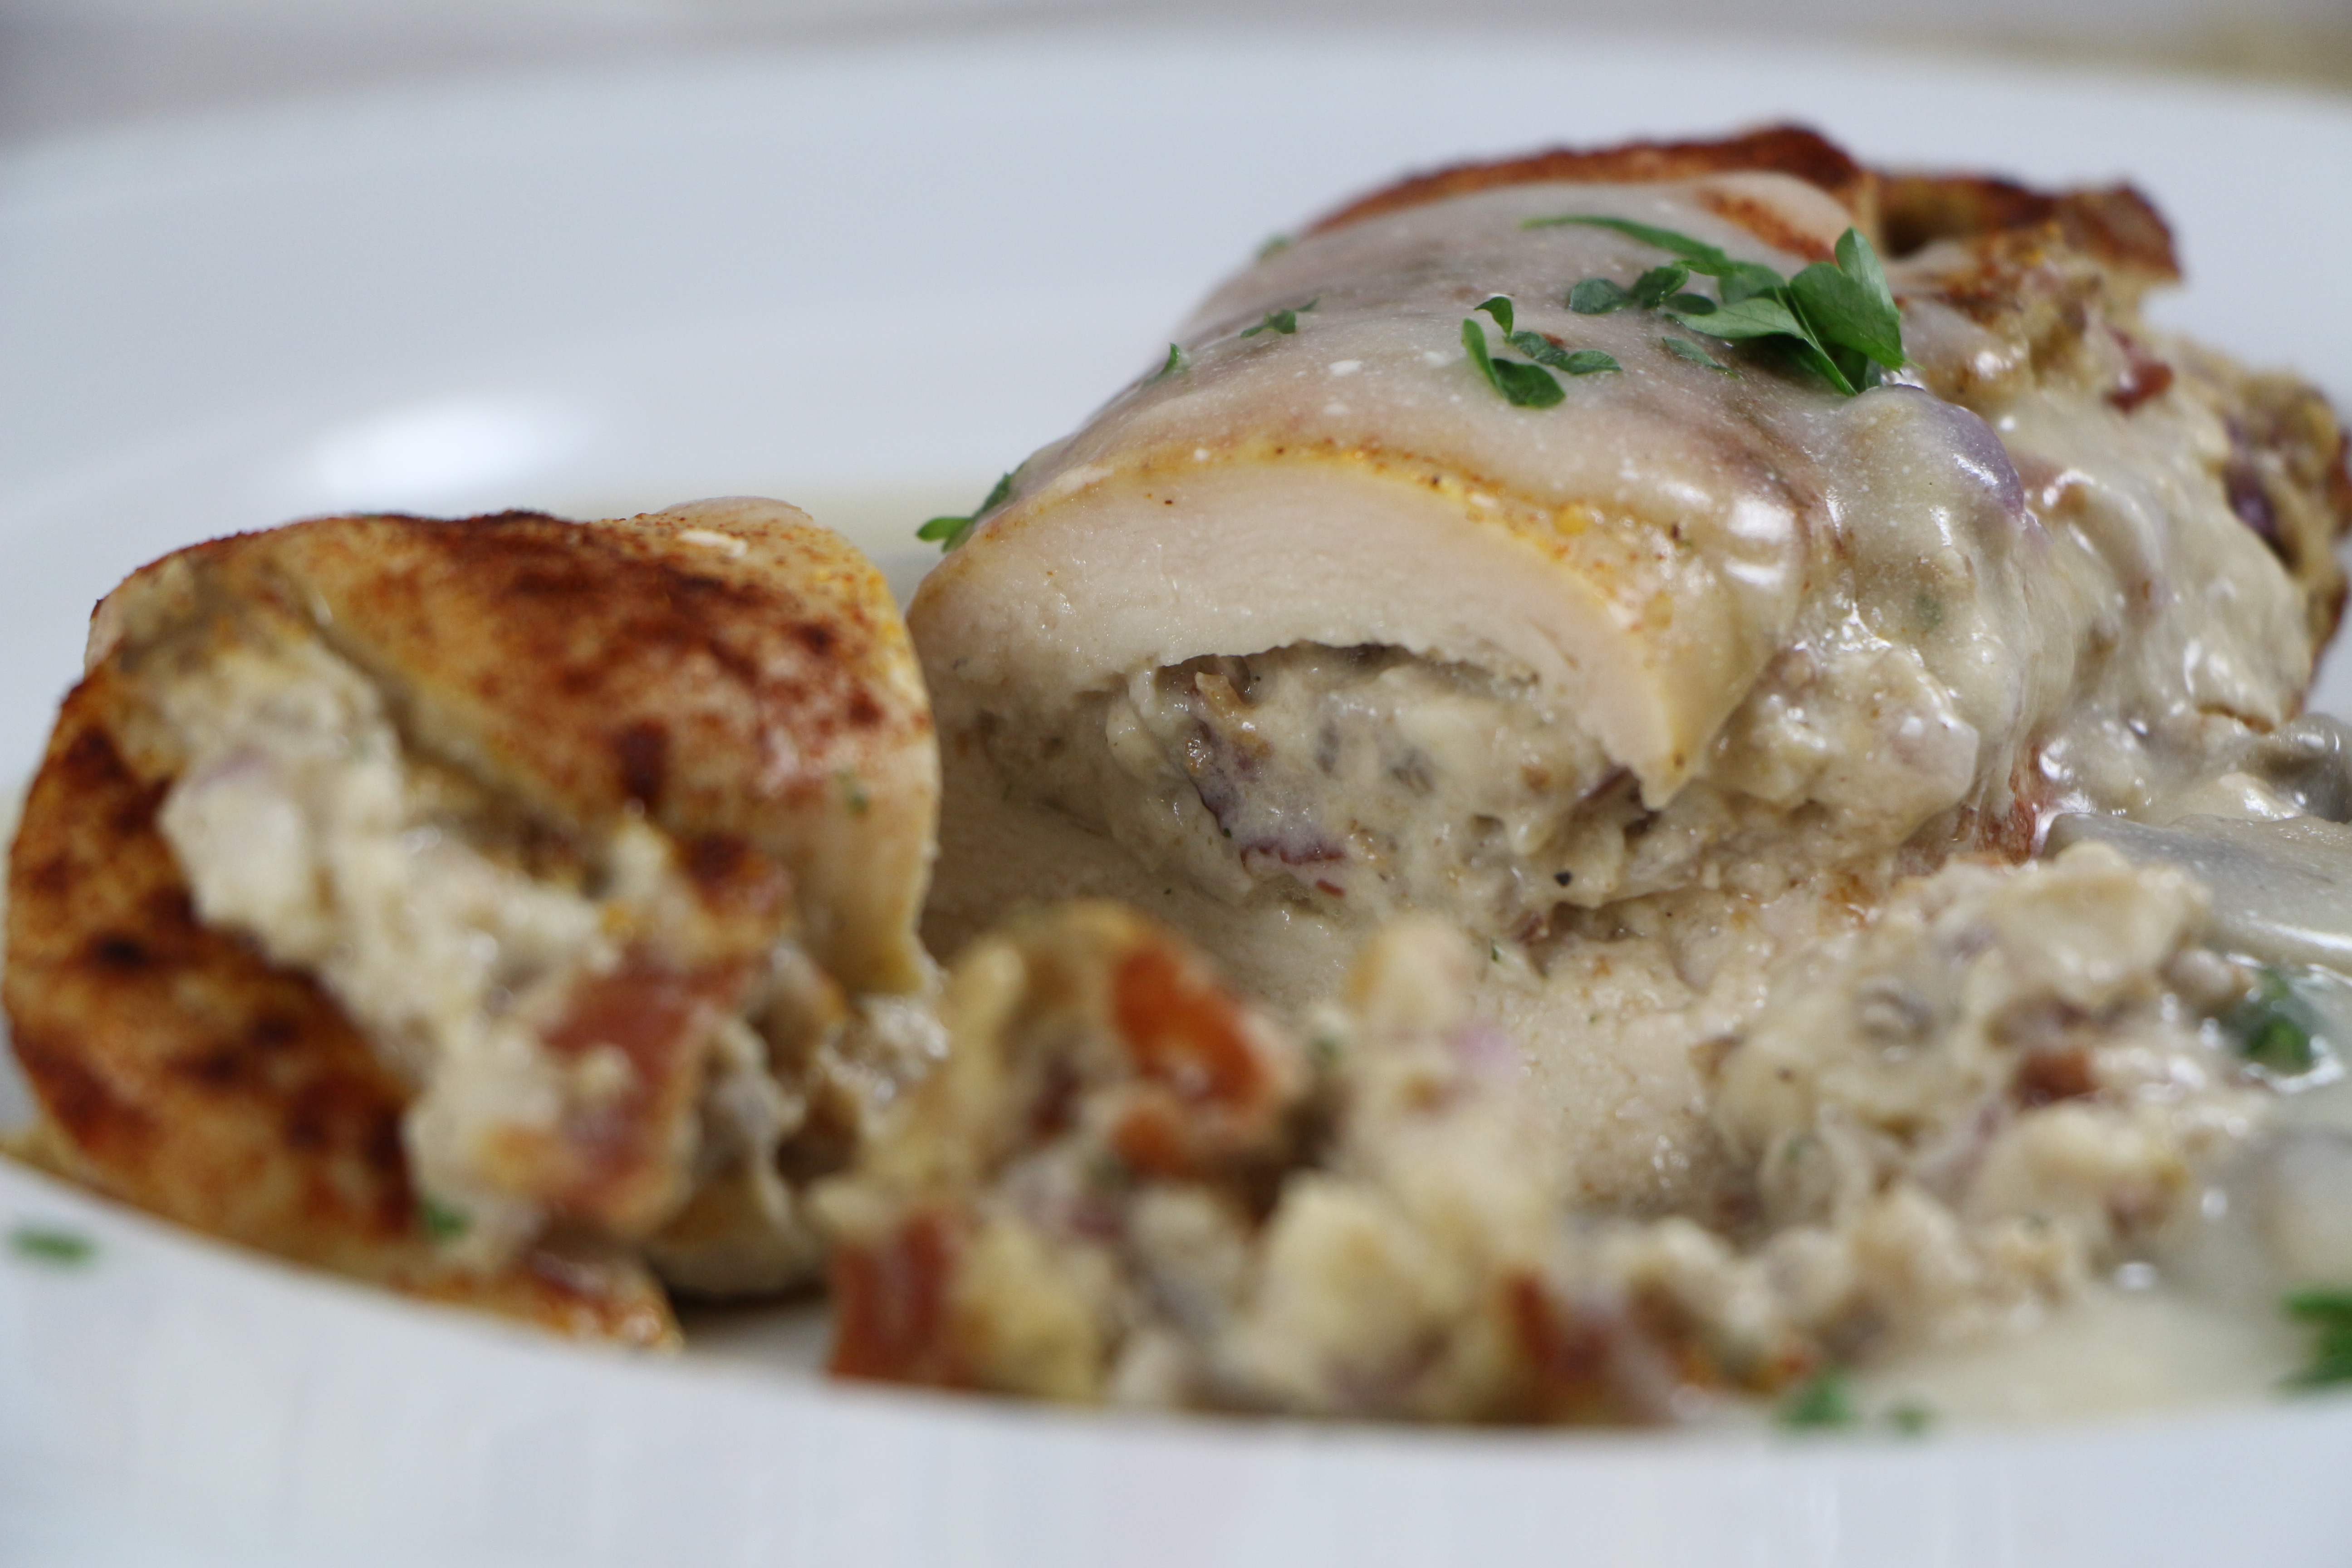
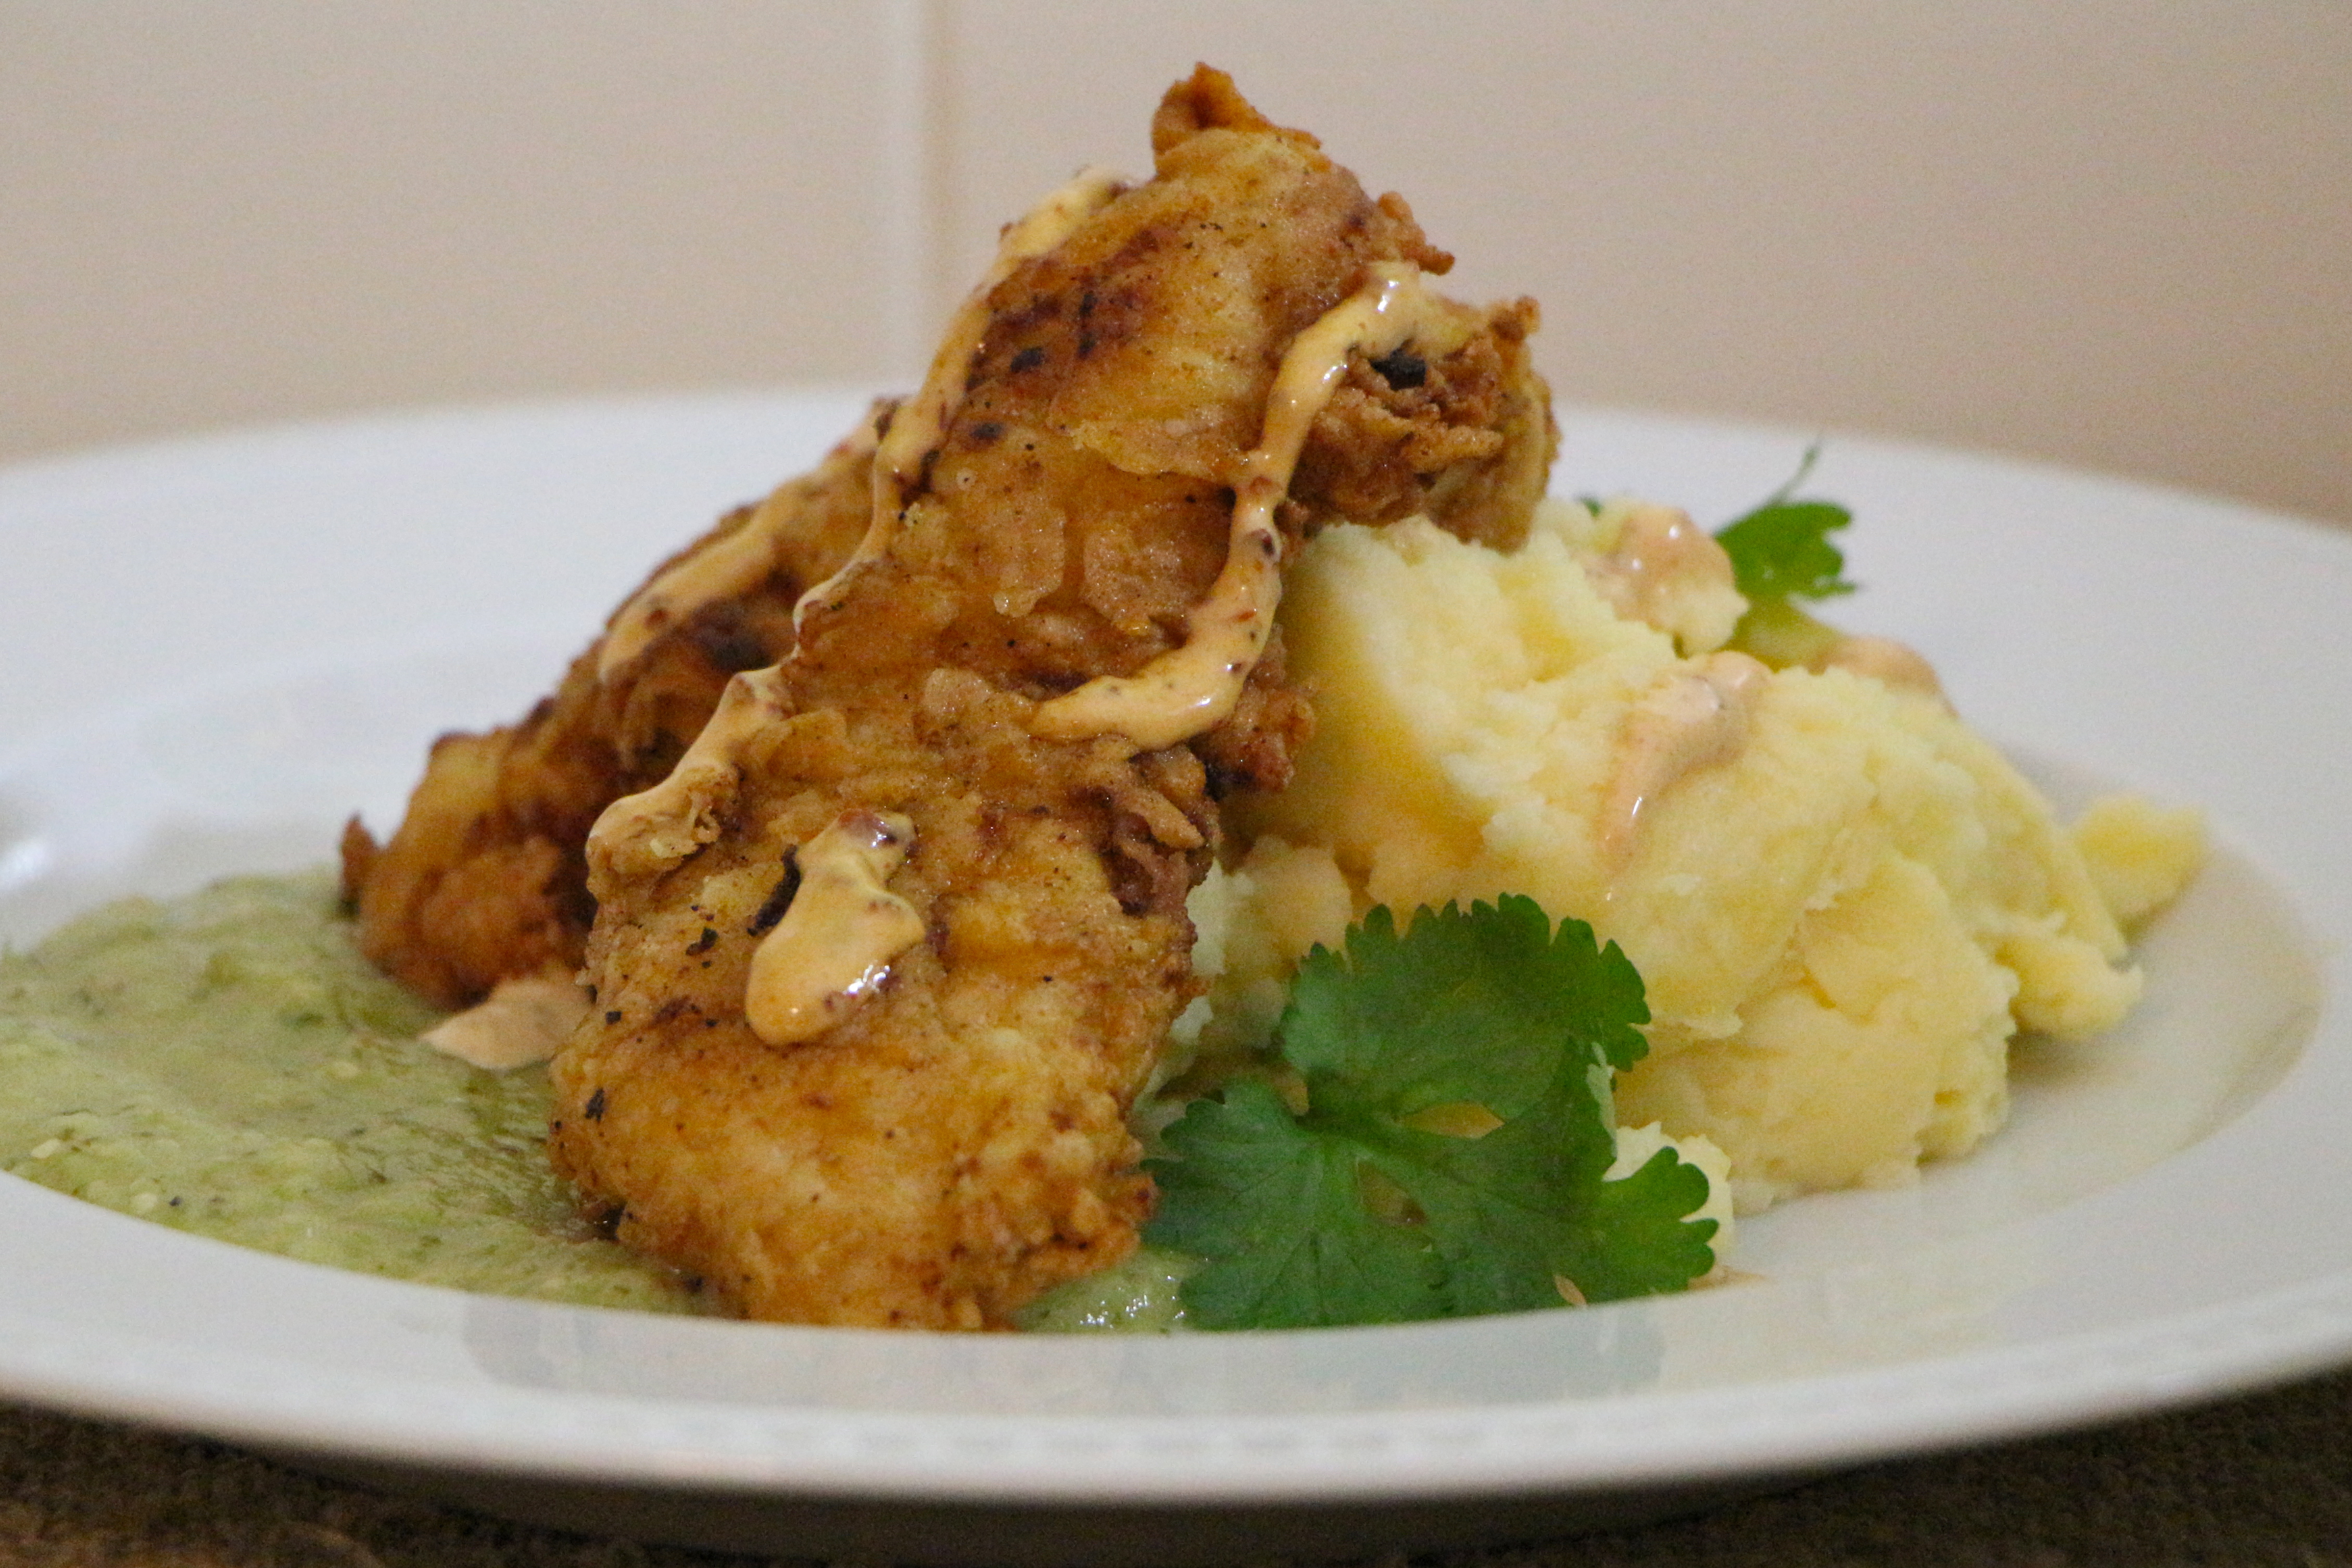
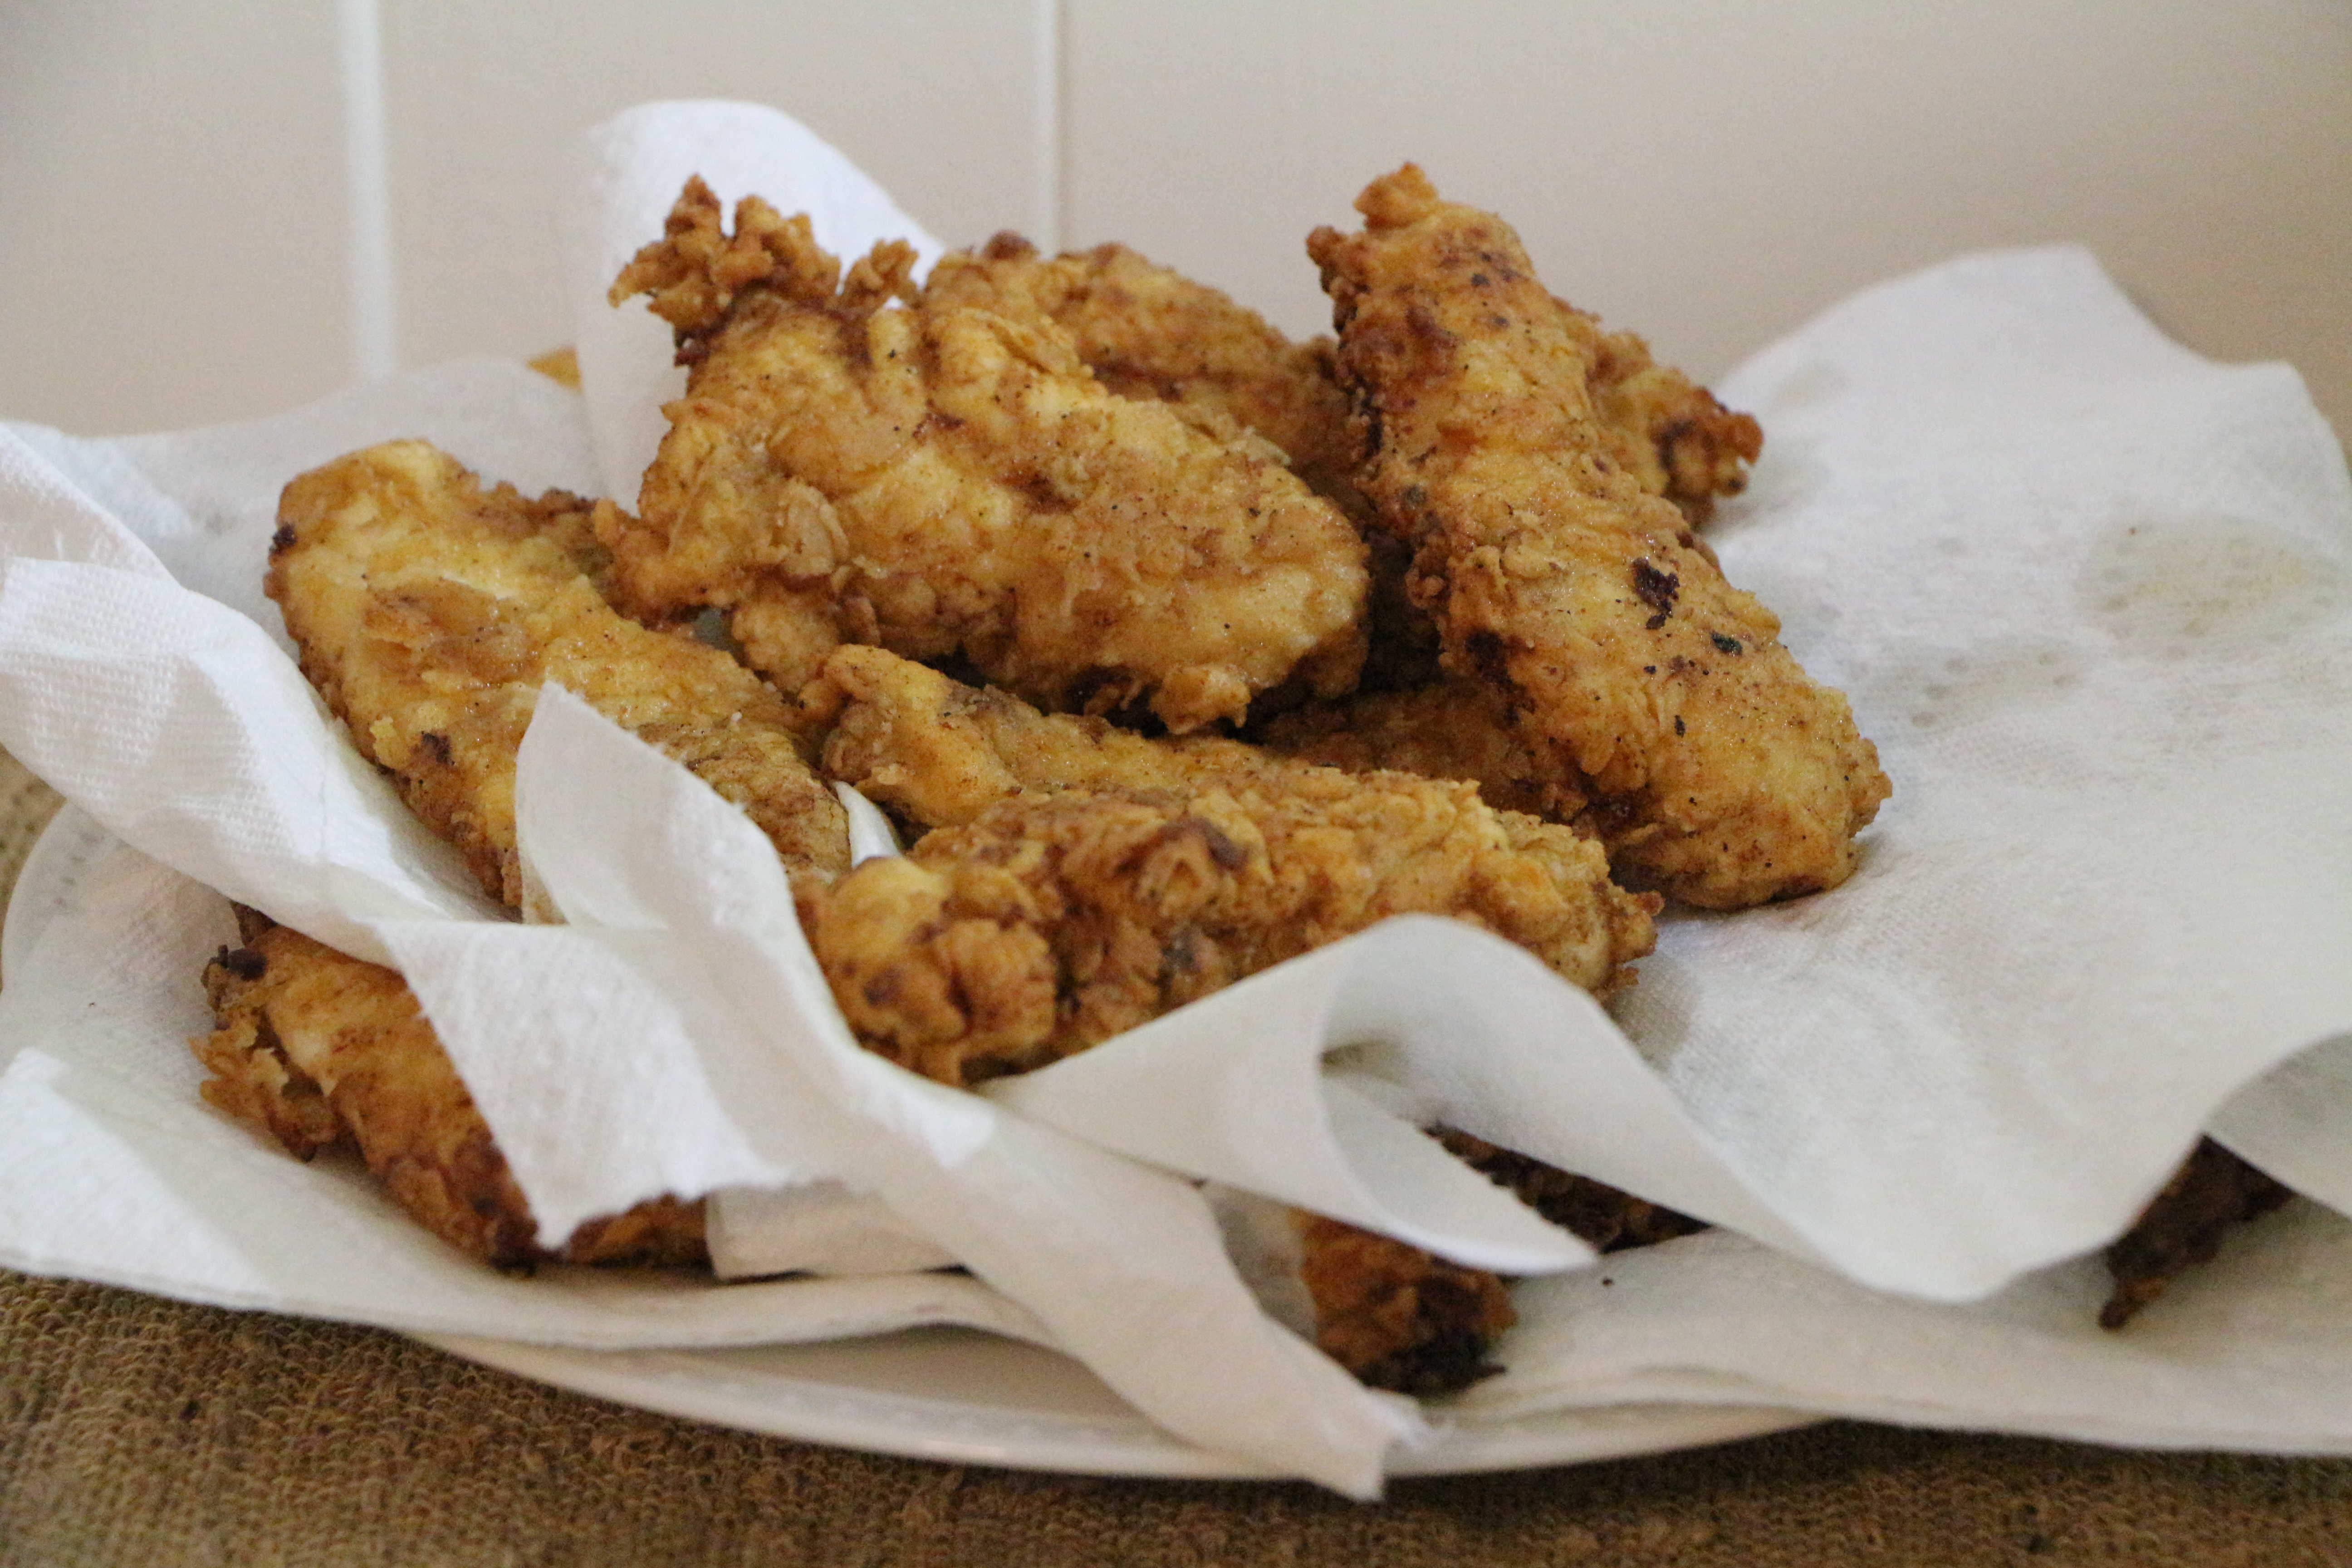
No Breaking Bad menu would be complete without some fried chicken, from Gus Fring’s Los Pollos Hermanos, the fried chicken joint which played heavily into the show’s third and fourth seasons. We served our boneless fried chicken tenders over a spicy salsa verde, drizzled with a bit of chipotle mayo.

Gus Fring’s Los Pollos Hermanos Fried Chicken Tenders over Salsa Verde with Chipotle Drizzle

Ingredients

  • 2 pounds chicken tenderloins
  • 3 cups buttermilk, divided
  • 2 eggs
  • 2 cups flour
  • 2 1/2 teaspoons garlic powder
  • 2 teaspoons salt
  • 1 1/2 teaspoons paprika
  • 3/4 teaspoon cayenne pepper
  • Vegetable oil, for frying

Directions

Soak the tenderloins in 2 cups of the buttermilk in a covered container in the refrigerator for a few hours.

Heat the vegetable oil in a large frying pan over medium/medium-high heat, until sizzling hot.

Whisk together the remaining cup of buttermilk and the eggs in a large bowl. Transfer the chicken tenders to the egg mixture.

In a small baking dish, stir together the flour, garlic powder, salt, paprika, and cayenne pepper.

Remove the chicken tenders from the egg mixture. Allow the excess to drip off. Press the chicken into the flour mixture until well coated on both sides. Place in the hot oil. Cook for about 3-4  minutes on each side, until cooked through and golden brown. (The chicken should sizzle when placed in the oil.) Drain the cooked tenders on a paper towel. Repeat in small batches until all of the chicken has been cooked.
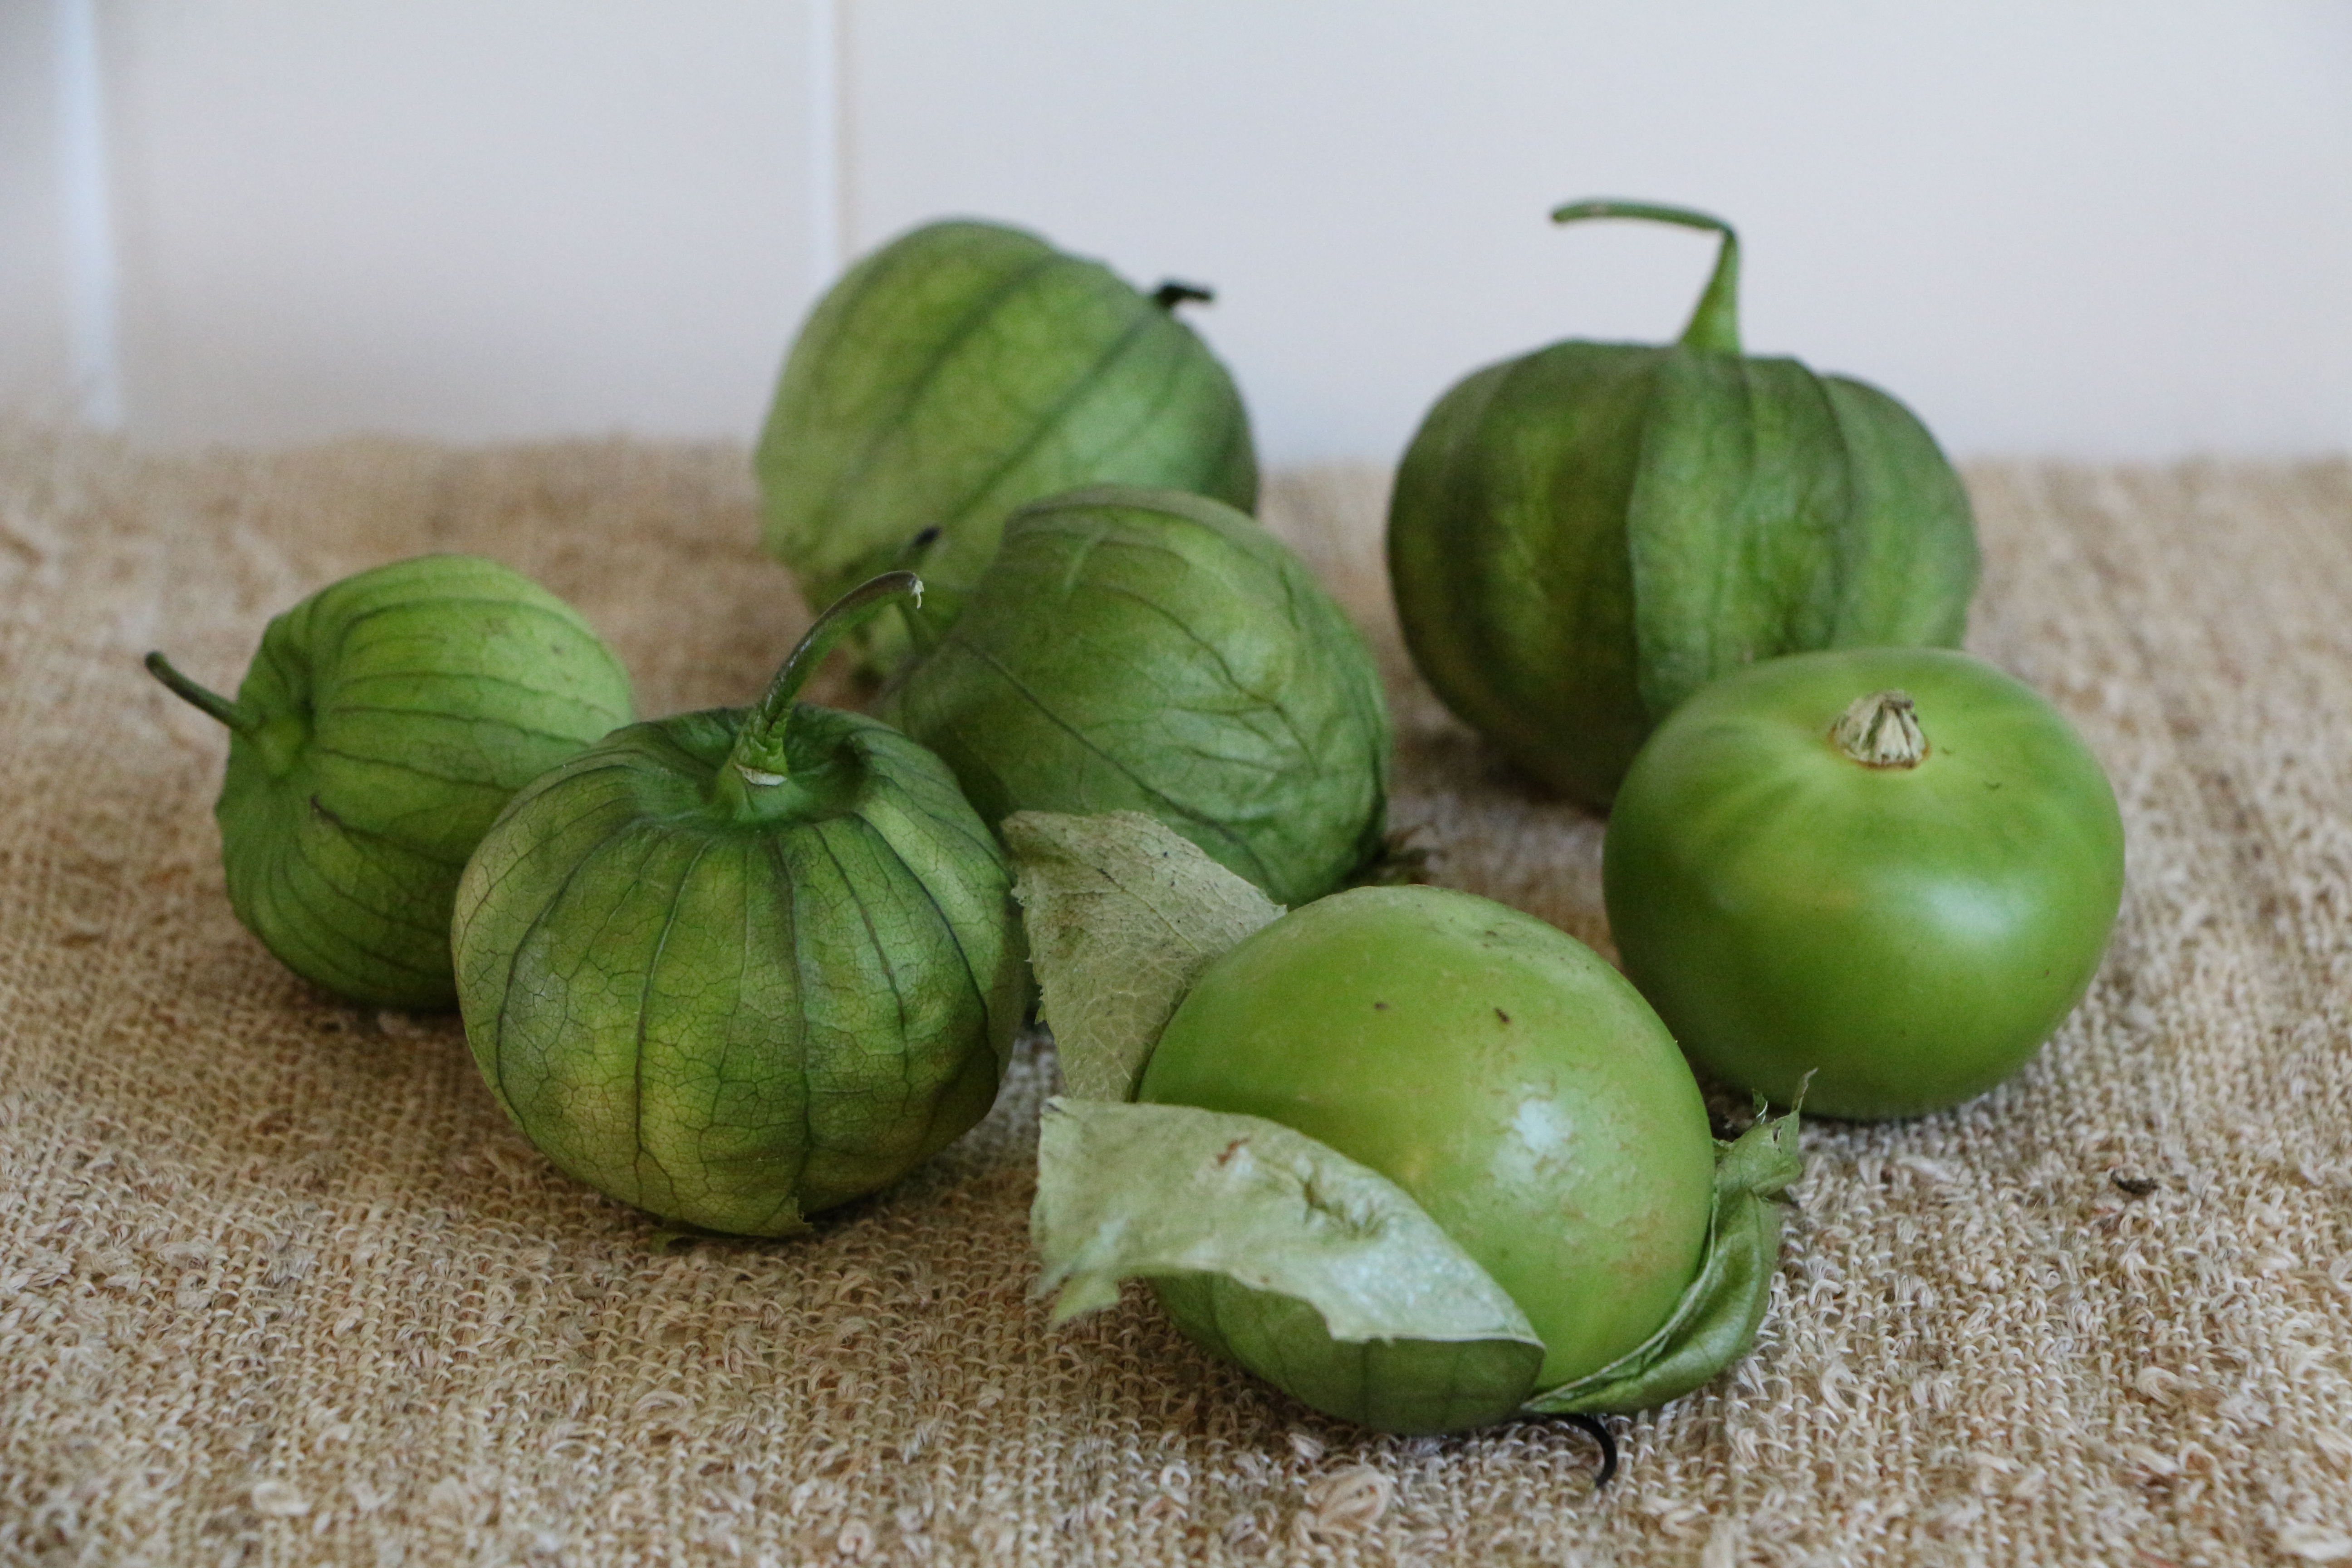
IMG_0882

Salsa Verde

Slightly modified from Rick Bayless’ Salsa Verde

Ingredients

  • 8 tomatillos
  • 1 jalapeno pepper or 1-2 serrano peppers, halved, stems and ribs removed*
  • 4 cloves garlic
  • 1 tablespoon olive oil
  • 1/2 white onion, coarse chopped
  • 10-12 cilantro sprigs, bottom portion of stem removed, coarse chopped
  • Juice of 1/2 lime
  • Salt, to taste

*Use jalapeño for a spicy sauce. Use serrano for a more mild sauce.

Directions

Preheat your broiler.

Remove the husks from the tomatillos. Rinse. Cut off the stem, then halve. Place the halved tomatillos, garlic cloves, and jalapeño or serrano pepper on a baking sheet. Lightly rub the tomatillos, peppers, and garlic with olive oil. Roast a few inches under the broiler for about 5 minutes. Flip them over and roast the other side for about 5 minutes. Once cool, transfer the entire contents of the tray (including the juices) to a blender. Add the onion and cilantro. Blend to desired consistency. Season with lime juice and salt, to taste.

IMG_0800

Chipotle Drizzle

Ingredients

  • 1 chipotle (from can of chipotles in adobo), pureed or very finely chopped
  • 1/3 cup mayonnaise
  • 2 tablespoons of adobo sauce (from can of chipotles in adobo)

Directions

Combine all ingredients until well blended.

IMG_0871

The fifth season’s episode “Fifty-one”, finds Walt, Skyler, Hank and Marie seated once again at a dinner table on Walt’s 51st birthday, reflecting back the past year, with Walt spinning a web of lies while Skyler silently contemplates an escape for herself and her children. Attempting to break the tension, Marie offers a compliment about Skyler’s mashed potatoes, eager to learn how she removed all of the lumps. Skyler distractedly credits the use of a potato ricer, though her potatoes were actually store-bought and microwaved.

It may not truly be Skyler’s trick to creamy potatoes, but a potato ricer is in fact the ticket to smooth, non-gummy potatoes. By pressing the cooked potatoes through the ricer, lumps are thoroughly removed, without disturbing the cooked starches too much. I’ve had my eye on a potato ricer for many years now, though the idea to purchase one always corresponds with the holiday season, when I’m bleeding money and just can’t wrap myself around the added expense. I bought myself one yesterday in honor of this dish. Those are some smooth potatoes!

Skyler’s Creamy Potatoes with Cheddar and Jalapeño

Ingredients

  • 8 large russet potatoes, peel and chopped into 1″ chunks
  • 1 cup sour cream
  • 2 cup cheddar cheese, grated
  • 1/2 cup milk
  • 1  jalapeño, ribs and seeds removed, very finely diced
  • Salt

Directions

Place the potatoes in a large saucepan. Add water to just cover the potatoes. Bring the water to a boil. Cook for about 10 minutes, until fork tender. Allow to cool slightly. Mash the potatoes in a potato ricer or food mill. Alternately, use a potato masher. Stir in the sour cream, cheese, milk, and jalapeño, just until blended. Do not over-stir. Add more milk, as desired, to reach your preferred consistency. Season with salt, to taste.

IMG_0808

Oh, Jesse, Jesse, Jesse… poor conflicted man, with any chance of living his American dream looking pretty hopeless right about now. Trapped in a concrete cell by some uber-creeps, Todd (no doubt the creepiest one of all) offers him some Ben and Jerry’s ice cream, giving him a choice between Peanut Butter Cup and Stephen Colbert’s Americone Dream.

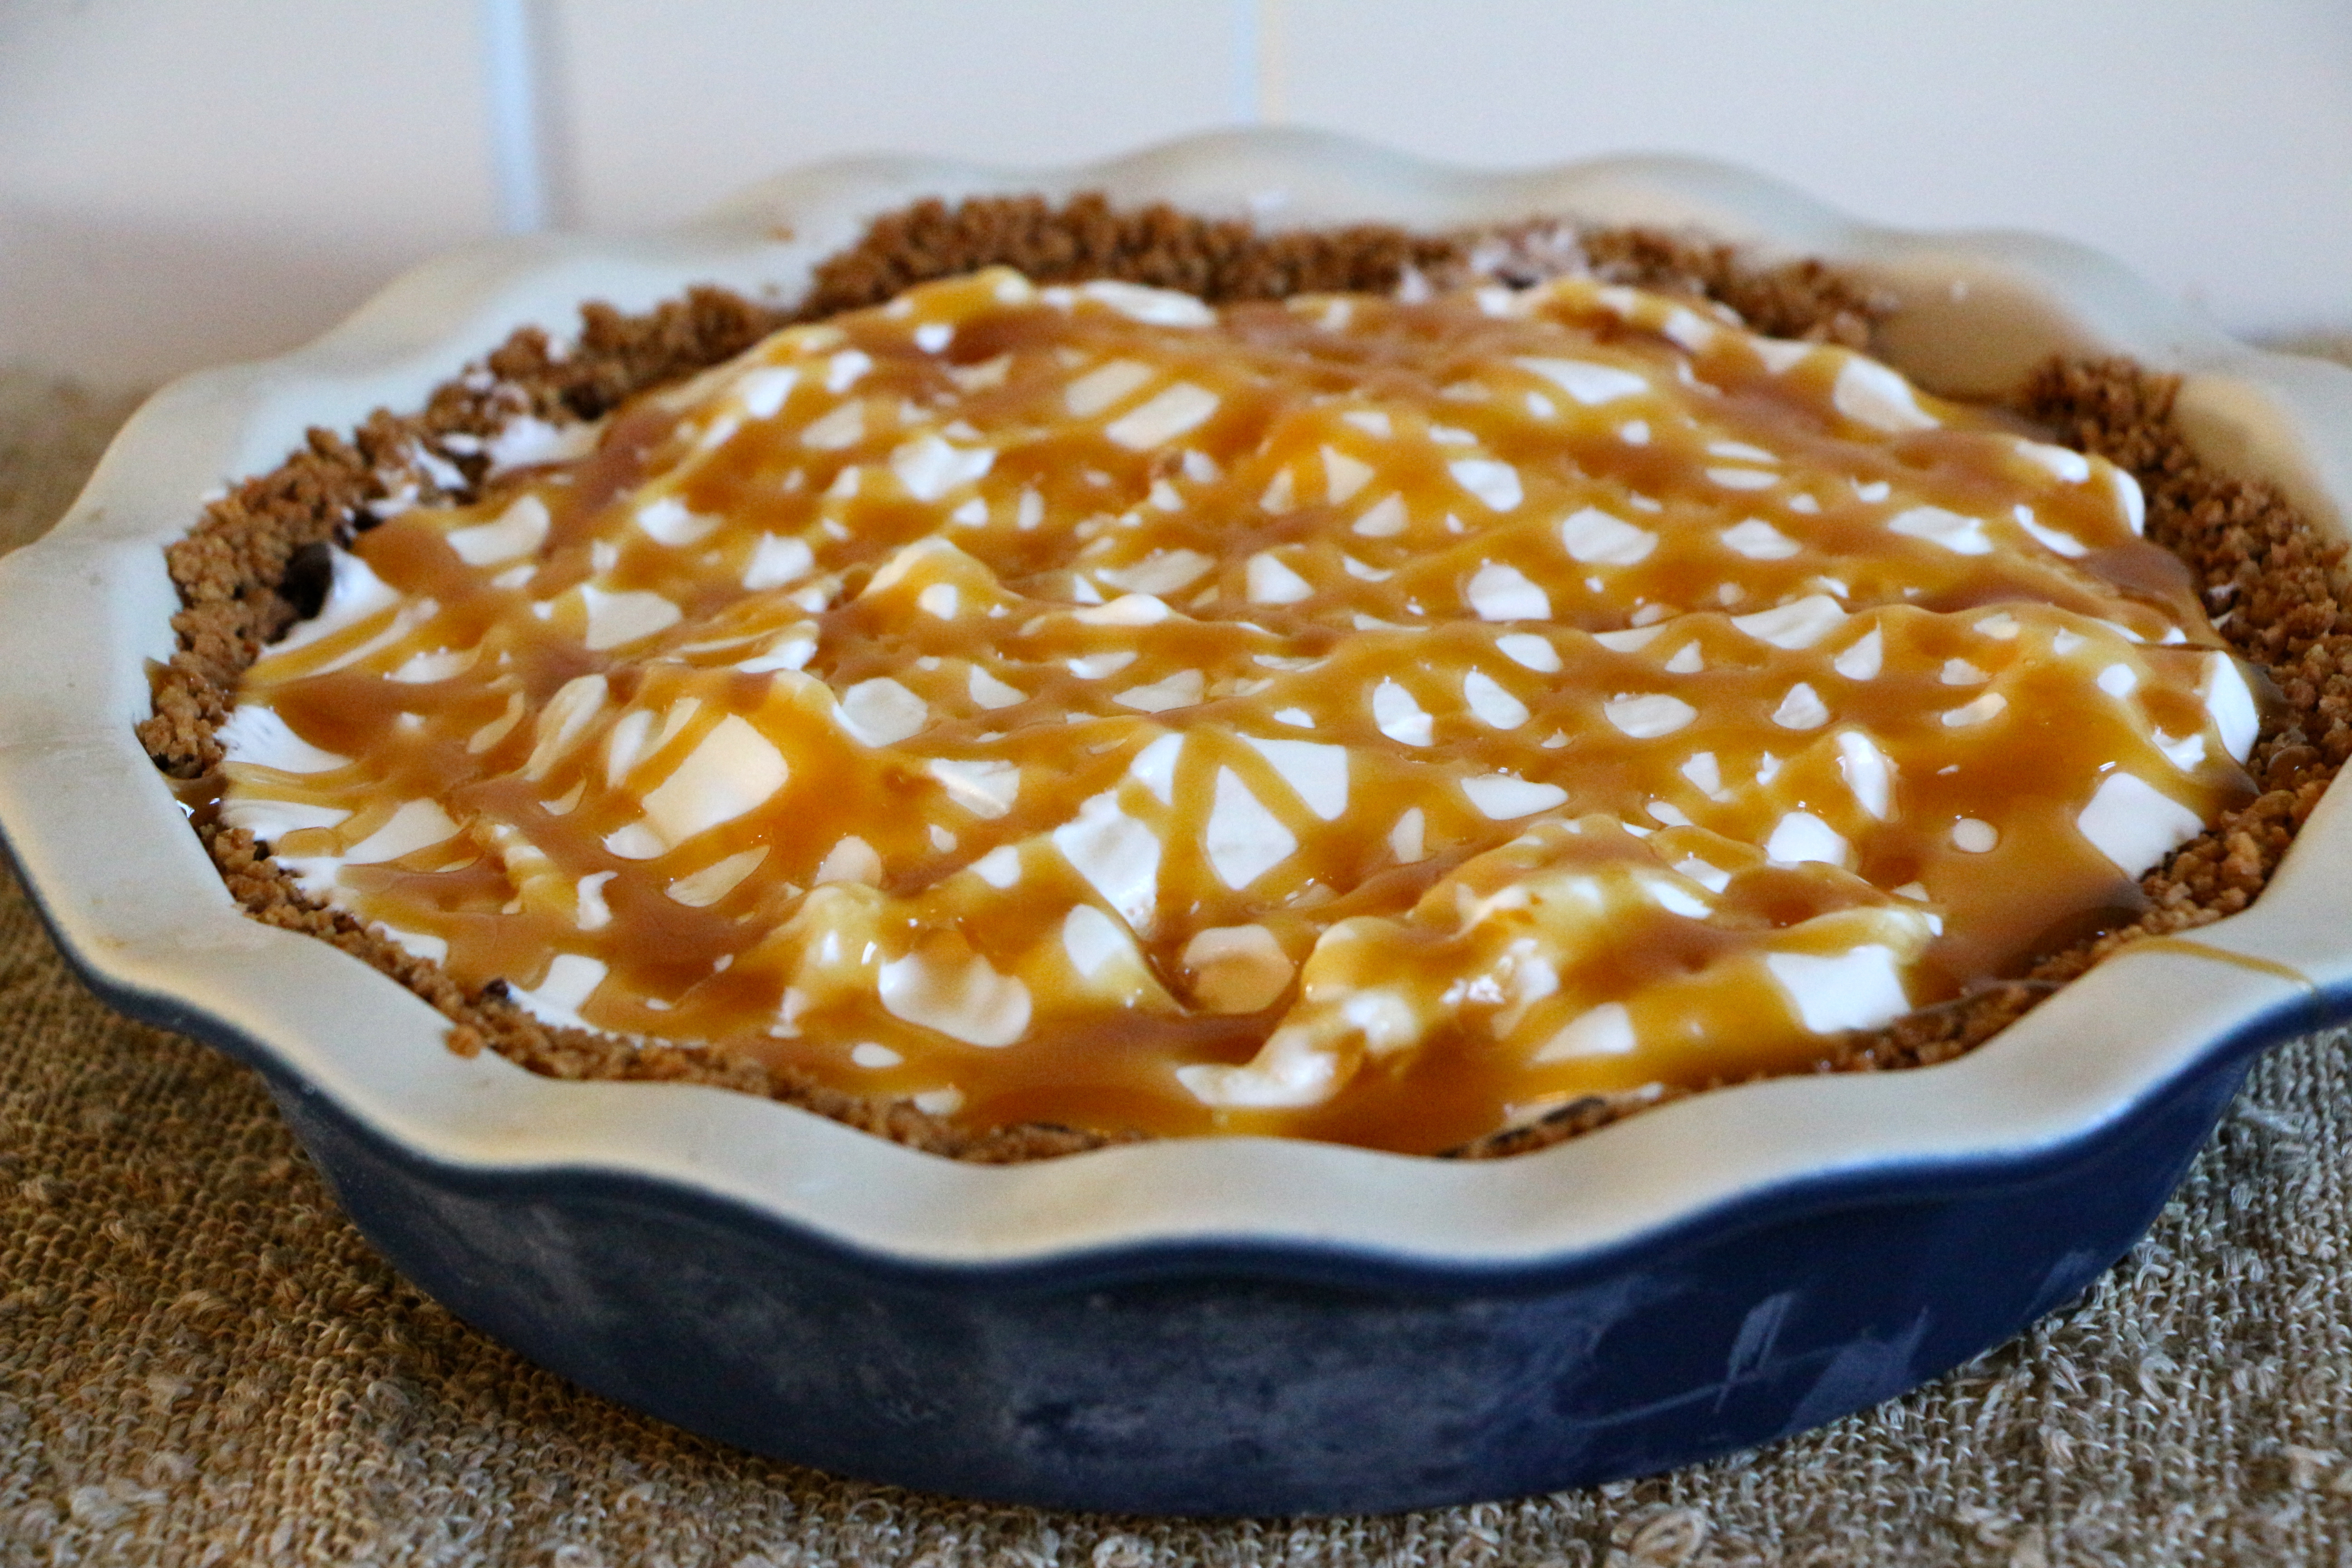
Stephen Colbert’s Americone Dream combines vanilla ice cream with fudge coated waffle cone and caramel. This ice cream pie is inspired by the crave-worthy Ben and Jerry’s flavor. A waffle-cone crust gets coated with rich chocolate ganache then filled with vanilla ice cream and drizzled with caramel.

*Did you know that you can make a pie crust out of just about anything that crumbles? Combine two cups of crumbs with enough melted butter to make it stick (I usually use 10-12 tablespoons for 2 cups of crumbs, though other recipes use less butter), then press it into your pie shell and bake for a few minutes to set.

Jesse’s “Americone Dream” Inspired Ice Cream Pie

Ingredients

  • 2 cups ice cream cone crumbs (sugar cones or waffle cones)
  • 10-12 tablespoons unsalted butter, melted
  • 1/4 cup semi-sweet chocolate chips
  • 1/3 cup heavy cream
  • 1/2 gallon vanilla ice cream
  • 1/4 cup caramel sauce

Directions

Preheat oven to 350°F.

Stir together the ice cream cone crumbs and melted butter, until it sticks together when pressed. Press the mixture into a deep dish pie pan. Bake the crust for 10 minutes. Cool.

Bring the cream just to a boil, then remove from heat. Stir the hot cream into the chocolate chips. Stir until melted. Pour the ganache onto the bottom of the pie crust. Use a spatula to spread the ganache in an even layer on the bottom and up part of the sides of the crust. Cool.

Allow the ice cream to soften at room temperature. Spread the softened ice cream into the prepared crust. Place the pie in the freezer to set.

Before serving, drizzle with caramel sauce.

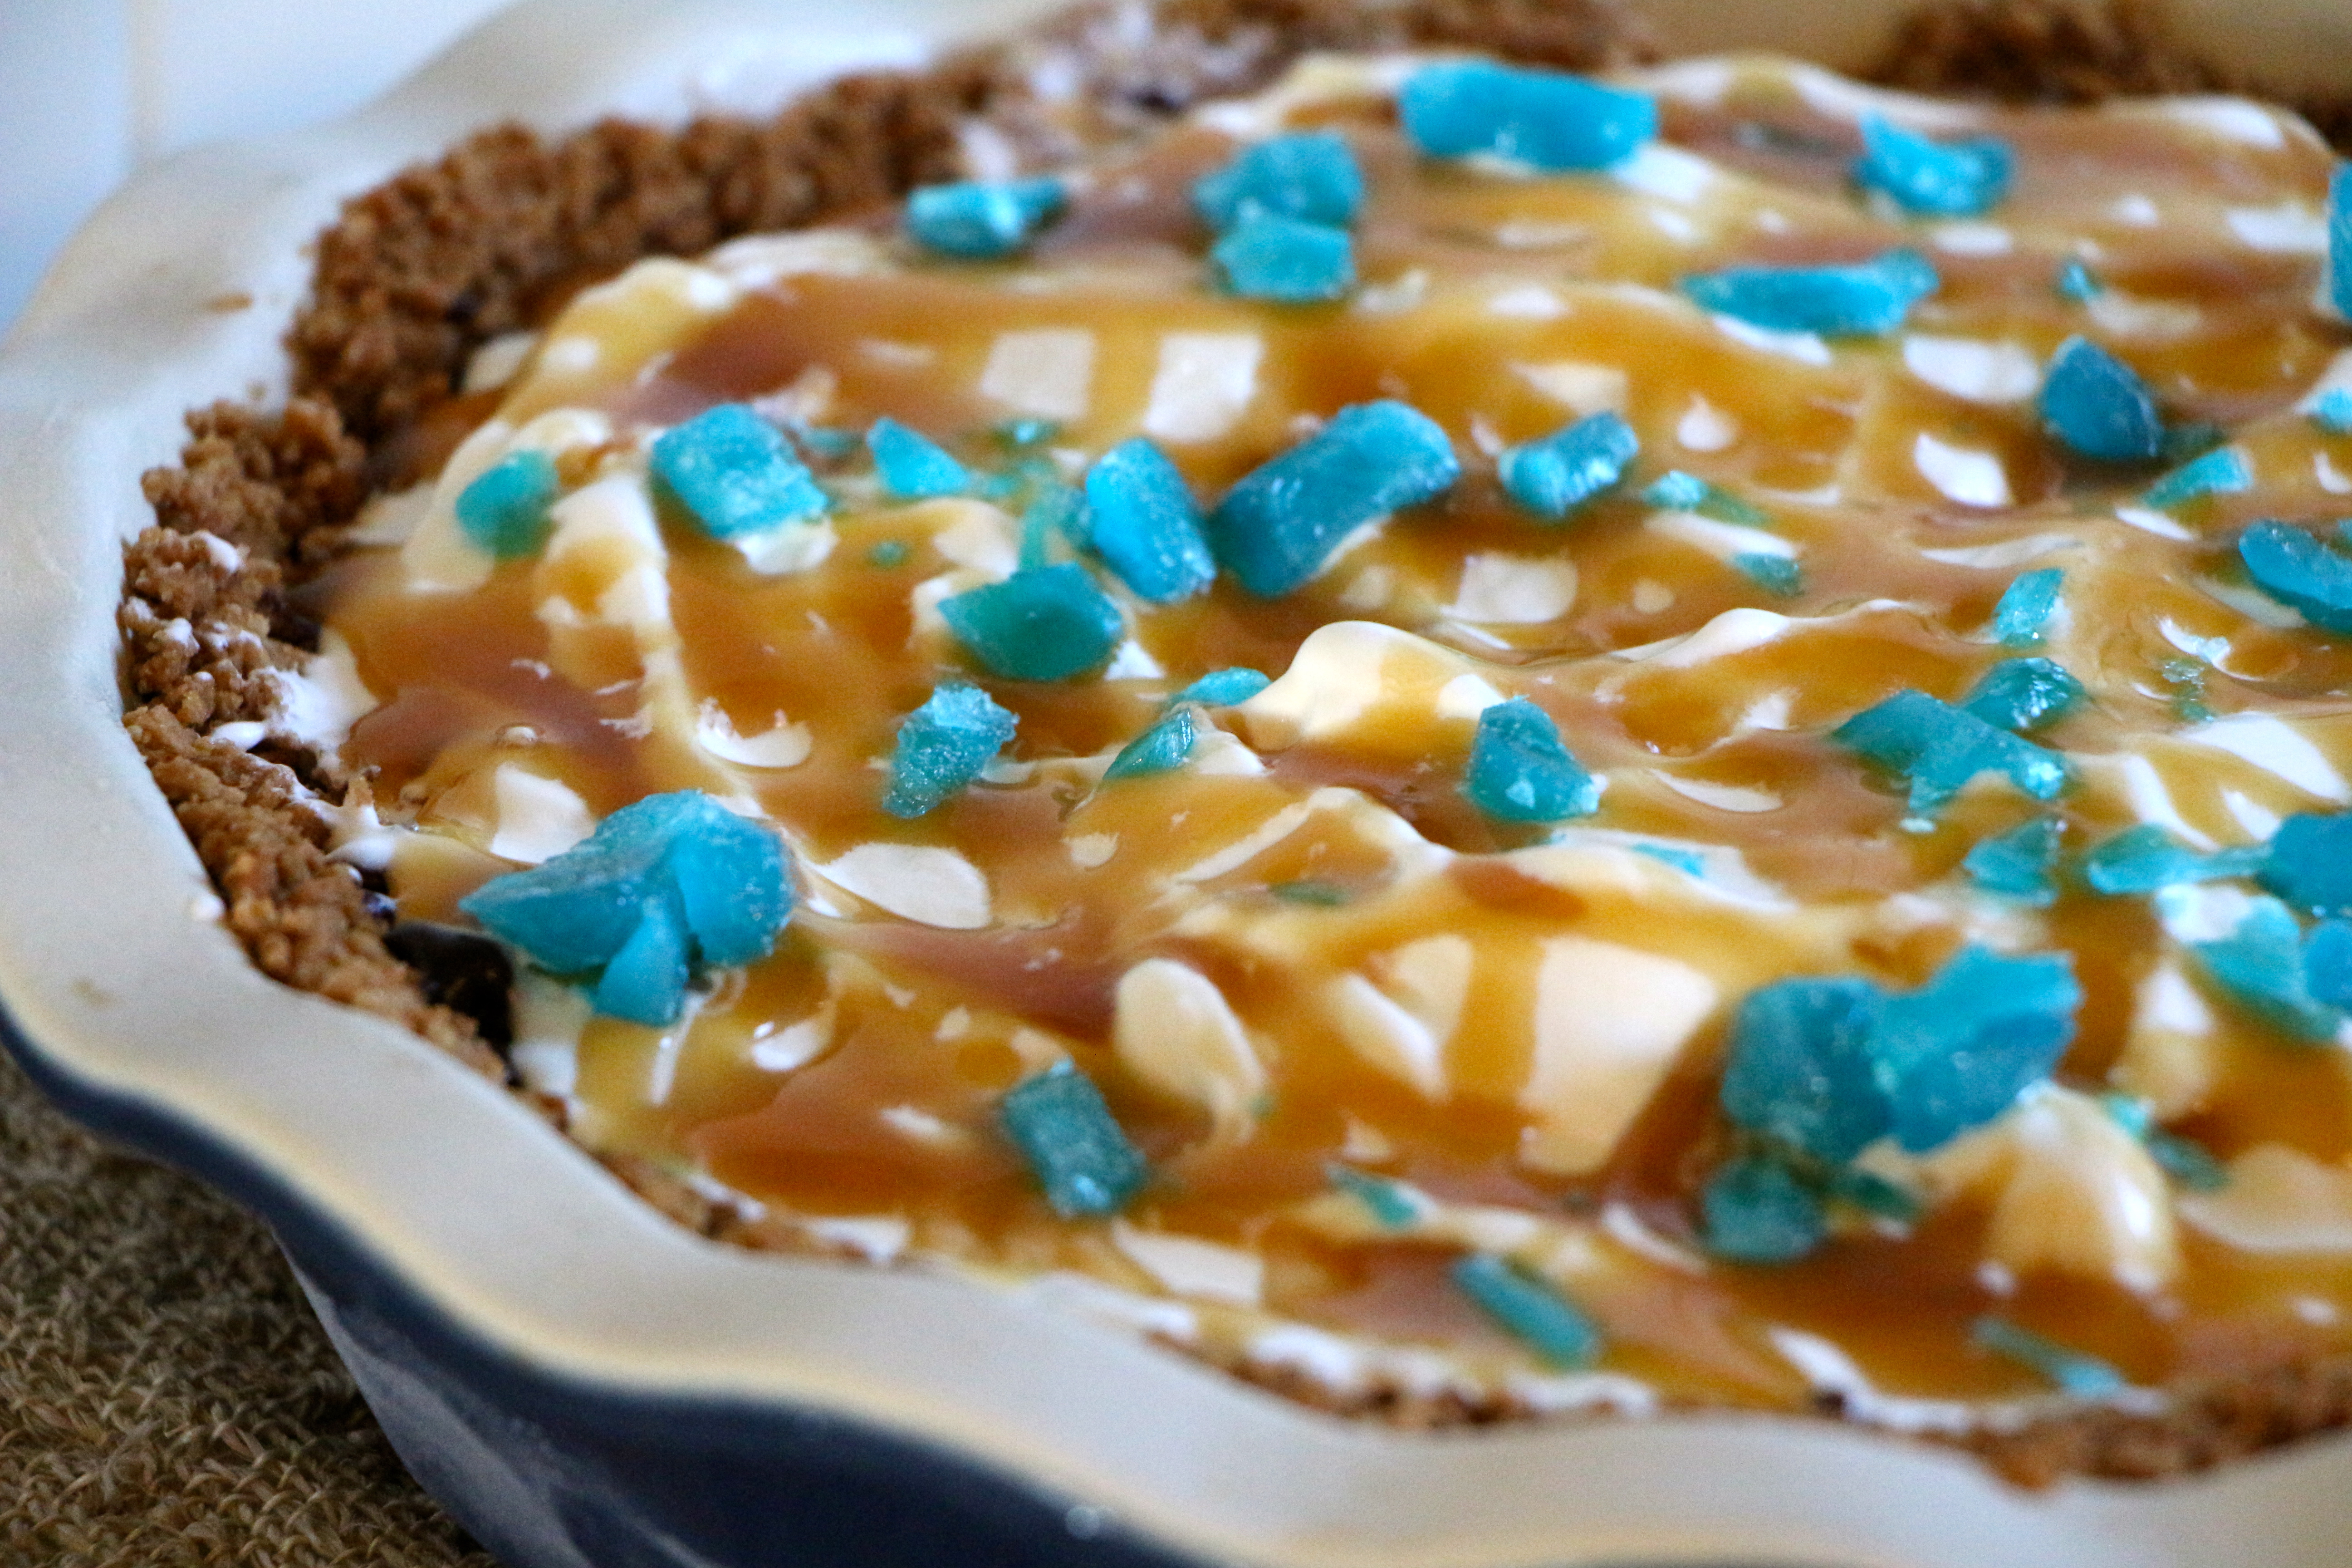
For more of a Breaking Bad effect, garnish the pie with little bits of blue rock candy or crushed blue hard candy. *You might want to wait until the kids go to bed before adding the crystal blue garnish. It just didn’t seem right to have the kids around pretend drugs, even if they’re clueless about the reference.

 IMG_0823

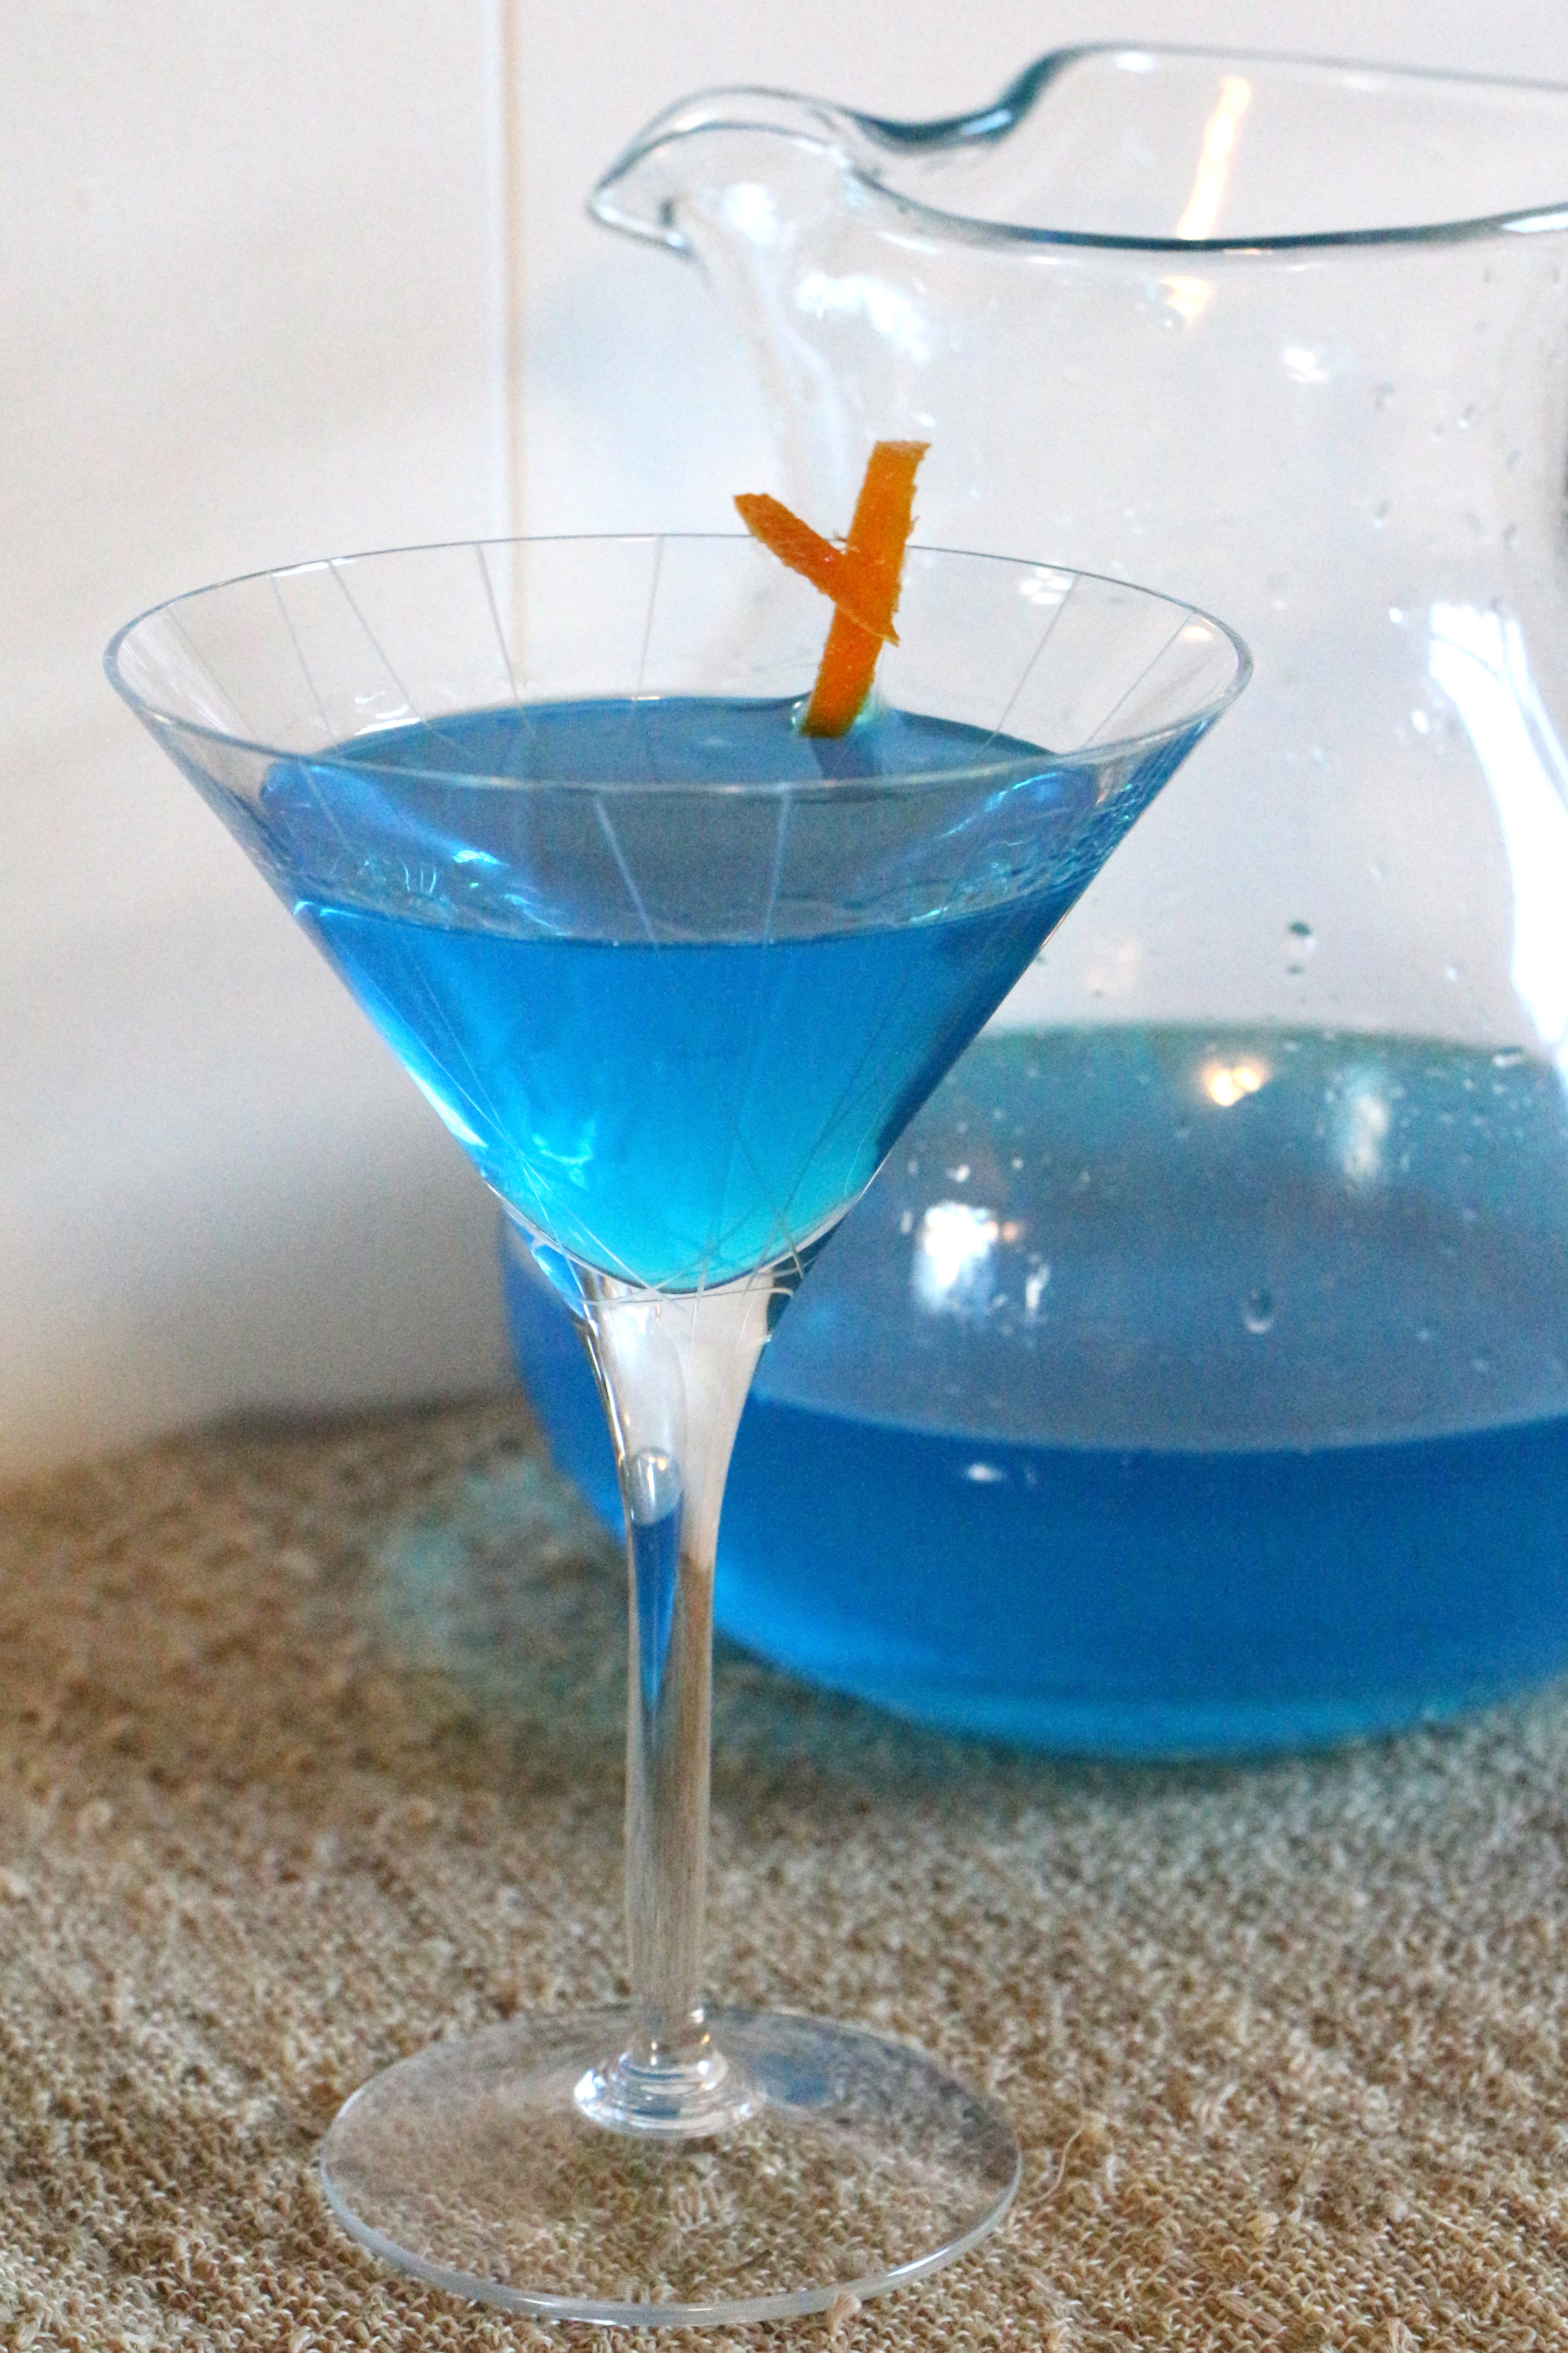
Blue is Walt and Jesse’s signature color. This crystal blue cocktail is oozing with orange flavors. I used an orange infused simple syrup to sweeten the drink, in order to preserve the beverage’s crystal transparency.

*This is a strong one, folks. Drink responsibly.

Crystal Blue Martini

Ingredients

  • 2 ounces orange vodka
  • 1 ounce triple sec
  • 1 ounce blue curacao
  • 2 ounces orange infused simple syrup
  • Lemon juice, to taste

Directions

Combine all ingredients in a cocktail shaker with ice. Pour off the ice. Garnish with orange peel.

IMG_0853

Orange Infused Simple Syrup

Ingredients

  • 1 cup sugar
  • 1/2 cup water
  • Peel of an orange, pith removed, thinly sliced

Directions

Combine all ingredients in a saucepan. Bring to a simmer, stirring until sugar is completely dissolved. Simmer gently for about 3-5 minutes. Remove the orange peel and reserve for garnish. Cool.

~~~~~~~~~~~~~~~~~~~~~~~~~~~~~~~~~~~~~~~~~~~~~~~~~~~~~~~~~~~~~~~~~~~~~~~~~~~~~~~~~~~~~~~~~~~~~~~~~~~~~~~

Here are a few other fun ideas you could incorporate for a Breaking Bad viewing party:

Rooftop Roasted Pizza, just how Walt likes it. – Try any of the pizza recipes in the pizza section of my recipe collection.

Green Beans Almondine, like the store-bought ones that so impressed Jesse during his dinner at the White’s.

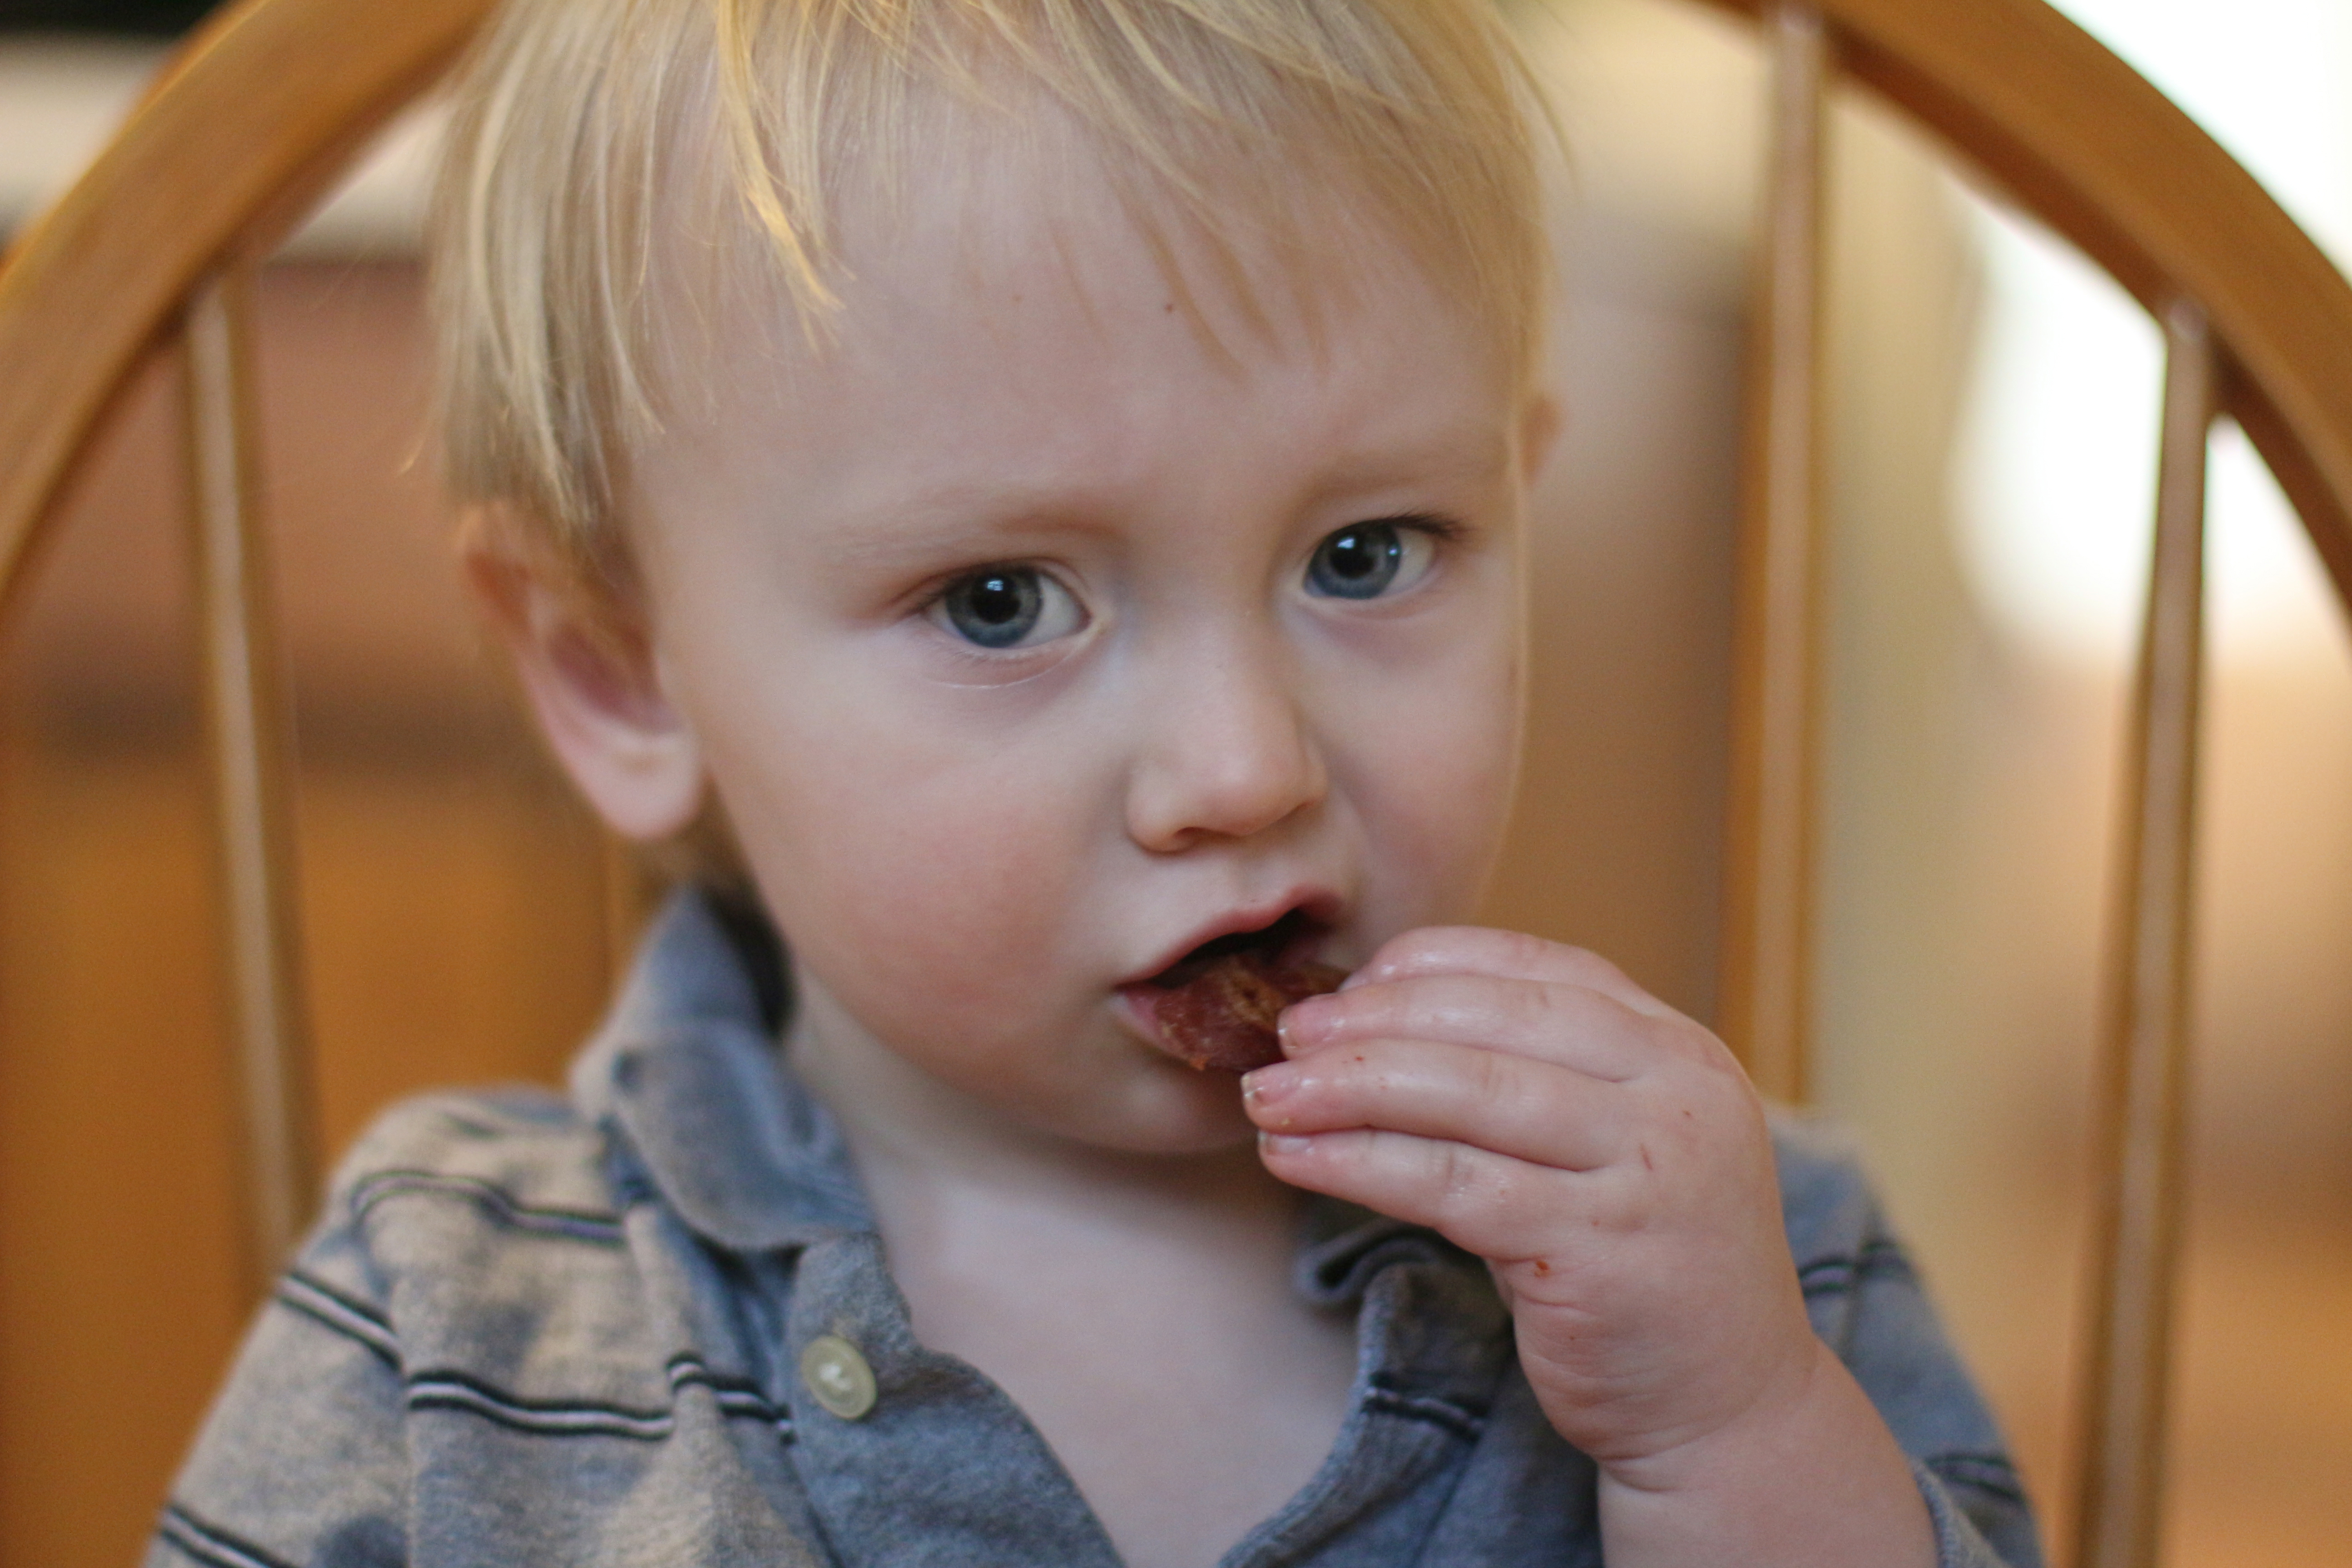
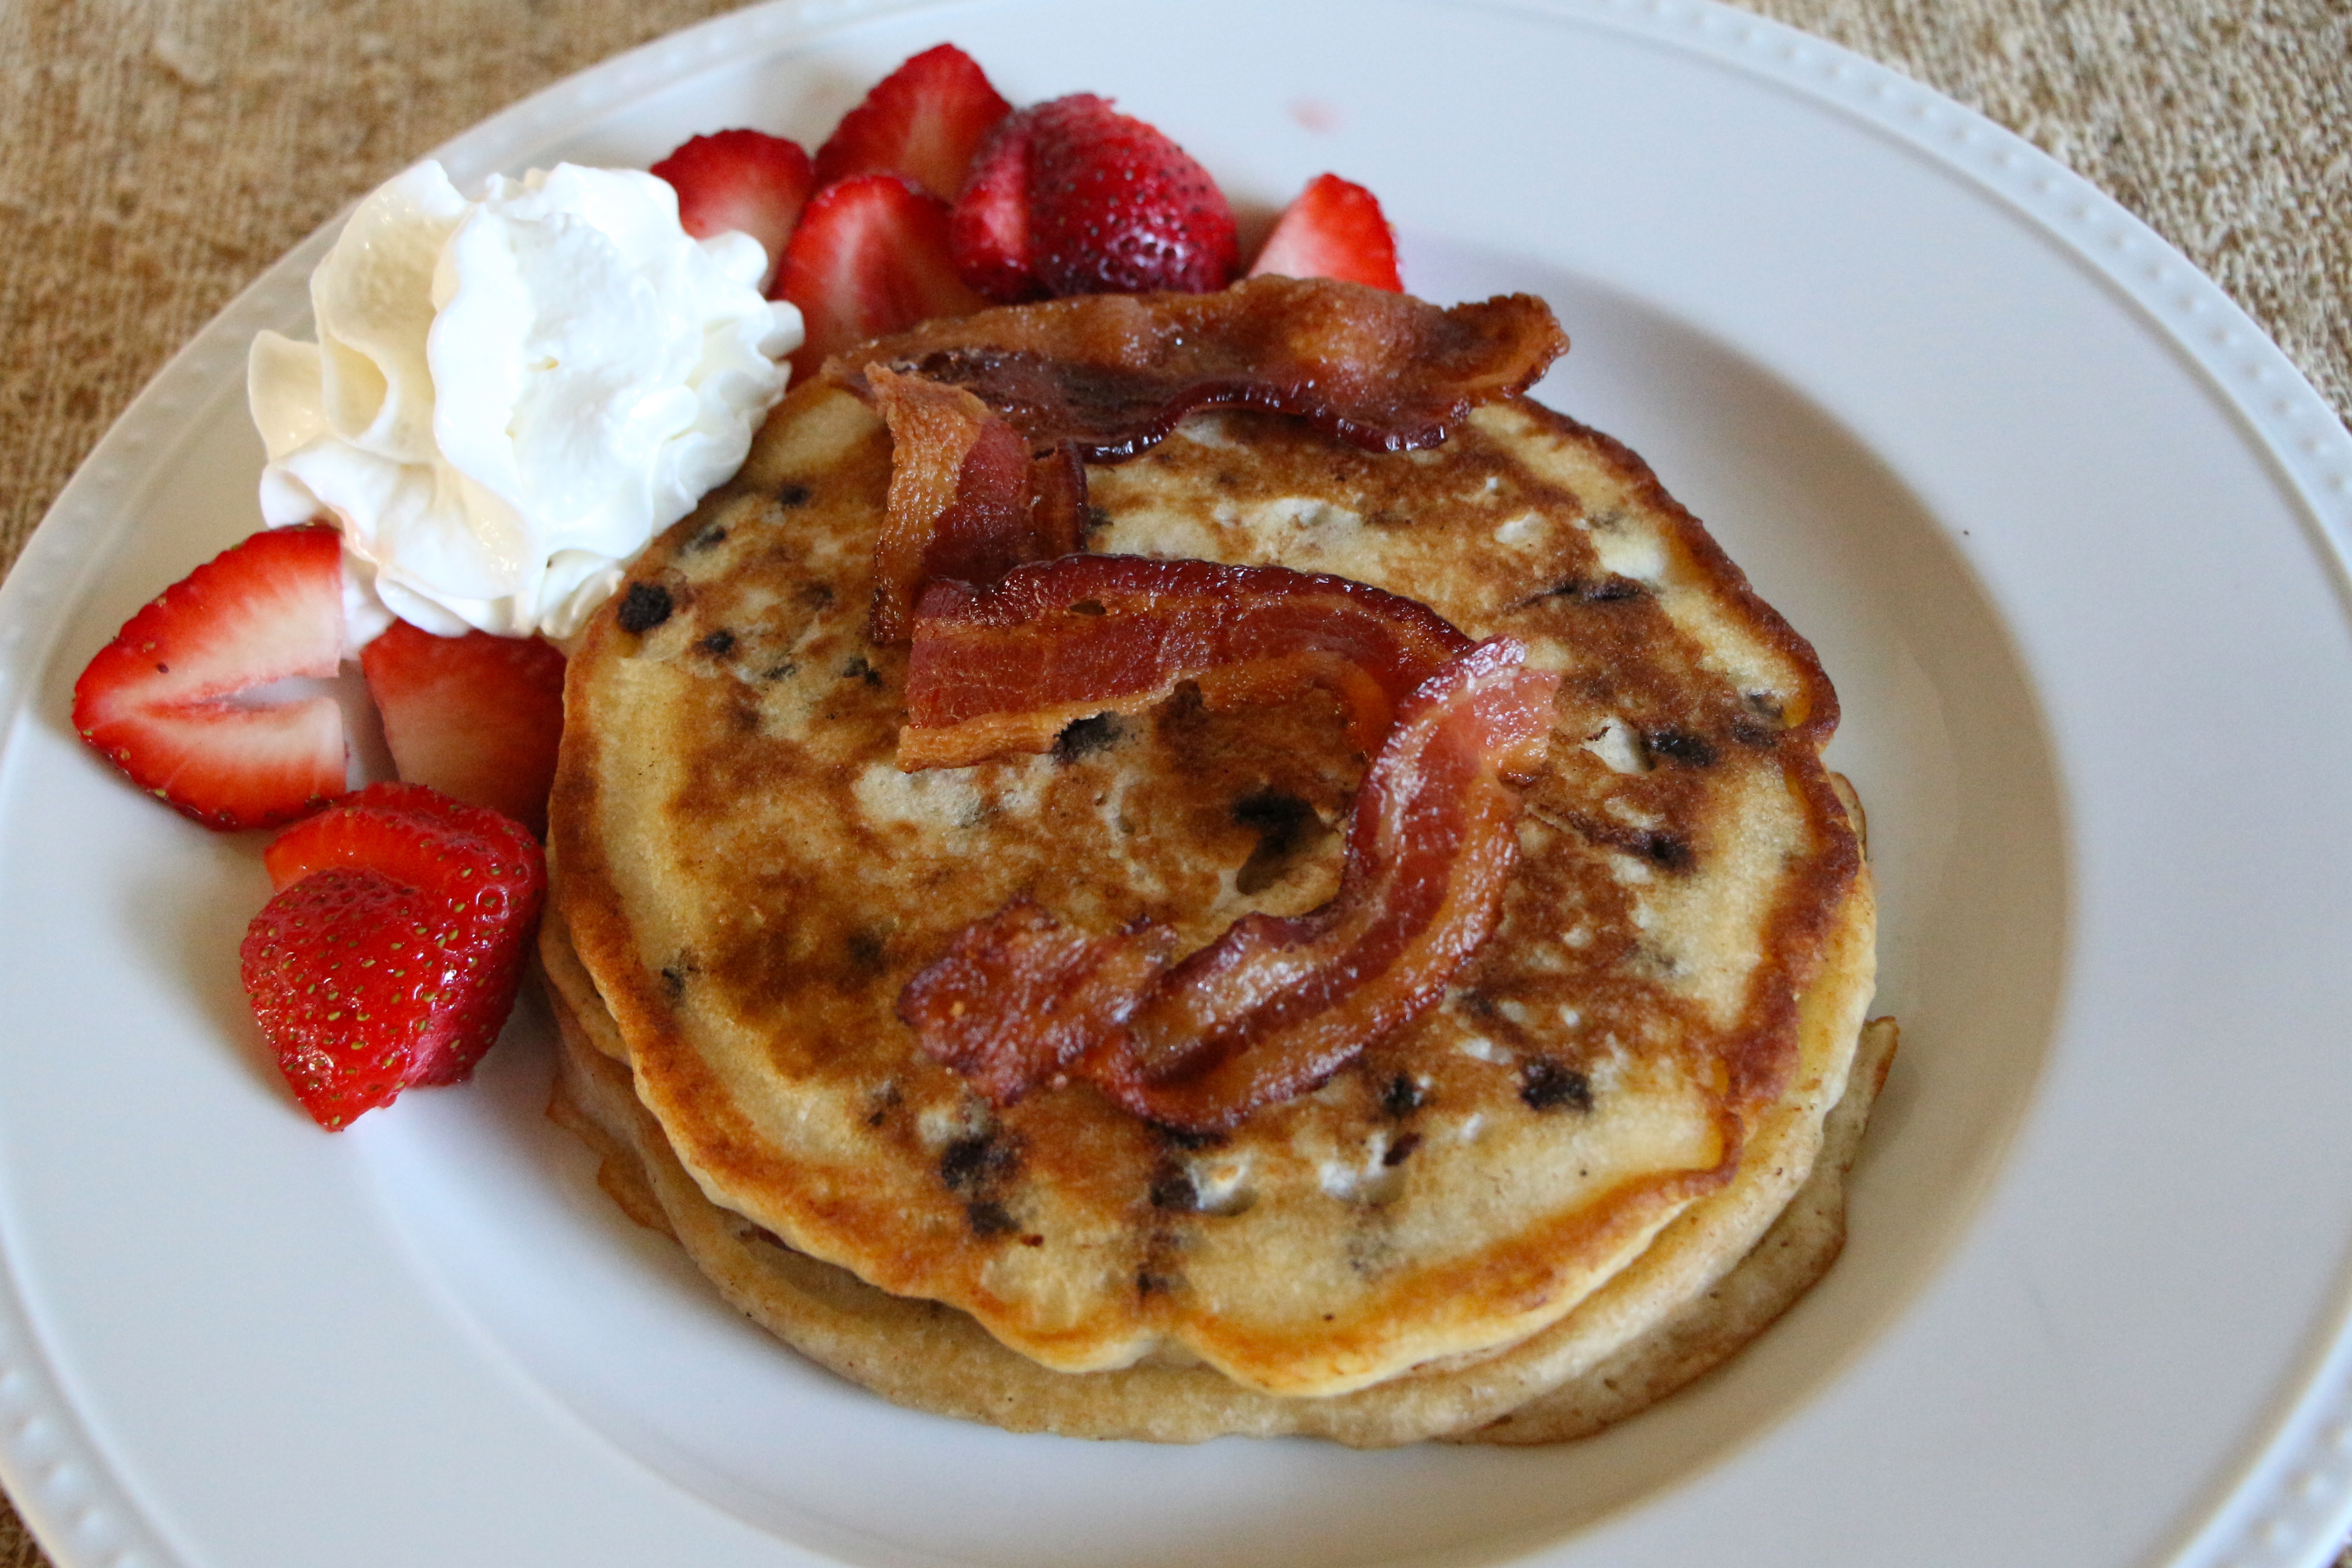
Breakfast with a number made of bacon, Walt’s annual way of bringing in his birthday. *This pic is from my son’s fifth birthday dinner. He is nothing like Walter White, except that he like breakfast foods and bacon.

IMG_0782

Tuco’s Burritos

Gus Fring’s Seafood Stew

Huevos Rancheros or this Huevos Rancheros Pizza

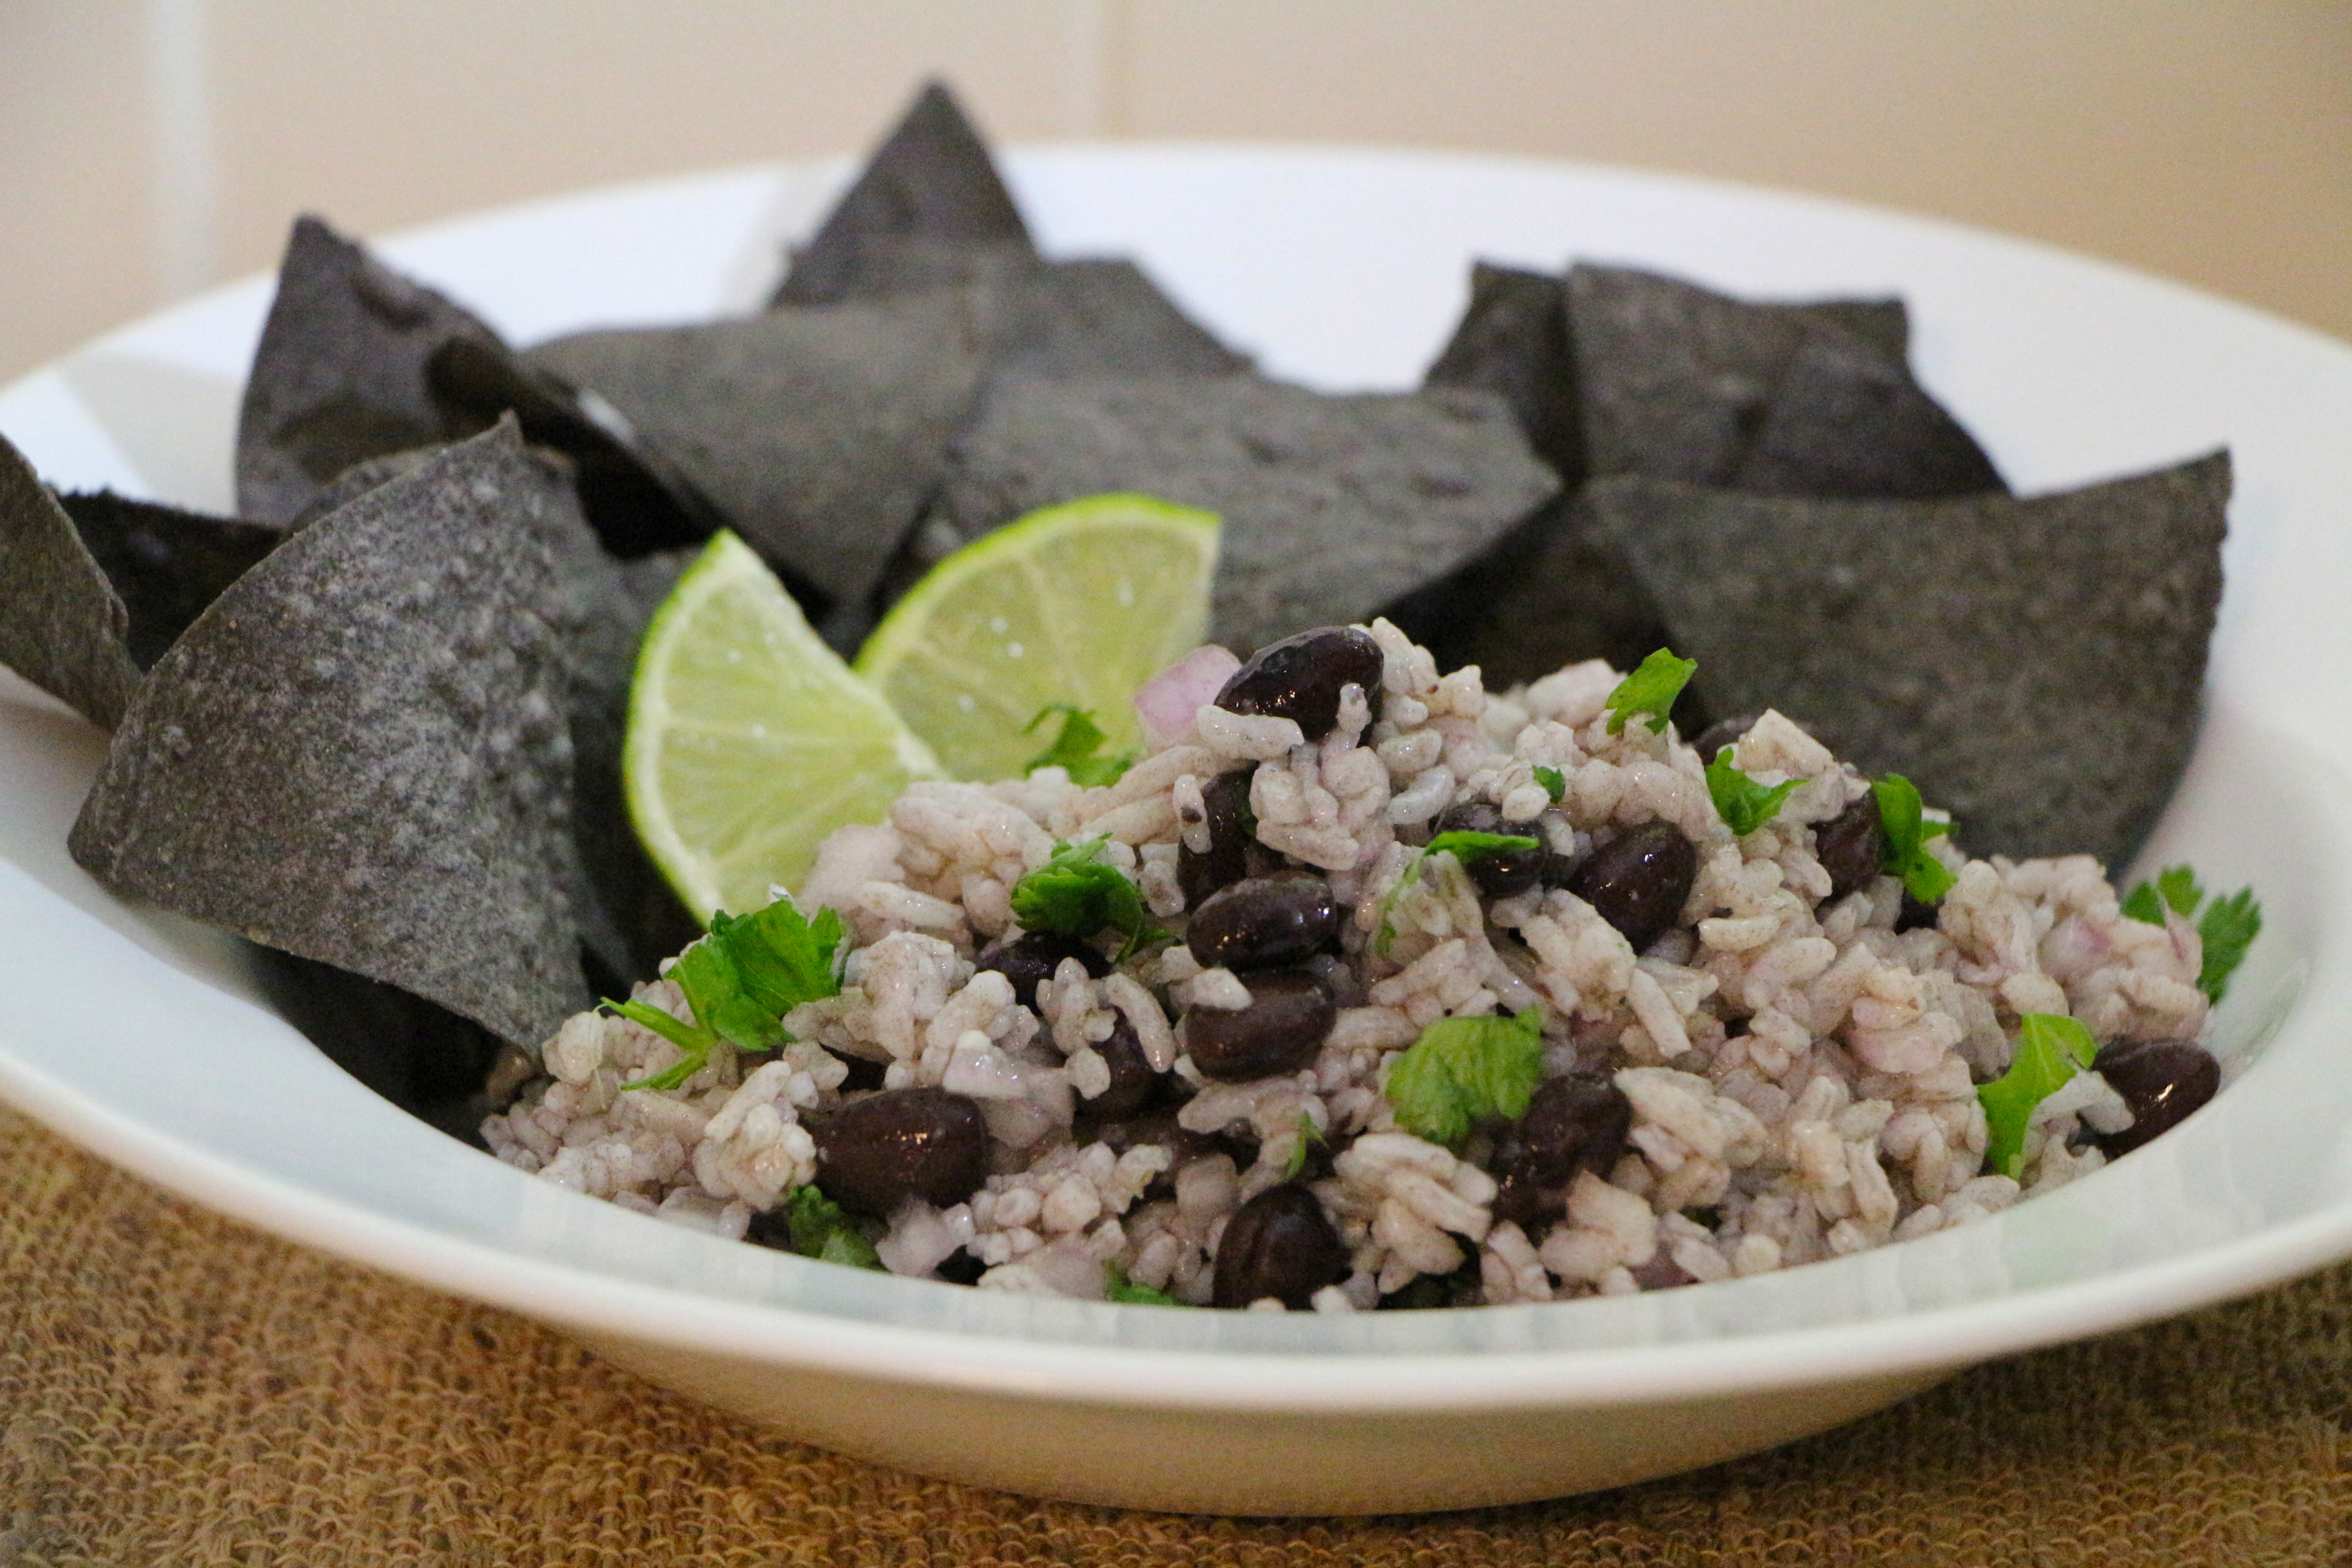
Rice ‘n’ Beans – Say it again. Rice ‘n’ Beans. Get it? Ricin Beans ** WARNING** DO NOT USE ACTUAL RICIN. It’s poison.

IMG_0889

Loaded Nacho Chicken

Like many young twenty-something couples, my husband and I spent a good amount of our time, energy, and income on accumulating stuff. We needed the stylish duvet from Pottery Barn, the flatware set from Crate and Barrel, and the clothes from JCrew. When we married, we registered for the long list of items the registry guide told us we needed, fully believing that we would find frequent use for that 50-piece fondue set and the espresso maker with the milk foaming wand. We gathered our items and checked them off the list of things we were ‘supposed’ to have as well-equipped adults. We were consumers to the utmost degree.

But, recently, there’s been a major shift in how we handle our ‘stuff management’. I don’t know if it’s come with parenthood or age or just a general change of perspective, but we now purge, rather than collect. A few months ago, the microwave broke. I liked the counter space better than the microwave, so we didn’t replace it, and we’ve been totally fine since. The blu-ray player broke a few months before that. We dropped it off at the place for recycled electronics and left the shelf empty. This past summer, we sold  a good portion of the books and DVDs we’d accumulated over the years and have been thankful for the reduced clutter. Neglected toys and outgrown clothing, we regularly donate to our local rescue mission.

IMG_5831

And what we ‘need’ has changed too. Gone are our days of overpriced, trendy bedding and clothing. We buy mostly everything from Target now and when our Dyson, which served us well for many years, finally bit the dust, we replaced it with a bargain-priced Bissell. And you know what? It’s done the job just fine. Our priorities have shifted. We just don’t want the same things we used to think we needed; things which take up too much space in our lives and leave wanting holes in our budget.

A week ago, we made what was probably the biggest cut of all. We pulled the plug on the cable. Now, for people who are as serious about our tv-watching as we are, this is a humungous deal. We’d been toying with the idea for awhile. While we love our cable, seeing that bill every month was torturing us. We’d just rather have that money in our pockets. Liam cried when we told him what we were about to do. That alone may have signified that it was the right decision to make.

We kept our Netflix and through the convenience of modern technology, we are able to hook our computer up to the tv to get our weekly fix of Downton Abbey and our favorite network shows. I’ve felt no emptiness in my life without cable. In fact, life feels beautifully simpler now.

IMG_5834

When I told my mom I was making this loaded nacho chicken for dinner, she giggled at me, the ‘gourmand mom’, breading chicken breasts in crushed tortilla chips. But hey, no one ever said that good food needed to be complicated or utilize fancy ingredients. Simplicity can be positively blissful. The tortilla chips in this dish provide a fun variation on a basic breaded chicken breast. The tortilla coated chicken breasts are then topped with warm, delicious chile con queso and a generous dose of nacho toppings for a vibrant dish the entire family will enjoy.

**This dish could easily be adapted for a fun super bowl appetizer, but cutting the chicken into smaller pieces, skewering the cooked chicken, and serving with a big bowl of warm queso, topped with black beans, green onions, olives, and chopped tomato!

IMG_5802

Today’s Focus on Technique – Basic Breading Procedure

A basic breading technique can be used to coat veggies, meats, or seafood with a crispy, flavorful exterior. It is often used to prepare foods for pan-frying, but works swimmingly for baking as well. Foods can be breaded with basic seasoned bread crumbs, panko bread crumbs, or any variety of crushed crackers or even chips! Properly breading foods is a three step process. First, dredge the food in a bit of flour. Second, dip the item in a simple bath of eggs whisked together with a touch of milk. Third, press the food into your dry breading, until thoroughly coated. The flour adheres easily to the food. The egg adheres to the flour. The breading adheres to the egg. To prevent your fingers from getting breaded in the process, it’s a wise idea to handle the wet ingredients with one hand, while using the other hand for the dry ingredients. Once breaded, your food can be pan-fried in a bit of oil until golden brown and cooked through or oven baked for a lighter result.

Loaded Nacho Chicken

Ingredients

  • 3-4 boneless, skinless chicken breasts
  • 1/2 cup flour
  • 2 eggs
  • 1 tablespoon milk
  • 2 cups corn tortilla chips, finely crushed
  • 3/4 cup chile con queso dip (store-bought or homemade)
  • Black olives, sliced
  • Black beans, drained and rinsed
  • 1-2 green onions, sliced
  • 1 tomato, diced
  • Salt and pepper

Directions

Preheat oven to 375 degrees.

Season the chicken breasts with a sprinkle of salt and pepper.  To set up your breading station, spread the flour onto a plate. Whisk the eggs and milk together in a small baking dish or bowl. Spread the crushed tortilla chips onto a plate. Dredge each chicken breast in the flour, then dip in the egg mixture. Finally, press the chicken into the tortilla chips until well coated. Place the coated chicken breasts in a baking dish. Cook for 25-35 minutes, until the chicken reaches 165°F, as measured with an instant-read meat thermometer.

To serve, top the cooked chicken with a generous helping of warm chile con queso and a sprinkle of black beans, black olives, tomatoes, green onions, or your other favorite nacho toppings.

IMG_5829

Tomorrow will mark the one year anniversary of what we now jokingly refer to as The DeLine Family Super Bowl Massacre. Guess who’s not hosting a super bowl party this year?? Looking for some fun super bowl food ideas? Check out my Baked Asian Sticky Wings, Buffalo Chicken Monkey Bread, Spicy Mexican Wontons, Chicken Wing Dip (you know you want some), Creole Deviled Eggs, or any of the other fun recipes found in the party food section of my Recipe Collection.

Baked Asian Sticky Wings

Teaching children to make good choices is one of the greatest responsibilities and most intense challenges of being a parent. Young children are clever, creative, and sneaky; oh so sneaky. Succeeding at this task requires the snooping skills of Sherlock Holmes, the vigilance of an air traffic controller, and the patience of Mother Teresa. You must watch, wait, anticipate, and react. You must act quickly to intervene before irreversible damage is done and you must sniff out clues like Scooby Doo to unravel mysteries. And most importantly, you must maintain a straight face; calm, but firm and consistent; in the face of discipline.

IMG_5751

But kids are devious and unpredicatable. Don’t be fooled by their sweet little button noses and soft, furry backs. They are constantly testing their limits and devising new methods for mischief. Stay sharp, captain.

My husband and I should have known something was up when we noticed that the stack of plastic kid plates was diminishing. We knew it was peculiar. And yet we just shrugged our shoulders in puzzled confusion and moved on. But all misdeeds come to light eventually, as did the mystery of the missing plates.

IMG_5764

It started when I was changing the baby’s diaper. I laid him down on the carpet which sits in the center of our living room. In the center of that carpet is a large trunk-style coffee table, with legs that raise it about three inches off the floor; just high enough for toys and things to slip beneath, but not tall enough to easily vacuum under. In the position I was in, sitting on the carpet with the baby, I saw what had previously been hidden. Peeking out from the edge of the table were the two plates I’d served the boys breakfast on, which they ate at their snack tables in front of the aforementioned coffee table. A small pile of discarded scrambled eggs sat on one of the plates. I scolded the boys for their lazy behavior and asked them if they thought we lived in a barn (’cause that’s what you’re supposed to say, right??). They hung their heads in appropriate shame and brought their plates to the sink.

IMG_5770

In retrospect, I don’t know why I didn’t put the pieces together at that point. I should have peeked under the table, but I didn’t. We moved on with our day. Then dinner time came along and I served the boys some of my new Asian sticky wings. Chicken wings don’t make frequent appearances on our menu, so I’d anticipated some normal apprehension. When serving something unfamiliar, I make a practice of always including something known and loved on the boys’ plates, so everyone has a chance to fill their bellies with something they like, while also having the opportunity to try something new. I don’t make a big deal about finishing everything on their plates or eating big portions of food they don’t enjoy. I only ask that they take a small taste of each new item, with the idea that over time, as their taste buds mature, they will enjoy a wide variety of foods. No pressure.

So, what happened next never should have happened.

Liam stood up with his dinner plate, proud to show me that he’d eaten everything on it and making a point that he was going to put it properly in the sink. The rice, the sugar snap peas, the yogurt, and the chicken wings were all gone. You catch that?? The chicken wings were all gone. “Where are the bones?” I asked. “Huh…the bones?” came his innocent reply. “Yes, the bones. Where are the bones?” And then he proceeded to explain that he’d eaten the bones. Clever lady that I am, I knew this could not be the case. I had a hard time keeping that ever-important straight face by this point. I knelt by the edge of the table to find the discarded chicken wings before the dog did. I found those wings under the table. I also found five of the kids’ plates. Another mystery solved, Scooby.

IMG_5668

But the wings…the wings are delicious, even if Liam wasn’t interested in them. I’ve been watching what I eat in the new year, but whereas in the past I’ve messed up by going all-in from the start, then losing steam, I’m trying to take a more long-term balanced approach this time. I’m making smart choices most of the time, but not denying myself the opportunity to enjoy some good food and drinks when the opportunity is ripe, like during a girls’ night out with my besties. On our most recent girls’ night out, at one of our favorite local joints, we ordered the Asian sticky wings, which became the inspiration for this recipe.

Healthy goals in mind, these wings are baked, rather than fried. I tried two different techniques in search of the crispiest result. While the resulting crispiness of the winning technique doesn’t quite match what you’d get from a fryer, they come pretty darn close. The secret is baking the wings on top of a rack, so that the excess juices drip below the wings, allowing the skin to become firm. A final few minutes under the broiler seals the deal with a golden brown exterior. Once cooked, the wings are tossed in a sweet Asian-style sauce, which has been reduced into a sticky, delicious glaze. They’d make a perfect addition to any super bowl menu!!

IMG_5677

Today’s Focus on Technique – Reductions

Cooking a flavored liquid by reduction is a method used in order to thicken the liquid and intensify flavors. It is typically used to prepare glazes and full-flavored sauces. To reduce a liquid, simply bring it to a boil in an uncovered pan. As the liquid evaporates, the remaining sauce will become thicker and more flavorful. It’s a wonderful technique for elevating the flavor-profile of a sauce. Using a pan with a wider base will spread the liquid over a greater surface area and increase the rate at which a liquid reduces.

Baked Asian Sticky Wings

Ingredients

  • Approximately 2 dozen chicken wings and legs
  • Juice from 1 orange (approximately 1/3 cup)
  • Zest from 1 orange
  • 1/2 cup honey
  • 1/2 cup hoisin sauce
  • 1/3 cup soy sauce
  • 1 1/2 teaspoons sambal oelek (or crushed red pepper, to taste)
  • 1 teaspoon garlic, minced
  • 1″ ginger root, grated (or 1/2 teaspoon ground ginger)
  • Sliced green onions and sesame seeds, for garnish

Directions

Preheat oven to 400 degrees. Set a rack on top of a baking sheet.  Arrange the chicken pieces in a single layer on top of the rack. Sprinkle with salt and pepper. Bake for about 40 minutes, then turn on the broiler. With the chicken several inches below the broiler, cook for 5-10 more minutes, until the exterior is golden brown and crisp.

While the chicken is cooking, prepare the glaze. Combine the orange juice, zest, honey, hoisin sauce, soy sauce, garlic, ginger, and sambal oelek in a saucepan. Bring the mixture to a bubbling boil over medium heat, stirring frequently. Allow the mixture to bubble away, uncovered, for approximately 10 minutes until the mixture has thickened to a glazy consistency. Taste and adjust flavor with additional honey, if a sweeter result is desired.

Toss the cooked wings in the warm glaze, then garnish with sesame seeds and sliced green onions. Serve with rice and/or steamed sugar snap peas.

Bacon-Mushroom Stuffed Chicken Breasts

One evening, when my sisters and I were young, my parents left us eating our dinner at the kitchen table. My father was in the swimming pool, cleaning it from the inside with one of those large nets for fishing out fallen leaves. My mother was standing outside the pool, chatting with him as he worked. And we, my two younger sisters and I, were calmly enjoying our dinner. Calmly, that is, until our youngest sister dug her fingers into either side of the stick of butter which sat on the table, grabbing handfuls of butter in each hand, which she then proceeded to eat. Straight up mouthfuls of cold butter.

My sister and I were appalled…the fingers in the communal food…the ingesting of pure milk fat. We were certain that our parents would want to be informed of this major dining transgression. If they’d taken away my sister’s knife privileges after she’d licked a butter knife, they would almost certainly take butter away from our youngest sis. Right?? And like many young siblings, we smugly delighted in the prospect of the other’s consequences for poor choices.

So, my sister and I go running outside, shouting, “Mommy, mommy, mommy,” who was in the middle of a conversation with our father and promptly shooed us away. “But, Mommy…” we persisted, confident in the righteousness of our interruption. She again directed us back to our dinners. So we just shouted it, “She’s dug her fingers into the butter.” We enthusiastically demonstrated, with an Oscar worthy tattle-telling performance. “And she’s eating it.”

Our mother ended her conversation mid-sentence and quickly moved into the kitchen to deal with our sister and her butter-slathered fingers. I can’t remember if she lost her butter privileges or not. What I do remember is our mother’s immediate shift from being inconvenienced by our interruption to urgently dealing with the incident at hand. We’d proven our cause to be worthy of interrupting.

IMG_5124

I had a parenting butter incident of my very own a few days ago. I had been trying to prepare dinner and the boys were in rare form; wildly running around the kitchen, stealing components of their dinner from their plates before I’d finished, and engaging in all manners of daredevil mischief which further diminished the odds that I’d ever complete dinner. I shooed them all into the living room. “Go watch tv. Leave me alone for a minute so I can get dinner on the table.”

Liam and Lucas reluctantly complied. James stuck around in the kitchen going about his normal business of pushing chairs around to access countertop supplies and opening the fridge in search of his beloved apple slices. I could see him out of the corner of my eye, standing in the light of the open fridge doors, chanting “Apple, apple, apple, apple…” I went about the dinner preparations, with my back turned to him. He became quiet and I’d assumed he’d temporarily given up his quest for precious apples.

And then Lucas comes into the kitchen, whining “Mommy, mommy, mommy…” I shooed him away in the same manner my mother had shooed me away at the pool. “But, Mommy…” he continued. I was becoming annoyed. I sent him away. He persisted, “But Gooba (our pet name for the baby) is eating bacon.”

I spun around, with the same swift shift of my mother at the pool. And sure enough, the baby was standing there with two handfuls of cooked bacon, which had been sitting on a plate in the fridge, happily snacking on his discovered fridge treasure.

I let him eat the bacon. It’s bacon, after all, and I’m not some kind of monster who steals bacon from babies. He was a smart baby to recognize the value of his find.

IMG_5134

Providing your baby doesn’t steal your bacon before you get a chance to use it, you should make this spectacular bacon-mushroom stuffed chicken. This recipe is fully inspired by a friend, who chopped up and stuffed some leftover bacon-stuffed mushrooms I’d made for her holiday party, into a few chicken breasts for an easy day-after-party dinner. Genius use of leftover stuffed mushrooms. Taking that lead, I modified my recipe for Bacon-Stuffed Mushrooms to be intentionally used as a filling for chicken and paired it all with a creamy sour cream and mushroom gravy for a simple and satisfying dinner.

Today’s Focus on Technique – Stuffed Meat Safety

When cooking stuffed meats, it is important to ensure that both the meat and the stuffing are cooked to a safe temperature. This is one of the major challenges with cooking larger stuffed items, like a whole turkey, where it will take much longer for the center stuffing to reach a safe temperature, while the surrounding turkey overcooks. In smaller cuts, like a stuffed chicken breast, it’s easier to bring both components to a safe temperature without overcooking the meat. To check for a safe temperature, it is important to test the temperature of both the meat and the stuffing. Do this by inserting an instant-read meat thermometer into both components of the dish. Poultry is safely cooked at 165 degrees.

Bacon-Mushroom Stuffed Chicken Breasts

Ingredients

  • 8 ounces mushrooms (about 10-12 medium-sized mushrooms)
  • 1/4 cup sour cream
  • 1/8 cup onion, finely diced
  • 1/2 teaspoon garlic, minced
  • 1/8 cup bread crumbs
  • 4 slices bacon, cooked and crumbled
  • 1/8 cup parmesan cheese
  • Salt and pepper, to taste
  • 3-4 large boneless, skinless chicken breasts
  • Paprika

For the Sour Cream-Mushroom Sauce

  • 2 1/2 tablespoons butter
  • 2 1/2 tablespoons flour
  • 1 cup chicken broth
  • 1/4 cup sour cream
  • Salt and pepper

Directions

Preheat oven to 375 degrees.

Using a damp paper towel, wipe the mushrooms clean. Remove the stems from the mushroom caps. Finely dice the mushroom stems and about half of the mushroom caps. Slice the remaining mushroom caps and set aside.

In a bowl, combined the diced mushrooms, sour cream, onion, garlic, bread crumbs, bacon, and parmesan cheese. Taste the mixture, then season with salt and pepper, as desired. The stuffing should be fairly thick.

Slice the chicken breasts almost all the way through to create a wide pocket. Generously fill each pocket with some of the stuffing mixture. Spray a baking sheet with non-stick spray, then place the stuffed chicken breasts on the sheet. Sprinkle each chicken breast with a pinch of paprika, salt, and pepper. Bake for approximately 30 minutes. Check for doneness with an instant-read meat thermometer. Test both the chicken and the stuffing. Both components are safely cooked at 165°F.

While the chicken is cooking, prepare the sauce. Melt the butter in a small pan over medium heat. Add the reserved sliced mushroom caps. Cook for 5-7 minutes until tender and slightly golden. Sprinkle the flour over the mushrooms. Stir to even coat the mushrooms. Cook for about a minute, then gradually whisk in the chicken broth until well combined. Bring the mixture to a simmer. Simmer for a couple minutes until it has thickened to the consistency of a gravy. Stir in the sour cream. Taste and adjust seasoning with salt and pepper, as desired.

Pour some of the sauce over each chicken breast before serving.

IMG_5357

Bacon Thief

Antipasto Chicken (and the yarn wreath giveaway winner!)

This recipe is born of my Thanksgiving leftovers, though not in the typical turkey soup, casserole, or sandwich sense you may expect. Thanksgiving at my Grammy’s always began with a giant platter of antipasto; all varieties of meat, cheese, and marinated yummies, drizzled with a dressing made from the oils and vinegars which preserved and flavored the veggies. And though I now host my own Thanksgiving feast, a smaller version of that antipasto platter still belongs at my table.

IMG_4153

So, after our Thanksgiving feast, we were left with the expected turkey leftovers, as well as a tasty assortment of salami, provolone, sun-dried tomatoes, and olives. In search of an easy dinner which would put those leftovers to use, I threw them all together in a baking dish with a bit of tomato sauce and a few chicken breasts. It wasn’t a planned blog post. No photos were taken or measurements made. It was just a lazy night’s meal made with leftovers. But the result was so delicious, I had to make it again just to share with you.

The savory antipasto ingredients flavor the tomato base as the dish cooks, creating a rich full-flavored tomato sauce. Nestled in the sauce as it bakes, the chicken remains moist and tender. Super simple for the busy holiday season, yet incredibly flavorful and satisfying!

IMG_4348

Today’s Focus on Technique – Using an Instant Read Meat Thermometer

When cooking meat, it’s important not to rely too heavily on the stated cooking times in any given recipe. Normal variations in actual oven temperatures, along with differences in the weight and dimensions of individual cuts of meat, mean that your meat may cook slower or faster than the stated time in a recipe. To avoid under- or over-cooking meat, your best bet is to use an instant read meat thermometer. It’s one of the most useful kitchen tools you can have on hand. If you don’t already have one, put an instant read meat thermometer on your Christmas list immediately! I use mine almost every day.

Here are a few tips for properly using an instant read meat thermometer:

  • Begin checking the temperature as you approach the expected finish time for your meat (typically a few minutes before the recipe’s stated time for smaller cuts; farther ahead for larger roasts).
  • Remove the meat from the heat before measuring the temperature. Do not measure the temperature while the meat is still in the oven, as the oven heat may skew the results.
  • Insert the thermometer into the center of the thickest part of the meat.
  • Make sure that the thermometer is not poking out the other end or touching bone.
  • Wait for the thermometer to register the temperature. Some thermometers will register the temperature immediately, while some will take a few seconds.
  • According to the USDA, the following are the recommended minimum safe temperatures for various foods:
    • Beef, Pork, Veal, and Lamb (steaks, roasts, and chops) – 145°F
    • Ground meats (this includes hamburger) – 160°F
    • Poultry – 165°F
    • Fish and Shellfish – 145°F
  • Keep your instant read meat thermometer pristinely clean and close at hand!

Antipasto Chicken

Ingredients

  • 1 8-ounce can tomato sauce
  • 1/4 cup tomato paste
  • 1/8 cup parmesan cheese, grated
  • 4 slices salami, chopped
  • 1/2 small onion, finely diced
  • 1 teaspoon garlic, minced
  • 1/4 cup sun-dried tomatoes
  • 1/4 cup olives (any kind), sliced
  • 3-4 boneless, skinless chicken breasts
  • Salt and pepper
  • 3-4 slices provolone cheese, chopped

*Marinated mushrooms, spicy peppers, or marinated artichokes would all make delicious additions.

Directions

Preheat oven to 375 degrees.

In a baking dish, combine the tomato sauce, tomato paste, parmesan cheese, salami, onion, garlic, sun-dried tomatoes, and olives. Sprinkle the chicken with salt and pepper, then press the chicken breasts into the tomato mixture. Turn once to coat on both sides. Bake for approximately 25-35 minutes*, until cooked through. Turn once, halfway through cooking. Once the chicken is cooked, sprinkle the provolone cheese over the top. Leave in the oven for just a few seconds to melt. *Cooking time will vary depending on the weight and dimensions of your chicken breasts. Use an instant read meat thermometer to determine doneness. Chicken is safely done at 165°F.

Slice and serve over pasta.

IMG_4333

GIVEAWAY WINNER!! We have a winner! Using http://www.random.org to select a number at random, out of the 15 entries received for the yarn wreath gift bag giveaway, the winner is #2 , Jennifer. Congratulations, Jennifer!! I’m going to send you an email at the address provided with your comment to get the information necessary to send you out your prize!! Thank you to everyone who shared their holiday tips and traditions.

Chicken Cordon Bleu Panini

boy, n.
1. noise with dirt on it
 

Daylight savings time has done a number on my noisy boys’ sleep schedules. They’ve always been early risers, but now we’re talking about 4:30 in the morning early. And they don’t wake slowly. They wake with the force of a jack-in-the-box that someone has been cranking all night long. It’s startling…even when you know it’s coming.

And they’re loud; so incredibly loud. I can’t even begin to put words to the kinds of noises which come from their little bodies. As they come barging into our room making all manners of inexplicable noises, I bury my head under my pillow and wonder why little boys don’t come with volume controls.

But even as I’m hoarsely grumbling ‘go away’, I’m reminded to be thankful for all of that predawn noise; that noise which means we have three healthy, active little boys to be making it. In a month of thanks giving, I am thankful for that.

Thursday nights are crazy nights for our noisy little family. For the few hours preceding the boys’ bedtime, it’s a revolving door of activity. The boys have ninja training (karate class) right about the time we’d normally be eating dinner, so we eat early. My husband gets home from work shortly after we return, then runs off to rock and roll training (band practice) just after the boys get to bed. At that point, I curl up onto the couch for my extremely informal sommelier training (glass of red).

So, everyone eats dinner in a rush and at a different time on Thursdays, making it essential that Thursday night dinners are simple and easy to reheat. This satisfying chicken cordon bleu panini fits the bill perfectly! Breaded chicken breasts are sliced and combined with salty prosciutto and a creamy gruyere sauce, then pressed together, wrapped in foil, and heated until it’s hot and melty. Every part of this sandwich can be made ahead of time (even the night before). Best yet, it can be wrapped in individual portions, which are ready to pop in the oven whenever your future ninja, rockstar, or sommelier gets hungry!

Today’s Focus on Technique – Bechamel Sauce

A bechamel sauce is one of the five French ‘mother sauces’, which means that it is a base sauce from which many variations can be made. Bechamel sauce is a simple white sauce made with a combination of roux (butter and flour) and milk. It’s typically seasoned with salt, pepper, and a pinch of nutmeg. Bechamel sauces can be made thinner or thicker by varying the amount of roux used in the sauce. A basic bechamel can be seasoned in a multitude of ways and used in lasagna, as the base of a cheese (mornay) sauce for macaroni and cheese, or as the start of a creamy soup.

The process of making a bechamel is simple. Combine equal parts butter and flour in a pan over medium heat, whisking constantly for a minute or two to remove some of that raw flour taste. Gradually add milk to the roux, whisking constantly. (Ideally, the milk should be warm or hot when it’s added to the roux, though I’ll admit that I rarely warm the milk and have never had a problem.) Whisk until well combined. Bring the mixture to a simmer. Cook for a few minutes, whisking constantly, until the milk is thickened. Season with salt, pepper, and nutmeg.

*1 tablespoon each of butter and flour to 1 cup of milk will produce a thin bechamel which makes a good base for a cheese sauce. Use 2-3 tablespoons each of butter and flour to 1 cup of milk for a thicker sauce.

Chicken Cordon Bleu Panini

Ingredients

  • 1 loaf of wide, flat crusty bread (such as ciabatta)
  • 1 pound boneless, skinless chicken breasts
  • 2 eggs, lightly beaten
  • 1 1/2 cups seasoned bread crumbs
  • Olive or vegetable oil
  • 3-4 ounces prosciutto (or ham)
  • 1 1/2 tablespoons butter
  • 1/2 teaspoon garlic
  • 1 1/2 tablespoons flour
  • 1 cup milk
  • 1/2 cup gruyere (or other swiss-style cheese), shredded
  • Salt and pepper
  • Pinch of nutmeg

Directions

For the chicken: Preheat oven to 375 degrees. Dip the chicken breasts in the beaten eggs, then press into the bread crumbs, until well coated. Heat a thin layer of oil in a fry pan over medium/medium-high heat. Cook the chicken for 2-3 minutes on each side, until golden brown. Transfer the chicken to a baking sheet. Place in the oven, until cooked through. (Chicken is fully cooked at 165 degrees. Cooking time will vary based on thickness of the chicken breasts and how well they’re cooked during the browning step. Mine took about 13 minutes in the oven.) *The chicken can be made ahead and refrigerated.

For the sauce: Melt the butter in a pan over medium heat. Add the garlic. Cook for a few seconds, being careful not to burn. Add the flour. Whisk to combine. Cook for a minute. Gradually add the milk, whisking constantly to combine. Bring the mixture to a simmer. Cook for a minute or two, until thickened. Reduce the heat. Add the cheese and whisk until melted. Season with a pinch of nutmeg and salt and pepper, to taste. *The sauce can be made ahead and refrigerated. It will thicken as it cools.

To assemble the sandwiches: Slice the loaf of bread in half. Spread a layer of sauce onto each half. Arrange the prosciutto in a thin layer on the bottom half. Slice the breaded chicken breasts into thin pieces. Arrange them on top of the prosciutto. Cover with the top half. Tightly wrap the sandwich in foil, pressing down to flatten the sandwich. If desired, you can pre-cut the sandwich and wrap in individual servings. Bake in a 375 degrees oven for about 20 minutes until hot and melty. *The entire sandwich can be made ahead of time. If cooking from cold, allow for extra cooking time.

Buffalo Chicken Pasta Bake (and Giveaway Winner!!)

Well, we did it! We made it through Halloween. I enjoy Halloween, especially now that I have kids to celebrate it with – but to be honest, for me it’s mostly just the gateway holiday to Thanksgiving and Christmas. Those are the holidays which really have my heart. I’ll admit, a small tear of joy may have run down my cheek when I walked into Target the other day to find the first of their holiday decorations hung from the ceiling. I have no problem with celebrating Christmas even as we prepare for Thanksgiving. The two go hand in hand for me.

But Halloween was fun this year. Really fun. The boys dressed up for the pre-Halloween party at their school. There was a dj, a disco ball, and hundreds of costumed children, half-blinded by masks, crashing into each other on the school gym dance floor. All varieties of goblins, ghouls, princesses and superheroes roamed the school cafeteria with slices of pizza and pumpkin cookies hanging from their mouths.

On Halloween, the boys put on their costumes for their school parade. Liam was Harry Potter, a costume I’m certain he selected for the pretend glasses it came with. Lucas was a terrifying werewolf, a costume I believe he selected for the shredded jeans it would give him a reason to wear. The kid’s got a weird love for jeans, as long as they have a real, functional button and zipper…none of those faux buttoned, elastic-waisted toddler jeans for him!

After school, we attended a pre-trick-or-treating party at our friends’ house. I dressed as a princess with baby James as my frog prince. We brought along a bucket of spooky eyeball cake pops, which everyone enjoyed after the delicious dinner served by our friend. There was pasta and meatballs, a vibrant pasta salad, Italian bread and butter, jumbo shrimp, fresh veggies with dip, cheese and crackers, baked ziti and chicken wings.

And that’s when the seedling of an idea began to take root, right there surrounded by ninjas and vampires – baked ziti and chicken wings…

Y’all know I’ve got a little thing for inserting buffalo chicken wing flavor into all varieties of other foods…chicken wing dip, buffalo chicken lasagna, buffalo chicken monkey bread, buffalo chicken pizzabuffalo chicken meatballs, buffalo chicken potato skins… so, why not buffalo chicken baked ziti? As my sister put it, “Why have we not eaten that before???” It’s a practically ludicrous idea to consider. Fortunately, we no longer need to commiserate over the absence of buffalo chicken baked ziti in our lives. I made it last night and my hybrid baked ziti-buffalo chicken world is now beautifully complete.

Focus on Technique – Poaching Chicken

It’s common to find recipes calling for poached chicken. Poaching is simply the process of very gently simmering a food until it’s cooked. Eggs, poultry, and fish all responded well to poaching. Foods can be poached in a variety of liquids, including water, milk, wine, and broth/stock. Various herbs and seasonings can be added to the poaching liquid to impart delicious flavor into the chicken. When poaching, it’s important to control the heat in order to keep the liquid at a gentle simmer.

Properly poached chicken breasts remain moist and tender. Poached chicken works well on its own, in chicken salad, on pizza, in soup, or mixed in with pasta.

To poach chicken breasts, place the chicken in a pot large enough for the chicken to fit comfortably. Cover the chicken with cool water (or chicken broth). Over medium heat, bring the liquid to a gentle boil. Adjust the heat so that the liquid maintains a gently bubbling simmer. Cook for about 10-15 minutes, until the chicken is cooked through. An instant read meat thermometer is the most effective way to determine doneness. Chicken is done once it’s reached 165 degrees.

Buffalo Chicken Pasta Bake

Ingredients

  • 1 pound pasta
  • 1 pound of chicken, poached and chopped into small pieces
  • 1/2 cup celery, chopped
  • 1 cup Frank’s Red Hot hot sauce (or your other favorite hot sauce)
  • 1 cup blue cheese dressing (I always recommend Marie’s)
  • 3/4 cup ricotta cheese
  • 2 cups mozzarella cheese, shredded
  • 1/4 cup blue cheese, crumbled (optional)
  • Salt and pepper (optional)

Directions

Preheat oven to 375 degrees.

Cook the pasta for about a minute less than the package directions call for. Strain and rinse with cool water to prevent overcooking. Return the cooled, strained pasta to the pot. Add the chicken and chopped celery.

In a bowl, combine the hot sauce and blue cheese dressing. Pour the mixture over the pasta. Add the ricotta cheese and 1 cup of the mozzarella. Stir to combine. Taste and adjust seasoning with salt, pepper, or additional hot sauce, as desired.

Transfer the pasta mixture into a large 13×9 baking dish. Sprinkle the remaining 1 cup of mozzarella cheese and the crumbled blue cheese (optional) over the top. Bake for about 30 minutes.

*You can prepare the entire dish, up to the baking step, ahead of time. If preparing ahead of time and refrigerating, allow for approximately 10-15 minutes of extra cooking time. 

Werewolf and the frog prince

GIVEAWAY WINNER!! We have a winner! Using http://www.random.org to select a number at random, out of the 28 entries received for the dairy-themed gift bag giveaway, the winner is #12 , Jessica M. Congratulations, Jessica!! I’m going to send you an email at the address provided with your comment to get the information necessary to send you out your prize!!

Orange Chicken

You know that feeling you’re left with after a major spring cleaning of your house…purging the junk, wiping away the dust, polishing the knick knacks…that refreshed feeling of comfort in your space, when everything is organized, neat, and tidy?

Well, after taking the past few weeks to put a fresh polish on some things around this site, that’s just about how I’m feeling. And it feels good…

  • The Recipe Collection is up to date and organized in a way which I hope will make browsing the vast selection of recipes on this site a bit more user friendly.
  • The Gallery page now includes a much more comprehensive collection of photos, which are bigger and arranged in a more appealing manner. Best yet, clicking any photo will bring you directly to that recipe. Hovering your cursor over any picture will provide a brief description of the featured recipe.
  • A few new step by step guides have been added to the How-To Photo Guides page.

I’ve still got a bit more housekeeping to do around here, but I really hope you enjoy browsing around those pages!

It’s been a productive few weeks. But the best thing about stepping away from new posts for a bit is that it gave me a little time to reflect on where I am and where I’m going with this little blog. I started this blog two and a half years ago as what felt like a natural extension of what I was already flooding my social networks with…ramblings about cooking and eating. Very quickly, I discovered that it gave me a great feeling of satisfaction to produce a blog post…a delicious dish, a few photos, a written recipe…that tangible ‘job completed’ feeling that’s rare in my life as a stay-at-home mom. The very act of clicking Publish was rewarding to me. Even more rewarding was finding that people were actually interested in what I’d published. And that sure felt good!

Rice Krispie Treat ‘Sushi’ for our ninja-themed party

What started as a sort of personal food journal, took on a life of its own, with readers and subscribers and a facebook page and a twitter account (which I don’t really know how to use). But at the end of the day, this is just my little space about food, with no aspirations of being anything other than what it is. It’s not a baking blog or a gluten-free blog or a South Beach blog, though it contains recipes that fall into each of those categories. It’s not a gourmet blog or even a family-friendly blog, though there are plentiful recipes in each of those categories as well. Admittedly, the collection of recipes on this site is a bit scattered.

But you know what? So am I. So is my family. And this blog is a snapshot of our lives… One day I’m intent on losing the weight that’s been nagging at me since having our third son. The next day I’ve craving chocolate-covered bacon-wrapped twinkies. One day I’m cooking hot dog casseroles with my kids. The next I’m serving slow-braised short ribs in a cabernet reduction sauce at an elegant dinner party with dear friends. (I wear sweatpants regardless of the occasion.) My kids are usually clamoring around my feet when I cook and with three boys ages five and under, it’s almost inevitable that one of them will throw a tantrum, fall off a chair, or start coloring the grout between the bricks on my fireplace just as I’m engaged in some crucial time-sensitive step in a recipe. My photos are rapidly staged and shot close because my table is usually too messy to shoot wider. There’s often a baby climbing my legs while I’m frantically snapping the photos.

It’s chaotic. It’s imperfect. It’s my life. And I’m guessing it’s probably some of your lives too.

The Birthday Boy!

And that’s not about to change anytime soon, but there is something new I’d like to bring to this blog… The most wonderful thing about the culinary program I completed many years ago is that it left me with so much more than a collection of tasty recipes. It armed me with an understanding of techniques, which I can now apply towards everything I do in the kitchen…the tools and the confidence that enable me to walk into the kitchen and cook without recipes or to read another’s recipe and quickly understand what I can substitute or alter to fit my family’s tastes. That’s the thing I hope to share with all of you. I want to take my posts here one step further than just some story about my chaotic life and an awesome recipe for braised short ribs or pumpkin parfaits or cheddar bacon biscuits. I want each post to leave you with understanding of why the recipe works and how you can take that idea and make it part of your culinary toolbox. So, from here on out, that’s what I intend to do. Everything else will remain the same, but with each new post, I’m going to pull out one or two techniques or tips which are demonstrated in the recipe and be just a bit more explicit about the how or why.

Ninjago (Ninja Lego) Cake

Ok then, enough chatting about this blog. Time to get back to actually blogging on this blog… We’re throwing our middle guy, Lucas, a grand ninja battle…errr, I mean party, this weekend in celebration of his fourth birthday. It’s gonna be a ninjatastic event with an Asian-themed menu, surprise costumed ninjas, and rice krispie treat ‘sushi’ for dessert. I will share more details, photos, and recipes after the party, but for the moment, I want to share one of the recipes I’ll be preparing for this weekend’s festivities.

Orange chicken…I just adore the sticky sweet and slightly spicy sauce coating chunks of crispy chicken. As I planned the menu for this little ninja party, it seemed like the perfect fit for a big group of adults and young children. It’s a dish I’ve eaten often and made never. So, I did a bit of searching for a starting point. The big surprise for me was that some of the recipes contained not a bit of orange. No juice, no extract, no peel. Many recipes were more sugar than anything else. And though those recipes may be successful at reproducing the familiar orange chicken flavor from your favorite Chinese takeout restaurant, I just can’t come to grips with an orange chicken recipe made without orange. So, I played around a bit and came up with the recipe which follows. It’s pleasingly sweet, just a bit spicy, and packed with a good dose of authentic orange flavor. Prior to frying, the chicken is marinated in a soy-ginger-orange marinade, then dipped in egg, and coated with cornstarch. A simple sauce, made with orange juice and fresh zest is accented with Asian flavors then thickened to the consistency of a glaze with a bit of cornstarch. Definitely a crowd-pleaser!

Focus on Technique – Thickening with Cornstarch

Cornstarch is an effective (and gluten-free) thickener which can be used in a variety of recipes, including sauces, gravy, pudding, and fruit pie filling. It adds no flavor of its own and produces a clear, glazy result, as compared to the cloudy effect of a butter/flour roux. In general, about 1 tablespoon of cornstarch can be used to thicken 1 cup of liquid. To effectively blend the cornstarch into the liquid to be thickened, you should start by making a slurry, which is simply a mixture of the cornstarch with a bit of cold liquid (usually water). This step prevents the cornstarch from clumping when added to the hot liquid. Add the slurry to the liquid you wish to thicken, then bring to a simmer for a minute or two until the liquid thickens.

Orange Chicken

Ingredients

For the Chicken

1 pound boneless, skinless chicken breasts, cut into 1″ chunks

  • 1/4 cup soy sauce
  • 1/4 cup orange juice
  • 1 teaspoon fresh ginger, grated
  • 2 eggs, lightly beaten
  • 3/4 cup cornstarch
  • 1/2 teaspoon salt
  • Vegetable oil, for frying

For the Sauce

  • 2/3 cup brown sugar
  • 3/4 cup water
  • 1/2 cup orange juice
  • Zest from 1 orange (about 1 tablespoon)
  • 2 tablespoons rice wine vinegar
  • 2 tablespoons lemon juice
  • 1 1/2 teaspoons sambal oelek (crushed chile paste)*
  • 2 teaspoons soy sauce
  • 1 1/2 tablespoons cornstarch
  • 2 tablespoons cold water
  • 2 green onions, sliced

*You can substitute crushed red pepper or cayenne pepper powder to add a bit of spiciness. If using cayenne powder, reduce the quantity.

Directions

For the Chicken

Stir together the soy sauce, orange juice, and ginger. Submerge the chicken in the mixture. Allow the chicken to marinade for about 20 minutes in the refrigerator.

Combine the cornstarch and salt on a plate. Heat about 1/2″ of oil in a large skillet over medium-high/high heat to approximately 375 degrees. (You can use an instant read meat thermometer to estimate the temperature. If you do not have a thermometer, just heat the oil for several minutes until it’s sizzling hot.)

Remove the chicken from the marinade. Place the chicken in a bowl with the lightly beaten eggs. Remove the chicken from the eggs, then dredge in the cornstarch until well coated. Fry the chicken in small batches until crispy, golden, and cooked through, about 5-6 minutes. Turn the chicken once or twice during cooking. Remove the chicken from the oil with a slotted spoon and drain on a paper towel.

For the Sauce

Combine the brown sugar, water, orange juice, orange zest, rice wine vinegar, lemon juice, soy sauce, and sambal oelek in a saucepan over medium heat until well combined. In a small ramekin or bowl, stir together the cornstarch with the cold water. Pour the mixture into the sauce and whisk to combine. Bring the sauce to a simmer. Simmer for a couple minutes until the sauce is thickened.

Just before serving, pour the sauce over the chicken. Garnish with sliced green onions and additional orange zest, if desired. Serve over white jasmine rice.

Tips

  • To maintain the chicken’s crispiness, wait until just before serving to toss the chicken in the sauce.
  • To make ahead of time, fry the chicken and refrigerate until using. Prepare the sauce and refrigerate until using. Reheat the chicken on a baking sheet in a 375 degrees oven for about 10-15 minutes until heated through and crispy. Heat the sauce and pour it over the reheated chicken.

Grilled Chicken Tikka Masala Pizza

Posted on

Anyone following all of this crazy zombie apocalypse ‘news’ popping up?? There’s some seriously wacky stuff going on out there.  I’ve seen enough zombie movies to know that this is always how it begins…a few random incidents which are brushed off as isolated events with some logical cause. The public is urged not to panic and then all h.e.double hockey sticks breaks loose. (Being told not to panic is a sure sign that it’s time to panic.) And honestly, though I’m inclined to believe that all of this has more to do with dangerous mind-altering drugs than a zombie armageddon, I’m not sure that brings me any peace of mind.

Did ya know that the CDC’s website has a section on zombie preparedness?? I kid you not. I’m pretty sure it’s a tongue-in-cheek, fun way to educate about general disaster readiness. Or is it???

Personally, I learned everything I need to know from the educational zombie comedy, Zombieland.

Zombie Survival Rule #1: Cardio

Good thing I’ve been running again. And it feels so good. I’d been struggling to get back to a regular running routine ever since having my baby 15 months ago and it’s been an uphill battle, both literally and figuratively. My progress had been dreadfully slow. But, the baby weaned from nursing almost two months ago and my running progress has accelerated ever since. Guess I didn’t realize the toll it was taking on my body. It feels good to get out there for my runs and I’ll be ready when the zombies…errr, I mean bath salt crazies…start chasing me down. (I’m joking…mostly.)

The other benefit of running is that it affords me a little more wiggle room in my dietary choices, so I can afford to enjoy a few indulgences. Ok, my running/indulgence balance is admittedly still a bit off, but it’s getting closer. This grilled chicken tikka masala is one of those indulgences that I think about when I’m running. This mouth-watering pizza combines one of my all-time favorite dishes, chicken tikka masala, with homemade garlicky grilled naan flatbread and a bit of melty mozzarella cheese. Seriously yummy and worth every second of heart-pounding cardio.

I’d like to tell you that this dish is a cinch to pull together, but that would be a lie. There is nothing inherently difficult about it, but between preparing the marinade, making the sauce, preparing the dough, grilling the chicken, grilling the naan, and then assembling and grilling the pizzas, this is a time consuming meal. But it is a labor of love. Definitely worth the time! Just save it for a sunny weekend day and get the whole family involved in the process!

To make things more manageable, you may want to plan to cook the meal in parts. The chicken can be marinated the night before. The sauce, the chicken, and the naan can all be made ahead of time and will hold well in the fridge for a day or two. You could even enjoy the meal as traditional chicken tikka masala with rice and naan one night and make the pizzas for leftovers the next day! However you decide to break it up, I think you’re going to enjoy this delicious meal!

Grilled Chicken Tikka Masala Pizza

Ingredients

For the Naan*

  • 1 packet dry active yeast
  • 1 cup warm water (about 110-115 degrees)
  • 1/8 cup sugar
  • 3/4 teaspoon salt
  • 1/4 cup milk
  • 1 egg, lightly beaten
  • 1 tablespoon garlic, minced
  • 4 cups flour (approximately)
  • 4 tablespoons butter, melted

For the Chicken

  • 1 1/2 pounds boneless, skinless chicken thighs, trimmed of excess fat
  • 1 1/2 cups plain yogurt
  • 3 tablespoons garam masala
  • 2 teaspoons garlic, minced
  • 1/2 teaspoon salt
  • 1 teaspoon paprika
  • 1/4 teaspoon cayenne
  • 1/2 inch segment of fresh ginger, grated

For the Sauce

  • 3 tablespoon butter
  • 1 small onion, diced
  • 1 teaspoon garlic, minced
  • 1 1-2″ segment fresh ginger, grated
  • 2 small serrano peppers, seeds and ribs removed, diced
  • 1 1/2 tablespoons garam masala
  • 1 (29 ounce) can crushed tomatoes
  • 1/4 cup tomato paste
  • 1 cup heavy cream
  • 1/4-1/2 teaspoon cayenne (plus more, if desired)
  • 1 teaspoon salt (plus more, if desired)
For the Pizzas
  • 2 cups mozzarella cheese, shredded
  • Fresh parsley leaves, chopped

Directions

To prepare the chicken marinade: Combine all marinade ingredients in a container with a tight-fitting lid. Place the chicken thighs in the marinade and toss to evenly coat. Refrigerate and allow the chicken to marinade for at least six hours or overnight.

To grill the chicken: Wipe the grill with a bit of vegetable oil to help prevent sticking. Preheat grill to medium heat. Shake the excess marinade off of the chicken and place it on the preheated grill. Cook the chicken for about 7-10 minutes on each side. (Cooking time will depend on the thickness of the chicken. The chicken is fully cooked when it has reached an internal temperature of 165 degrees.) Allow the chicken to cool, then cut into small pieces. Refrigerate until using.

To make the naan: Stir together the yeast and warm water. Allow to rest for about 10 minutes. Stir in the sugar, salt, milk, garlic and egg. Add the flour 1 cup at a time, stirring and kneading for several minutes until a soft dough forms. (Add the flour slowly towards the end, since the quantity of flour will vary. The dough should be slightly sticky, but manageable. If the dough is too dry, add little bits of water or milk. If the dough is too wet, add small quantities of additional flour.) Place the dough in a lightly oiled bowl. Cover with a slightly damp towel and allow it to rest at room temperature for 1-2 hours, until it has doubled in size. Then, divide the risen dough into 12 equal balls of dough. Place the balls on a lightly oiled baking sheet. Cover with the towel and allow to rest at room temperature for about 30 minutes. Preheat your grill to medium heat. Prepare a work station near your grill with a rolling pin, cutting board, and flour. Lightly scatter the flour over the cutting board. One at a time, roll each ball of dough into a flat round, then gently stretch the dough into a soft teardrop shape. Place the dough directly onto the grill and cook for about a minute on each side. It will begin to puff slightly when it is done. Remove from the grill and brush with melted butter.

To make the sauce: Melt butter in a saucepan over medium heat. Add the onions, garlic, ginger, and serrano peppers. Cook for about 5 minutes, stirring frequently, until the onion is translucent. Add the garam masala, stir, and cook for another minute. Add the crushed tomatoes, tomato paste, salt, and cayenne pepper. Stir to combine. Continue cooking until heated through, stirring frequently. Reduce the heat and add the cream. Taste and adjust seasoning with additional salt and cayenne pepper, as desired.

To assemble the pizzas: Spread a layer of sauce onto each piece of naan. Scatter some of the chicken over each naan. Sprinkle each pizza with a bit of the mozzarella cheese. Garnish with fresh parsley. Heat the pizzas on the grill or in a 350 degree oven until the cheese is melty and all components are heated through (about 8-10 minutes).

*Recipe for naan adapted from the recipe found HERE.

Makes 10-12 small individual pizzas

Spicy Mexican Wontons

Posted on

A few weeks ago, I opened one of my kitchen cabinets and set my eyes upon a set of margarita glasses which have been long neglected. And what’s a girl to do when her margarita glasses have gathered dust, but wash them off and host una fiesta pequeña.

With the purchase of a few brightly colored decorations, a sombrero, maracas, and a piñata, plans for our little Mexican shindig were coming along. I taught the boys a few Spanish greetings and we practiced dancing in the kitchen to the sounds of a mariachi album, while we cooked up a chocoflan and spicy Mexican wontons.

It wasn’t until the tequila was chilled and the limes sliced that I realized we were hosting our Mexican-themed party on the weekend when many Americans would be celebrating America’s Independence Day. Oops. Arriba? I will celebrate America’s birthday in appropriate patriotic red, white, and blue style on July 4. Honest.

But, our little gathering was un gran éxito; a grand success. Everyone brought a dish to share and we killed a few bottles of tequila shaken with homemade mango and strawberry lime margarita mixes. The kids even enjoyed kiddie margaritas in sugar-rimmed glasses, as their pockets burst full of piñata candy. My three-year-old is already reminiscing about ‘the old days’…way back yesterday when we had a piñata. That was living!

One of my contributions to the party menu were these spicy Mexican wontons; not exactly traditional Mexican food, but I like to dance to the rhythm of my own maracas anyway. They start with a simple combination of shredded chicken, a hefty dose of Mexican cheese, fresh jalapeño pepper, and green onions which are then seasoned with a bit of chile powder, cumin, and cayenne. Spoonfuls of the mixture are tucked into wonton wrappers, then quickly pan-fried until crisp.

They can be completely made ahead of time and reheated in the oven for a few minutes before serving. They re-crisp beautifully in the oven, which means that you can get that messy frying part out of the way and all cleaned up, long before your guests arrive! Perfect party food.

Spicy Mexican Wontons

Ingredients

  • 1 pound boneless, skinless chicken breasts, cooked and shredded*
  • 1 jalapeño pepper, ribs and seeds removed, very finely diced
  • 1 green onion, sliced
  • 3 cups Mexican cheese shredded**
  • 1 tablespoon chile powder
  • 1/2 teaspoon salt
  • 1/4 teaspoon cayenne pepper (plus more, if desired)
  • 1/8 teaspoon cumin
  • 40-50 wonton wrappers (check the refrigerated or frozen section of your grocery store)
  • Vegetable oil, for frying

* I poached the chicken breasts in simmering water. Alternately, they can be baked until cooked through.

**I used 1 1/2 cups queso blanco and 1 1/2 cups shredded Mexican blend (cheddar, monterey jack, and asadero). If you are unable to get queso blanco, you can use any combination of cheddar, monterey jack, or other Mexican cheese.

Directions

Combine the chicken, jalapeño pepper, green onion, cheese and spices. In batches of about 5 or 6, place a hefty teaspoon of the filling in the center of each wonton wrapper. Wet the edges of the wonton wrapper with a bit of water and fold over into a triangle. If desired, wet two of the corners and fold them in towards the center. Place the prepared wontons on a tray in a single layer as you repeat the process for all wonton wrappers.

Once all wontons have been prepared, heat about 1/2″ vegetable oil in a large skillet over medium/medium high heat. Get the oil good and hot. Test out one of the prepared wontons by placing it into the oil. It should become golden brown and bubbly-looking within about 30 seconds. Flip to cook on the other side. Cook all of the wontons in small batches. Remove them from the oil using a slotted spoon. Drain the cooked wontons on a paper towel. Serve hot.

If desired, the wontons can be served with a chipotle sour cream, made by blending one chipotle pepper (from a can of chipotles in adobo) with 8 ounces sour cream.

To reheat, place the wontons in a single layer on two large baking sheets. Bake at 375 degrees for about 7-10 minutes, until hot and crispy.

Click HERE for more tips on working with wonton wrappers and a photo guide showing an alternate method of folding the wontons.

The Gourmand Mom

Good food, seasoned with a dash of life