RSS Feed

Category Archives: Pizza

Huevos Rancheros Pizza

Back in the spring, I strong-armed a couple of my friends into taking Irish step dancing lessons with me. (I actually didn’t need to twist their arms too hard.) We three became the unlikeliest bunch of dancers you could imagine. It was a blast. We clobbered away through a few classes, along with an (almost) equally novice classmate, before the weather became too hot to continue in our dance space. At that point, we broke for the summer, with the intention of resuming classes come fall.

IMG_5639

Well, fall rolled around and I sent an email to our instructor expressing our eagerness to continue. But we never heard back. After a few months with no reply, we’d become fully convinced that we’d been silently dumped as a result of our utter hopelessness in the field of Irish dancing. We couldn’t really blame her. We truly are a hopeless bunch. But then, just as we were about to pack away our dancing shoes, I received a message explaining an email switch, along with an invitation to resume classes. We accepted, of course.

This time though, there are a few other adults in our class and a second instructor. Apparently, our new classmates danced all throughout their childhood and teen years. They’re just picking up where they left off, which is someplace lightyears ahead of the rest of us. While we practiced basic skips, intently concentrating on not running into each other, one of our new classmates gracefully danced circles around us, quite literally. It feels oddly like being stuck in the ‘guppies’ group, aside out advanced classmates in the ‘shark’ group. They’re reading War and Peace, while we struggle through Ted in a Red Bed. Us four clumsy guppies stick as close together as we can without kicking each other. It’s a level of comfort thing. We huddle close together, executing every drill as a unified group, in a fruitless attempt not to draw too much attention to ourselves.

IMG_5642

It’s a ridiculously fun time, swimming in our guppy group. I haven’t laughed so hard in a long while. Graceful, we are not. Skillful, we are not. Coordinated, we most definitely are not. But for all we lack in ability, we more than make up for it with enthusiasm. We will probably never have the graceful, swift-footed skills of our river-dancing role models, but we’re certainly having fun with it. And that’s what it’s all about, isn’t it??

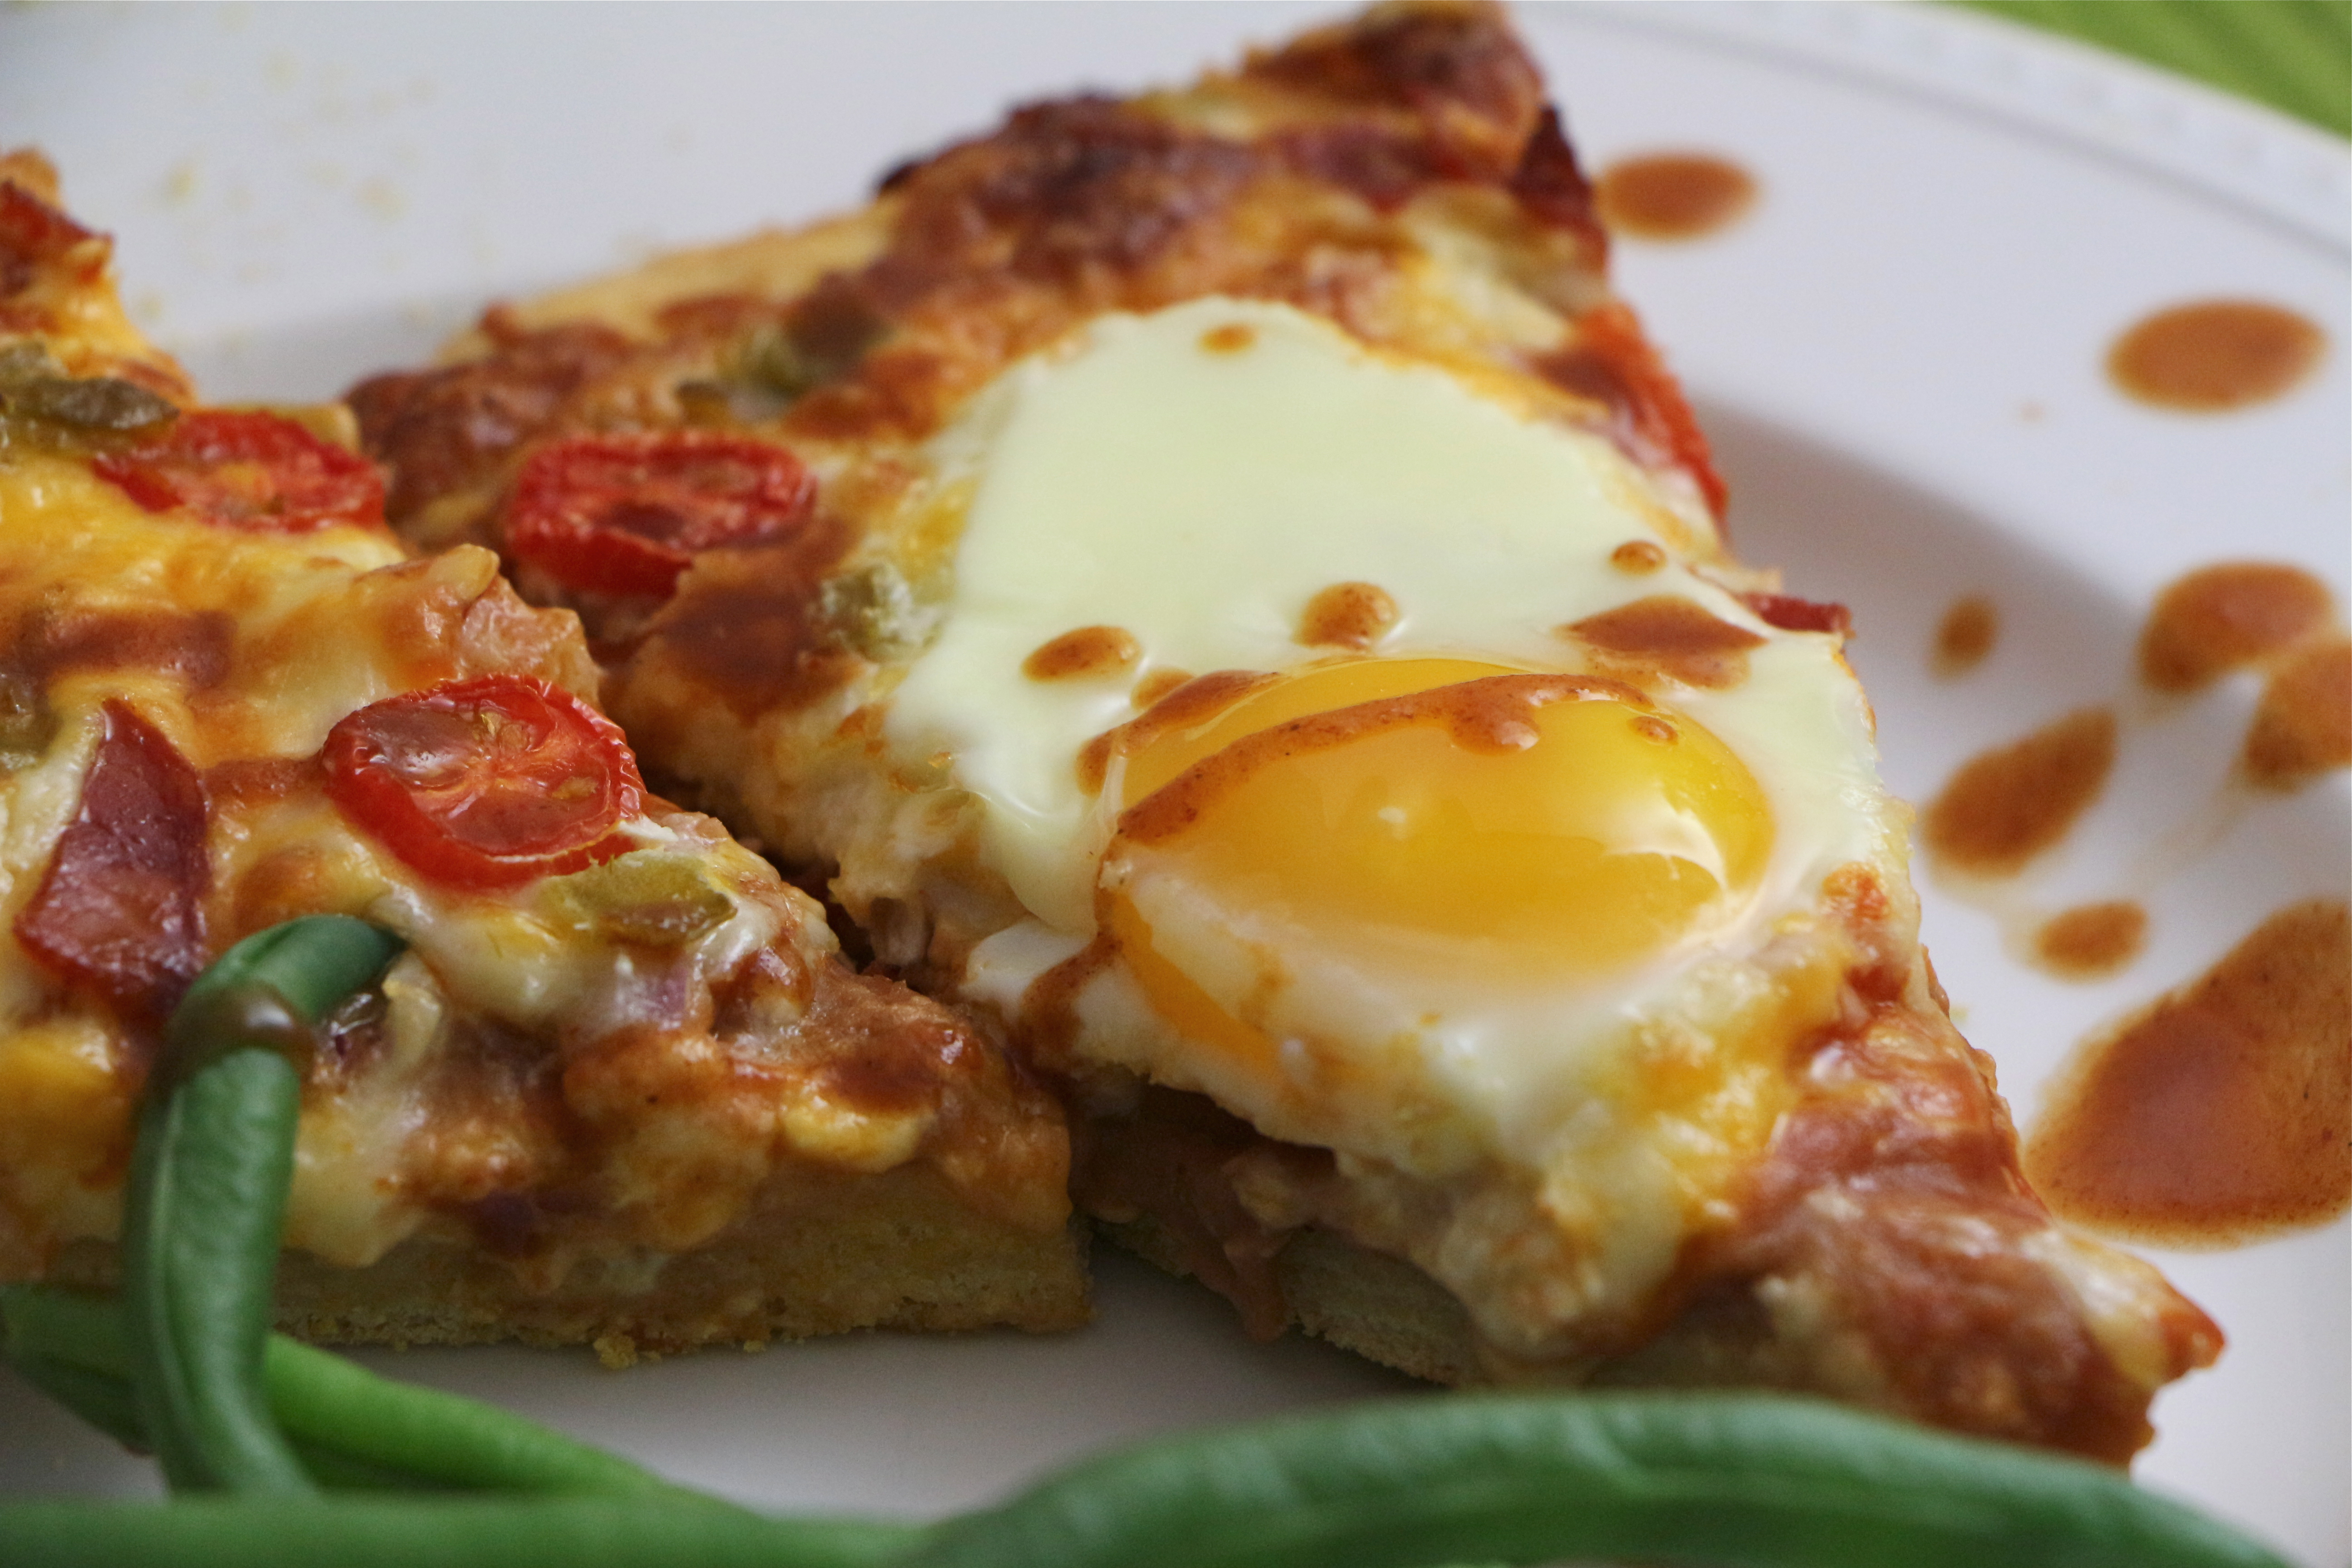
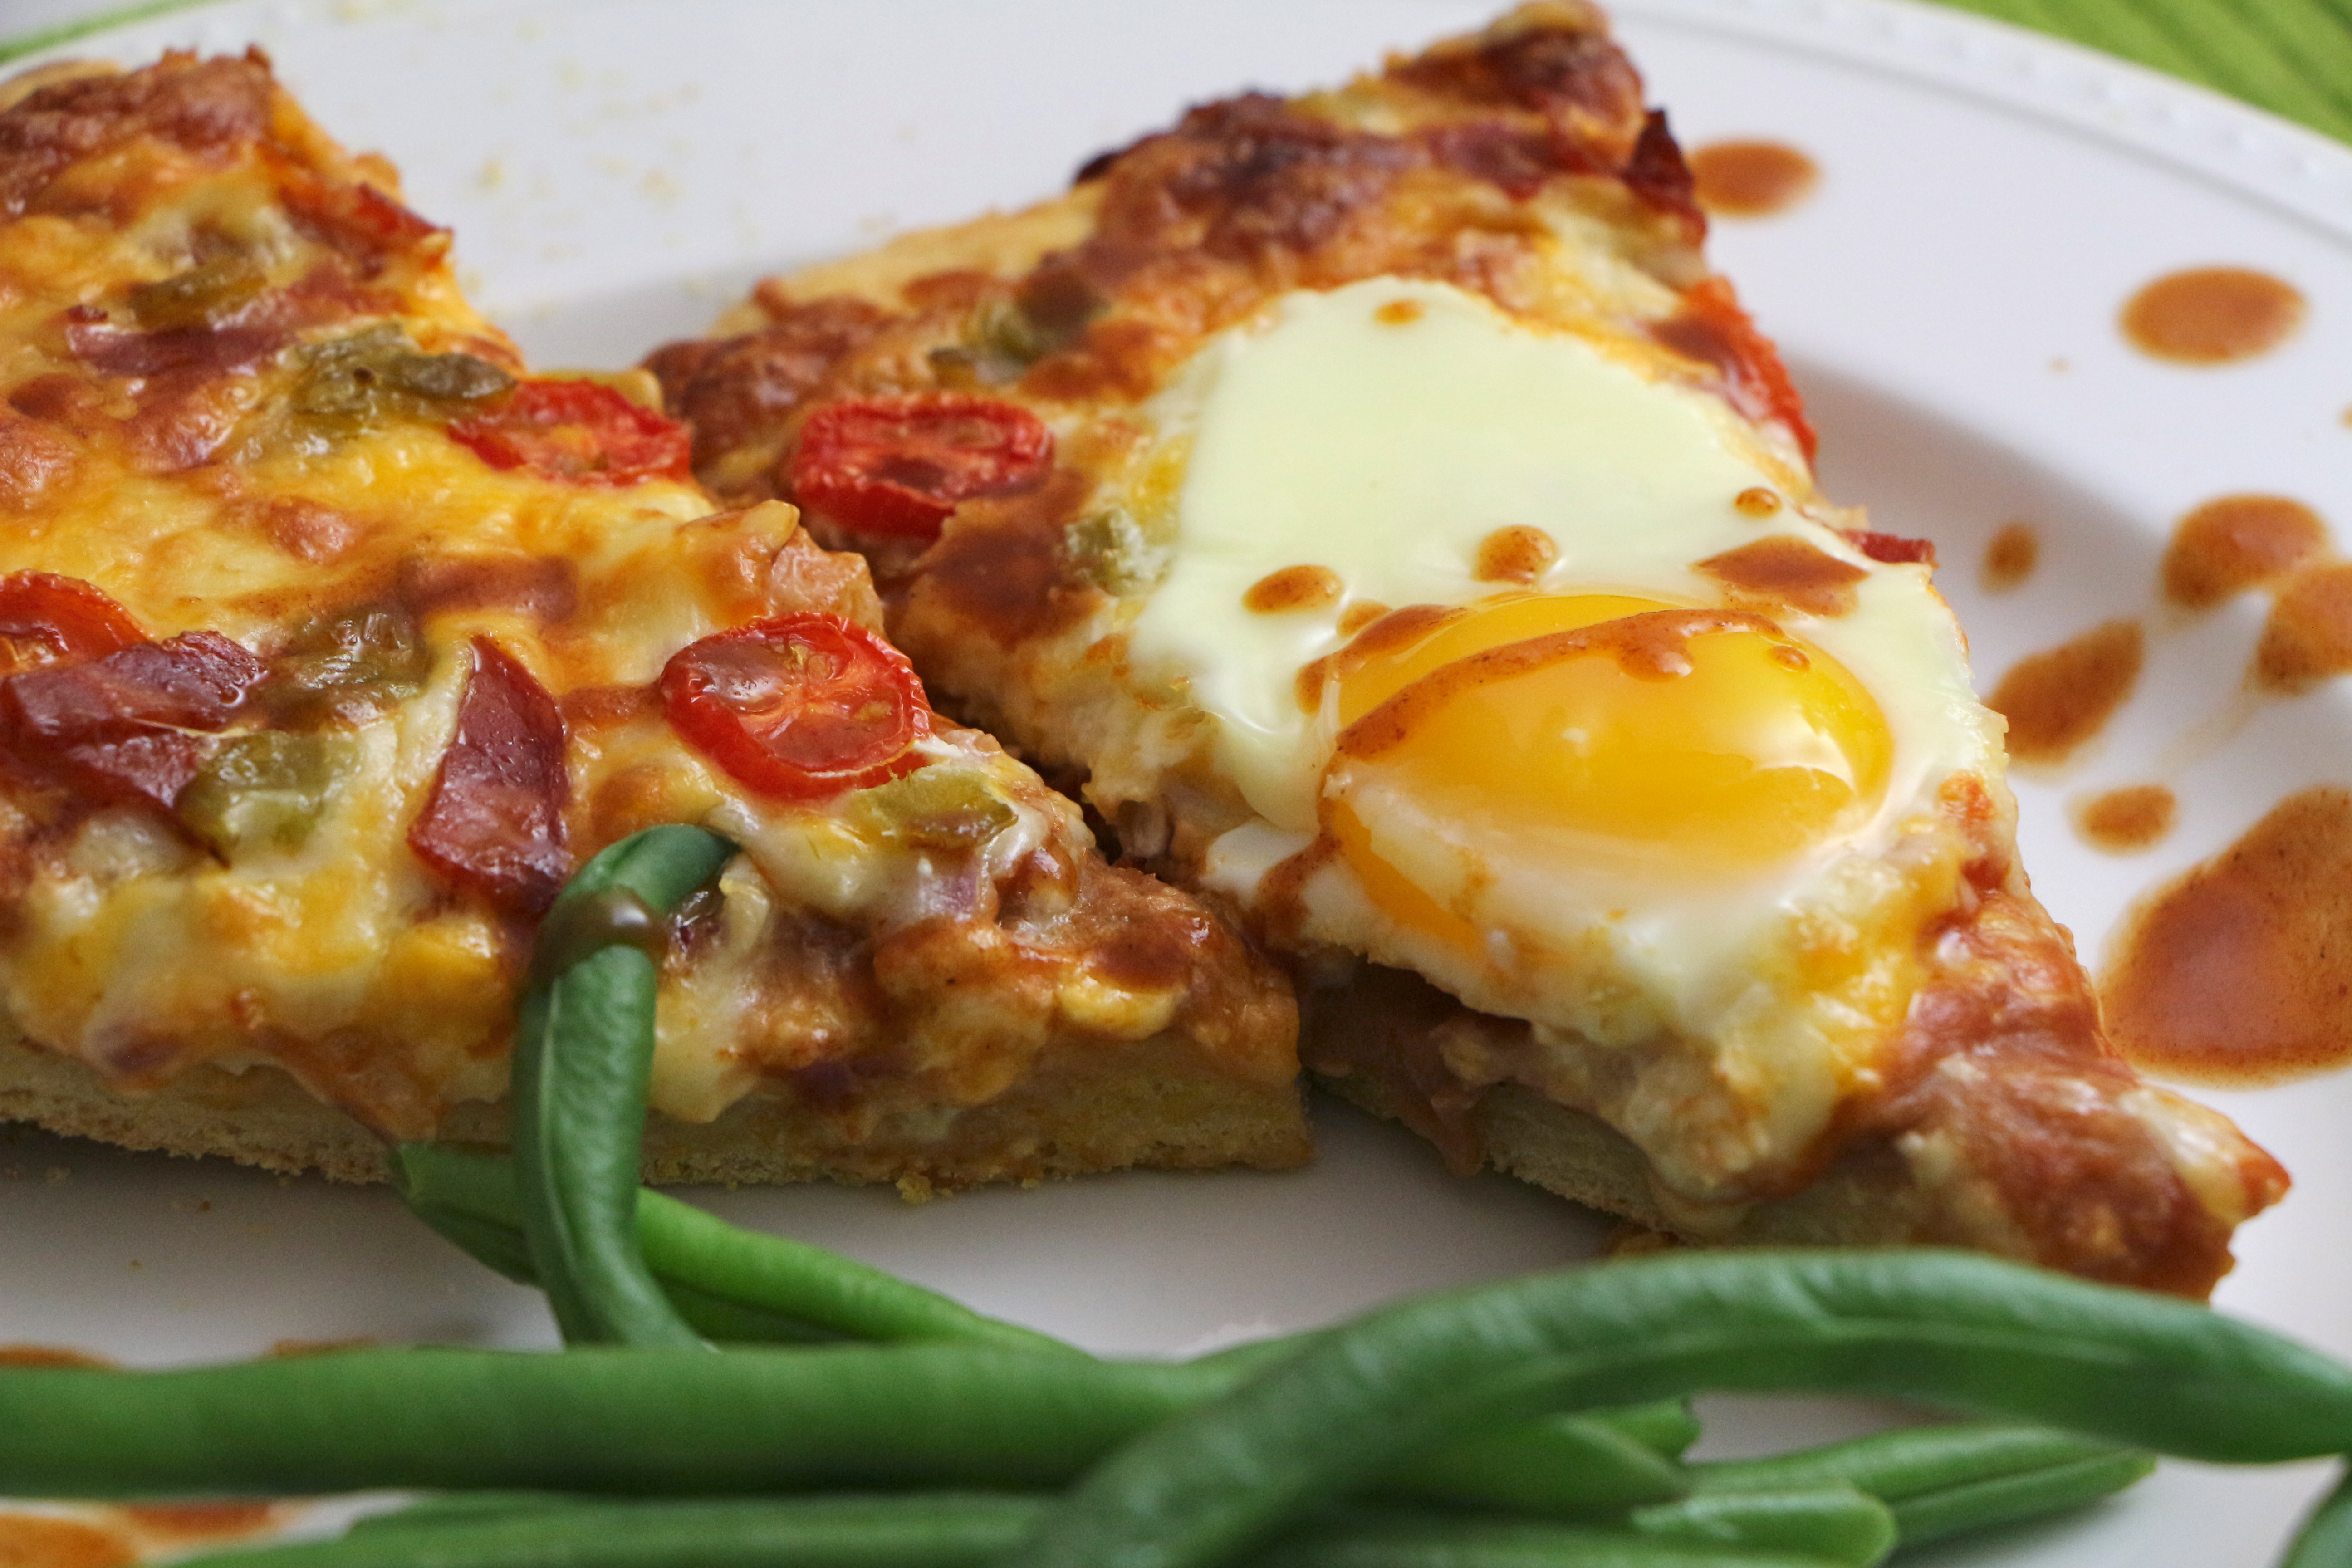
The added bonus is that our weekly lesson and all the practice in between burns a bucketload of calories. Now, if I were smart, I’d save those burned calories and let them work their magic on a bit of weight loss. Oh, but I love food too much and the dancing leaves me ravenously hungry. So, I choose to ‘spend’ my burned calories on fun food, like this Mexican-inspired huevos rancheros pizza. Truth be told, this pizza is fully inspired by nothing more than my desire to cook a pizza with eggs baked into it. It starts with a cornmeal crust, in place of the corn tortillas which would typically be used in huevos rancheros. The homemade crust is then topped with beans, taco sauce, Mexican cheese, chiles, and tomatoes. Fresh eggs are then carefully cracked on top of the pizza before baking for a stunning and unique twist on pizza.

IMG_5656

Today’s Focus on Technique – Cooking with Baker’s Yeast

Baker’s yeast is a single cell organism, commonly used as a leavening agent in many breads, pretzel doughs, and pizza doughs. As the yeast feeds on the sugars in the dough, it releases carbon dioxide, which becomes trapped within the dough, causing it to rise and expand. The most common types of yeast used in baked goods are active dry yeast and rapid rise yeast. Rapid rise yeast is made up of smaller particles, which touch a greater surface area of the dough and typically require half as much time to rise. Many people feel that the long rise time required for active dry yeast recipes results in a more flavorful dough.

Typically, many yeast dough recipes begin by proofing the yeast. Proofing is simply a process of dissolving the yeast in lukewarm water. After a few minutes, the yeast should begin to foam, proving that it is alive and ready to work its leavening magic. If the yeast doesn’t foam, it’s time to buy some new yeast. The magic temperature for proofing yeast is somewhere between 110-115°F. To assure you’ve got the right temperature, it’s helpful to use an instant-read thermometer. I usually stick the thermometer in hot water from the tap, then wait until it reduces to the right range before adding the yeast.

Yeast doughs rise best in a draft-free area, on the warmer side of room temperature (around 70°F). If your house is chillier than that, allow extra time for rising. If time is an issue, I sometimes find it helpful to preheat the oven for a bit, then place the bowl of rising dough on top of or near the oven. You don’t need to keep the oven on throughout the rise time; just long enough to release a little extra heat near the rising dough.

** Lots of other interesting information about yeast can be found HERE.


Huevos Rancheros Pizza

Ingredients

  • 2/3 cup refried beans
  • 1/3 cup taco sauce
  • 2 cups shredded Mexican blend cheese
  • 2-3 tablespoons red onion, finely diced
  • 2-3 tablespoons green chile (fresh or canned), finely diced
  • 5-6 grape tomatoes, thinly sliced
  • 1/3 cup chorizo, chopped (optional)
  • 3 eggs
  • Additional taco sauce or hot sauce for drizzling (optional)
  • Cornmeal Pizza Dough (recipe from www.marthastewart.com)

Directions

Preheat oven to 450°F.

Prepare the cornmeal pizza dough according to the recipe found HERE, except do not divide the dough into smaller portions. Roll the entire dough into one large (approximately 12″) crust. Transfer the rolled dough to a baking sheet, which has been sprinkled with a bit of cornmeal.

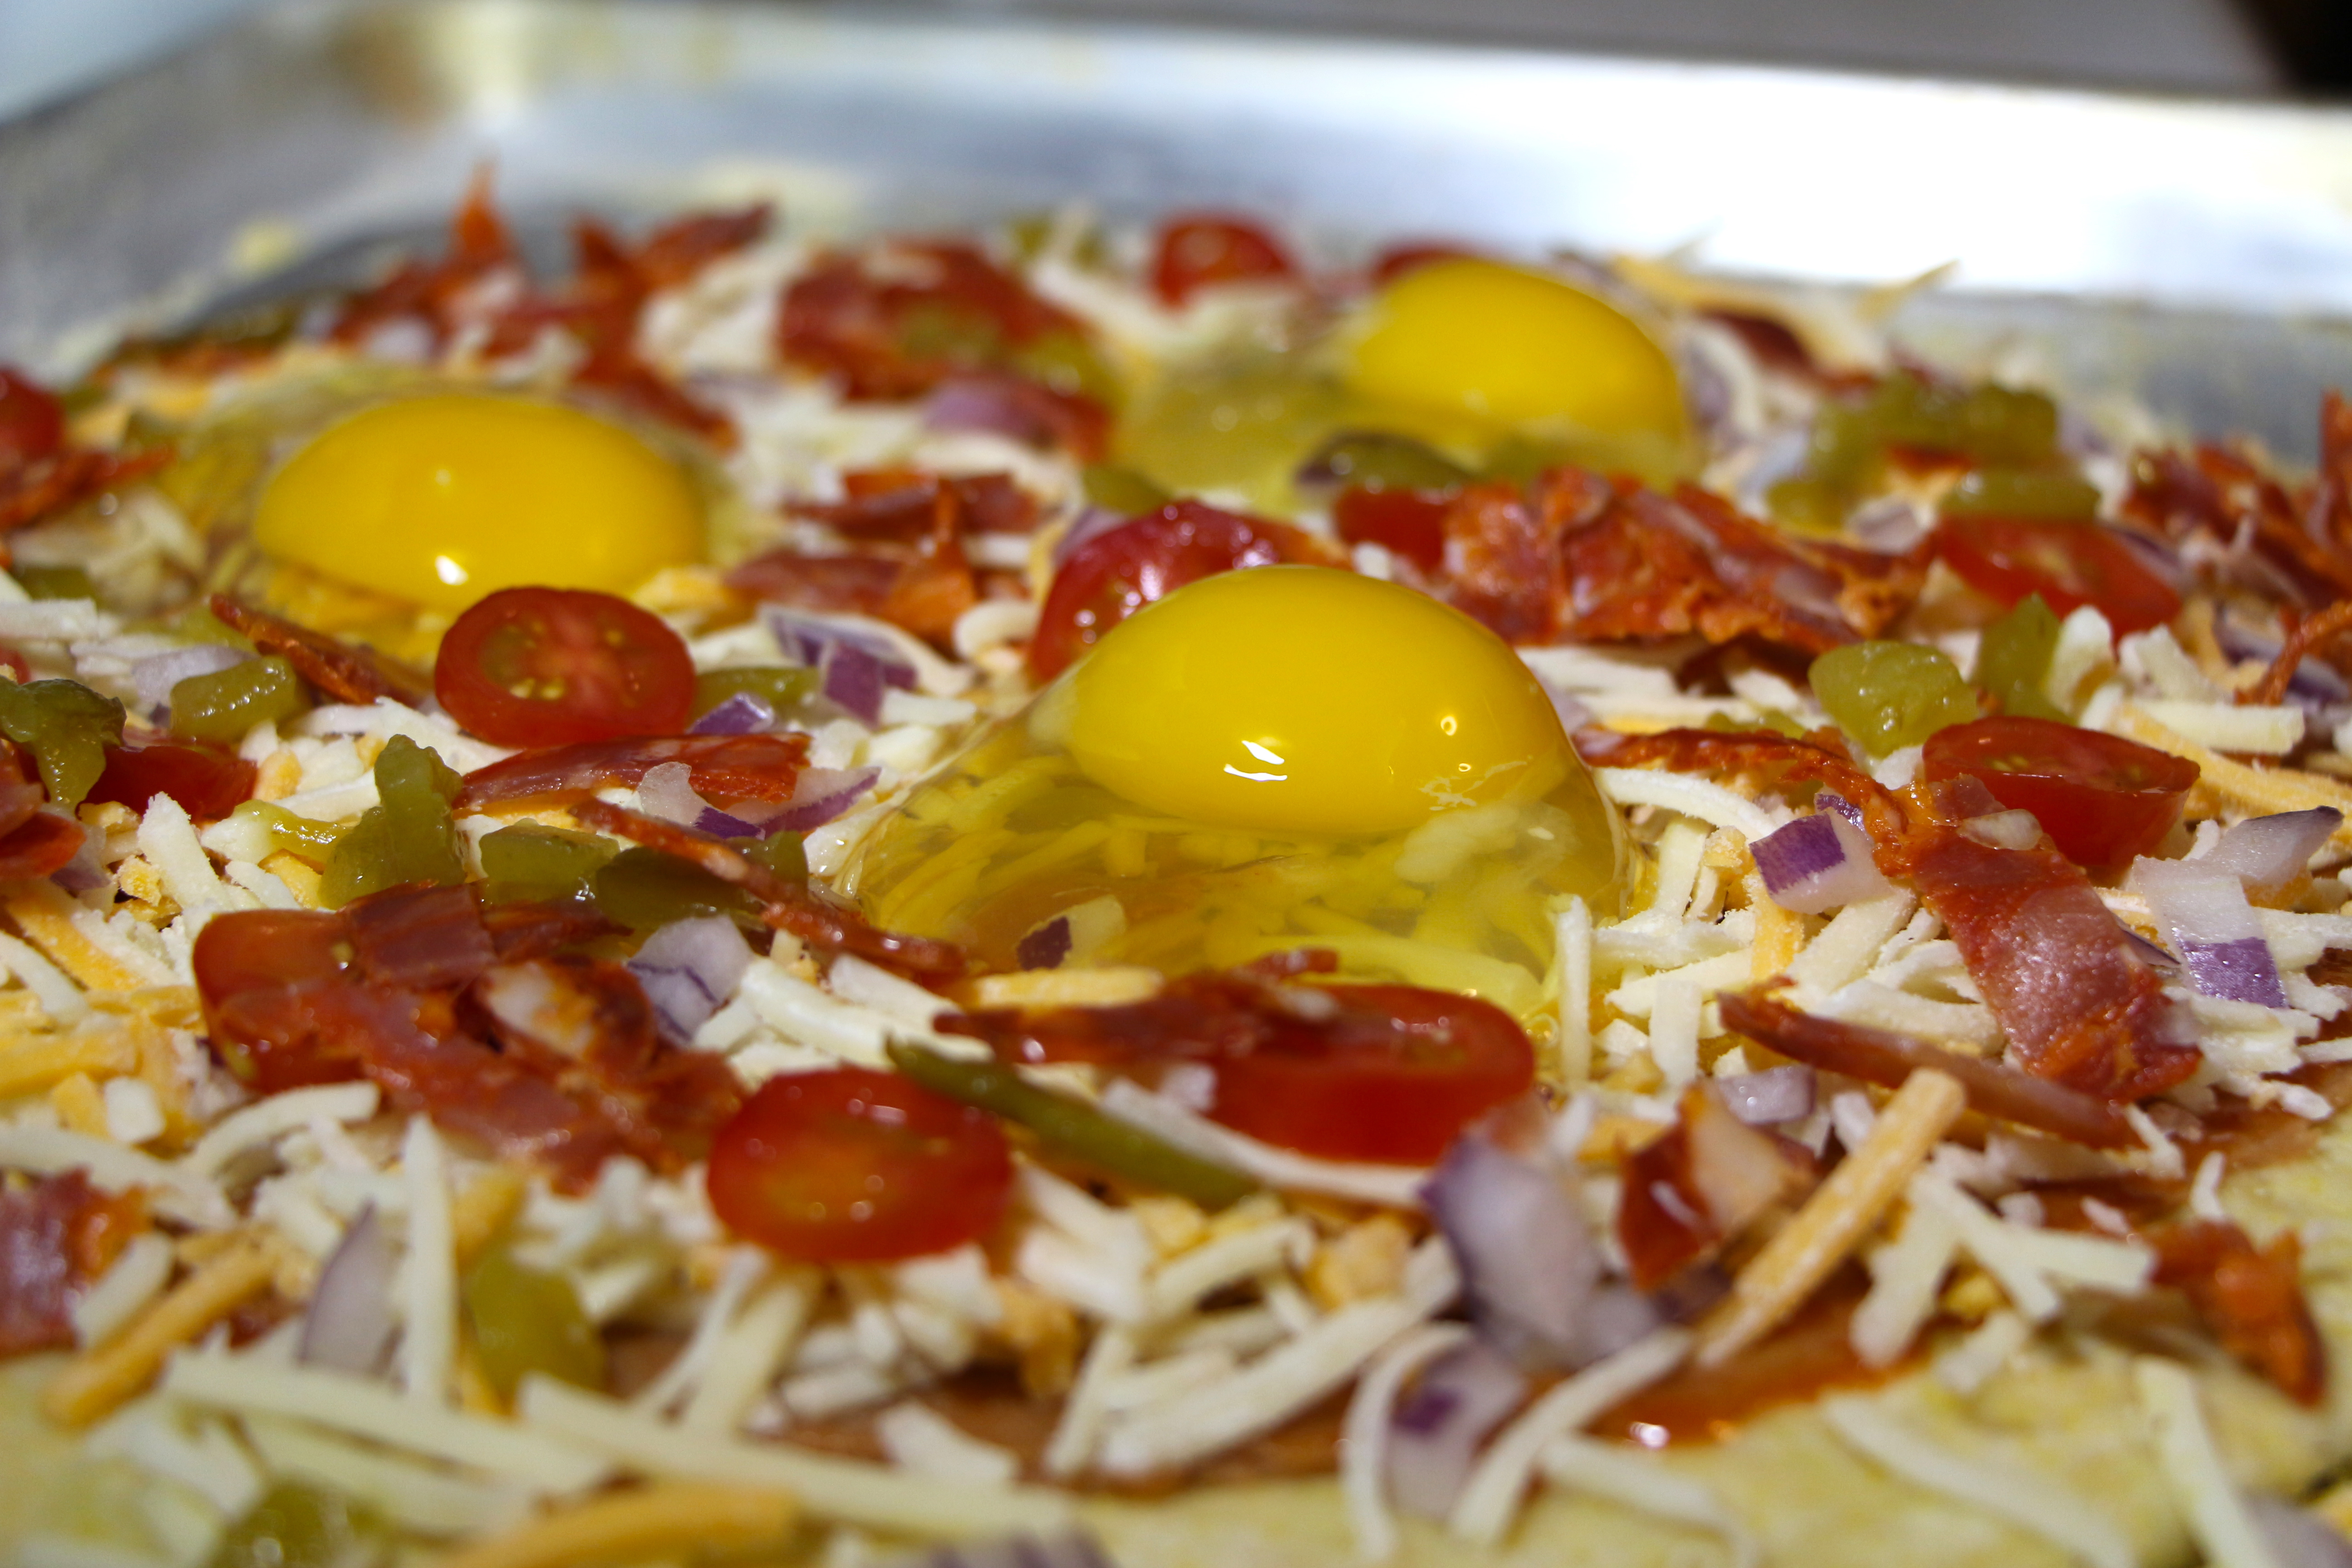
Spread the refried beans onto the crust, leaving a 1/2″-1″ lip around the edge. Drizzle the taco sauce over the beans. Scatter about 1/2 of the cheese over the sauce, then sprinkle with the onion, chile, tomatoes, and chorizo. Scatter with the remaining cheese.

Use your fingers to create three shallow wells in the pizza toppings. Carefully crack an egg into each well.

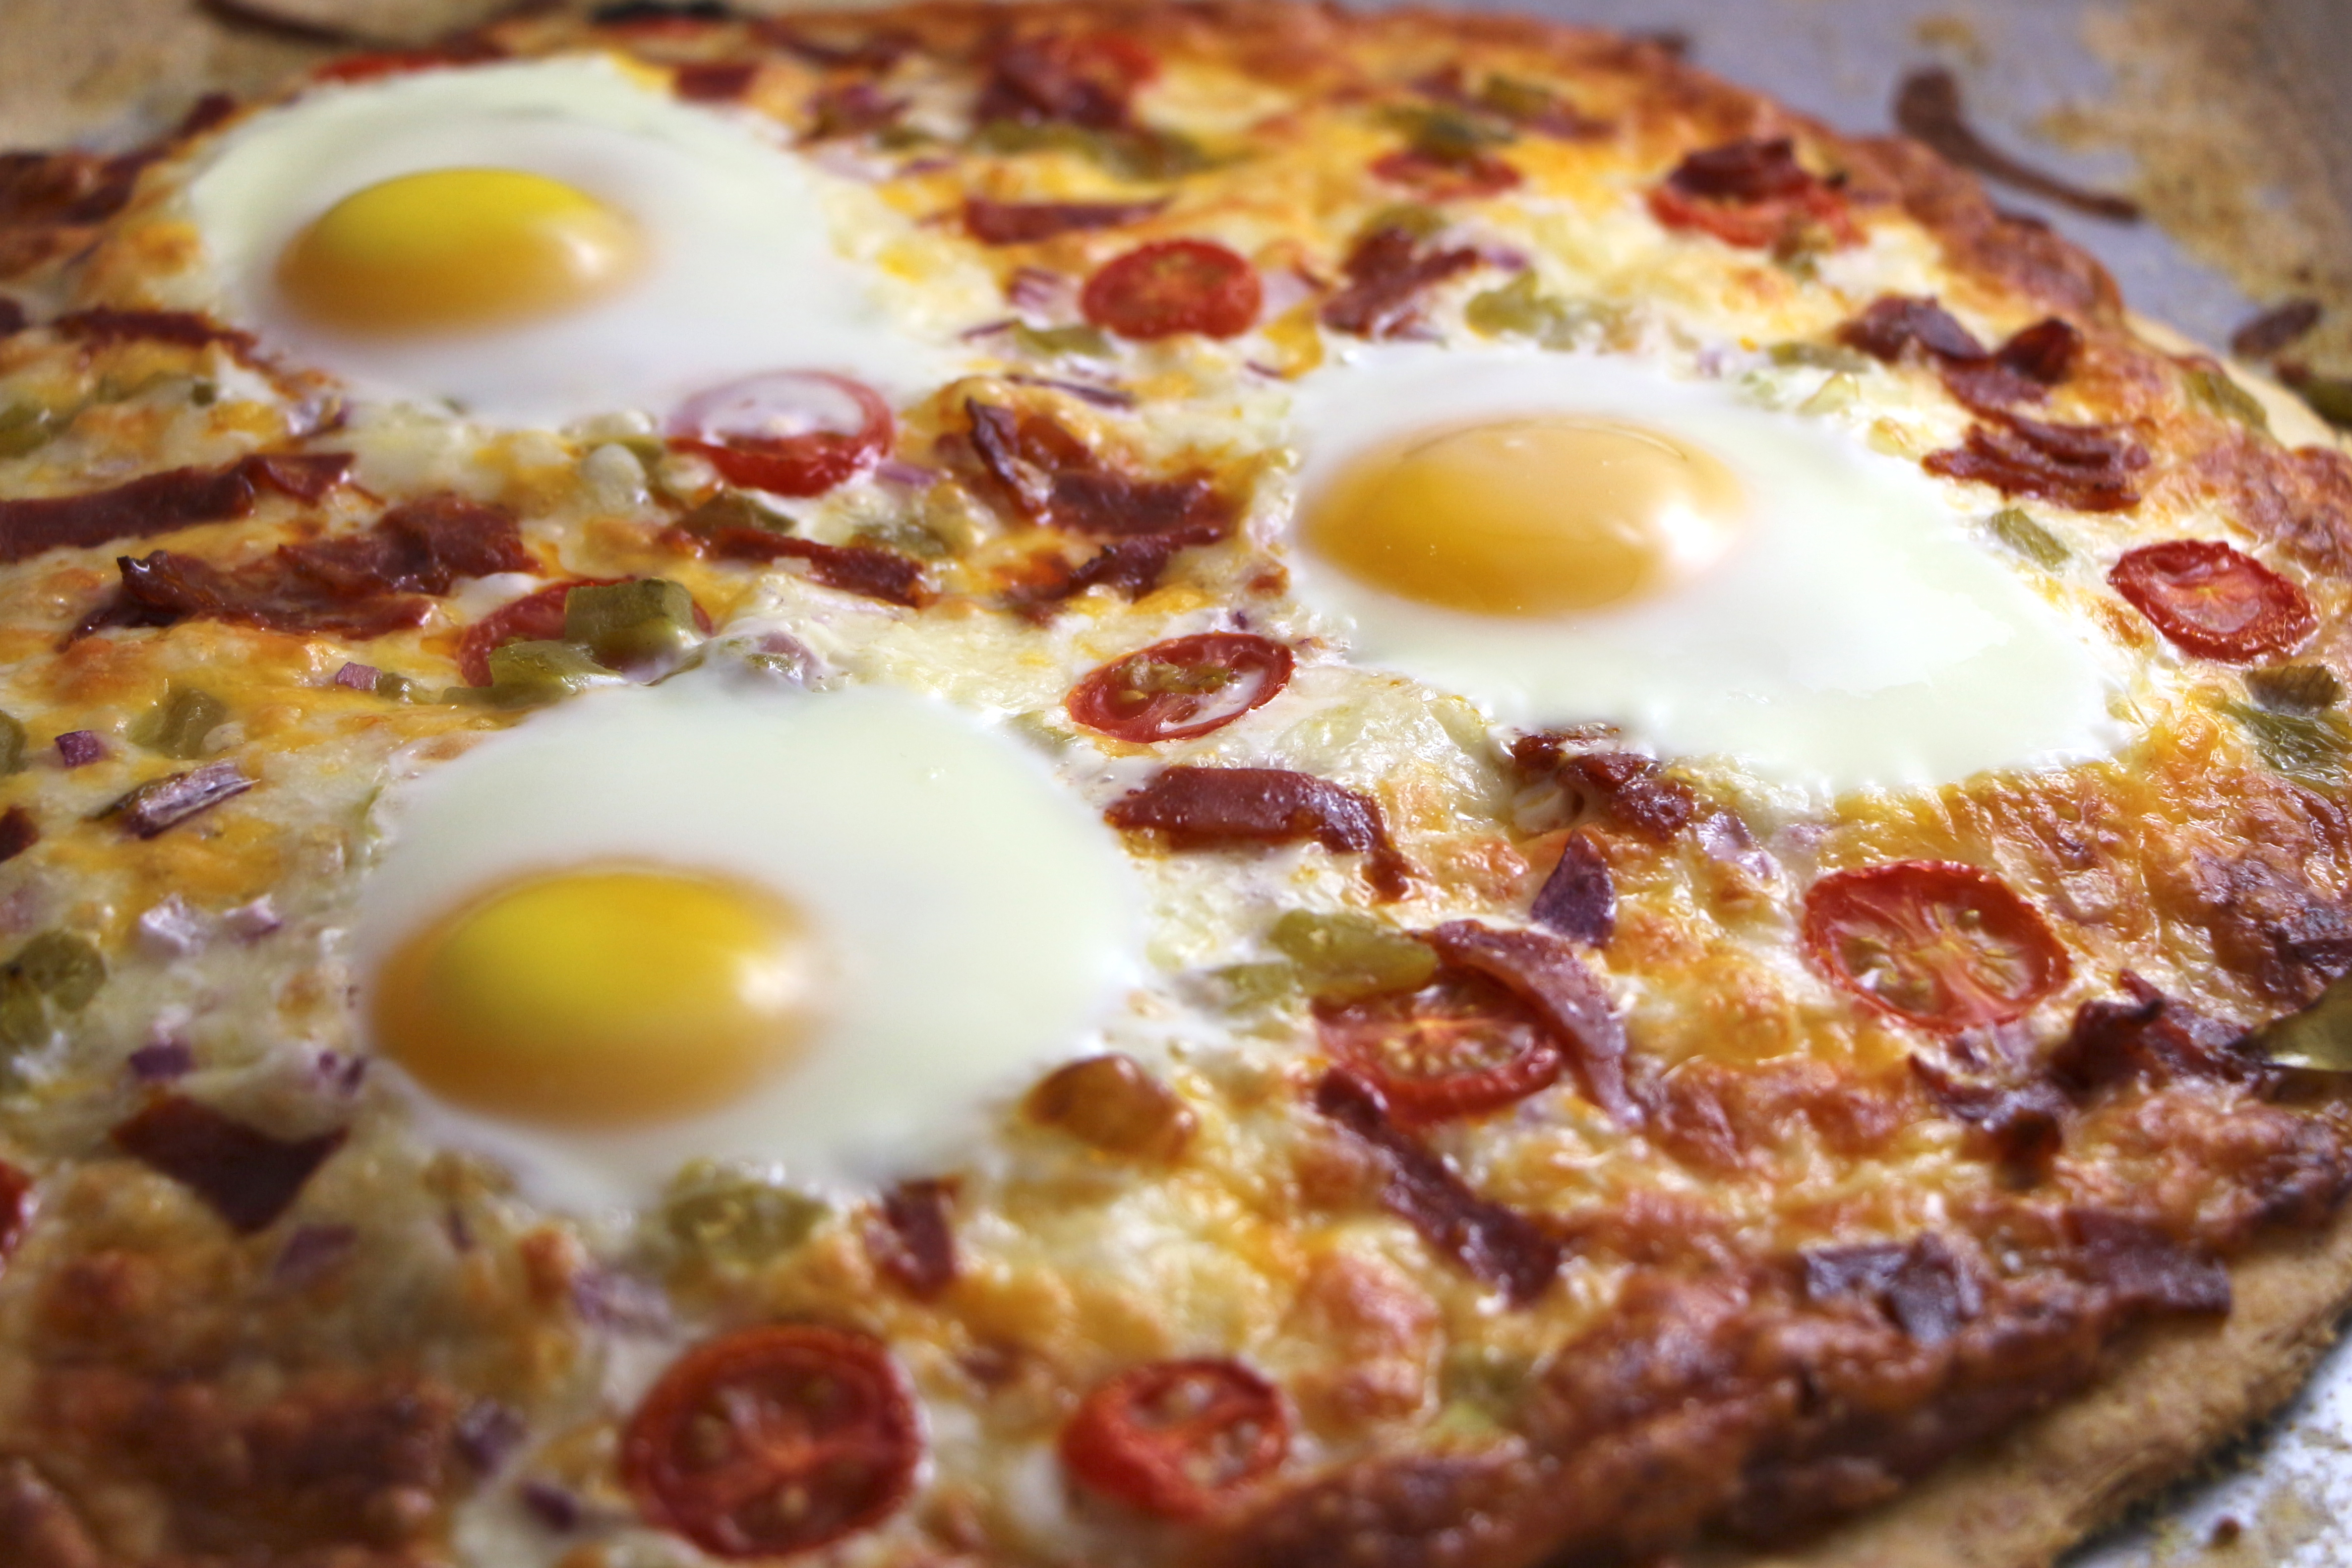
Bake for approximately 15 minutes, until the toppings are hot and melty and the eggs are cooked to your desired doneness.

**Be aware that the egg whites and yolks will maintain a bright, glossy appearance as they bake. In this case, touching the eggs to check for doneness is a more reliable indicator than their appearance. (I made the mistake of relying on appearance and cooked my eggs past the cooked white/runny yolk I was aiming for. The yolks in the photos with this post are actually fully cooked, even though they appear runny.)

IMG_5659

Eggplant Parmesan Pizza (and a Giveaway!)

Yikes! Where’d the past week go? Think I can blame my absence on a Thanksgiving tryptophan-induced coma?? Seriously though, once the dishes were cleaned from our Thanksgiving dessert, I felt myself melt into an unproductive pile of mush. I just needed a little time to recover from the rush of Thanksgiving and gear up for the holiday rush. I’m ready now. Mostly.

It wasn’t a completely unproductive week though. I decided to try my hand at making one of those adorable yarn wreaths I’ve seen pictured online. I made one, admired it for a bit, then got sucked into a major crafting time warp. I awoke covered in bits of yarn and a web of those stringy glue gun remnants. I made sixteen yarn wreaths, complete with handcrafted felt flowers and tiny green leaves, over the course of six days. I barely remember making them. They just sort of appeared in a pretty pile on my dining room table. It’s kinda weird. Almost everyone I know is getting a wreath for Christmas…even one of you!

IMG_3875

On top of manic crafting, I’ve been overfilling my calendar with holiday events, shopping lists, and cookie baking schedules. Suffice it to say, this is gonna be a busy month. And busy months require easy dinners  – the sort of stuff you can easily prepare by throwing together a few basic ingredients, while still resulting in a tummy-warming winter meal. This eggplant parmesan pizza fits the bill perfectly. You could even make it with frozen pre-fried eggplant, if you wanted to keep it super, super simple, though frying your own eggplant takes minimal effort. That crisp fried eggplant gets scattered on a pizza shell (make your own or buy pre-made, like I did) along with pizza sauce, ricotta cheese, parmesan, and melty mozzarella for a simple, satisfying meal.

IMG_3884

Today’s Focus on Technique – Salting Eggplant

It is often recommended to salt eggplant prior to frying it. This technique is best applied to larger eggplants which have been sitting in the grocery case for a bit. Baby eggplants or those that have been freshly picked will most likely be wonderful without salting. The purpose of salting the eggplant is to draw out some of the bitter liquid which collects in larger, older eggplants. The end result is better tasting, firmer eggplant which will absorb less oil as it’s fried.

To salt your eggplant, start by cutting or slicing your eggplant, as desired. Arrange the pieces or slices in a single layer on a baking sheet. Sprinkle the eggplant slices with a good amount of salt. Allow it to rest for approximately 20-25 minutes. Beads of liquid will begin appearing on the surface. Thoroughly rinse the eggplant and pat dry.

IMG_3896

Eggplant Parmesan Pizza

Ingredients 

  • 1 eggplant, sliced into 1/4″ slices
  • Salt
  • 1/2 cup flour
  • 2 eggs, lightly beaten
  • 2 cups seasoned bread crumbs
  • Vegetable or olive oil, for frying
  • 1 pizza crust (store-bought or homemade)
  • 1/2 cup ricotta cheese
  • 1/2 cup pizza sauce
  • 1/4 cup parmesan cheese
  • 1 cup mozzarella cheese, shredded

*All measurements are approximate. Actual measurements will vary depending on the size of your pizza crust. I used a 12″ store-bought crust.

Directions

Arrange the eggplant slices in a single layer. Sprinkle with a good amount of salt. Allow to rest for about 20 minutes. Rinse thoroughly, then pat dry.

Dredge each slice in the flour, then dip in egg, then dredge in the bread crumbs. Press the bread crumbs into the eggplant so that it is thoroughly covered. Heat a thin layer (about 1/8″) of oil in a large fry pan over medium/medium-high heat. Fry the eggplant slices for a minute or two on each side, until golden brown and crispy. Adjust the heat, as necessary, to prevent burning. Drain the fried slices on paper towels. Chop into small pieces.

To assemble the pizza: Preheat oven to 375 degrees. Spread the ricotta cheese in an even layer over the pizza crust. Spread the pizza sauce on top of the ricotta (I like to use a smooth and thick, tomato paste based pizza sauce.) Sprinkle about 1/2 of the mozzarella cheese over the sauce. Arrange some of the eggplant pieces around the pizza. (You may have extra eggplant remaining.) Sprinkle with the parmesan cheese and remaining mozzarella cheese. Bake for about 15-18 minutes, until hot and melty.

IMG_4324

I come bearing gifts… Want to win one of the 8″ wreaths I made? Keep it for yourself or cross someone off your shopping list! I’ll even try to match the winner up with a color scheme of your choice! If you’d like to enter to win a wreath, leave a comment about your favorite holiday tradition (any holiday) or your top tip for enjoying a stress-free holiday season. The contest will end at 12:00 noon EST on Saturday, December 8, 2012, when I will randomly select one winner. One entry per person. US mailing addresses only, please. Good luck!

Barbecue Bacon Mango Pizza

Posted on

The sun is barely risen. I’m lying in bed and I can feel sweet warm breath rhythmically hitting my face. I slowly open my eyes and find myself nose to nose with Lucas, my three-year-old, who climbs into bed with me each morning. I put my arms around him, then close my eyes and pretend to be asleep. He plays with one of my earrings, trying to remove the small silver leaf from my ear. After a moment, he abandons the earring and begins running his tiny fingers over my eyebrows. Behind me, I can feel my five-year-old, Liam, trying to braid my excessively long hair. Lucas becomes bored with my eyebrows and begins trying to forcefully push my eyelids open. I roll over to face my Liam. Liam pushes his nose closer to mine and whispers, I love you, Mommy. I kiss his nose. The baby begins to peep through the monitor, wordlessly begging to join the family snuggle time. My husband rolls out of bed to grab the baby. Once in our bedroom, our sweet baby James crawls over his brothers to get on top of me. He puts his wide open mouth onto my cheek. I think it’s a kiss. A very sloppy kiss. Then he tries to jam his finger into my mouth to touch my teeth. I rouse myself then, to bring the boys downstairs for breakfast before my little amateur dentist gets too aggressive.

I’ve come to realize that I belong to my children as much as they belong to me. We belong to each other. It’s a thoroughly symbiotic relationship.

More than anything, I want my family to feel loved in the same way they so generously give their love to me. And one of the ways that I show my love is through fresh and delicious food, carefully crafted into delicious meals we can enjoy as a family, like this barbecue bacon mango pizza. This pizza is inspired by one of the recipes provided by The National Mango Board in a booklet they sent along with a shipment of beautiful ripe mangos. It instantly reminded me of a sweet and savory Hawaiian pizza, only substituting the ham for bacon and the pineapple for mango. Genius. Only I took that idea a little further by coming up with a homemade mango barbecue sauce, rather than slathering on something store-bought.

Though unplanned, the preparation of this pizza became a family affair. Small noses came running at the scent of bacon. Small hands stole said bacon. Small mouths gobbled up an entire mango before I had a moment to protest. We dubbed the afternoon Mangofest. There were tears when the last of the mango had been devoured, but smiles returned once this pizza was presented. Definitely a family pleaser! Best yet, the recipe for the barbecue sauce will make more than you need for the pizza…perfect for grilled mango barbecue chicken breasts the next day!!

Barbecue Bacon Mango Pizza

Ingredients

For the mango barbecue sauce

  • 1 tablespoon olive oil
  • 1/2 small red onion, chopped
  • 1 1/2 teaspoons garlic, minced
  • 1 (15-ounce) can tomato sauce
  • 1 1/2 cups fresh mango puree (2 medium mangos should do the trick)
  • 4 tablespoons tomato paste
  • 2 tablespoons brown sugar
  • 2 tablespoons apple cider vinegar
  • 1 tablespoon worcestershire sauce
  • 1 teaspoon dry mustard
  • 1/2 teaspoon cayenne pepper (plus more, if desired)
  • Salt (optional), as desired

For the pizza

  • 1 12″ pizza crust
  • 1/2 red onion, thinly sliced
  • 1 tablespoon olive oil
  • 1 mango, chopped*
  • 6-8 slices bacon, cooked and chopped
  • 3/4 cup mozzarella cheese, shredded
  • Fresh parsley, chopped

* Click HERE to see my photo guide on how to chop a mango.

Directions

To prepare the mango barbecue sauce: Heat the olive oil in a large pan over medium/medium-low heat. Add the onion and cook for 5-7 minutes until tender and translucent. Add the garlic and cook for another minute or two. Add all other barbecue sauce ingredients and stir to combine. Bring to a very gentle simmer, then reduce the heat to low and simmer for about 25 minutes, stirring occasionally to prevent burning. Allow the sauce to cool, then use a food processor or blender to puree until smooth. Taste the sauce and adjust seasoning as desired. Refrigerate until using.*

To prepare the pizza: Heat the oil in a small pan over medium/medium-low heat. Add the onion. Cook for about 15 minutes, stirring frequently to prevent burning, until the onions are tender, sweet, and lightly golden. Spread a thin layer of the sauce (approximately 1/2 cup) over the pizza crust. Scatter most of the bacon, mango, and onions over the sauce. Top with the shredded cheese. Scatter the remaining bacon, mango, onions, and parsley on top. Bake in a 400 degrees oven for about 12-15 minutes, until hot and melty.

*The barbecue sauce recipe will produce more sauce than is necessary for the pizza. You can use the sauce as you might use any barbecue sauce on grilled chicken, ribs, shrimp… It would also freeze nicely for later use.

Grilled Chicken Tikka Masala Pizza

Posted on

Anyone following all of this crazy zombie apocalypse ‘news’ popping up?? There’s some seriously wacky stuff going on out there.  I’ve seen enough zombie movies to know that this is always how it begins…a few random incidents which are brushed off as isolated events with some logical cause. The public is urged not to panic and then all h.e.double hockey sticks breaks loose. (Being told not to panic is a sure sign that it’s time to panic.) And honestly, though I’m inclined to believe that all of this has more to do with dangerous mind-altering drugs than a zombie armageddon, I’m not sure that brings me any peace of mind.

Did ya know that the CDC’s website has a section on zombie preparedness?? I kid you not. I’m pretty sure it’s a tongue-in-cheek, fun way to educate about general disaster readiness. Or is it???

Personally, I learned everything I need to know from the educational zombie comedy, Zombieland.

Zombie Survival Rule #1: Cardio

Good thing I’ve been running again. And it feels so good. I’d been struggling to get back to a regular running routine ever since having my baby 15 months ago and it’s been an uphill battle, both literally and figuratively. My progress had been dreadfully slow. But, the baby weaned from nursing almost two months ago and my running progress has accelerated ever since. Guess I didn’t realize the toll it was taking on my body. It feels good to get out there for my runs and I’ll be ready when the zombies…errr, I mean bath salt crazies…start chasing me down. (I’m joking…mostly.)

The other benefit of running is that it affords me a little more wiggle room in my dietary choices, so I can afford to enjoy a few indulgences. Ok, my running/indulgence balance is admittedly still a bit off, but it’s getting closer. This grilled chicken tikka masala is one of those indulgences that I think about when I’m running. This mouth-watering pizza combines one of my all-time favorite dishes, chicken tikka masala, with homemade garlicky grilled naan flatbread and a bit of melty mozzarella cheese. Seriously yummy and worth every second of heart-pounding cardio.

I’d like to tell you that this dish is a cinch to pull together, but that would be a lie. There is nothing inherently difficult about it, but between preparing the marinade, making the sauce, preparing the dough, grilling the chicken, grilling the naan, and then assembling and grilling the pizzas, this is a time consuming meal. But it is a labor of love. Definitely worth the time! Just save it for a sunny weekend day and get the whole family involved in the process!

To make things more manageable, you may want to plan to cook the meal in parts. The chicken can be marinated the night before. The sauce, the chicken, and the naan can all be made ahead of time and will hold well in the fridge for a day or two. You could even enjoy the meal as traditional chicken tikka masala with rice and naan one night and make the pizzas for leftovers the next day! However you decide to break it up, I think you’re going to enjoy this delicious meal!

Grilled Chicken Tikka Masala Pizza

Ingredients

For the Naan*

  • 1 packet dry active yeast
  • 1 cup warm water (about 110-115 degrees)
  • 1/8 cup sugar
  • 3/4 teaspoon salt
  • 1/4 cup milk
  • 1 egg, lightly beaten
  • 1 tablespoon garlic, minced
  • 4 cups flour (approximately)
  • 4 tablespoons butter, melted

For the Chicken

  • 1 1/2 pounds boneless, skinless chicken thighs, trimmed of excess fat
  • 1 1/2 cups plain yogurt
  • 3 tablespoons garam masala
  • 2 teaspoons garlic, minced
  • 1/2 teaspoon salt
  • 1 teaspoon paprika
  • 1/4 teaspoon cayenne
  • 1/2 inch segment of fresh ginger, grated

For the Sauce

  • 3 tablespoon butter
  • 1 small onion, diced
  • 1 teaspoon garlic, minced
  • 1 1-2″ segment fresh ginger, grated
  • 2 small serrano peppers, seeds and ribs removed, diced
  • 1 1/2 tablespoons garam masala
  • 1 (29 ounce) can crushed tomatoes
  • 1/4 cup tomato paste
  • 1 cup heavy cream
  • 1/4-1/2 teaspoon cayenne (plus more, if desired)
  • 1 teaspoon salt (plus more, if desired)
For the Pizzas
  • 2 cups mozzarella cheese, shredded
  • Fresh parsley leaves, chopped

Directions

To prepare the chicken marinade: Combine all marinade ingredients in a container with a tight-fitting lid. Place the chicken thighs in the marinade and toss to evenly coat. Refrigerate and allow the chicken to marinade for at least six hours or overnight.

To grill the chicken: Wipe the grill with a bit of vegetable oil to help prevent sticking. Preheat grill to medium heat. Shake the excess marinade off of the chicken and place it on the preheated grill. Cook the chicken for about 7-10 minutes on each side. (Cooking time will depend on the thickness of the chicken. The chicken is fully cooked when it has reached an internal temperature of 165 degrees.) Allow the chicken to cool, then cut into small pieces. Refrigerate until using.

To make the naan: Stir together the yeast and warm water. Allow to rest for about 10 minutes. Stir in the sugar, salt, milk, garlic and egg. Add the flour 1 cup at a time, stirring and kneading for several minutes until a soft dough forms. (Add the flour slowly towards the end, since the quantity of flour will vary. The dough should be slightly sticky, but manageable. If the dough is too dry, add little bits of water or milk. If the dough is too wet, add small quantities of additional flour.) Place the dough in a lightly oiled bowl. Cover with a slightly damp towel and allow it to rest at room temperature for 1-2 hours, until it has doubled in size. Then, divide the risen dough into 12 equal balls of dough. Place the balls on a lightly oiled baking sheet. Cover with the towel and allow to rest at room temperature for about 30 minutes. Preheat your grill to medium heat. Prepare a work station near your grill with a rolling pin, cutting board, and flour. Lightly scatter the flour over the cutting board. One at a time, roll each ball of dough into a flat round, then gently stretch the dough into a soft teardrop shape. Place the dough directly onto the grill and cook for about a minute on each side. It will begin to puff slightly when it is done. Remove from the grill and brush with melted butter.

To make the sauce: Melt butter in a saucepan over medium heat. Add the onions, garlic, ginger, and serrano peppers. Cook for about 5 minutes, stirring frequently, until the onion is translucent. Add the garam masala, stir, and cook for another minute. Add the crushed tomatoes, tomato paste, salt, and cayenne pepper. Stir to combine. Continue cooking until heated through, stirring frequently. Reduce the heat and add the cream. Taste and adjust seasoning with additional salt and cayenne pepper, as desired.

To assemble the pizzas: Spread a layer of sauce onto each piece of naan. Scatter some of the chicken over each naan. Sprinkle each pizza with a bit of the mozzarella cheese. Garnish with fresh parsley. Heat the pizzas on the grill or in a 350 degree oven until the cheese is melty and all components are heated through (about 8-10 minutes).

*Recipe for naan adapted from the recipe found HERE.

Makes 10-12 small individual pizzas

Steak and White Cheddar Flatbread Pizza

Posted on

I had another parenting panic moment recently, similar to my reaction upon discovering that my oldest had his first loose tooth. Only this time, I didn’t immediately rush off to the doctor, which is a good thing, since he surely would have laughed at me.

You see, on multiple occasions during the past few weeks, we have noticed that the top of the baby’s right foot appears darkened; sort of a like a pale bruise. Each time, the darkening has gone away by the next day and since he seemed otherwise alright, we assumed we were just seeing things with our over-cautious parent eyes. Until it happened again, which increased our worry. Then, just the other day, it happened again. And I thought…That’s it! I’m bringing this kid into to the doctor, for something is surely wrong. I was in full Mommy panic mode by that point, assuming that my sweet baby must have some sort of horrible circulation disorder or something unimaginably worse.

But, before calling the doctor, I had the clever idea to try washing his foot. Sure enough, that pale bruised appearance quickly wiped away revealing a perfect little foot to match his left. Relief washed over me. And with the clarity of relief, I quickly figured out what had been causing the top of that one foot to repeatedly turn brown. You see, our sweet little baby has the most unique crawl I’ve ever seen. He started doing it a couple months ago. It is so fast and effective that we fear he’ll never choose to walk, though he already has all of the skills and coordination to do so. We fondly call it his ‘Planet of the Apes’ crawl, for it strongly resembles the half walk/half crawl of an evolved ape. He plants both hands and one foot (his left foot) flat onto the ground. The other leg (his right) maintains a bent crawling position. He leads with the left foot, in a pseudo walk, as he drags the bent right leg along. It’s an extremely fast and effective mode of locomotion. He does not have a circulation disorder. He does not have a bruised foot. The top of his right foot is merely the embarrassing evidence of my dirty floors. I’ve never been so relieved over dirty floors.

In between moments of needless parenting panic, I spend my mental energy obsessing over favored flavor combinations. They get caught in my head and I find myself itching to marry those flavor combinations again and again, in every form I can think of. Prosciutto, figs, and gorgonzola or chicken with hot sauce and bleu cheese or goat cheese with sun-dried tomatoes and olives.

Lately, I’m stuck on the combination of steak with aged white cheddar and horseradish. Recently, I made the most amazing, warm and cheesy steak and white cheddar dip. The dip was crave-worthy delicious. We used warm slices of French baguette to shovel the tasty dip into our hungry mouths. But it was an ugly dip; not at all photogenic. Definitely too ugly to form a post around.

And then, I found myself with some leftover flank steak. It didn’t take me long to decide what I would do. I’d adapt that luscious dip, into a flavorful spread, which I’d lather over flatbreads, then top with the leftover steak and some sweet caramelized onions; a final sprinkle of mozzarella and white cheddar cheese, with a scatter of green onions for a little vibrant color, and we’d have steak and white cheddar flatbread pizzas. Crave-worthy AND photogenic!

Steak and White Cheddar Flatbread Pizza

Ingredients

  • 4 ounces cream cheese, softened to room temperature
  • 1 cup aged white cheddar cheese, shredded
  • 1/2 cup sour cream
  • 2 tablespoons prepared horseradish
  • Dash of hot sauce
  • Salt and pepper
  • 1 cup leftover steak, cut into small pieces
  • 1 red onion, thinly sliced
  • 2 tablespoons olive oil
  • 4 flatbreads, naan, or pita rounds
  • 1/2 cup mozzarella cheese, shredded
  • 1/2 cup white cheddar cheese, shredded
  • 3 green onions, sliced

Directions

To prepare the cheddar-horseradish spread: Combine cream cheese, white cheddar, sour cream, horseradish, and hot sauce until well blended. Taste and season with salt and pepper, as desired. Refrigerate until using.

To prepare the caramelized onions: Heat olive oil in a pan over medium heat. Add the onions and cook, stirring frequently, until the onions are tender, sweet, and lightly golden (about 10-15 minutes should do the trick).

To assemble the pizzas: Spread a thin layer of the white cheddar spread over each flatbread. Top with a portion of the caramelized onions and steak. Sprinkle with a bit of mozzarella and white cheddar cheese. Garnish with some of the sliced green onions. Bake in a 400 degrees oven for about 15 minutes, until the crusts are slightly crisp and the toppings are hot and melty. (Placing the pizzas directly on the oven rack will help the crust to get crispier faster.)

Makes 4 flatbread pizzas

Sweet Little Monkey Baby

Fishy Friday – Lenten Round-Up

The kids have been home from school this week for their mid-winter break, which I’m now convinced is some sort of cruel joke on parents. I mean, seriously…whose idea was it to schedule a week off from school in the middle of winter, leaving me stuck inside with three very loud, very active, and very needy children?? I’ve been jumping through hoops all week trying to keep everyone sufficiently content, which has left little time for things like thinking or writing…hence the lack of blog posts this week. Even now, as I attempt to type, the baby is grabbing at my fingers, while the other boys are playing a game which seems to center around making an unusually loud and abrasive growling sound.

This morning I took the boys to meet up with some friends at  a local bounce house, followed by lunch (which turned into second breakfast, since we vacated the bounce house sooner than planned) and ice cream at Friendly’s. It was a feeble attempt to encourage the kids to burn off some of their excess energy so that I had a small chance of a calm afternoon. Though I think the ice cream may be working against my plans. Ugh…this parenting thing is hard!

New recipes coming up next week, but for now here’s a round-up of fishy recipes, which may come in handy for any of you who are observing meat-free Fridays during lent.

Pan-seared Scallops with Pina Colada Salsa and Coconut Rice

Pan-seared Cod over Bean and Basil Puree

Creole Fish Tacos

Smoked Salmon and Cucumber Salad

Asian-style Fish Tacos

Lobster Pot Pie

Lobster BLT Sandwiches (skip the bacon)

Salmon, Cucumber, and Orzo Salad

Codfish Cakes

Shrimp Scampi Flatbread Pizza (and last year’s Lenten recipe round-up!)

Top Ten Gourmand Mom Recipes

As I’ve mentioned before, I’m greatly entertained by reading through the search terms which lead people to this little blog. It often leaves me puzzling over how the terms “Christmas money wreath” or “dog with running shoes” brought people here. What in the world have I been writing about? Of course, most of the time, people are just looking for recipes and, as it turns out, some of those recipes are quite popular!

Here, I’ve compiled a list of the top ten most viewed Gourmand Mom recipes. Then, if you scroll down a bit further, you’ll see ten of my personal favorites. (Clicking on the recipe titles will bring you straight to the recipe.)

What’s your favorite recipe? Tell me about it!

Top Ten Gourmand Mom Recipes

(according to page views)

Crab Stuffed Jalapeno Poppers  – Coming in at #10, these spicy little appetizers are a fresh and flavorful alternative to the kind you’ll find in the frozen food section of your grocery store!

A Better Caramel Apple Cake – Yum! This recipe is the result of experimenting with a delicious recipe I found in the Food Network magazine! Who knew that a bit of boiling water would make such a big difference?? With apple season reaching its peak, now’s a great time to give this one a try!

Almost Perfect Fontina Chops – This recipe is inspired by a Bonefish Grill dish, which is apparently a big favorite, since I get a few search hits every day from people looking for this recipe. This version is not intended to be a copycat recipe; it’s just a delicious dinner inspired by the popular Bonefish dish.

 Independence Day Berries and Cream – Mixed Berry Mousse and Vanilla Bean Panna Cotta – My love for panna cotta began with this sweet treat. Mmmm….fresh berry mousse with sweetened cream! Mmmm…

Strawberry Spinach Salad with Goat Cheese and Almonds – The fresh ingredients do all of the hard work in this simple and delicious salad!

Hawaiian Garlic Shrimp – This is another recipe that gets a ton of search hits. The people want Hawaiian garlic shrimp…and with good reason! It’s delicious! Next time, I’d veer away from the traditional preparation and cook these babies with the shells removed to get more of the buttery garlic in my mouth and less on my fingers.

Chicken Wing Dip – Coming in at #4 is Chicken Wing Dip. It’s practically a classic and totally crave-worthy. Oh dear, just thinking about it makes me want to throw batch in the oven. Must. Have. Chicken Wing Dip.

Pumpkin Gingersnap Parfait – Perfect season for these tasty treats. Some may prefer to sweeten the pumpkin a touch more in these easy treats. For me, they’re just right!

Sweet Honey Cornbread – This one scored most of its hits when it landed on WordPress’ Freshly Pressed section for a day. It’s a great cornbread recipe; sweet, tender, and super easy to make!

And the #1 Most Viewed Gourmand Mom recipe is (drumroll, please)…

Chocolate Peanut Butter Cream Pie  – This luscious pie wins the top spot by a landslide. Somehow it’s found itself within the StumbleUpon community. I’m really not quite sure how StumbleUpon works, but it sure drives a ton of traffic to this delicious recipe!

Ten of My Personal Favorite Recipes

Greek Lamb Burgers with Tzatziki Sauce – This burger takes the cake as far as my husband is concerned! It’s become his meal of choice for birthdays, anniversaries, and any other excuse he can come up with!

The World’s Greatest Penne ala Vodka – I can’t claim credit for the creation of this recipe, but it’s definitely on my list of all-time favorites!! Seriously the best vodka sauce I’ve ever tasted!

Sausage, Bean, and Rapini Soup – This incredibly satisfying dish is in our regular dinner rotation. It freezes well, so make it in a huge batch to keep on hand for an easy dinner. Make it as brothy as you prefer and serve with a nice piece of French bread!

Chicken Salad Sandwich – Waldorf Style – There’s something incredibly satisfying about the combination of sweet, savory, and crunch in this chicken salad. It’s on my go-to list of easy weeknight dinners!

Grilled Honey Garlic Baby Lamb Chops – I want to slather this honey garlic sauce on everything. I think I could live on this honey garlic sauce.

Cheddar and Garlic Biscuits – I first made these biscuits during a major craving for Red Lobster’s Cheddar Bay Biscuits. I searched online for a copycat recipe and found a ton of Bisquick-based recipes. Wanting to make fresh biscuits from scratch, I combined the elements from a basic, buttery drop biscuit with the seasoning of the Red Lobster biscuit. They’re perfect. Everyone cheers when these are on the menu!

Salmon, Cucumber, and Orzo Salad in Lemon-Dijon Vinaigrette – This was initially intended as a pantry meal, if you will; something quick and easy using a few leftover ingredients I had on hand. It became an instant favorite. There’s something incredibly satisfying about the combination of flavors and textures in this simple dish!

BBQ Beef Chili – This hybrid chili/bbq beef dish makes my mouth water. Serve it with the cornbread from the Top 10 list!

Corn and Bacon Fritter Cakes – I just posted about these recently. I want to eat them for breakfast, lunch, and dinner everyday, topped with smoked salmon and creme fraiche. The best part is that they reheat really well. In fact, they may even be better reheated than straight out of the pan. Pop them in the oven for about 10 minutes at 400 degrees and they’re perfect! (P.S. A dollop of sour cream would make a fine substitute for the creme fraiche!)

Pizza Dragon and Chairs of Stock (Steak Bordelaise Pizza) – My brother in law goes nuts for this pizza! He’s still trying to figure out how to package it and sell it, since he’s convinced it will make me millions. This pizza is a steak dinner on a pizza crust. It takes a little time to get all of the components together, but everything can be prepared ahead of time and it’s worth the trouble!

Do you have a favorite Gourmand Mom recipe? Any other recipe you’d like to see here? Tell me about it!

Game Day Menu Ideas

Growing up, my family never watched football. We were more of a hockey and baseball kind of clan. But every year we had a big ole Super Bowl Sunday party. I was infinitely envious of my younger sister, whose birthday happens to fall right around the Super Bowl, for she had a guaranteed birthday party each year, long after the rest of us had been weaned off of annual birthday celebrations.

In college, I briefly and half-heartedly tried to get into the whole football thing. I watched games on TV with my new college friends and looked to them to explain the ins and outs of the activity I was so hopelessly clueless about. But, my interest in football was short-lived. Not long after that, I met my husband, who’s more of a guitar and drum kind of guy than a sports fan. So, football remains largely absent from my life.

But in true, inherited non-football-fan fashion, my husband and I are throwing a Super Bowl party this year. Our game day menu is still under construction, but will almost certainly include some adaptation of these Buffalo Chicken Potato Skins and a decadent German Chocolate Cake in honor of my sister’s birthday. (Those recipes to follow after the Superbowl!)

In the meantime, if you’re in search of a few new ideas for your game day celebrations, check out these previously posted Gourmand Mom recipes:

Spicy Beef Chili

White Chicken Chili

Sweet Honey Cornbread

Jalapeno Poppers

Spinach Dip and Fried Wonton Chips

Chicken Wing Dip

Homemade Pizza Dough

Blue Cows in a Blanket

Creole Deviled Eggs

Fresh Tomato or Corn and Chipotle Salsa

Steak Bordelaise Pizza

Buffalo Chicken Pizza


Pizza Dough with Kids

Posted on

Food inspiration can come from any place. My sister’s breakfast pizza was inspired by a visit to a gas station, my vanilla carrot bisque came by request of my imaginative toddler, and the internet has recently been flooded with stories and recipes for spaghetti tacos, inspired by an episode of the popular children’s show, iCarly. I’ve got to admit that spaghetti tacos are a genius idea. I’ll probably be serving mine up topped with baby meatballs and cheese. Personally, my inspiration often comes from pictures of food, restaurant menus, or food on tv. It comes through daydreams of favorite flavors and insatiable cravings. In the absence of other ideas, a walk through the grocery store never fails to flood me with inspiration.

Most recently, I was inspired by an episode of Barney. Yes, Barney. My boys and I were snuggled up on the couch one recent morning; our typical early morning routine, prior to starting the day. They were enjoying an episode of Barney, while I was poking around the internet. I looked up to see the giant purple dinosaur skipping around a kitchen, followed by a small army of children, throwing pizza dough in the air and singing a merry song. Boy were they having a grand ol’ time! I casually asked the boys if they’d like to make pizza dough someday. In an instant, my three year threw the blanket off his lap and jumped off the couch, excitedly saying, Lets do it right now!

I was hardly ready to make pizza dough at that very instant, but we did make it the very next day. Myself being a pizza dough novice, I ran a search online for a basic pizza dough recipe. I settled upon a recipe from Giada De Laurentiis at the Food Network. My husband is skeptical of skinny chefs. I love that about my husband. I just want to know her secret. Regardless, Giada knows her way around an Italian kitchen, so I was fully confident in her recipe.

I gathered our ingredients, cleaned our work surface, then called my tiny sous chefs into the kitchen. After getting them cleaned up and reminding them of the importance of clean hands in the kitchen, we set to work.

We started by sprinkling one packet of Dry Active Yeast (7 grams) over 1 1/2 cups Warm Water (approximately 100-110 degrees). An instant-read thermometer is helpful in checking the temperature. Water that is too hot will kill the yeast, while too cold will prevent it from activating. Stir until the yeast is dissolved.

In a separate bowl, whisk together 5 cups Flour with 1 1/2 tsp Salt.

Pour the yeast mixture over the flour and stir to combine. If the mixture is too dry, add more water, a tablespoon at a time, until the dough comes together. If the dough gets too wet, add more flour, a tablespoon at a time. We needed to add a few spoonfuls of additional water to achieve the right consistency.

Remove the dough from the bowl and place it on a well-floured surface. Lightly coat your hands in flour and knead the dough for about 10-12 minutes. Small children make excellent kneaders.

Place the dough in an oiled bowl. Turn the dough in the bowl so that all sides of the dough are lightly coated in oil. Cover loosely with a piece of plastic wrap and allow it to rest at room temperature for about two hours. It should double in size.

Push down the dough and divide it into 3 equal sized balls. Place each ball in its own oiled bowl. Cover and let rest for another hour.

Thoroughly wrap each ball of dough in plastic wrap and refrigerate. You can use it immediately or keep it refrigerated for up to a day.

To use the dough, lightly oil your work surface. Press and pull the dough into an 8-12 inch round. If desired, roll the edges to create an outer crust. Place the pizza round onto a baking sheet which has been sprinkled with a bit of corn meal. The corn meal will prevent the dough from sticking.

Top with your desired sauce, cheese, and toppings. Children love spreading sauce and sprinkling toppings. Set up an assortment of toppings and let them go to town! Bake for about 10 minutes on your oven’s highest heat (about 500 degrees).

As you know, I’m  a huge fan of cooking with kids. It develops a wide range of skills and helps to develop an appreciation of food. The process of cooking together is bursting with teachable moments about language, science, and math. It’s engaging, memorable, and helps kids develop a sense of pride in their accomplishments as they enjoy the product of their work.

To ensure a positive cooking experience with kids, be prepared. Gather the necessary ingredients and materials ahead of time, so you can keep the process moving smoothly. Muster up all of your patience and be prepared for a bit of mess, which admittedly, is often easier said than done. It’s normal for young children to need repeated directions and multiple prompts to stay on task. They may find that brushing all the flour off of the table onto the floor is more interesting than kneading the dough. Take a deep breath and try to redirect their attention. Modeling is your best teaching tool. Prior to each step, explain and show children what to do. If necessary, guide their hands as they complete each step.  Finally, talk, talk, talk as you cook. Talk about the procedure. Talk about the ingredients. Discuss how the yeast makes the dough grow. Make predictions about what will happen next. Ask questions and engage their curiosity.

This pizza dough recipe is a winner! It comes together easily, is a cinch to work with, and tastes perfectly doughy and delicious. It would be delicious with any combination of toppings.  My husband and I enjoyed one of the dough rounds with a few ingredients we had on hand; Bertolli’s Four Cheese Rosa Sauce, sliced pieces of leftover Wine and Cheese Sausage, and a generous sprinkle of a Monterey Jack cheese blend.

The kids chose traditional pizza sauce with mild cheddar, bologna, and pineapple tidbits. Such a kids’ pizza!

Everyone was satisfied with their selections. This dough will most definitely be making future appearances in our home. Also, keep your eye out for a basic pizza sauce recipe, coming up soon!

Oven-roasted Pulled Pork and Summer Peach Pizza

Posted on

Recently, I was having a conversation with someone who was tossing around the idea of opening a pizza shop in a city whose pizza market is predominated by chain restaurants. I suggested that as a way of setting himself apart, he should focus on using very fresh ingredients; local, seasonal, and organic when possible. In addition to offering a really good traditional pizza with traditional toppings, he could offer a special of the month, something a bit different, which features the most seasonal produce. As an example, I threw out peaches. Well, that got an odd look. So, I continued, Maybe with a BBQ type of sauce and pork or something. The odd look remained.

Over the next couple days, I mentioned this peach and pork pizza idea to a handful of other people, all of whom had the same confused reaction. Maybe I should have let it go, but for some reason, I couldn’t get this pizza off my mind. I mean, people put ham and pineapple on pizza. So why not pork and peaches?

I let the idea simmer in my brain for a while. The pork should be slow-cooked and tender, like pulled pork. The peaches would need to be roasted to make them extra sweet and tender. The sauce should full of tomato flavor, but with a definite sweet bbq accent. The cheese should be melty and mild. The more I thought it through, the more convinced I became that it would work.

So, I picked up a big pork shoulder and got cooking. Pulled pork is something which works best when cooked low and slow. There are several ways to do it, all of which can be successful. My preferred method is to oven-roast the pork, since I can use that method year round and I find that it produces a less mushy result than with a slow-cooker. You can decrease the cooking time by increasing the heat, but low and slow is your best bet for a tender roast, which will pull apart with ease. My recipe is sort of in middle as far as heat and time goes, but if you have more time on your hands, lower the heat and give it a bit more time.

For the sauce, I made a Honey Garlic BBQ sauce. I cooked the sauce along with the pork to pick up some of the pork flavor and allow the flavors to blend and concentrate. This also allows the onion and roasted garlic to slow cook for an even sweeter flavor. For a leaner end-result, you can cook the sauce separate from the roast.

Pulled Pork and Summer Peach Pizza

Ingredients

For the Roasted Garlic-Honey BBQ Sauce:

  • 1 15 oz. can Tomato Sauce
  • 1/4 cup Tomato Paste
  • 1/3 cup Apple Cider Vinegar
  • 2 Tbsp Mustard
  • 1/4 cup Worchestire
  • 1/4 cup Honey
  • 1 tsp Cayenne
  • 1/2 tsp Salt
  • 1 head Roasted Garlic, cloves removed from the skin*
  • 1 Small Onion, chopped

For the Roast:

  • 1 5-7 pound Pork Shoulder
  • Paprika
  • Brown Sugar
  • Salt
  • Cayenne Pepper

For the Peaches:

  • 2 Peaches, thinly sliced
  • 1/2 Tbsp Brown Sugar

For the Pizza:

  • 2 12″ Prepared Pizza Crusts
  • 2-3 cups Mozzarella Cheese
  • 1/3 cup Chives, finely chopped

*Click here for my guide to roasting garlic.

Directions

To prepare the roast, trim the excess fat from the exterior. Rub the roast all over with paprika, brown sugar, salt, and cayenne. Refrigerate for at least an hour.

Preheat oven to 325 degrees. In a heavy dutch oven pan with a tight fitting lid or in a baking dish that is just big enough to hold the roast, combine all sauce ingredients. Place the roast on top of the sauce and cover. If using a baking dish, tightly seal the pan with foil. Place it in the oven and cook for about 5 hours. No need to check, stir, or baste. Just pop it in a let it do its thing. You’ll know it’s done when the meat starts to pull away from the bone and the internal temperature, as measured with an instant-read thermometer, has reached at  least 170 degrees. You can also test the meat by scraping a fork into a piece of the roast. It should easily shred from the roast.

For the peaches, place the thin slices in a small baking dish and toss with the brown sugar. You can omit the sugar, if desired, but the small amount of sugar gives the peaches a very light, sweet glaze. Place the baking dish in the oven during the last 30 minutes of the roast’s cooking time.

When the roast is cooked, remove from the oven. Carefully lift the roast from the pan and place it on a rack or in a colander to cool for about 15 minutes.

While the roast is cooling, pour the sauce through a strainer to remove the chunks of onion, garlic, and any pork pieces. Allow the sauce to settle. Then, pour off any excess fat, which will rise to the top or use a spoon to remove the fat. Taste the sauce and adjust the flavor with more salt, cayenne, or honey, as desired.

When the pork is cool enough to handle, but still warm, use a fork to begin pulling the meat. If you scrape the fork against the meat, it should start pulling apart easily. Discard any fatty chunks. I like to go back over the meat with my fingers after pulling it, to make sure there are no slimy, fatty bits remaining.

Pour the sauce over the meat and toss to combine.

For the pizza, preheat oven to 425 degrees. Scatter the sauced pork in an even layer over the crust. Place several slices of peach on top of the pork. Sprinkle with a good layer of mozzarella cheese. Garnish with the chopped chives. Bake for about 12 minutes until everything is hot, the cheese is melty and the edges of the crust are golden.

Makes 2 12-inch Pizzas (plus leftover pulled pork for sandwiches!)

This pizza was really good. Even my skeptical husband was pleased!

The Gourmand Mom

Good food, seasoned with a dash of life