RSS Feed

Tag Archives: summer

Easy Indoor Slider Burgers with Spicy-As-You-Like-It Special Sauce

Posted on

It’s burger season. It’s also unpredictable, chance-of-rain just about everyday season, which might just foil your grilling burgers plan, unless you’re like my dad who grills in snow, sleet, and rain. Weather is no more a deterrent for my father than it is for the mail man. I guarantee he’ll have ribs on the grill during the apocalypse. I like that about him.

I, however, am a fair-weather griller. Thankfully, burgers can still be enjoyed on rainy days with these simple, indoor burger sliders. The kids love these tiny tasty burgers. Who am I kidding? We all love these burgers. Hot dog buns, split into thirds make the perfect little slider buns. A dill pickle slice and spoonful of my spicy-as-you-like-it special sauce complete each perfect mini burger.

Here’s a step-by-step guide to making these tasty burgers, which may quickly become one of your easy go-to weeknight meals!

Step 1: Preheat oven to 425 degrees. Scatter 1/2 finely diced onion in an even layer at the bottom of a 9×13 baking dish or half-sheet pan. **Click HERE  for a step-by-step photo guide for dicing onions.

IMG_8548

Step 2: Crumble 1 pound of ground beef over the onion. **Use 80/20 ground beef. It makes a difference!

IMG_8554

Step 3: Press the meat into an even layer. Sprinkle with seasoned salt. (I used Old Bay seasoning.)

IMG_8555

Step 4: Bake for 18-20 minutes. While the burgers are cooking, divide 7-8 hot dog buns in half. Cut the bottom halves into thirds. Top each piece with a spoonful of special sauce and a dill pickle slice.

IMG_8557

Step 5: Once the meat has cooked, remove it from the oven. Pour off any excess juices. Top the meat with slices of American cheese. Place in the oven for another few seconds to melt the cheese.

IMG_8567

Step 6: Arrange the tops of the hot dogs buns on top of the meat. Cut through the buns and meat so that each bun is cut into thirds. **A pizza cutter makes a convenient cutting tool.

IMG_8569

Step 7: Pick up each bun and burger portion and place it on top of the prepared bottom buns. Enjoy!

IMG_8573

Spicy-As-You-Like-It Special Sauce

Ingredients

  • 1/2 cup mayonaisse
  • 1/2 cup ketchup
  • 1 tablespoon dill relish
  • 1/4 teaspoon onion powder
  • 1/4 teaspoon garlic powder
  • Tabasco, to taste
  • Salt and Pepper, to taste

Directions

Combine the mayo, ketchup, dill relish, onion powder, and garlic powder until well blended. Add a few dashes of tabasco sauce, then stir and taste. Continue adding tabasco, as desired. Season with salt and pepper, to taste.

Roasted Red Pepper Vinaigrette: One Simple Dressing, Two Amazing Salads (and a GIVEAWAY WINNER!)

Posted on

It was back in one of my undergraduate teacher education classes, that I was first introduced to the debate over nature vs. nurture. How much of our personality, strengths, challenges, and interests are a product of our individual biological makeups and how much is due to the environment in which we’re raised and the life events we experience?

From an educator’s point of view, I want very much to believe that nurture plays a more important role, because that idea acknowledges every child’s potential for success and a teacher’s ability to play a significant role in that. We teachers want to believe that given enough time, effective effort, and support, every one of our students can be successful. As educators, the idea of intelligence being a fixed, inborn characteristic would be limiting. So, as a matter of practice, we subscribe more heavily to the theory that nurture plays a more dominant role in human development.

IMG_8054

I have to admit though, watching my own boys grow and develop, it’s become a lot more evident to me that nature really does play a significant role. My three boys, all nurtured in the same environment, under very similar conditions, save for the automatic differences in birth order and changes that adding new members to the family have on a home environment. But, my three boys are just about as different as they can be, with their own individual strengths, interests, preferences, and challenges – traits which have been part of who they are since birth.

IMG_8425

My Liam is a creator, inventor, and planner. Hand the kid an old piece of cardboard, scissors, and a strip of painter’s tape and he’ll invent some revolutionary new technology which just might change the world. He’s also our head mischief-maker, in an ever-scheming, mad-scientist sort of way. He loves telling stories and doesn’t understand the reason for spaces between his words, either spoken or written. He’s a “What’s next?” sort of kid who wants to plow through the day filling it with as many experiences as possible. Liam doesn’t mind coloring, as long as he can do it fast and all with the same color.

Lucas is our character. He is silly and unabashedly honest with his emotions. The kid takes the stage and steals the show. Just last night, at his Irish step-dancing recital, he snuck out from behind the curtain before the show and spent a good five minutes flapping his arms and shaking his butt in front of the 100 or so people who’d gathered to watch the recital. After completing the first dance, while the rest of the dancers remained poised for the second dance, Lucas approached the front of the stage to shout to me about how much fun he was having. The curtain closed behind him. After spinning around and running nose first into the curtain, he giggled, then shuffled behind the curtain for his second dance. He feels things deeply, for better or worse. He likes his quesadillas with cheese only and “nothing I don’t like.” (If you’re sneaky about it, he will know.) He’s a songwriter, loves legos, and despises coloring.

Little James is a love. He requires copious amounts of hugs and kisses and snuggles, which he soaks up like a sponge and is generous in regifting to everyone he meets. He gives every child at the gym’s childcare a personal hug goodbye when we exit, and the gym cleaning lady gets one too. Sometimes he bites when he gets a bit to excited during a hug, sort of like a dolphin, which makes hugs a bit tense sometimes, but he’s irresistible. He thinks apples and corn on the cob are the best foods in the universe and he’s already trying to learn the alphabet – something the other boys had little interest in for most of their young lives. (His favorite letter is E.) James thinks coloring is the bee’s knees.

IMG_8055

They are who they are. And certainly, everything they experience throughout the rest of their lives will have an impact on who they will ultimately become, but it would be foolish to undervalue the unique people they were born as. I’ve learned that parenting, much like teaching, requires ongoing assessment of where our little people are in their lives, what natural talents and interests they possess, what motivates and what discourages them. Then, if we’re doing it right, we take all of that information and design little personalized plans that help nurture their existing strengths, expose them to other possible areas of interest, and teach strategies that might help them handle the areas of life which are more of a personal struggle.

So, do I treat all of my children the same? Absolutely not. I nurture each of my children in the way which seems to work best for them. We follow each of their natural leads and take it from there. Nature vs. nurture? I’m not sure. Ideally a bit of both, I guess, working harmoniously with each other to create unique, well-rounded, happy little people.

IMG_8427

Tomorrow, we welcome June. The weather is hot and soon my gaggle of small men will be off for a summer full of creating, destroying, laughing, crying, and loving. Our neighbors opened their pool yesterday and once again, I smacked myself in the head and thought, “Why the heck didn’t I start eating healthier months ago???” Somehow, I’m always too late for bathing suit season. But, the added bonus of the warm weather is that salads for dinner seem ever so much more crave-worthy. They’re light and fresh and have huge potential for deliciousness.

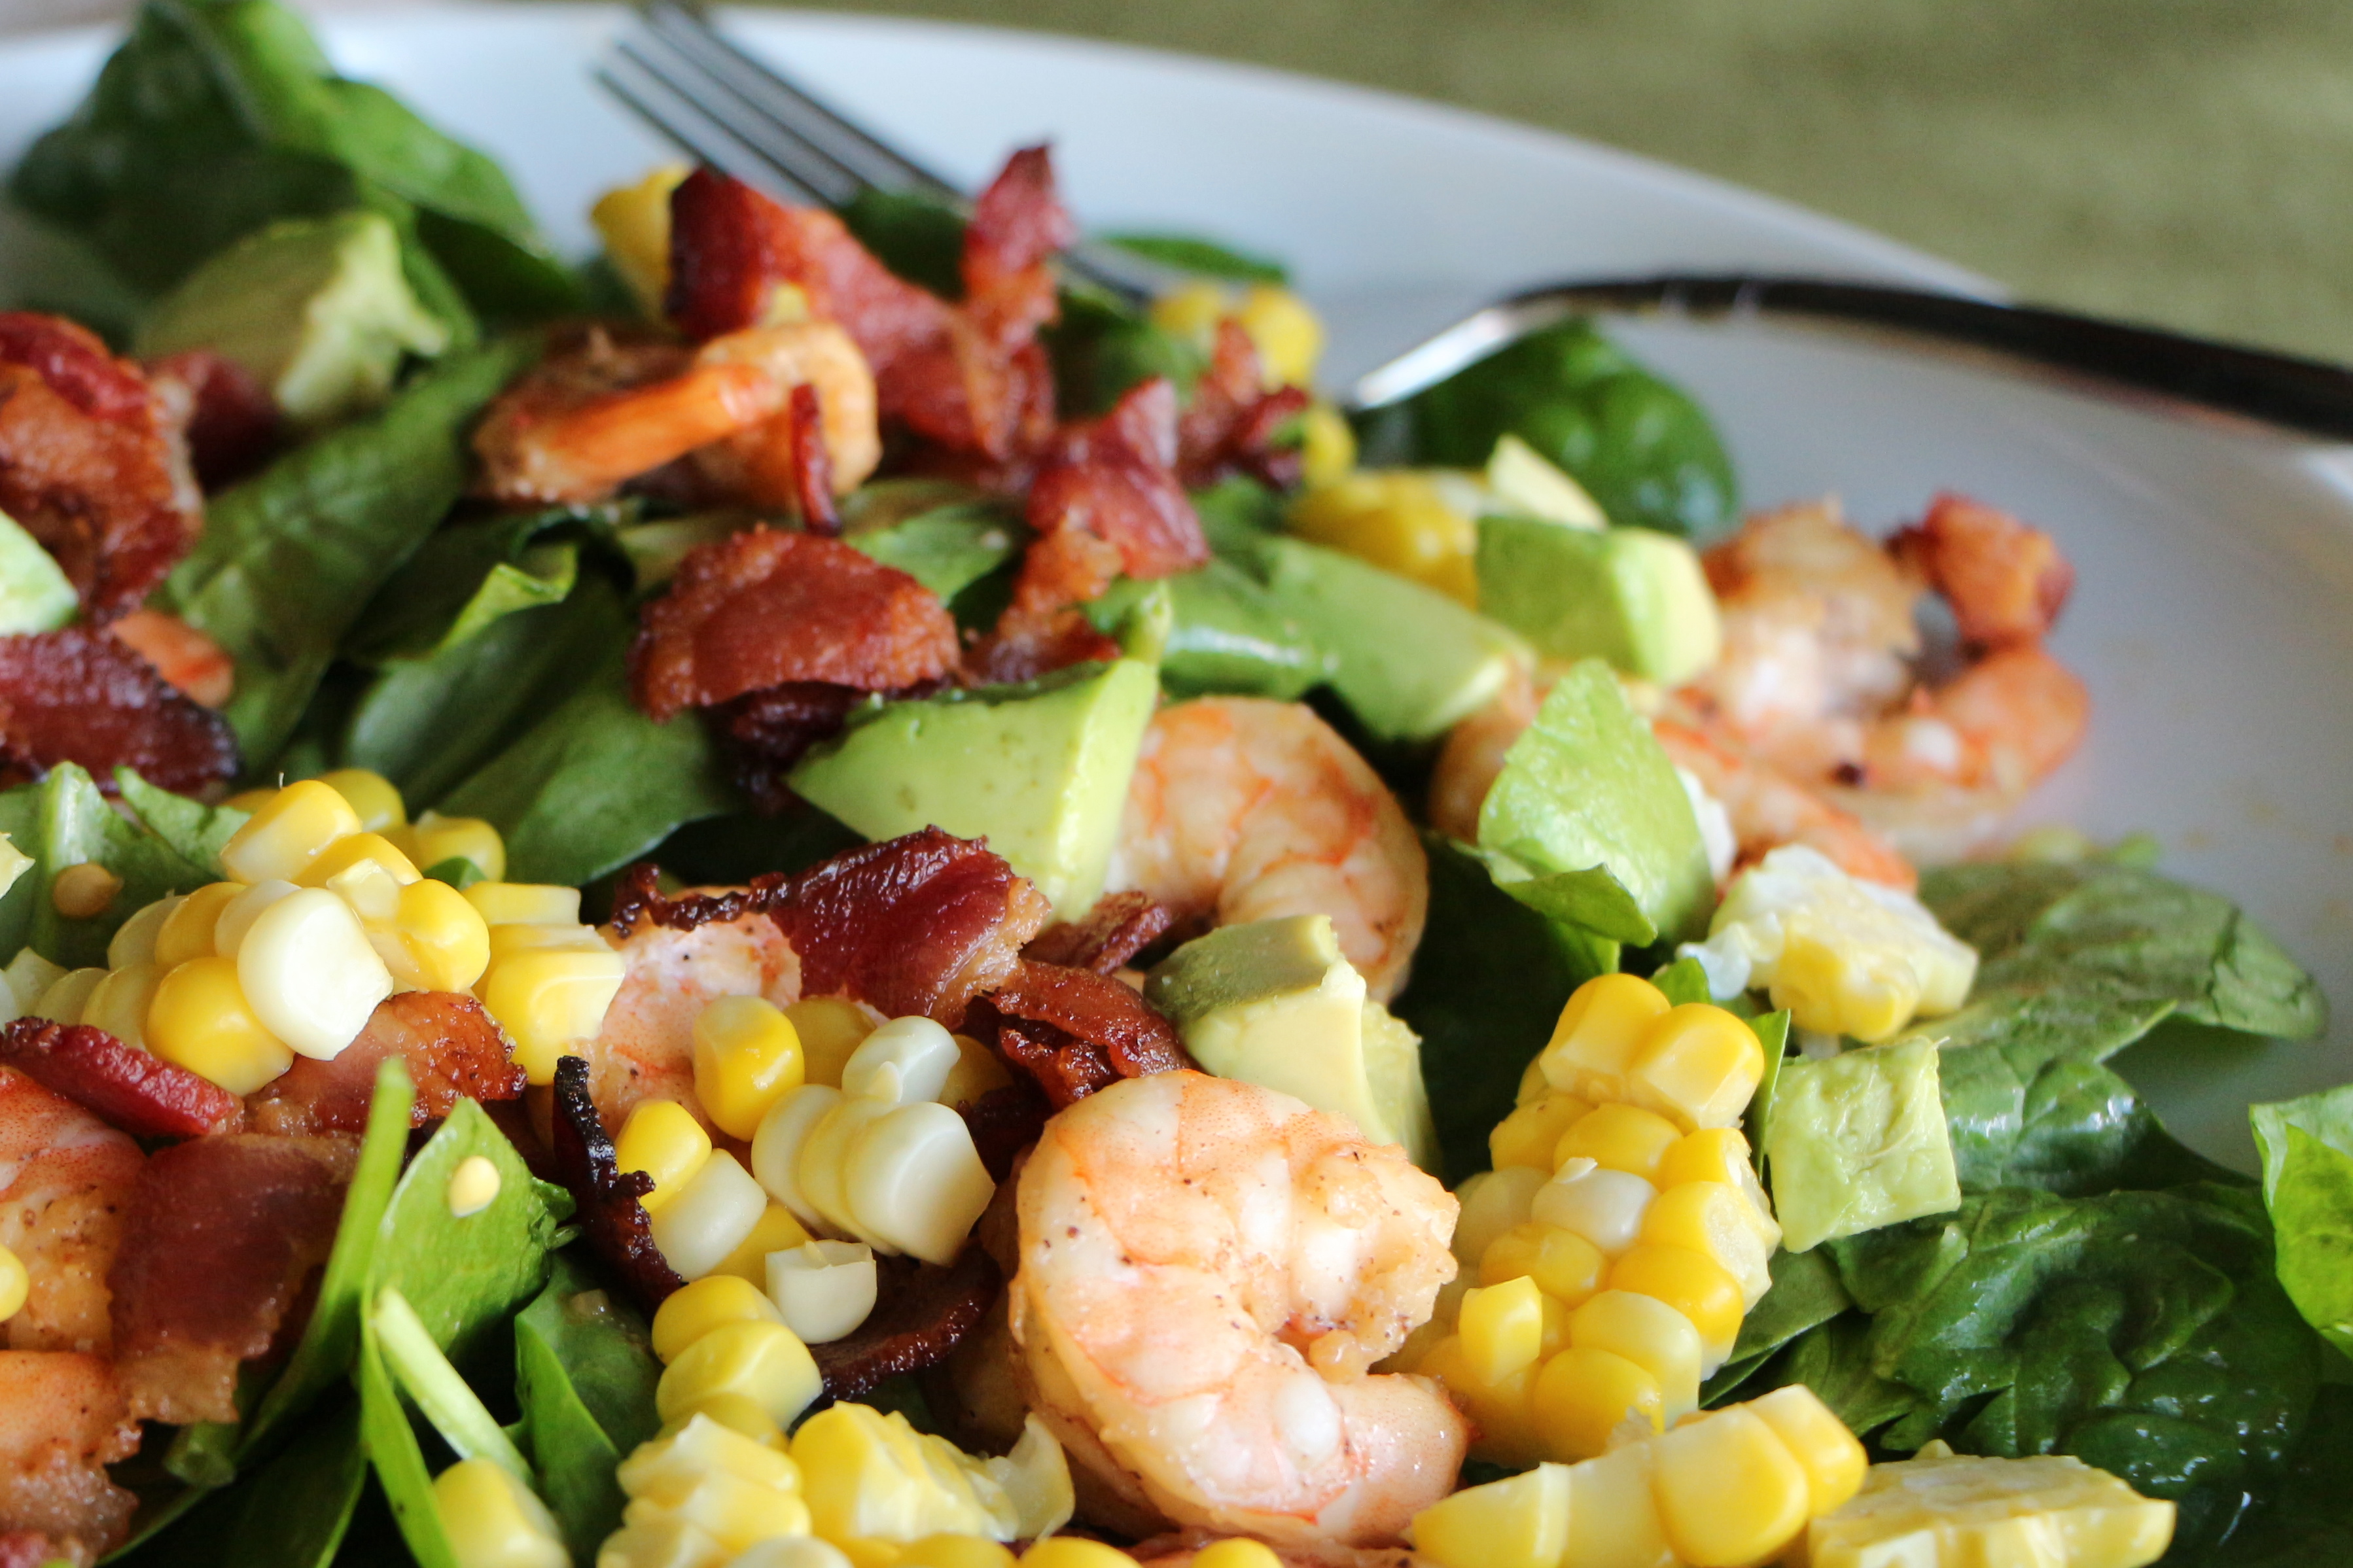
Here are two of my current favorite salads, both made with the same simple roasted red pepper vinaigrette. The dressing is light and flavorful, with a perfect balance of sweetness and acidity. The protein-rich toppings on these salads make either option a quick and easy, satisfying summer dinner.

Roasted Red Pepper Vinaigrette

Ingredients

  • 1/2 cup roasted red peppers (from a jar works just fine or roast your own)
  • 1/4 cup olive oil
  • 1/4 cup white balsamic vinegar
  • 1 teaspoon dijon mustard
  • 1 teaspoon garlic, minced
  • Salt and pepper

Directions

Combine all ingredients in a blender. Pulse until smooth. Taste and adjust seasoning with salt and pepper, as desired.

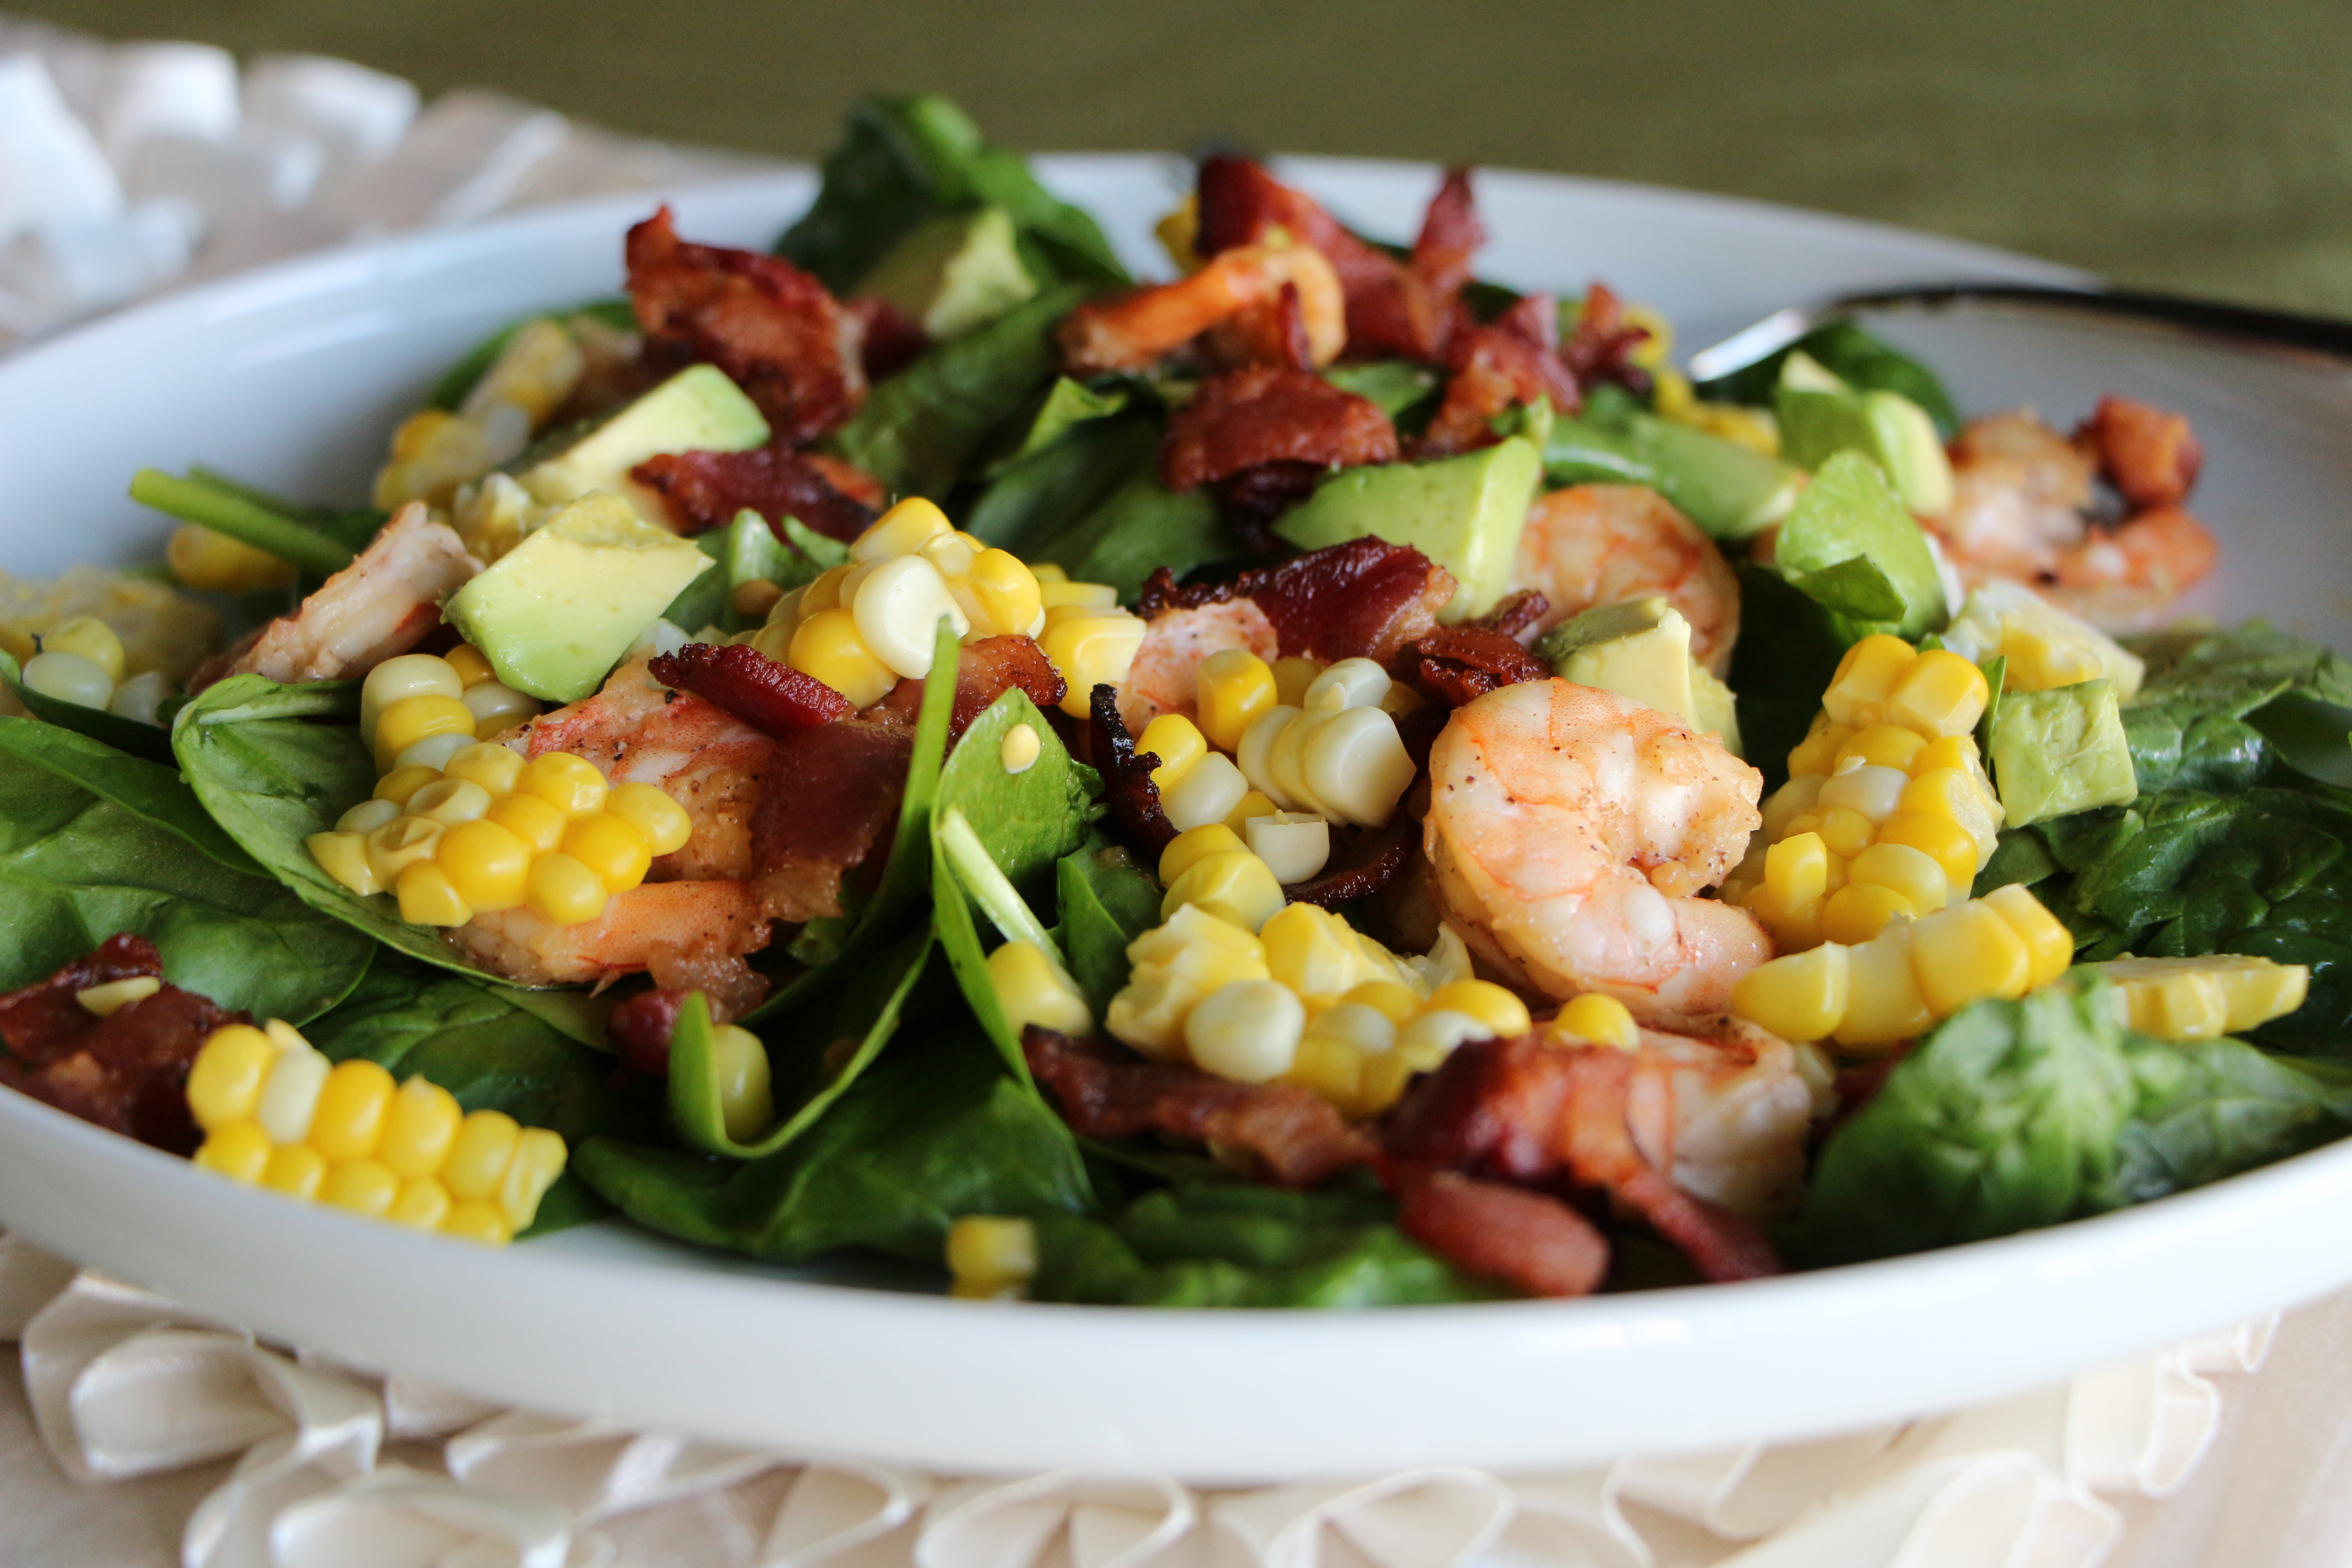
Salad Idea #1 – Spinach with Shrimp, Bacon, Corn, and Avocado – Chop the bacon and cook in a fry pan until crisp. Remove with a slotted spoon and drain over a paper towel. Cook large shrimp in the hot bacon fat for a minute or two on each side, until cooked through. Toss a generous serving of fresh baby spinach leaves in a bit of the roasted red pepper dressing. Top with the cooked bacon and shrimp, fresh avocado, and sweet corn.

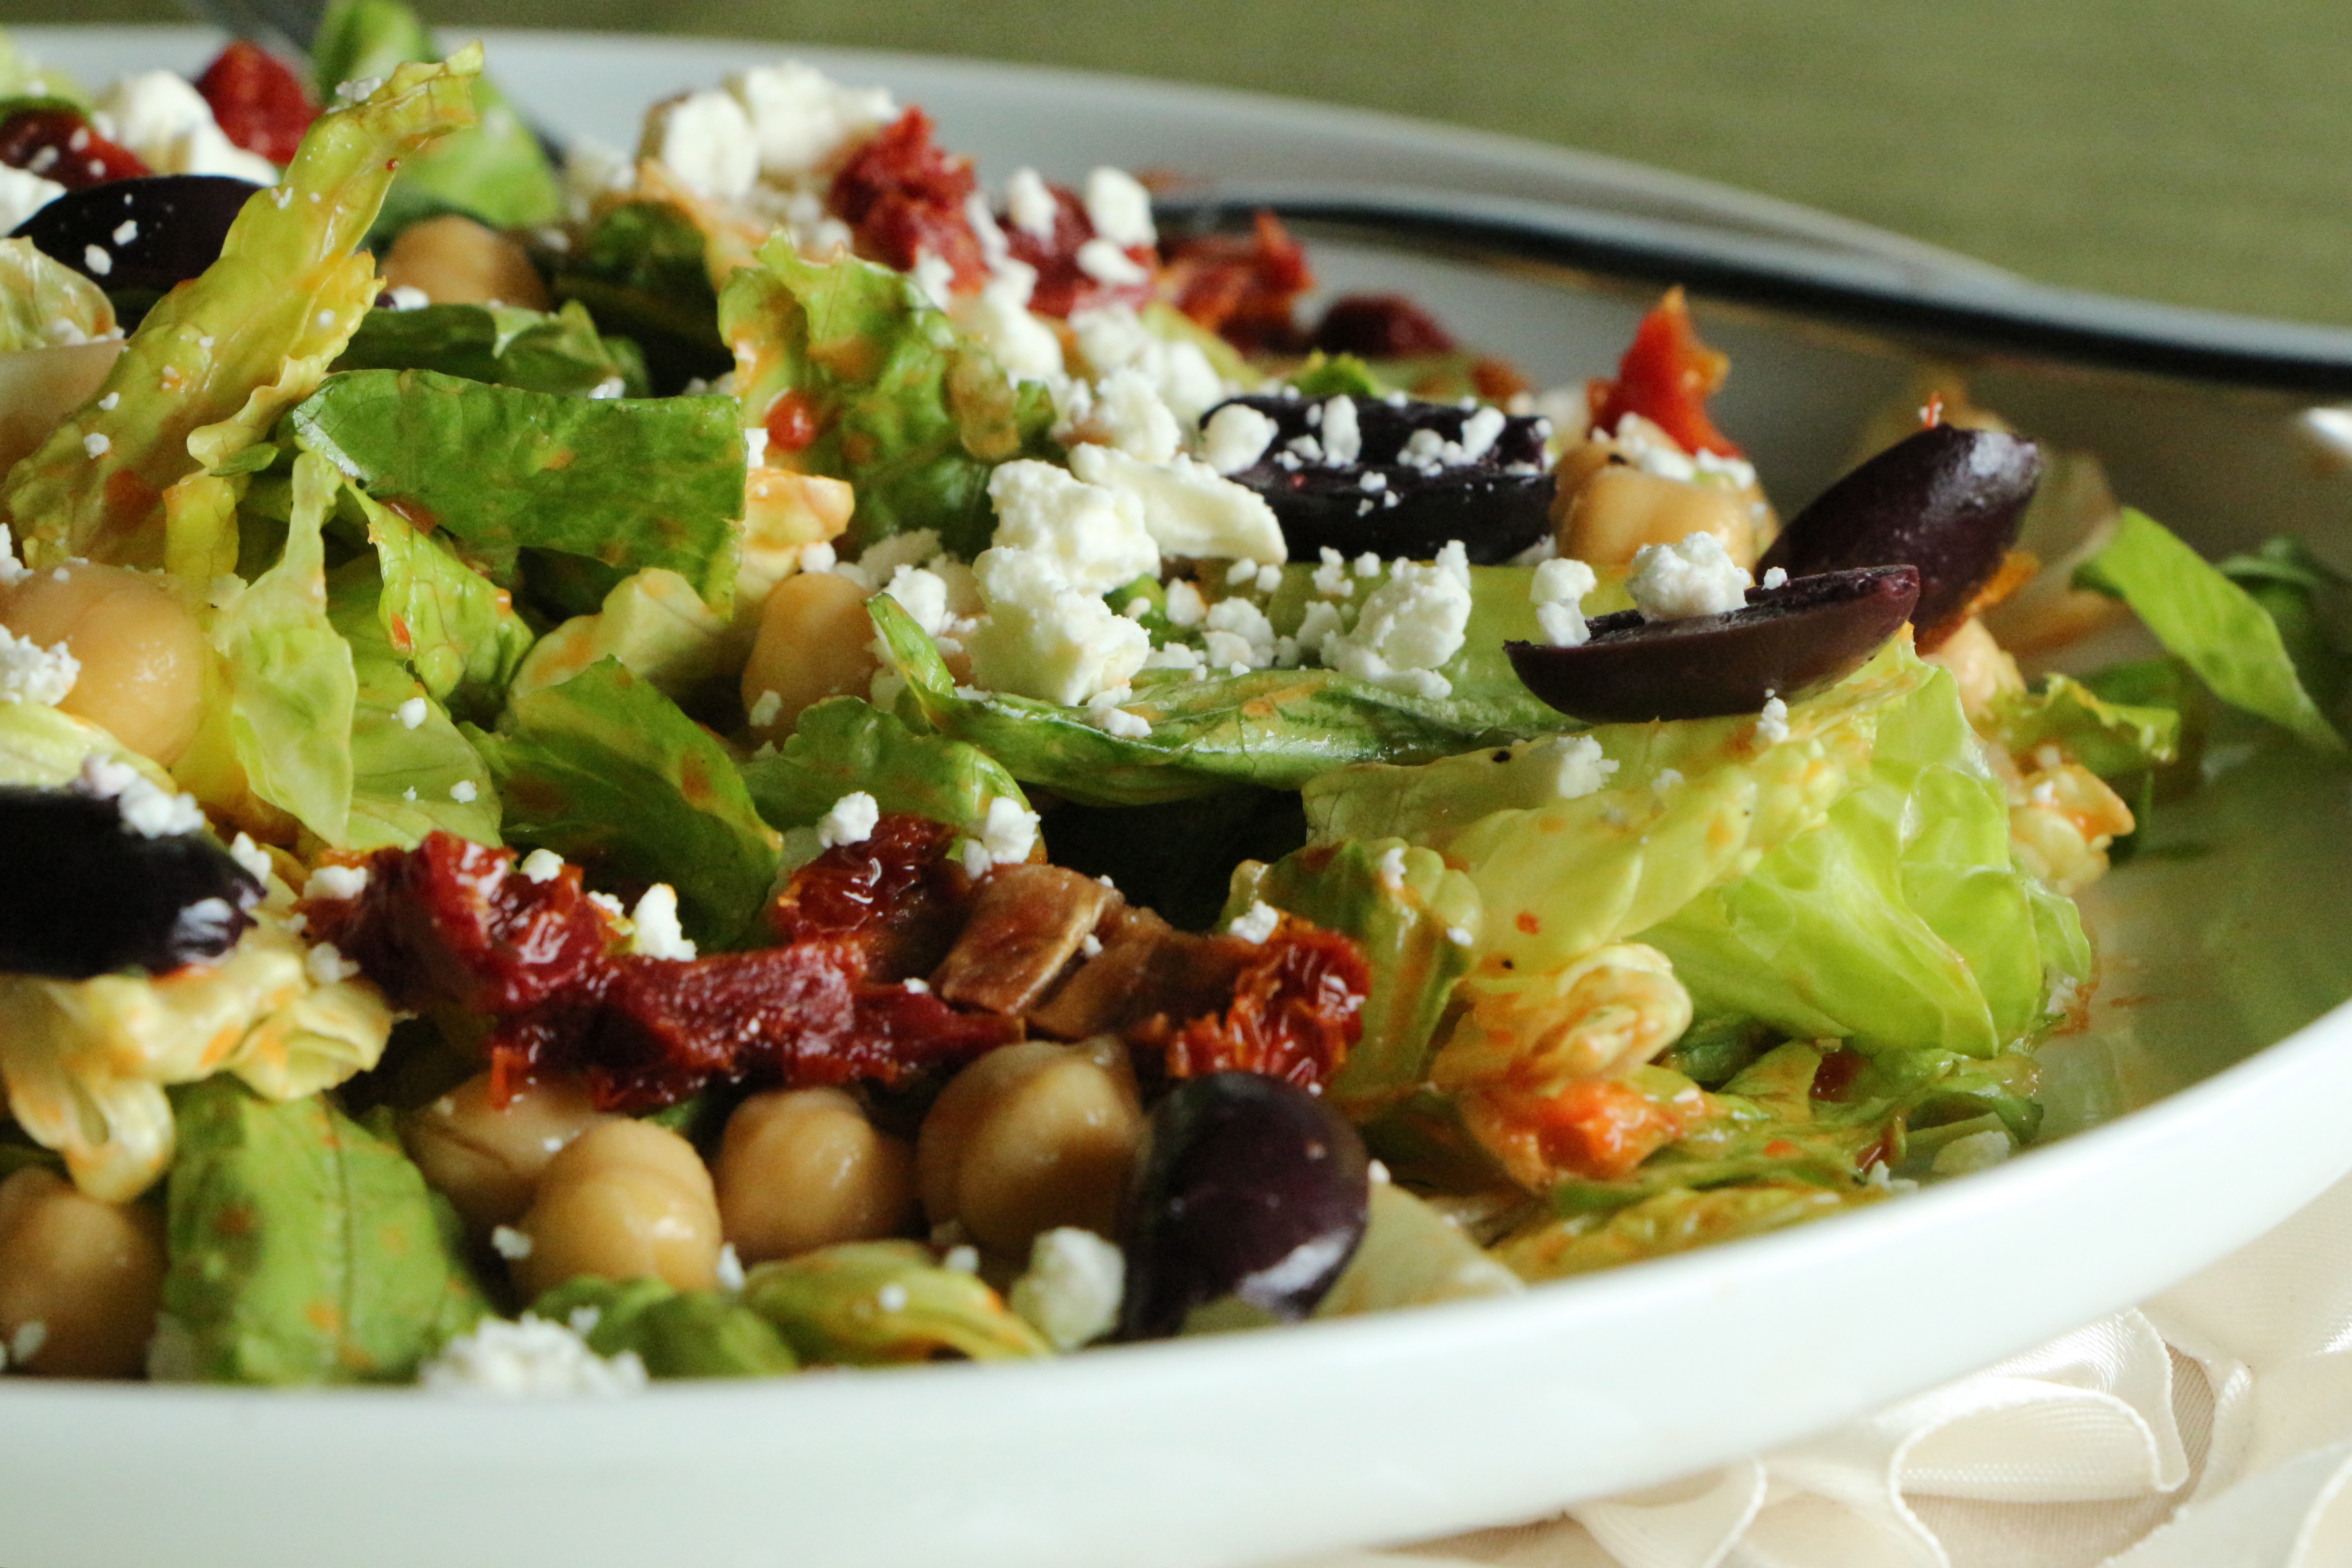
Salad Idea #2 – Mediterranean – Toss romaine or butter lettuce in the roasted red pepper dressing. Top with garbanzo beans, kalamata olives, chopped sun-dried tomatoes and feta cheese crumbles.

IMG_7628

GIVEAWAY WINNER!! We have a winner! Using http://www.random.org to select a number at random, out of the 17 entries received for the $50 Shindigz gift card giveaway, the winner is #7, Jill fox. Congratulations, Jill!! I’m going to send you an email at the address provided with your comment to get the information necessary to fulfill your prize!! Thank you to everyone who entered!

‘Temple Run’ Indian-Spiced Meatballs with Raita (and a GIVEAWAY!!)

Posted on

Anyone play the game, Temple Run? You know, the video game for phones and tablets where this great big, manic, hybrid gorilla-vulture creature chases your character as you dodge fire, rushing waterfalls, and treacherous cliffs at the same time as trying to collect shiny medallions and green gems? That’s the one. We’re big fans of that game around here, bordering on obsession, to the point that I had to give it up for Lent to prevent myself from spending every second of my already minimal free time dodging fire and escaping gorilla beasts.

IMG_7368

Tiki Lantern Garland from Shindigz, for that exotic ‘Temple Run’ vibe.

Well, when my oldest son requested a Temple Run themed birthday party for his 6th birthday, I promptly replied, “No, they don’t make Temple Run party supplies. I’m not even sure how we’d do that. Think of another theme. How about pirates or rock ‘n’ roll or superheroes?” But, my son is not easily dissuaded once he’s stuck on an idea, so he persisted with his request. And I persisted with offering alternate ideas. Construction trucks, a luau, dinosaurs???

IMG_7387

Beginning of the ‘Temple Run’ obstacle course, complete with jungle entrance, terrifying flames and a rushing waterfall.

But after a bit of brainstorming with some friends, a vision for a Temple Run themed party started to evolve. We’d construct a Temple Run obstacle course in the backyard. There’d be fire and waterfalls and a cave. There’d be green gems and monkeys and tropical birds. There’d be a terrifying gorilla chasing our young party guests through the course, as they attempted to gather gold medallions and green gems to redeem for goody bag treats. Perhaps we’d need to ask parents to sign a waiver as they arrived with the party guests, sort of like those waivers of death they merrily hand you as you arrive at a bounce house party. (Kidding, sort of.) My husband was skeptical about this insane plan, but I’m just about as hard to dissuade as our six year old, once I’m set on an idea.

IMG_7379

Unfortunate temple runner who took a turn down the dead end, lured by the shiny gold medallions.

As if by fate, in the early stages of my party planning, I received an email from a party supply company, Shindigz, offering to send me a gift certificate to sample their products and services, in order to share my experience with all of you. It was kismet. It only took a few minutes of browsing their site to spark a million ideas. During a quick search for jungle party supplies, my plan for a Temple Run obstacle course became clear. I found green festooning in three different colors  to use to as tropical vines framing the perimeter of our course. Rolls of sheer gossamer fabric printed in a water pattern would create the perfect waterfall obstacle. A shimmery foil banner printed with flames would become our fire obstacle. Plastic gold medallions became the coins we needed to entice our temple runners – coins which they could later redeem for goody bag treats. Tropical birds and monkeys lent an exotic feel to my run of the mill backyard. We added tiki lantern garland and a hanging fiery pot to complete the atmosphere. The hardest part was narrowing down my wish list from Shindigz’ extensive collection of party supplies. I was so happy with everything I received and how fast it got to me, that I actually placed a second order for more festooning and a variety of streamers, which arrived just as quickly.

IMG_7469

The gorilla beast, right on Lucas’ tail, as he choose the faster route around the cave, instead of crawling through it.

Once the vision for our ‘Temple Run’ course was in place, all that was left to do was plan an appropriately themed menu. Admittedly, I was stuck for quite a while. I even tried researching the supposed setting for the Temple Run game, but came up empty handed. Then, I started thinking about Indiana Jones and the Temple of Doom. I certainly wasn’t about to go down the monkey brains and snake-stuffed snakes route for our menu, but then it occurred to me that Temple of Doom took place in India, which just happens to serve up some of my family’s favorite food. In fact, chicken tikka masala with naan is high on the list of the birthday boy’s favorite foods.

An Indian-themed buffet it would be. From that point, it was just a matter of selecting dishes that would appeal to both children and adults, as well as people who might not be so adventurous when it comes to trying new foods. The other top priority was ease of reheating during the party.

IMG_7471

Capture anyway, just before escaping through the waterfall exit!

This was the Indian-themed ‘Temple Run’ menu we settled on:

Chicken Tikka Masala
Naan*
Basmati Rice with Cinnamon, Cardamon, and Peas
Indian-Spiced Meatballs with Raita
Beef and Potato Samosas with Mango Chutney
Indian Chickpeas
Mango Lassis (Mango Yogurt Smoothies)
 
IMG_7326

We also served a large platter of fresh fruit as well as a plate full of peanut butter and jelly sandwiches, for anyone craving something a bit less adventurous. The PB&Js went largely untouched, as our Temple Run menu was enjoyed by most of our guests, big and small. I’ve linked to the recipes for the chicken tikka masala and naan in the menu above. (Rather than grill the naan, as in the linked recipe, I cooked them on a baking sheet, several inches under the broiler for about two minutes on the first side, a minute on the second. Worked like a charm!) I’ll be sharing the recipes for the Indian Chickpeas and Mango Lassis in the near future.

Today, I’m sharing the recipe for the Indian-spiced meatballs and raita. Raita is a refreshing yogurt dip, not too different from a Greek tzatziki sauce. It’s frequently served as a cooling counterbalance to spicy Indian dishes, and while these meatballs are not overly spicy, the raita makes a perfect dip. (Kids love to dip stuff. Trust me.) I added these meatballs to the menu mostly to appeal to our younger guests, but they were a notable hit with the bigger guests too!

IMG_7400

Chicken tikka masala, spicy and mild, to please all taste buds!

A GIVEAWAY!!! My friends at Shindigz are offering a $50 gift card to one lucky reader, to give you a chance to enjoy their wide variety of part supplies. With graduation and summer barbecue season just around the corner, I’m sure that gift card would come in handy! To enter the drawing for the gift card, simply leave a comment below sharing what you think is the #1 factor which makes a memorable party! The winner will be selected using Random.org on Friday, May 31, 2013 at 12:00pm EST. One entry per person. 18 years or older. US mailing addresses only, please. Good luck!!

IMG_7409

Indian-Spiced Meatballs

Ingredients

  • 1 small or 1/2 medium onion, very finely diced
  • 1/2 teaspoon garlic, minced
  • 1/2 tablespoon fresh ginger, grated
  • 1/2 teaspoon curry powder
  • 1 teaspoon garam masala
  • 1/2 teaspoon salt
  • 1/8 teaspoon cayenne pepper
  • 2 eggs, lightly beaten
  • 1/2 cup bread crumbs
  • 1 pound ground beef

Directions

Preheat oven to 375 degrees. Wipe a baking sheet with a little oil or spray with nonstick cooking spray.

Combine the chopped onion, garlic, ginger, curry powder, garam masala, salt, cayenne pepper, eggs and bread crumbs (everything except the meat) in a large bowl, until evenly blended. Add the meat. Use your hands to combine the mixture, just enough to evenly disperse the ingredients.

Form the mixture into balls, about 1 1/2″ in diameter. Place them on the prepared baking sheet. Bake for about 20 minutes, until cooked through.

Makes about 24 small meatballs

IMG_7408

Cucumber Mint Raita

Ingredients

  • 1 large seedless cucumber
  • 1 1/2 cups plain yogurt
  • 1/8 cup fresh mint leaves, finely diced
  • Salt and pepper

Directions

Use a box grater to finely grate the cucumber. Squeeze the cucumber gratings to remove as much liquid as possible. (If you have a piece of cheesecloth available, it’s useful to place the cucumber gratings inside the cheesecloth, then squeeze to remove the excess liquid.) Combine the cucumber, yogurt, and chopped fresh mint. Season with a pinch of salt and pepper.

IMG_7480

Green Gem Ringpop Cupcakes

Disclaimer – Shindigz provided me with  $100 gift card to sample their products and services in order to share  my experience with you. All opinions expressed in this post are completely my own. 

Irish Mocha Chip Ice Cream

Posted on

Well, hello there! Long time, no see.

IMG_5145

I hadn’t intended to abandon the blog for any length of time, but life sort of sucked me into its unpredictable time warp. Between the kids and appointments and work and all of the other business of being a family of five, the weeks just flew by. Oh, and I joined a local gym, which has a ‘Kids Korner’, that the kids actually love going to. Ninety bucks bought me up to two hours of time for myself, every day, forever. Best childcare deal out there, folks. I’ve rarely missed a day since I joined. The getting in shape aspect almost feels like the bonus of going, not the very purpose itself.

IMG_6057

But, it’s come to my attention that one of my favorite holidays is rapidly approaching. So, I’ve pulled myself out of life’s time warp in order to bring you an appropriately Irish themed recipe. This is one for the grown-ups, as it’s chock full of caffeine and festively spiked with a bit of Irish Cream. Interestingly, it was my five year who inspired the whole ice cream idea, while I was pondering aloud about some Baileys twist on panna cotta or chocolate mousse. “It should be an ice cream,” he insisted. And with the approaching spring season peppering our days with warmer weather, he was right-on with that suggestion. I may need to reward him with a decaf, alcohol-free version of this recipe soon.

IMG_6102

The look your child may make when you prepare an ice cream, just for grown-ups.

If you’re looking for some more traditional Irish ideas, like Corned Beef and Cabbage, Irish Soda Bread, Shepherd’s Pie or even a low-carb twist on Cottage Pie, check out last year’s St. Patty’s Day recipe round-up HERE.

Have fun and most importantly, be safe, in all of your St. Patty’s Day festivities!

Today’s Focus on Technique – The Difference Between Ice Cream and Frozen Custard

The main difference between ice cream and frozen custard (also known as French-style ice cream or French custard ice cream) is the addition of egg yolks. Technically, to be considered a frozen custard, it must contain at least 1.4% egg yolks by weight. The USDA has lengthy documents which define all of the characteristics of ice cream, frozen custard, gelato, sherbet and something called mellorine, but basically, the difference between ice cream and frozen custard comes down to the egg yolks. The egg yolks in a frozen custard add a rich, silky creaminess to the end result. When adding the egg yolks to the ice cream mixture, it is important to temper the eggs by very gradually adding the hot cream mixture to the yolks. This allows the temperature of the eggs to rise to meet the temperature of the hot cream mixture without scrambling the eggs. The egg mixture is then returned to the pan and gently heated until the eggs are cooked to a safe temperature. For more info on tempering eggs into hot liquids, click here. I haven’t calculated the percent weight of egg yolks in the following recipe, but I’d venture to say it falls technically in the family of frozen custards.

IMG_6146

Irish Mocha Chip Ice Cream

Adapted from Emeril’s Coffee Ice Cream 

Ingredients

  • 1 1/2 cups heavy cream
  • 1 1/2 cups whole milk
  • 2/3 cup sugar
  • 1 1/2 tablespoons instant coffee granules
  • 1 1/2 tablespoons unsweetened cocoa powder
  • 3-4 tablespoons Baileys Irish Cream*
  • 4 egg yolks
  • 2/3 cup mini chocolate chips

*TIP – When cooking with liquors or liqueurs that you don’t frequently use, see if your liquor store carries the mini bottles (like they have on airplanes), to avoid having leftovers go to waste. 

Directions

Combine the cream, milk, sugar, coffee, and cocoa powder in a medium saucepan. Bring to a gentle boil over medium heat, stirring until sugar, coffee and cocoa are dissolved. Remove from the heat.

In a medium bowl, lightly beat the egg yolks with a fork. In a slow steady stream, gradually whisk about 1 cup of the hot mixture into the egg yolks. Then, gradually add the egg mixture to the remaining mixture in the pan. Cook the mixture over medium-low/low heat, stirring frequently, for 5-8 minutes, until it just begins to bubble. (You can use an instant read thermometer to check that the mixture is at least 170ºF.) Remove from the heat. Cool slightly at room temperature, then transfer to a bowl and cover with plastic wrap, pressing down against the surface to prevent a skin from forming. Refrigerate until completely chilled, about 2-3 hours. Stir in the Baileys Irish Cream and chocolate chips just before freezing in the ice cream maker.

Transfer the cooled mixture to your ice cream maker. Freeze according to your ice cream maker’s instructions. The ice cream will still be semi-soft (and lusciously creamy) coming out of the ice cream maker. It will harden a bit further after a few hours in the freezer.

*This recipe would make a perfectly delicious mocha chip ice cream without the Bailey’s. You could also use decaf instant coffee grounds if you’d prefer to skip the caffeine.

IMG_5140

Pumpkin Pie Frozen Custard

Our weather is forecast to hit 69 degrees tomorrow. It will probably be the last ‘warm’ day for a long while, as winter is already breathing its frosty breath down our necks. In the meantime we’ll appreciate whatever remaining moderate weather we have left. It won’t be long before we’re slicing cinnamon-spiced pumpkin pies at our Thanksgiving tables. But right now I’m still desperately trying to hold onto whatever remains of the warm season before we plunge into the winter abyss.

So, I thought, why not marry the autumny flavors of  pumpkin pie with my favorite warm weather treat…ice cream?? What more perfect way could there be to acknowledge what may well be the last day we can go without our winter coats, than with a rich and creamy pumpkin pie frozen custard, flavored with vanilla, ginger, nutmeg, and a generous dose of cinnamon. Your ice cream maker will thank you for giving it one last whirl before it’s tucked away for the season.

Frozen custard differs from ice cream in that it contains egg yolks. The egg yolks add an extra creaminess to the frozen treat. The following recipe would also work well without the eggs, so if you or a loved one have an egg allergy, just omit them and call it ice cream. The half-and-half will contribute a good amount of creaminess, but you can substitute light cream or heavy cream for an even richer result.

Focus on Technique – Tempering Eggs

Tempering eggs is a process by which egg yolks are gradually brought up to a higher temperature, by very slowing incorporating hot liquid. This is done to prevent the eggs from scrambling when they are incorporated into hot liquid…cause who wants to eat custard with the texture of scrambled eggs, right??? Tempering the egg yolks helps them to maintain a smooth, silky consistency. Egg yolks may be tempered for use in custards, puddings, sauces, or souffles.

To temper egg yolks, start by lightly beating the eggs with a fork. Then, take some of your hot liquid and very gradually, starting with just a few drips at a time, incorporate some of the hot liquid into the eggs, whisking constantly. After the first few drips, you can increase to a slow stream. Continue incorporating the hot liquid until the egg mixture is about the same temperature as the mixture you will be adding it to. Then, you can safely add the egg mixture to the remaining hot liquid and bring to a gentle simmer for a couple minutes to ensure the yolks are cooked.

Pumpkin Pie Frozen Custard

Ingredients

  • 1 1/2  cups half and half
  • 1/2 cup milk
  • 1 cup pumpkin puree (canned or fresh)
  • 1/2 cup sugar
  • 1 1/2 teaspoons vanilla
  • 1/2 teaspoon cinnamon
  • 1/8 teaspoon nutmeg
  • 1/8 teaspoon ginger
  • Pinch of salt
  • 2 egg yolks, lightly beaten

Directions

Combine the milk, pumpkin puree, sugar, vanilla, cinnamon, salt, nutmeg, and ginger in a saucepan. Bring the mixture to a simmer over medium heat, whisking frequently. Once the mixture begins to simmer, reduce the heat. In a separate bowl, lightly beat the egg yolks. Gradually whisk about 3/4 cup of the hot mixture into the egg yolks, starting with a very slow drizzle. Gradually whisk the tempered egg mixture into the remaining mixture in the pot. Bring to a very gentle boil over medium heat, whisking constantly for 2-3 minutes. Allow the mixture to cool for several minutes at room temperature, then refrigerate until completely chilled. Pour the mixture into your ice cream maker and freeze according to your maker’s instructions.

Praline Banana Splits

Posted on

I’m going to disappear for a couple weeks. Not completely vanish, but I’m going to take a little break off of new posts. There are a few things around this blog that require a bit of housekeeping, namely the Recipe Collection and Gallery pages, which I haven’t updated in nearly two years. Eek! So, I’m going to spend a little time focusing on cleaning up a few things around the site that have been nagging at me before resuming new posts.

Before I vanish, I wanted to leave you with something delicious. Mouth-watering inspiration came to me in the form of National Banana Split Day, which will take place on August 25. My twist on a banana split includes one-ingredient banana “ice cream”, caramelized banana halves, and a decadent pecan praline sauce. Yeah…bananas and praline. Yum. 

You may have run across fancy banana ice cream makers out there, but no specialized tool is required to make this perfectly creamy banana confection. A regular food processor or a good blender will do the trick! And since our “ice cream” is made with pure naturally-sweetened, naturally fat-free banana, you can afford to have a little more fun with the toppings, like this pecan praline sauce. Once you try this sauce, you’re going to want to pour it over everything. In fact, I plan to make a second batch to drizzle over my husband’s birthday cheesecake. Best yet, made with fat-free milk, it’s a lighter version than many cream-laden praline sauce recipes, with no sacrifice to the crave-worthy end result.

Enjoy, folks! I’ll be back with you soon and in the mean time, keep an eye around the site for updates!

Praline Banana Splits

Ingredients

For the Praline Sauce*

  • 1 teaspoon butter
  • 1/6 cup pecans, chopped
  • 1/2 cup dark brown sugar
  • 1/3 cup milk (fat-free works well)
  • 1 1/2 teaspoon cornstarch
  • Pinch of salt

For the Caramelized Bananas

  • 1 banana, peeled and sliced in half lengthwise
  • 1 teaspoon butter
  • 1 teaspoon brown sugar

For the Banana “Ice Cream”

  • 3 medium or 4 small bananas, sliced and well-frozen

Directions

For the Praline Sauce: Stir the cornstarch and salt into the milk. Set aside. Melt the butter in a pan over medium heat. Add the pecans and cook for 1-2 minutes, stirring frequently, until lightly toasted. Reduce the heat to low and stir in the brown sugar, until it begins to soften and melt. Whisk the milk mixture into the pecan mixture. Raise the heat back to medium. Continue whisking until the mixture bubbles and thickens, about 1-2 minutes. Remove from the heat and cool slightly.

For the Caramelized Bananas: Combine the butter and brown sugar in a pan over medium heat. Once the butter has melted, place the banana halves in the pan, cut-side down. Gently move the bananas in the pan so that the cut-side becomes coated with the butter and sugar. Cook for 3-5 minutes, until the cut-side develops a golden brown crust. Remove from the pan and cool slightly. Cut each banana half into half crosswise.

For the Banana Ice Cream: Place the frozen bananas pieces into a food processor or blender. Begin by pulsing the slices until they are mostly broken up. Then, continue blending the mixture until it’s smooth and creamy like ice cream.

To Assemble the Banana Splits: Place a large scoop of the banana ice cream in each bowl. Arrange two of the bananas pieces on the sides. Top with a tablespoon or two of the warm praline sauce. Garnish with additional pecans, if desired.

Makes 2 generous banana split sundaes

Recipe for the Praline Sauce adapted from the EatingWell recipe found HERE.

Creamy Chipotle Tomato Soup

Posted on

We have one of those Kinect sensors for the Xbox 360. We bought it on a whim a few months ago, in search of something fun and active to do as a family while we were all cooped up during the chilly winter months. We picked up a few games for the kids and ourselves and we played them often for about two weeks time. Then, our enthusiasm for our new toy waned and the games have gathered dust since.

Mostly, we use the Xbox 360 for watching movies and shows through Netflix. And my husband enjoys the convenience of the Kinect’s voice-command abilities. I, however, have been unable to get comfortable with shouting commands at the little sensor which sits perched on top of my tv. It just feels so We’re the Jetsons to me. Just can’t do it.

My husband, amused at my apprehension to talk to the machine, got a bit surly with it the other night. He started yelling at it, Xbox, make my dinner. Xbox, take a hike. Xbox, smell my feet. At each command, Xbox, upon hearing its name, would stop and try to process the request. Poor, confused Xbox was dutifully attempting to identify and obey each given command, while we sat by and giggled as it struggled.

Well…I’m pretty sure my husband broke the sensor with this little game. It hasn’t worked correctly ever since. It now requires most commands to be repeated multiple times or firmly shouted before it responds. It appears we’re dealing with a little case of boy-who-cried-wolf. The Xbox no longer believes we’re serious when we call it. Either that or it’s just angry and being difficult. It’s smart. It’s learning. And it freaks me out.

Thankfully, I am not reliant on the Xbox for doing my laundry or cooking my dinner.

We’re right about at that time of year when gardeners are proudly reaping the fruits of their labor in the form of baskets full of ripe, delicious tomatoes. I myself did not undertake trying to grow anything more than a few herbs and a beautiful flowering plant, which I promptly killed. I can grow some darn fine humans, but the ability to grow things in dirt eludes me. I buy my tomatoes at the grocery store and they have been garden-fresh, ripe, and delicious lately…the perfect tomatoes for fresh tomato soup. At any other time of the year, you might be wise to use canned tomatoes when making tomato soup, but now is the perfect time to use the season-peak ones you’re harvesting from your gardens or picking up in local farmer’s markets.

I give my tomato soup a spicy, smokey flavor with the addition of a chipotle pepper. A bit of heavy cream balances the spice and gives the soup a rich texture. The soup is garnished with a few homemade croutons and a couple dashes of chipotle tabasco sauce. On the side, I served a simple mixed green salad tossed in a ginger vinaigrette and grilled brie and gouda with bacon on French baguette. I’m fairly certain that the Xbox would have been incapable of coming up with something so perfectly simple and delicious as this…but don’t tell the Xbox I said that.

Creamy Chipotle Tomato Soup

Ingredients

  • 3 pounds ripe tomatoes, peeled and deseeded, coarse chopped*
  • 2 tablespoons olive oil
  • 1 small red onion, chopped
  • 2 garlic cloves, smashed
  • 1/2 cup vegetable stock
  • 1 chipotle pepper (from a can of chipotles in adobo)
  • 3 tablespoons tomato paste
  • 1/2 cup heavy cream
  • 1/2 teaspoon salt
  • Cayenne pepper, to taste
  • Chipotle Tabasco Sauce, optional (for garnish)

*Click HERE to see my photo guide on how to peel and deseed tomatoes.

Directions

Heat the olive oil in a large pan over medium heat. Add the onion. Cook for 7-10 minutes, stirring frequently, until tender and translucent. Add the garlic and cook for another minute or two. Add the tomatoes, vegetable stock, chipotle pepper, and tomato paste. Simmer over medium/medium-low heat for about 25 minutes, stirring frequently. The tomatoes should almost completely break down during the cooking time. Allow the mixture to cool slightly, then transfer to a food processor or blender. Blend until smooth, then return to the pan. Add the cream. Season with salt, to taste (about 1/2 teaspoon should do the trick). Add cayenne pepper, to taste, if additional spiciness is desired. Warm gently over medium-low heat.

Garnish with a few dashes of chipotle tabasco and homemade croutons.

Makes 2 generous servings

* For the homemade croutons, simply toss a few chunks of French bread in a bit of olive oil, season with cajun seasoning or any other seasoning, then bake in a 375 degree oven until toasted, about 10 minutes or so.

How to Peel and Deseed Tomatoes

Posted on

Using fresh tomatoes in homemade sauces and soups (like the creamy chipotle tomato soup I’ve got coming for you) often requires starting with peeled and deseeded tomatoes. Fortunately, peeling tomatoes is easier than you may expect. Just let a bit of boiling water do all of the work! Here are a few simple steps for easily peeling tomatoes.

Step 1: Start with beautifully ripe, seasonal tomatoes.

Step 2: Cut a small ‘X’ into the non-stem end of the tomato.

**It’s a good idea to use a paring knife to cut out the tough green stem end at this point. It will help the skin to slip off easier and will save you from removing it later. 

Step 3: Bring a pot of water to a rolling boil.

Step 4: Insert the tomatoes into the water for about 1 minute.

Step 5: Remove the tomatoes using a slotted spoon and place in a bowl of ice water. The skin should be practically falling off on its own.

Step 6: Use your fingers to slide the skin from the tomato. If necessary, use a paring knife to remove any remaining peel.

**Use the paring knife to cut out the green stem end, if you haven’t already.

Step 7: Cut the tomatoes in half. Gently squeeze the tomatoes to remove the seeds. Use your clean fingers to remove the seeds from any small pockets. 

Barbecue Bacon Mango Pizza

Posted on

The sun is barely risen. I’m lying in bed and I can feel sweet warm breath rhythmically hitting my face. I slowly open my eyes and find myself nose to nose with Lucas, my three-year-old, who climbs into bed with me each morning. I put my arms around him, then close my eyes and pretend to be asleep. He plays with one of my earrings, trying to remove the small silver leaf from my ear. After a moment, he abandons the earring and begins running his tiny fingers over my eyebrows. Behind me, I can feel my five-year-old, Liam, trying to braid my excessively long hair. Lucas becomes bored with my eyebrows and begins trying to forcefully push my eyelids open. I roll over to face my Liam. Liam pushes his nose closer to mine and whispers, I love you, Mommy. I kiss his nose. The baby begins to peep through the monitor, wordlessly begging to join the family snuggle time. My husband rolls out of bed to grab the baby. Once in our bedroom, our sweet baby James crawls over his brothers to get on top of me. He puts his wide open mouth onto my cheek. I think it’s a kiss. A very sloppy kiss. Then he tries to jam his finger into my mouth to touch my teeth. I rouse myself then, to bring the boys downstairs for breakfast before my little amateur dentist gets too aggressive.

I’ve come to realize that I belong to my children as much as they belong to me. We belong to each other. It’s a thoroughly symbiotic relationship.

More than anything, I want my family to feel loved in the same way they so generously give their love to me. And one of the ways that I show my love is through fresh and delicious food, carefully crafted into delicious meals we can enjoy as a family, like this barbecue bacon mango pizza. This pizza is inspired by one of the recipes provided by The National Mango Board in a booklet they sent along with a shipment of beautiful ripe mangos. It instantly reminded me of a sweet and savory Hawaiian pizza, only substituting the ham for bacon and the pineapple for mango. Genius. Only I took that idea a little further by coming up with a homemade mango barbecue sauce, rather than slathering on something store-bought.

Though unplanned, the preparation of this pizza became a family affair. Small noses came running at the scent of bacon. Small hands stole said bacon. Small mouths gobbled up an entire mango before I had a moment to protest. We dubbed the afternoon Mangofest. There were tears when the last of the mango had been devoured, but smiles returned once this pizza was presented. Definitely a family pleaser! Best yet, the recipe for the barbecue sauce will make more than you need for the pizza…perfect for grilled mango barbecue chicken breasts the next day!!

Barbecue Bacon Mango Pizza

Ingredients

For the mango barbecue sauce

  • 1 tablespoon olive oil
  • 1/2 small red onion, chopped
  • 1 1/2 teaspoons garlic, minced
  • 1 (15-ounce) can tomato sauce
  • 1 1/2 cups fresh mango puree (2 medium mangos should do the trick)
  • 4 tablespoons tomato paste
  • 2 tablespoons brown sugar
  • 2 tablespoons apple cider vinegar
  • 1 tablespoon worcestershire sauce
  • 1 teaspoon dry mustard
  • 1/2 teaspoon cayenne pepper (plus more, if desired)
  • Salt (optional), as desired

For the pizza

  • 1 12″ pizza crust
  • 1/2 red onion, thinly sliced
  • 1 tablespoon olive oil
  • 1 mango, chopped*
  • 6-8 slices bacon, cooked and chopped
  • 3/4 cup mozzarella cheese, shredded
  • Fresh parsley, chopped

* Click HERE to see my photo guide on how to chop a mango.

Directions

To prepare the mango barbecue sauce: Heat the olive oil in a large pan over medium/medium-low heat. Add the onion and cook for 5-7 minutes until tender and translucent. Add the garlic and cook for another minute or two. Add all other barbecue sauce ingredients and stir to combine. Bring to a very gentle simmer, then reduce the heat to low and simmer for about 25 minutes, stirring occasionally to prevent burning. Allow the sauce to cool, then use a food processor or blender to puree until smooth. Taste the sauce and adjust seasoning as desired. Refrigerate until using.*

To prepare the pizza: Heat the oil in a small pan over medium/medium-low heat. Add the onion. Cook for about 15 minutes, stirring frequently to prevent burning, until the onions are tender, sweet, and lightly golden. Spread a thin layer of the sauce (approximately 1/2 cup) over the pizza crust. Scatter most of the bacon, mango, and onions over the sauce. Top with the shredded cheese. Scatter the remaining bacon, mango, onions, and parsley on top. Bake in a 400 degrees oven for about 12-15 minutes, until hot and melty.

*The barbecue sauce recipe will produce more sauce than is necessary for the pizza. You can use the sauce as you might use any barbecue sauce on grilled chicken, ribs, shrimp… It would also freeze nicely for later use.

Grilled Chicken Tikka Masala Pizza

Posted on

Anyone following all of this crazy zombie apocalypse ‘news’ popping up?? There’s some seriously wacky stuff going on out there.  I’ve seen enough zombie movies to know that this is always how it begins…a few random incidents which are brushed off as isolated events with some logical cause. The public is urged not to panic and then all h.e.double hockey sticks breaks loose. (Being told not to panic is a sure sign that it’s time to panic.) And honestly, though I’m inclined to believe that all of this has more to do with dangerous mind-altering drugs than a zombie armageddon, I’m not sure that brings me any peace of mind.

Did ya know that the CDC’s website has a section on zombie preparedness?? I kid you not. I’m pretty sure it’s a tongue-in-cheek, fun way to educate about general disaster readiness. Or is it???

Personally, I learned everything I need to know from the educational zombie comedy, Zombieland.

Zombie Survival Rule #1: Cardio

Good thing I’ve been running again. And it feels so good. I’d been struggling to get back to a regular running routine ever since having my baby 15 months ago and it’s been an uphill battle, both literally and figuratively. My progress had been dreadfully slow. But, the baby weaned from nursing almost two months ago and my running progress has accelerated ever since. Guess I didn’t realize the toll it was taking on my body. It feels good to get out there for my runs and I’ll be ready when the zombies…errr, I mean bath salt crazies…start chasing me down. (I’m joking…mostly.)

The other benefit of running is that it affords me a little more wiggle room in my dietary choices, so I can afford to enjoy a few indulgences. Ok, my running/indulgence balance is admittedly still a bit off, but it’s getting closer. This grilled chicken tikka masala is one of those indulgences that I think about when I’m running. This mouth-watering pizza combines one of my all-time favorite dishes, chicken tikka masala, with homemade garlicky grilled naan flatbread and a bit of melty mozzarella cheese. Seriously yummy and worth every second of heart-pounding cardio.

I’d like to tell you that this dish is a cinch to pull together, but that would be a lie. There is nothing inherently difficult about it, but between preparing the marinade, making the sauce, preparing the dough, grilling the chicken, grilling the naan, and then assembling and grilling the pizzas, this is a time consuming meal. But it is a labor of love. Definitely worth the time! Just save it for a sunny weekend day and get the whole family involved in the process!

To make things more manageable, you may want to plan to cook the meal in parts. The chicken can be marinated the night before. The sauce, the chicken, and the naan can all be made ahead of time and will hold well in the fridge for a day or two. You could even enjoy the meal as traditional chicken tikka masala with rice and naan one night and make the pizzas for leftovers the next day! However you decide to break it up, I think you’re going to enjoy this delicious meal!

Grilled Chicken Tikka Masala Pizza

Ingredients

For the Naan*

  • 1 packet dry active yeast
  • 1 cup warm water (about 110-115 degrees)
  • 1/8 cup sugar
  • 3/4 teaspoon salt
  • 1/4 cup milk
  • 1 egg, lightly beaten
  • 1 tablespoon garlic, minced
  • 4 cups flour (approximately)
  • 4 tablespoons butter, melted

For the Chicken

  • 1 1/2 pounds boneless, skinless chicken thighs, trimmed of excess fat
  • 1 1/2 cups plain yogurt
  • 3 tablespoons garam masala
  • 2 teaspoons garlic, minced
  • 1/2 teaspoon salt
  • 1 teaspoon paprika
  • 1/4 teaspoon cayenne
  • 1/2 inch segment of fresh ginger, grated

For the Sauce

  • 3 tablespoon butter
  • 1 small onion, diced
  • 1 teaspoon garlic, minced
  • 1 1-2″ segment fresh ginger, grated
  • 2 small serrano peppers, seeds and ribs removed, diced
  • 1 1/2 tablespoons garam masala
  • 1 (29 ounce) can crushed tomatoes
  • 1/4 cup tomato paste
  • 1 cup heavy cream
  • 1/4-1/2 teaspoon cayenne (plus more, if desired)
  • 1 teaspoon salt (plus more, if desired)
For the Pizzas
  • 2 cups mozzarella cheese, shredded
  • Fresh parsley leaves, chopped

Directions

To prepare the chicken marinade: Combine all marinade ingredients in a container with a tight-fitting lid. Place the chicken thighs in the marinade and toss to evenly coat. Refrigerate and allow the chicken to marinade for at least six hours or overnight.

To grill the chicken: Wipe the grill with a bit of vegetable oil to help prevent sticking. Preheat grill to medium heat. Shake the excess marinade off of the chicken and place it on the preheated grill. Cook the chicken for about 7-10 minutes on each side. (Cooking time will depend on the thickness of the chicken. The chicken is fully cooked when it has reached an internal temperature of 165 degrees.) Allow the chicken to cool, then cut into small pieces. Refrigerate until using.

To make the naan: Stir together the yeast and warm water. Allow to rest for about 10 minutes. Stir in the sugar, salt, milk, garlic and egg. Add the flour 1 cup at a time, stirring and kneading for several minutes until a soft dough forms. (Add the flour slowly towards the end, since the quantity of flour will vary. The dough should be slightly sticky, but manageable. If the dough is too dry, add little bits of water or milk. If the dough is too wet, add small quantities of additional flour.) Place the dough in a lightly oiled bowl. Cover with a slightly damp towel and allow it to rest at room temperature for 1-2 hours, until it has doubled in size. Then, divide the risen dough into 12 equal balls of dough. Place the balls on a lightly oiled baking sheet. Cover with the towel and allow to rest at room temperature for about 30 minutes. Preheat your grill to medium heat. Prepare a work station near your grill with a rolling pin, cutting board, and flour. Lightly scatter the flour over the cutting board. One at a time, roll each ball of dough into a flat round, then gently stretch the dough into a soft teardrop shape. Place the dough directly onto the grill and cook for about a minute on each side. It will begin to puff slightly when it is done. Remove from the grill and brush with melted butter.

To make the sauce: Melt butter in a saucepan over medium heat. Add the onions, garlic, ginger, and serrano peppers. Cook for about 5 minutes, stirring frequently, until the onion is translucent. Add the garam masala, stir, and cook for another minute. Add the crushed tomatoes, tomato paste, salt, and cayenne pepper. Stir to combine. Continue cooking until heated through, stirring frequently. Reduce the heat and add the cream. Taste and adjust seasoning with additional salt and cayenne pepper, as desired.

To assemble the pizzas: Spread a layer of sauce onto each piece of naan. Scatter some of the chicken over each naan. Sprinkle each pizza with a bit of the mozzarella cheese. Garnish with fresh parsley. Heat the pizzas on the grill or in a 350 degree oven until the cheese is melty and all components are heated through (about 8-10 minutes).

*Recipe for naan adapted from the recipe found HERE.

Makes 10-12 small individual pizzas

The Gourmand Mom

Good food, seasoned with a dash of life