RSS Feed

Tag Archives: comfort food

Cheesecake-Swirled Carrot Cake

Posted on

Every so often, I get an idea for a recipe which I’m certain is so genius that no home cook or master chef has thought of it yet. 99.9999% of the time, it turns out that someone else has already covered that ground. It’s really challenging to come up with something truly novel and unique in the culinary field…at least for me it is.

IMG_6415

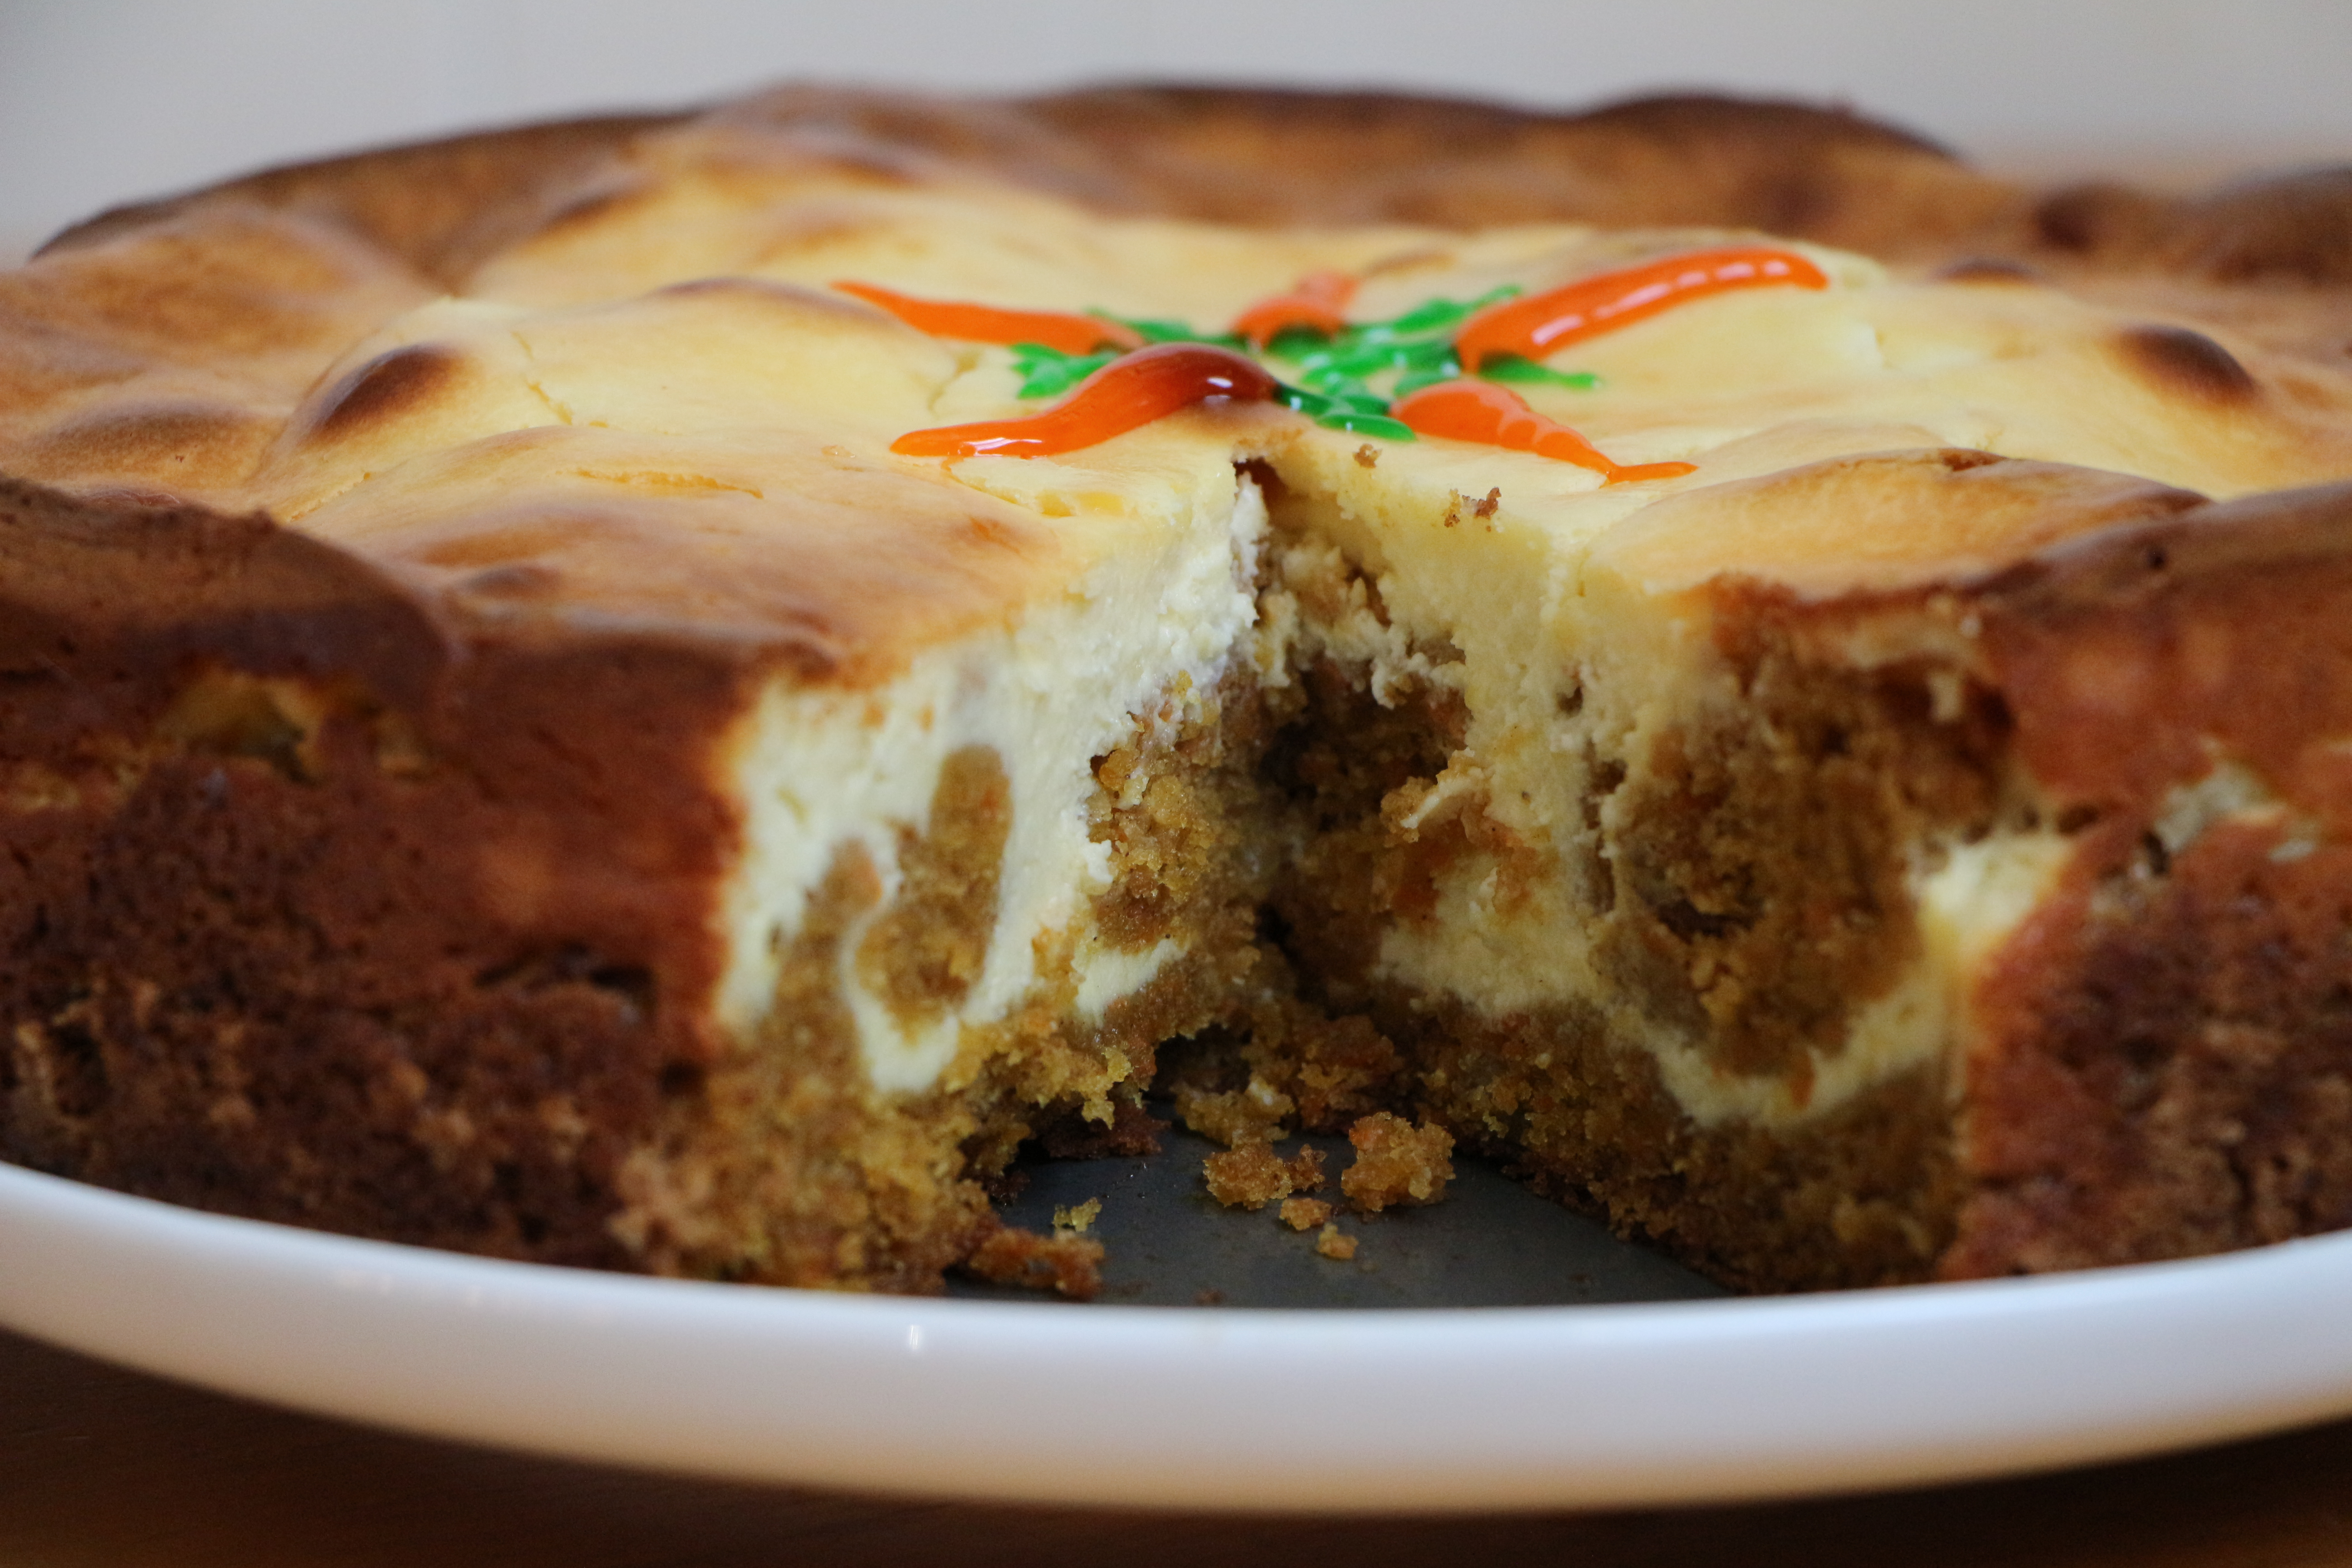
Such is the case with this cheesecake-swirled carrot cake. The idea came to me as I was brainstorming for some interesting twist on carrot cake to share as Easter approaches. The way I figured it, if carrot cake and sweet vanilla cream cheese frosting are delicious together (and they are), and cheesecake is also made with cream cheese, sugar, and vanilla (which it is), then carrot cake and cheesecake would be delicious together. If A and B, then C sort of logic…or something like that anyway.

IMG_6446

I initially contemplated stacking layers of carrot cake with cheesecake, but the idea seemed too similar to a basic carrot cake with cream cheese frosting. That was the point where I decided I’d bake the two cakes together in one pan, intermingled to create one grand cheesecake-swirled carrot cake. It was in my research phase of concocting this delicious confection that I discovered The Cheesecake Factory already beat me to the punch. Having been to The Cheesecake Factory a grand total of one, maybe two times in my life, probably about ten years ago, this was news to me. Perhaps you’ve already had theirs??

IMG_6564

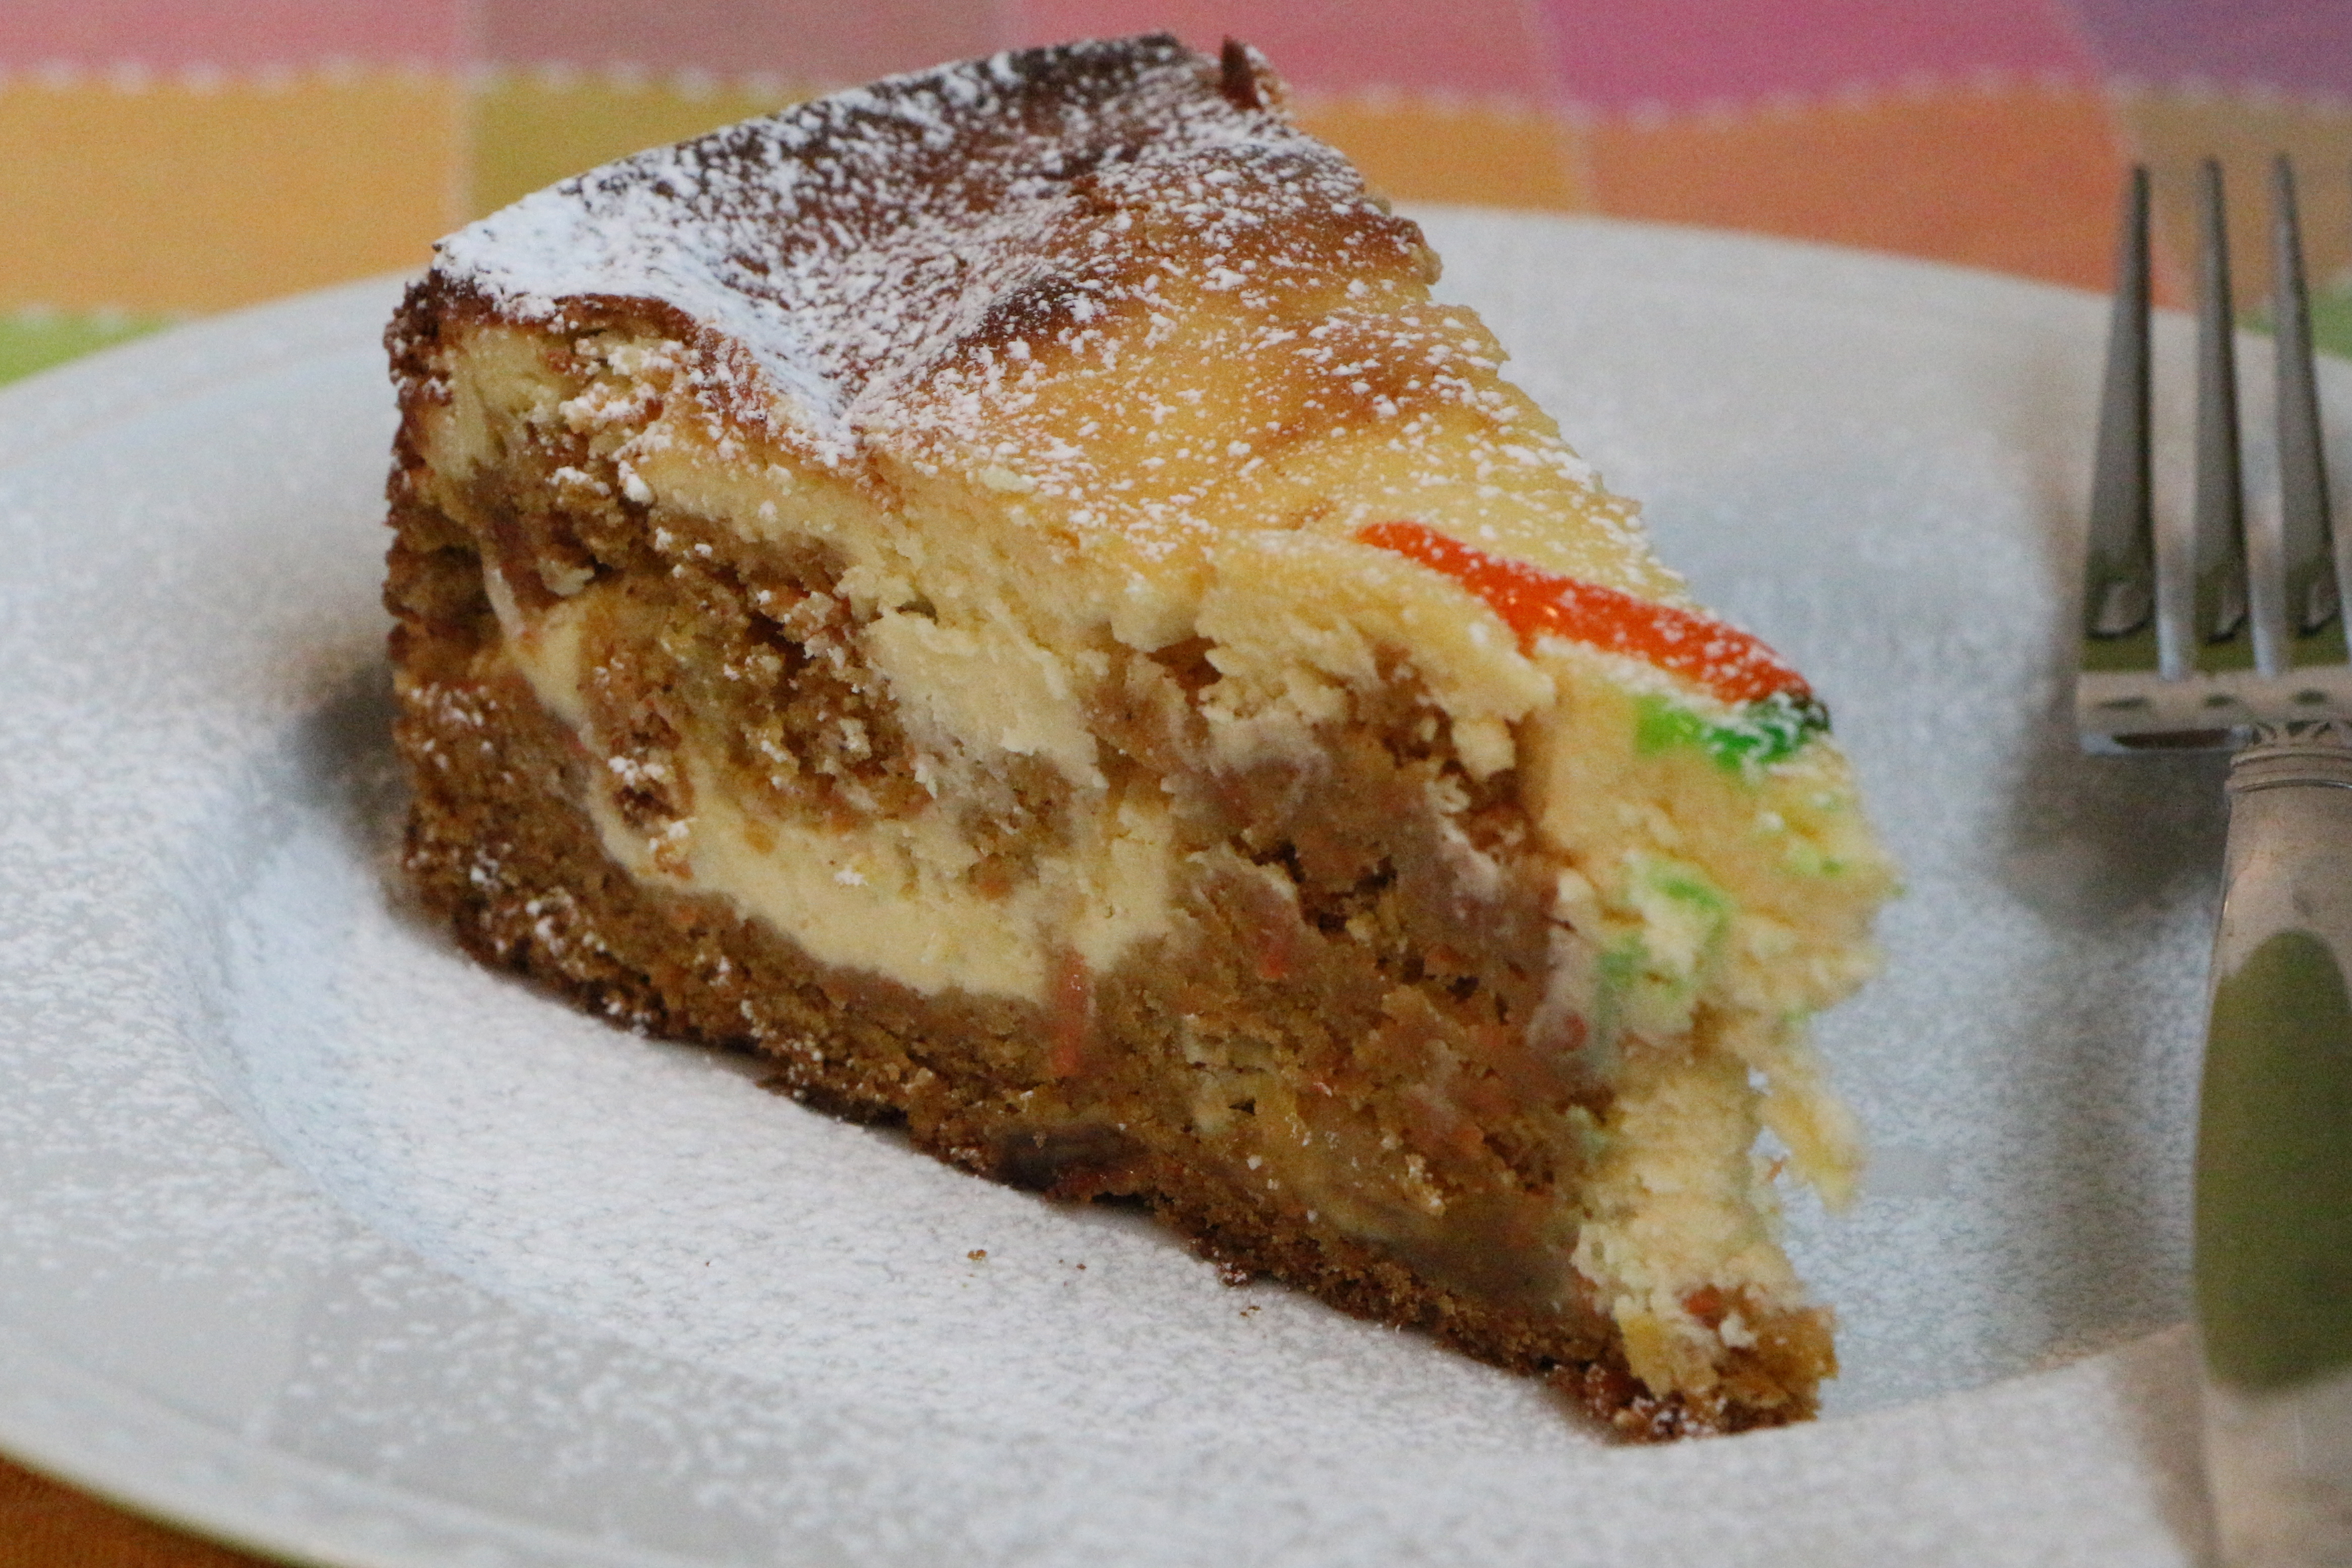
So, turns out my grand idea isn’t nearly as revolutionary as I’d initially thought, but it is spectacularly delicious, nonetheless. Rich, moist carrot cake gets twisted with a creamy classic cheesecake to create a treat which is sure to be the hit of the Easter dessert buffet. Ol’ Peter Rabbit might even forego his basket of candy in favor of a slice of this carroty beauty.

IMG_6503

Cheesecake-Swirled Carrot Cake

Ingredients

For the Carrot Cake

  • 1 3/4 cups flour
  • 3/4 teaspoon baking powder
  • 3/4 teaspoon baking soda
  • 3/4 teaspoon cinnamon
  • 1/4 teaspoon ginger
  • Pinch of nutmeg
  • 1/2 teaspoon salt
  • 2 sticks unsalted butter, softened to room temperature (plus more for greasing pan)
  • 2/3 cup dark brown sugar
  • 1/3 cup white sugar
  • 1 1/2 teaspoon vanilla
  • 2 eggs
  • 1/3 cup water
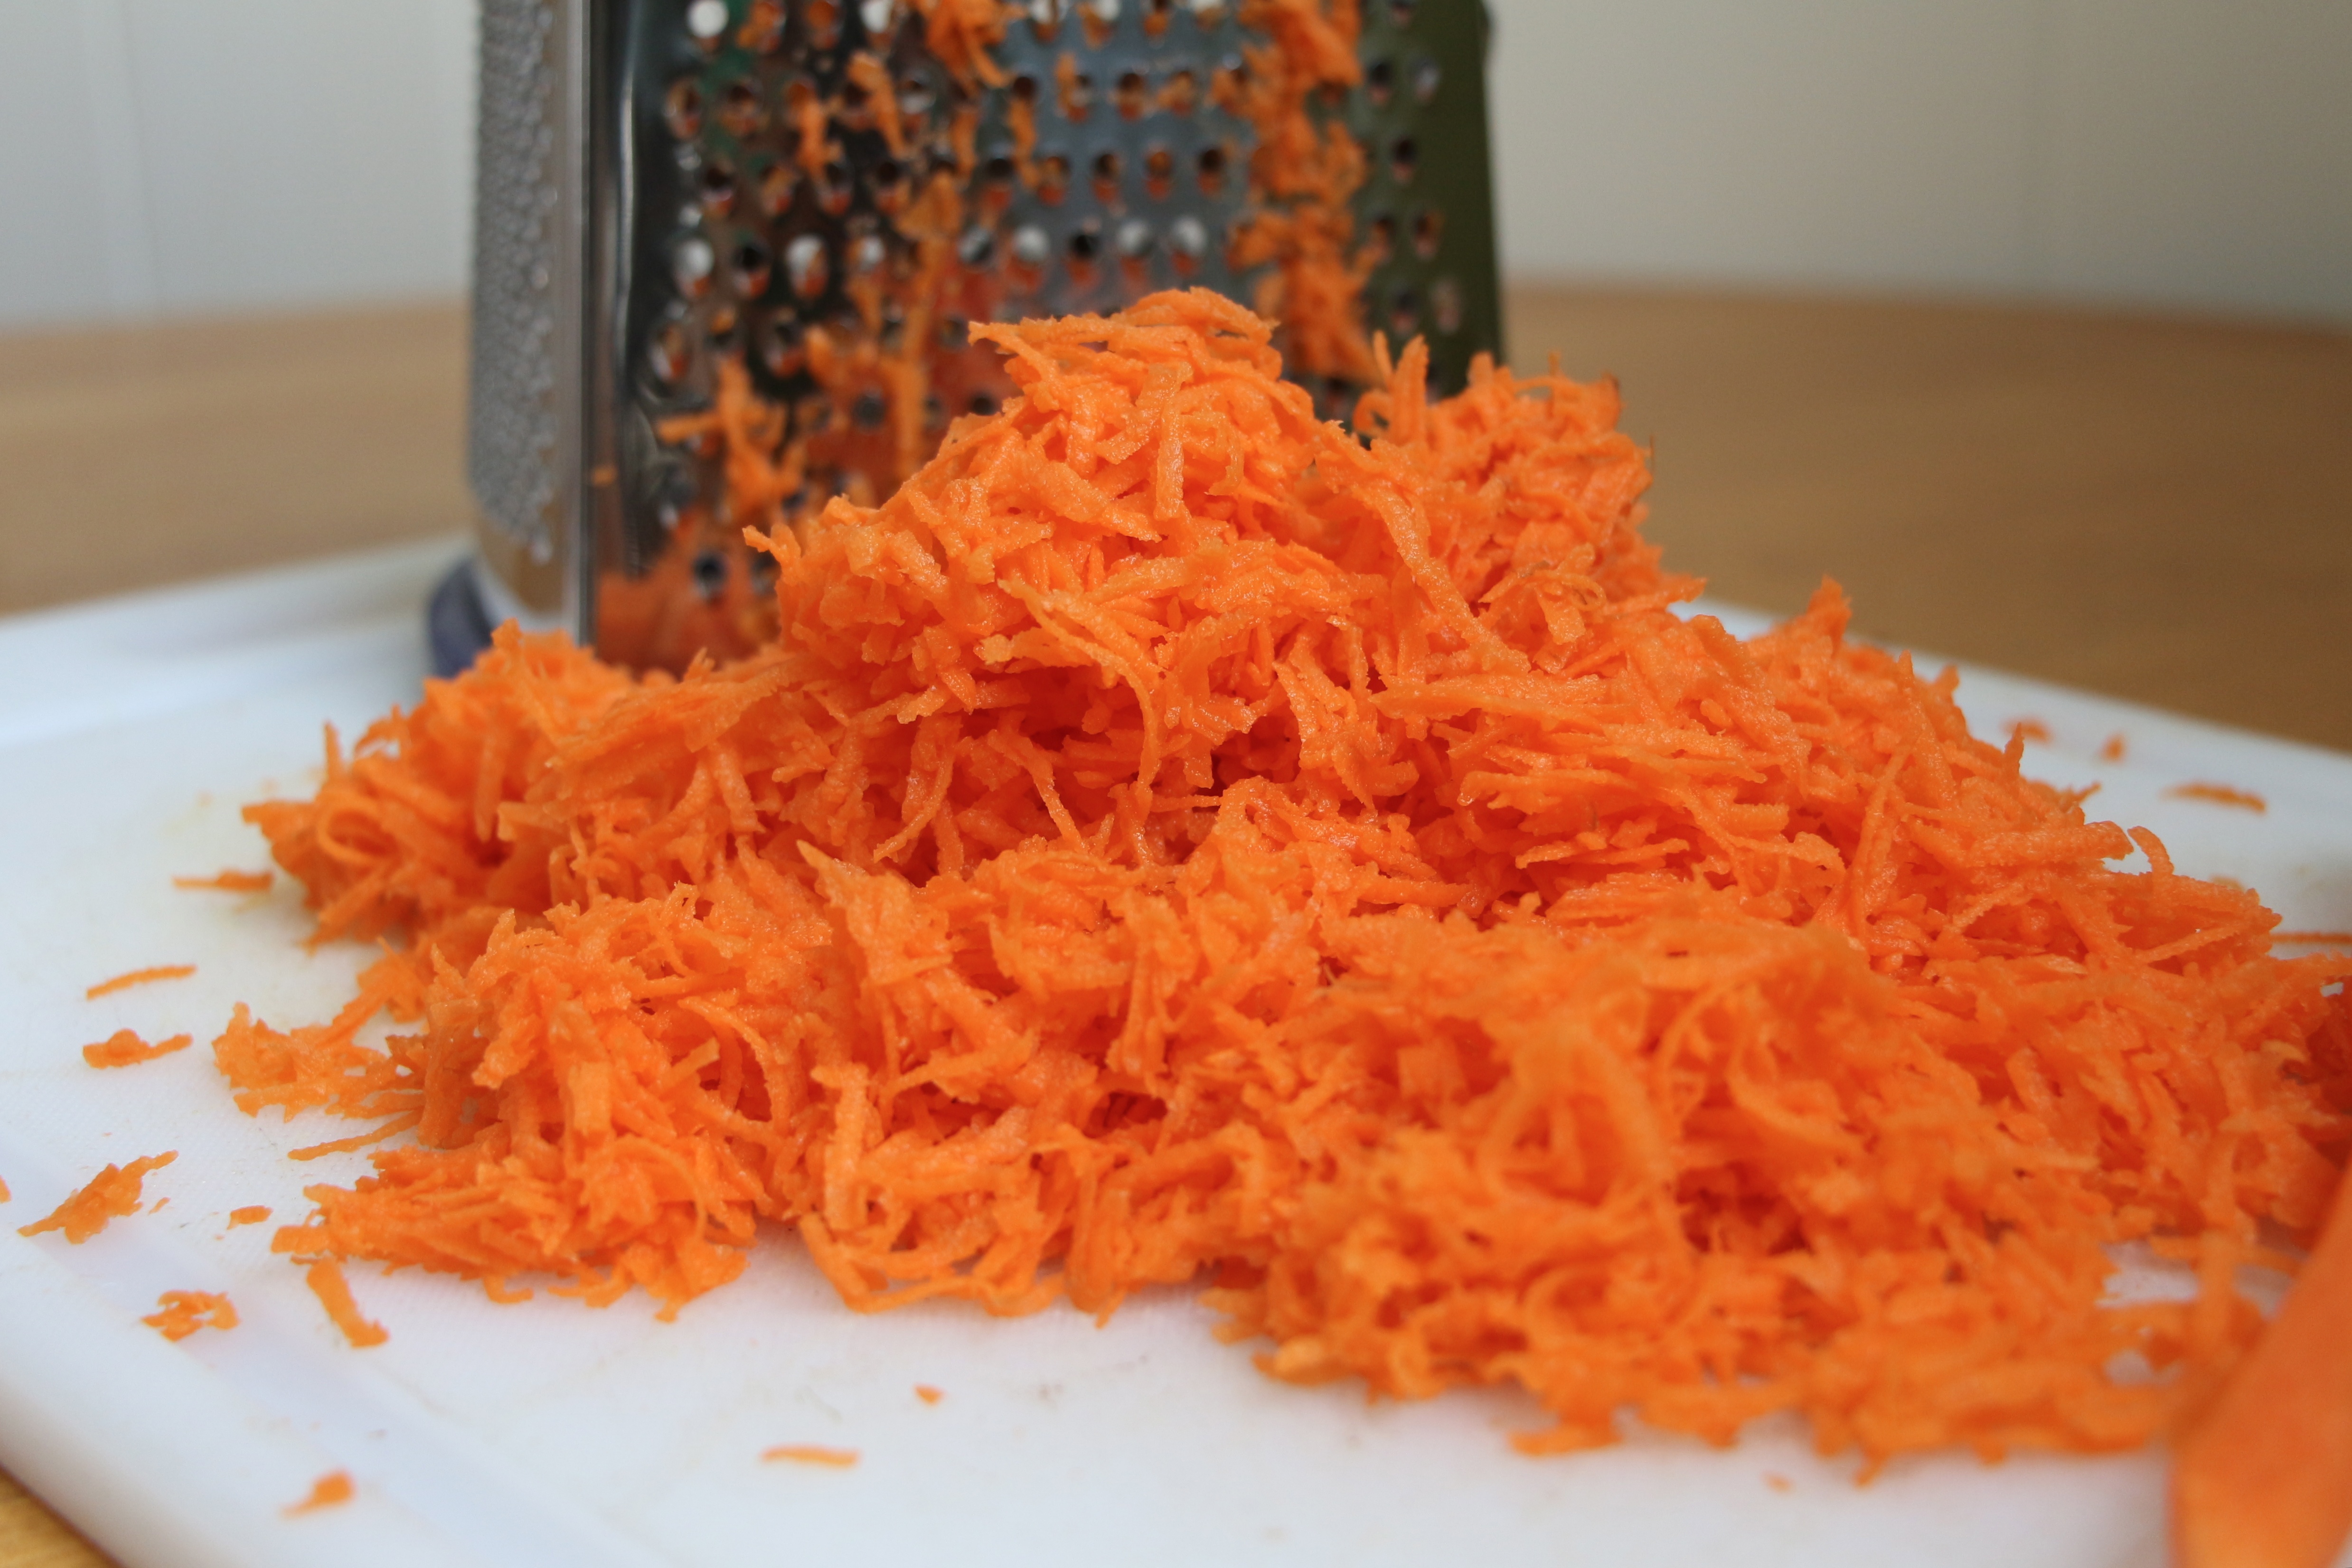
  • 2 cups finely grated carrots (approximately 4 medium-sized carrots)
  • 3/4 cup golden raisins (optional, but recommended)

For the Cheesecake

  • 3 8-ounce bars of cream cheese, softened to room temperature
  • 1 cup sugar
  • 3 eggs
  • 1 teaspoon vanilla

Directions

Preheat oven to 350 degrees. Grease a 10″ springform pan with butter.

For the Carrot Cake: In a large bowl, combine the flour, baking powder, baking soda, cinnamon, ginger, nutmeg and salt. In a separate bowl, beat together the butter and sugars until light and fluffy. Add the vanilla and the eggs, one at a time, beating between each addition. Add the water, then beat for another minute. Add the carrots, then beat for another minute. On low speed, gradually beat in the dry mixture until well blended. Stir in the raisins.

For the Cheesecake: Using an electric mixer, beat together the cream cheese and sugar until well blended. Add the vanilla and the eggs one at a time, beating until well blended.

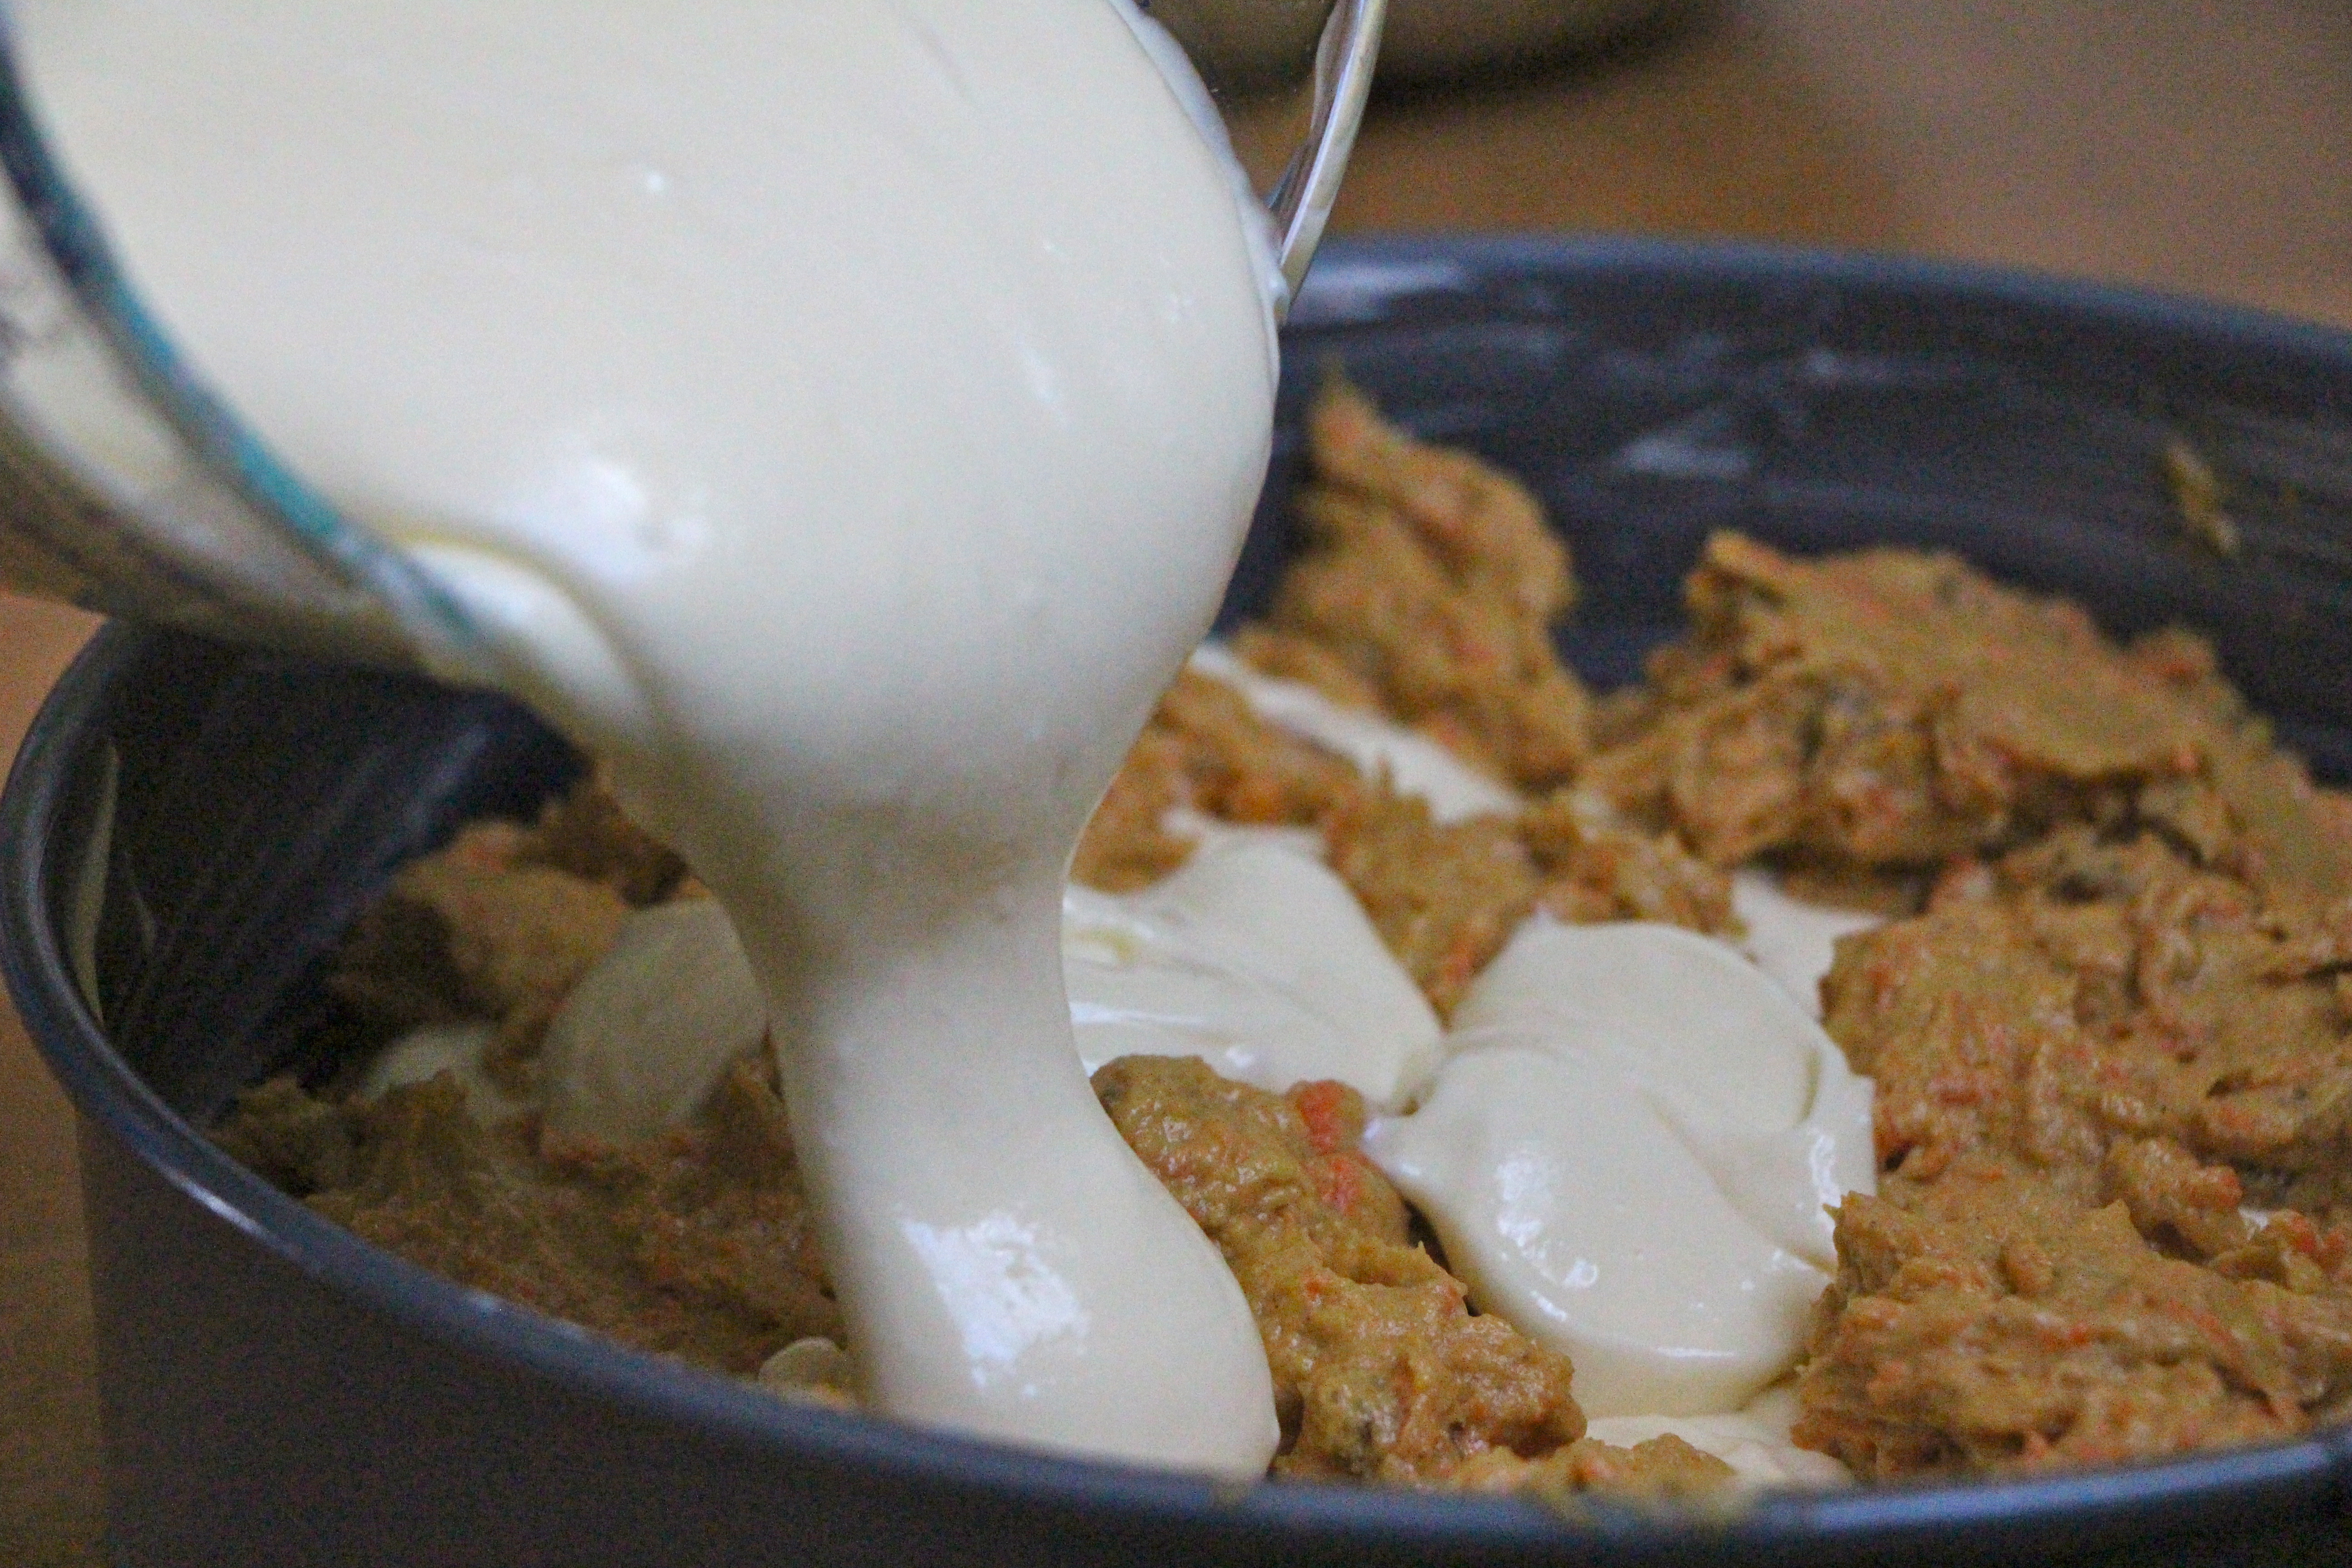
To Assemble the Cake: Spread about 1/2 of the carrot cake batter over the bottom of the prepared springform pan. Drop large spoonfuls of about 1/2 of the cheesecake mixture on top of the carrot cake. Drop large spoonfuls of the remaining carrot cake mixture on top of and around the cheesecake. Pour the remaining cheesecake mixture over the top. Use a spatula to smooth the cheesecake on the top. Bake for about 55-65 minutes, until set.

Cool at room temperature for about an hour, then refrigerate for a few hours until completely chilled.

** Carrot cake portion of the recipe is adapted from Martha Stewart’s Carrot Cake recipe, found HERE.

Advertisement

Cherry Cordial Brownie Bites

My Lucas is charismatic, enigmatic, and profusely loving. There’s just something insanely captivating about him. He’s a heart-melter for sure, with his big blue eyes, sweet dimples, and long, dark lashes. And he’s mine. More than anyone or anything in the whole world (except perhaps Ninjago legos), he loves me. Not sure how I got so lucky!

IMG_1649

Just look at that face!

The kid says, “I love you sooooo much,” so many times each day that I’d begun to suspect it was just a filler statement; simply something to say when there was nothing else to be said. He even says it in his sleep, when I sneak in at night to kiss his little head before I tuck myself into bed. “Mommy, I love you so much.”

But I’ve come to realize that his words are so much more than sounds to fill the silence. He recently turned to my husband and began to say, “Daddy, I love…” I’d expected the statement to end with his predictable “…you soooo much.” But it didn’t. It was quite beautifully, “Daddy, I love Mommy soooo much.” He’s my precious little lovebug.

IMG_5788

On a recent trip to the grocery store, as we walked hand in hand through the parking lot, he squeezed my hand and expressed his sweet statement of love. I returned the sentiment, then we continued into the store. An older woman, who’d been coming from her car, caught the exchange as we passed. I saw her pause and hold her heart for a moment. We ran into that woman as we made our way through the store and she stopped to comment on my sweet boys. I thanked her and she parted with a friendly, “God bless.” As we began to walk away, she shouted back, “What am I saying? Clearly, He already has.”

He certainly has. I have been so generously blessed in love; a family who cherishes and supports me, a husband I can laugh with, children whose love is more contagious than the flu, and the most beautiful friends, who persistently raise me up. This Valentine’s Day, I will celebrate every bit of that priceless, precious love.

IMG_5790

Sweet treats are the perfect way to celebrate the sweetest people in your life, like these absolutely decadent, truffle-like cherry cordial brownie bites. They start with my World’s Simplest Fudgey Brownies, which are then blended with a bit of cream cheese, until rich and smooth. The luscious brownie mixture is then rolled into small balls with a Grand Marnier (or orange juice, for the kiddies) soaked cherry in the center, before being dipped in smooth, melted chocolate. A drizzle of melted pink candy and sprinkles provide the perfect final touches.

Today’s Focus on Technique – Using a Double Boiler

The process of cooking with a double boiler (also called a bain marie) is an ideal technique to use when preparing delicate sauces, such as hollandaise, or when melting chocolates. In a double boiler set-up, the food is placed in a bowl which is suspended above simmering water. The water provides a gentle, consistent, indirect heat which prevents finicky foods from breaking (separating) or burning. It works in a similar manner as using water bath to prepare custards and other delicate egg-based dishes. No special equipment or dedicated ‘double boiler’ is required to utilize a double boiler technique. Simply fill a saucepan with an inch or two of water. Place a stainless steel or glass mixing bowl on top of the pot, so that the bottom of the bowl dips into the pot, but does not touch the water. Place the food you’re preparing in the bowl, bring the water to a simmer, and you’re set to go!

For more useful tips, techniques, and culinary photo guides click HERE.

IMG_5804

Cherry Cordial Brownie Bites

Ingredients

For the brownies:

  • 1 stick of butter
  • 1 cup chocolate chips
  • 1 cup sugar
  • 1 cup flour
  • 2 eggs
  • 1/4 teaspoon salt

For the brownie bites:

  • 1/4 cup Grand Marnier or orange juice (approximately)*
  • 3 dozen dried cherries
  • 4 ounces cream cheese, softened to room temperature
  • 2 cups chocolate chips (semi-sweet or milk chocolate)
  • Pink or red candy melts and sprinkles, for decorating (optional)

*Be aware that no alcohol will be cooked off in the preparation of these candies, so it would be wise to use the orange juice for children, pregnant women, or anyone who is avoiding alcohol intake.

Directions

To prepare the brownies:

Preheat oven to 350 degrees. Spray an 8×8 baking dish with cooking spray. In a saucepan over medium-low heat, melt the chocolate chips and butter until smooth, stirring constantly. Turn off the heat. Stir in the sugar and salt until dissolved. Stir in the flour. Add the eggs and stir until well blended. Pour the mixture into the prepared pan and bake for about 35 minutes.

To prepare the brownie bites:

Soak the dried cherries in approximately 1/4 cup of Grand Marnier or orange juice for at least an hour.

Once the brownies are cool, crumble into small pieces, then place in a food processor. Add the cream cheese and pulse until well-blended and smooth. (A food processor would work best for this task, but it can also be done by hand. If combining by hand, cut off the crispy brownie edges before blending, for a smoother result. If using the food processor, it’s not necessary to cut off the brownies edges.) Roll the mixture into small balls (less than 1″ diameter), inserting a soaked cherry in the center as you roll. Refrigerate until well chilled.

Melt the chocolate chips in a double boiler, stirring frequently, until smooth. Use a fork to lower each brownie ball into the melted chocolate. Shake off the excess chocolate, then place on a baking sheet, which has been lined with parchment paper or wax paper. Refrigerate until the chocolate has set. If desired, drizzle the brownie bites with melted pink or red candy melts and decorate with sprinkles.**

**Click HERE to see an easy pastry bag technique, which can be used for drizzling the brownie bites.

Makes 2.5 – 3 dozen candies

IMG_5841

Huevos Rancheros Pizza

Back in the spring, I strong-armed a couple of my friends into taking Irish step dancing lessons with me. (I actually didn’t need to twist their arms too hard.) We three became the unlikeliest bunch of dancers you could imagine. It was a blast. We clobbered away through a few classes, along with an (almost) equally novice classmate, before the weather became too hot to continue in our dance space. At that point, we broke for the summer, with the intention of resuming classes come fall.

IMG_5639

Well, fall rolled around and I sent an email to our instructor expressing our eagerness to continue. But we never heard back. After a few months with no reply, we’d become fully convinced that we’d been silently dumped as a result of our utter hopelessness in the field of Irish dancing. We couldn’t really blame her. We truly are a hopeless bunch. But then, just as we were about to pack away our dancing shoes, I received a message explaining an email switch, along with an invitation to resume classes. We accepted, of course.

This time though, there are a few other adults in our class and a second instructor. Apparently, our new classmates danced all throughout their childhood and teen years. They’re just picking up where they left off, which is someplace lightyears ahead of the rest of us. While we practiced basic skips, intently concentrating on not running into each other, one of our new classmates gracefully danced circles around us, quite literally. It feels oddly like being stuck in the ‘guppies’ group, aside out advanced classmates in the ‘shark’ group. They’re reading War and Peace, while we struggle through Ted in a Red Bed. Us four clumsy guppies stick as close together as we can without kicking each other. It’s a level of comfort thing. We huddle close together, executing every drill as a unified group, in a fruitless attempt not to draw too much attention to ourselves.

IMG_5642

It’s a ridiculously fun time, swimming in our guppy group. I haven’t laughed so hard in a long while. Graceful, we are not. Skillful, we are not. Coordinated, we most definitely are not. But for all we lack in ability, we more than make up for it with enthusiasm. We will probably never have the graceful, swift-footed skills of our river-dancing role models, but we’re certainly having fun with it. And that’s what it’s all about, isn’t it??

The added bonus is that our weekly lesson and all the practice in between burns a bucketload of calories. Now, if I were smart, I’d save those burned calories and let them work their magic on a bit of weight loss. Oh, but I love food too much and the dancing leaves me ravenously hungry. So, I choose to ‘spend’ my burned calories on fun food, like this Mexican-inspired huevos rancheros pizza. Truth be told, this pizza is fully inspired by nothing more than my desire to cook a pizza with eggs baked into it. It starts with a cornmeal crust, in place of the corn tortillas which would typically be used in huevos rancheros. The homemade crust is then topped with beans, taco sauce, Mexican cheese, chiles, and tomatoes. Fresh eggs are then carefully cracked on top of the pizza before baking for a stunning and unique twist on pizza.

IMG_5656

Today’s Focus on Technique – Cooking with Baker’s Yeast

Baker’s yeast is a single cell organism, commonly used as a leavening agent in many breads, pretzel doughs, and pizza doughs. As the yeast feeds on the sugars in the dough, it releases carbon dioxide, which becomes trapped within the dough, causing it to rise and expand. The most common types of yeast used in baked goods are active dry yeast and rapid rise yeast. Rapid rise yeast is made up of smaller particles, which touch a greater surface area of the dough and typically require half as much time to rise. Many people feel that the long rise time required for active dry yeast recipes results in a more flavorful dough.

Typically, many yeast dough recipes begin by proofing the yeast. Proofing is simply a process of dissolving the yeast in lukewarm water. After a few minutes, the yeast should begin to foam, proving that it is alive and ready to work its leavening magic. If the yeast doesn’t foam, it’s time to buy some new yeast. The magic temperature for proofing yeast is somewhere between 110-115°F. To assure you’ve got the right temperature, it’s helpful to use an instant-read thermometer. I usually stick the thermometer in hot water from the tap, then wait until it reduces to the right range before adding the yeast.

Yeast doughs rise best in a draft-free area, on the warmer side of room temperature (around 70°F). If your house is chillier than that, allow extra time for rising. If time is an issue, I sometimes find it helpful to preheat the oven for a bit, then place the bowl of rising dough on top of or near the oven. You don’t need to keep the oven on throughout the rise time; just long enough to release a little extra heat near the rising dough.

** Lots of other interesting information about yeast can be found HERE.


Huevos Rancheros Pizza

Ingredients

  • 2/3 cup refried beans
  • 1/3 cup taco sauce
  • 2 cups shredded Mexican blend cheese
  • 2-3 tablespoons red onion, finely diced
  • 2-3 tablespoons green chile (fresh or canned), finely diced
  • 5-6 grape tomatoes, thinly sliced
  • 1/3 cup chorizo, chopped (optional)
  • 3 eggs
  • Additional taco sauce or hot sauce for drizzling (optional)
  • Cornmeal Pizza Dough (recipe from www.marthastewart.com)

Directions

Preheat oven to 450°F.

Prepare the cornmeal pizza dough according to the recipe found HERE, except do not divide the dough into smaller portions. Roll the entire dough into one large (approximately 12″) crust. Transfer the rolled dough to a baking sheet, which has been sprinkled with a bit of cornmeal.

Spread the refried beans onto the crust, leaving a 1/2″-1″ lip around the edge. Drizzle the taco sauce over the beans. Scatter about 1/2 of the cheese over the sauce, then sprinkle with the onion, chile, tomatoes, and chorizo. Scatter with the remaining cheese.

Use your fingers to create three shallow wells in the pizza toppings. Carefully crack an egg into each well.

Bake for approximately 15 minutes, until the toppings are hot and melty and the eggs are cooked to your desired doneness.

**Be aware that the egg whites and yolks will maintain a bright, glossy appearance as they bake. In this case, touching the eggs to check for doneness is a more reliable indicator than their appearance. (I made the mistake of relying on appearance and cooked my eggs past the cooked white/runny yolk I was aiming for. The yolks in the photos with this post are actually fully cooked, even though they appear runny.)

IMG_5659

Loaded Nacho Chicken

Like many young twenty-something couples, my husband and I spent a good amount of our time, energy, and income on accumulating stuff. We needed the stylish duvet from Pottery Barn, the flatware set from Crate and Barrel, and the clothes from JCrew. When we married, we registered for the long list of items the registry guide told us we needed, fully believing that we would find frequent use for that 50-piece fondue set and the espresso maker with the milk foaming wand. We gathered our items and checked them off the list of things we were ‘supposed’ to have as well-equipped adults. We were consumers to the utmost degree.

But, recently, there’s been a major shift in how we handle our ‘stuff management’. I don’t know if it’s come with parenthood or age or just a general change of perspective, but we now purge, rather than collect. A few months ago, the microwave broke. I liked the counter space better than the microwave, so we didn’t replace it, and we’ve been totally fine since. The blu-ray player broke a few months before that. We dropped it off at the place for recycled electronics and left the shelf empty. This past summer, we sold  a good portion of the books and DVDs we’d accumulated over the years and have been thankful for the reduced clutter. Neglected toys and outgrown clothing, we regularly donate to our local rescue mission.

IMG_5831

And what we ‘need’ has changed too. Gone are our days of overpriced, trendy bedding and clothing. We buy mostly everything from Target now and when our Dyson, which served us well for many years, finally bit the dust, we replaced it with a bargain-priced Bissell. And you know what? It’s done the job just fine. Our priorities have shifted. We just don’t want the same things we used to think we needed; things which take up too much space in our lives and leave wanting holes in our budget.

A week ago, we made what was probably the biggest cut of all. We pulled the plug on the cable. Now, for people who are as serious about our tv-watching as we are, this is a humungous deal. We’d been toying with the idea for awhile. While we love our cable, seeing that bill every month was torturing us. We’d just rather have that money in our pockets. Liam cried when we told him what we were about to do. That alone may have signified that it was the right decision to make.

We kept our Netflix and through the convenience of modern technology, we are able to hook our computer up to the tv to get our weekly fix of Downton Abbey and our favorite network shows. I’ve felt no emptiness in my life without cable. In fact, life feels beautifully simpler now.

IMG_5834

When I told my mom I was making this loaded nacho chicken for dinner, she giggled at me, the ‘gourmand mom’, breading chicken breasts in crushed tortilla chips. But hey, no one ever said that good food needed to be complicated or utilize fancy ingredients. Simplicity can be positively blissful. The tortilla chips in this dish provide a fun variation on a basic breaded chicken breast. The tortilla coated chicken breasts are then topped with warm, delicious chile con queso and a generous dose of nacho toppings for a vibrant dish the entire family will enjoy.

**This dish could easily be adapted for a fun super bowl appetizer, but cutting the chicken into smaller pieces, skewering the cooked chicken, and serving with a big bowl of warm queso, topped with black beans, green onions, olives, and chopped tomato!

IMG_5802

Today’s Focus on Technique – Basic Breading Procedure

A basic breading technique can be used to coat veggies, meats, or seafood with a crispy, flavorful exterior. It is often used to prepare foods for pan-frying, but works swimmingly for baking as well. Foods can be breaded with basic seasoned bread crumbs, panko bread crumbs, or any variety of crushed crackers or even chips! Properly breading foods is a three step process. First, dredge the food in a bit of flour. Second, dip the item in a simple bath of eggs whisked together with a touch of milk. Third, press the food into your dry breading, until thoroughly coated. The flour adheres easily to the food. The egg adheres to the flour. The breading adheres to the egg. To prevent your fingers from getting breaded in the process, it’s a wise idea to handle the wet ingredients with one hand, while using the other hand for the dry ingredients. Once breaded, your food can be pan-fried in a bit of oil until golden brown and cooked through or oven baked for a lighter result.

Loaded Nacho Chicken

Ingredients

  • 3-4 boneless, skinless chicken breasts
  • 1/2 cup flour
  • 2 eggs
  • 1 tablespoon milk
  • 2 cups corn tortilla chips, finely crushed
  • 3/4 cup chile con queso dip (store-bought or homemade)
  • Black olives, sliced
  • Black beans, drained and rinsed
  • 1-2 green onions, sliced
  • 1 tomato, diced
  • Salt and pepper

Directions

Preheat oven to 375 degrees.

Season the chicken breasts with a sprinkle of salt and pepper.  To set up your breading station, spread the flour onto a plate. Whisk the eggs and milk together in a small baking dish or bowl. Spread the crushed tortilla chips onto a plate. Dredge each chicken breast in the flour, then dip in the egg mixture. Finally, press the chicken into the tortilla chips until well coated. Place the coated chicken breasts in a baking dish. Cook for 25-35 minutes, until the chicken reaches 165°F, as measured with an instant-read meat thermometer.

To serve, top the cooked chicken with a generous helping of warm chile con queso and a sprinkle of black beans, black olives, tomatoes, green onions, or your other favorite nacho toppings.

IMG_5829

Tomorrow will mark the one year anniversary of what we now jokingly refer to as The DeLine Family Super Bowl Massacre. Guess who’s not hosting a super bowl party this year?? Looking for some fun super bowl food ideas? Check out my Baked Asian Sticky Wings, Buffalo Chicken Monkey Bread, Spicy Mexican Wontons, Chicken Wing Dip (you know you want some), Creole Deviled Eggs, or any of the other fun recipes found in the party food section of my Recipe Collection.

Baked Asian Sticky Wings

Teaching children to make good choices is one of the greatest responsibilities and most intense challenges of being a parent. Young children are clever, creative, and sneaky; oh so sneaky. Succeeding at this task requires the snooping skills of Sherlock Holmes, the vigilance of an air traffic controller, and the patience of Mother Teresa. You must watch, wait, anticipate, and react. You must act quickly to intervene before irreversible damage is done and you must sniff out clues like Scooby Doo to unravel mysteries. And most importantly, you must maintain a straight face; calm, but firm and consistent; in the face of discipline.

IMG_5751

But kids are devious and unpredicatable. Don’t be fooled by their sweet little button noses and soft, furry backs. They are constantly testing their limits and devising new methods for mischief. Stay sharp, captain.

My husband and I should have known something was up when we noticed that the stack of plastic kid plates was diminishing. We knew it was peculiar. And yet we just shrugged our shoulders in puzzled confusion and moved on. But all misdeeds come to light eventually, as did the mystery of the missing plates.

IMG_5764

It started when I was changing the baby’s diaper. I laid him down on the carpet which sits in the center of our living room. In the center of that carpet is a large trunk-style coffee table, with legs that raise it about three inches off the floor; just high enough for toys and things to slip beneath, but not tall enough to easily vacuum under. In the position I was in, sitting on the carpet with the baby, I saw what had previously been hidden. Peeking out from the edge of the table were the two plates I’d served the boys breakfast on, which they ate at their snack tables in front of the aforementioned coffee table. A small pile of discarded scrambled eggs sat on one of the plates. I scolded the boys for their lazy behavior and asked them if they thought we lived in a barn (’cause that’s what you’re supposed to say, right??). They hung their heads in appropriate shame and brought their plates to the sink.

IMG_5770

In retrospect, I don’t know why I didn’t put the pieces together at that point. I should have peeked under the table, but I didn’t. We moved on with our day. Then dinner time came along and I served the boys some of my new Asian sticky wings. Chicken wings don’t make frequent appearances on our menu, so I’d anticipated some normal apprehension. When serving something unfamiliar, I make a practice of always including something known and loved on the boys’ plates, so everyone has a chance to fill their bellies with something they like, while also having the opportunity to try something new. I don’t make a big deal about finishing everything on their plates or eating big portions of food they don’t enjoy. I only ask that they take a small taste of each new item, with the idea that over time, as their taste buds mature, they will enjoy a wide variety of foods. No pressure.

So, what happened next never should have happened.

Liam stood up with his dinner plate, proud to show me that he’d eaten everything on it and making a point that he was going to put it properly in the sink. The rice, the sugar snap peas, the yogurt, and the chicken wings were all gone. You catch that?? The chicken wings were all gone. “Where are the bones?” I asked. “Huh…the bones?” came his innocent reply. “Yes, the bones. Where are the bones?” And then he proceeded to explain that he’d eaten the bones. Clever lady that I am, I knew this could not be the case. I had a hard time keeping that ever-important straight face by this point. I knelt by the edge of the table to find the discarded chicken wings before the dog did. I found those wings under the table. I also found five of the kids’ plates. Another mystery solved, Scooby.

IMG_5668

But the wings…the wings are delicious, even if Liam wasn’t interested in them. I’ve been watching what I eat in the new year, but whereas in the past I’ve messed up by going all-in from the start, then losing steam, I’m trying to take a more long-term balanced approach this time. I’m making smart choices most of the time, but not denying myself the opportunity to enjoy some good food and drinks when the opportunity is ripe, like during a girls’ night out with my besties. On our most recent girls’ night out, at one of our favorite local joints, we ordered the Asian sticky wings, which became the inspiration for this recipe.

Healthy goals in mind, these wings are baked, rather than fried. I tried two different techniques in search of the crispiest result. While the resulting crispiness of the winning technique doesn’t quite match what you’d get from a fryer, they come pretty darn close. The secret is baking the wings on top of a rack, so that the excess juices drip below the wings, allowing the skin to become firm. A final few minutes under the broiler seals the deal with a golden brown exterior. Once cooked, the wings are tossed in a sweet Asian-style sauce, which has been reduced into a sticky, delicious glaze. They’d make a perfect addition to any super bowl menu!!

IMG_5677

Today’s Focus on Technique – Reductions

Cooking a flavored liquid by reduction is a method used in order to thicken the liquid and intensify flavors. It is typically used to prepare glazes and full-flavored sauces. To reduce a liquid, simply bring it to a boil in an uncovered pan. As the liquid evaporates, the remaining sauce will become thicker and more flavorful. It’s a wonderful technique for elevating the flavor-profile of a sauce. Using a pan with a wider base will spread the liquid over a greater surface area and increase the rate at which a liquid reduces.

Baked Asian Sticky Wings

Ingredients

  • Approximately 2 dozen chicken wings and legs
  • Juice from 1 orange (approximately 1/3 cup)
  • Zest from 1 orange
  • 1/2 cup honey
  • 1/2 cup hoisin sauce
  • 1/3 cup soy sauce
  • 1 1/2 teaspoons sambal oelek (or crushed red pepper, to taste)
  • 1 teaspoon garlic, minced
  • 1″ ginger root, grated (or 1/2 teaspoon ground ginger)
  • Sliced green onions and sesame seeds, for garnish

Directions

Preheat oven to 400 degrees. Set a rack on top of a baking sheet.  Arrange the chicken pieces in a single layer on top of the rack. Sprinkle with salt and pepper. Bake for about 40 minutes, then turn on the broiler. With the chicken several inches below the broiler, cook for 5-10 more minutes, until the exterior is golden brown and crisp.

While the chicken is cooking, prepare the glaze. Combine the orange juice, zest, honey, hoisin sauce, soy sauce, garlic, ginger, and sambal oelek in a saucepan. Bring the mixture to a bubbling boil over medium heat, stirring frequently. Allow the mixture to bubble away, uncovered, for approximately 10 minutes until the mixture has thickened to a glazy consistency. Taste and adjust flavor with additional honey, if a sweeter result is desired.

Toss the cooked wings in the warm glaze, then garnish with sesame seeds and sliced green onions. Serve with rice and/or steamed sugar snap peas.

Bacon-Mushroom Stuffed Chicken Breasts

One evening, when my sisters and I were young, my parents left us eating our dinner at the kitchen table. My father was in the swimming pool, cleaning it from the inside with one of those large nets for fishing out fallen leaves. My mother was standing outside the pool, chatting with him as he worked. And we, my two younger sisters and I, were calmly enjoying our dinner. Calmly, that is, until our youngest sister dug her fingers into either side of the stick of butter which sat on the table, grabbing handfuls of butter in each hand, which she then proceeded to eat. Straight up mouthfuls of cold butter.

My sister and I were appalled…the fingers in the communal food…the ingesting of pure milk fat. We were certain that our parents would want to be informed of this major dining transgression. If they’d taken away my sister’s knife privileges after she’d licked a butter knife, they would almost certainly take butter away from our youngest sis. Right?? And like many young siblings, we smugly delighted in the prospect of the other’s consequences for poor choices.

So, my sister and I go running outside, shouting, “Mommy, mommy, mommy,” who was in the middle of a conversation with our father and promptly shooed us away. “But, Mommy…” we persisted, confident in the righteousness of our interruption. She again directed us back to our dinners. So we just shouted it, “She’s dug her fingers into the butter.” We enthusiastically demonstrated, with an Oscar worthy tattle-telling performance. “And she’s eating it.”

Our mother ended her conversation mid-sentence and quickly moved into the kitchen to deal with our sister and her butter-slathered fingers. I can’t remember if she lost her butter privileges or not. What I do remember is our mother’s immediate shift from being inconvenienced by our interruption to urgently dealing with the incident at hand. We’d proven our cause to be worthy of interrupting.

IMG_5124

I had a parenting butter incident of my very own a few days ago. I had been trying to prepare dinner and the boys were in rare form; wildly running around the kitchen, stealing components of their dinner from their plates before I’d finished, and engaging in all manners of daredevil mischief which further diminished the odds that I’d ever complete dinner. I shooed them all into the living room. “Go watch tv. Leave me alone for a minute so I can get dinner on the table.”

Liam and Lucas reluctantly complied. James stuck around in the kitchen going about his normal business of pushing chairs around to access countertop supplies and opening the fridge in search of his beloved apple slices. I could see him out of the corner of my eye, standing in the light of the open fridge doors, chanting “Apple, apple, apple, apple…” I went about the dinner preparations, with my back turned to him. He became quiet and I’d assumed he’d temporarily given up his quest for precious apples.

And then Lucas comes into the kitchen, whining “Mommy, mommy, mommy…” I shooed him away in the same manner my mother had shooed me away at the pool. “But, Mommy…” he continued. I was becoming annoyed. I sent him away. He persisted, “But Gooba (our pet name for the baby) is eating bacon.”

I spun around, with the same swift shift of my mother at the pool. And sure enough, the baby was standing there with two handfuls of cooked bacon, which had been sitting on a plate in the fridge, happily snacking on his discovered fridge treasure.

I let him eat the bacon. It’s bacon, after all, and I’m not some kind of monster who steals bacon from babies. He was a smart baby to recognize the value of his find.

IMG_5134

Providing your baby doesn’t steal your bacon before you get a chance to use it, you should make this spectacular bacon-mushroom stuffed chicken. This recipe is fully inspired by a friend, who chopped up and stuffed some leftover bacon-stuffed mushrooms I’d made for her holiday party, into a few chicken breasts for an easy day-after-party dinner. Genius use of leftover stuffed mushrooms. Taking that lead, I modified my recipe for Bacon-Stuffed Mushrooms to be intentionally used as a filling for chicken and paired it all with a creamy sour cream and mushroom gravy for a simple and satisfying dinner.

Today’s Focus on Technique – Stuffed Meat Safety

When cooking stuffed meats, it is important to ensure that both the meat and the stuffing are cooked to a safe temperature. This is one of the major challenges with cooking larger stuffed items, like a whole turkey, where it will take much longer for the center stuffing to reach a safe temperature, while the surrounding turkey overcooks. In smaller cuts, like a stuffed chicken breast, it’s easier to bring both components to a safe temperature without overcooking the meat. To check for a safe temperature, it is important to test the temperature of both the meat and the stuffing. Do this by inserting an instant-read meat thermometer into both components of the dish. Poultry is safely cooked at 165 degrees.

Bacon-Mushroom Stuffed Chicken Breasts

Ingredients

  • 8 ounces mushrooms (about 10-12 medium-sized mushrooms)
  • 1/4 cup sour cream
  • 1/8 cup onion, finely diced
  • 1/2 teaspoon garlic, minced
  • 1/8 cup bread crumbs
  • 4 slices bacon, cooked and crumbled
  • 1/8 cup parmesan cheese
  • Salt and pepper, to taste
  • 3-4 large boneless, skinless chicken breasts
  • Paprika

For the Sour Cream-Mushroom Sauce

  • 2 1/2 tablespoons butter
  • 2 1/2 tablespoons flour
  • 1 cup chicken broth
  • 1/4 cup sour cream
  • Salt and pepper

Directions

Preheat oven to 375 degrees.

Using a damp paper towel, wipe the mushrooms clean. Remove the stems from the mushroom caps. Finely dice the mushroom stems and about half of the mushroom caps. Slice the remaining mushroom caps and set aside.

In a bowl, combined the diced mushrooms, sour cream, onion, garlic, bread crumbs, bacon, and parmesan cheese. Taste the mixture, then season with salt and pepper, as desired. The stuffing should be fairly thick.

Slice the chicken breasts almost all the way through to create a wide pocket. Generously fill each pocket with some of the stuffing mixture. Spray a baking sheet with non-stick spray, then place the stuffed chicken breasts on the sheet. Sprinkle each chicken breast with a pinch of paprika, salt, and pepper. Bake for approximately 30 minutes. Check for doneness with an instant-read meat thermometer. Test both the chicken and the stuffing. Both components are safely cooked at 165°F.

While the chicken is cooking, prepare the sauce. Melt the butter in a small pan over medium heat. Add the reserved sliced mushroom caps. Cook for 5-7 minutes until tender and slightly golden. Sprinkle the flour over the mushrooms. Stir to even coat the mushrooms. Cook for about a minute, then gradually whisk in the chicken broth until well combined. Bring the mixture to a simmer. Simmer for a couple minutes until it has thickened to the consistency of a gravy. Stir in the sour cream. Taste and adjust seasoning with salt and pepper, as desired.

Pour some of the sauce over each chicken breast before serving.

IMG_5357

Bacon Thief

Antipasto Chicken (and the yarn wreath giveaway winner!)

This recipe is born of my Thanksgiving leftovers, though not in the typical turkey soup, casserole, or sandwich sense you may expect. Thanksgiving at my Grammy’s always began with a giant platter of antipasto; all varieties of meat, cheese, and marinated yummies, drizzled with a dressing made from the oils and vinegars which preserved and flavored the veggies. And though I now host my own Thanksgiving feast, a smaller version of that antipasto platter still belongs at my table.

IMG_4153

So, after our Thanksgiving feast, we were left with the expected turkey leftovers, as well as a tasty assortment of salami, provolone, sun-dried tomatoes, and olives. In search of an easy dinner which would put those leftovers to use, I threw them all together in a baking dish with a bit of tomato sauce and a few chicken breasts. It wasn’t a planned blog post. No photos were taken or measurements made. It was just a lazy night’s meal made with leftovers. But the result was so delicious, I had to make it again just to share with you.

The savory antipasto ingredients flavor the tomato base as the dish cooks, creating a rich full-flavored tomato sauce. Nestled in the sauce as it bakes, the chicken remains moist and tender. Super simple for the busy holiday season, yet incredibly flavorful and satisfying!

IMG_4348

Today’s Focus on Technique – Using an Instant Read Meat Thermometer

When cooking meat, it’s important not to rely too heavily on the stated cooking times in any given recipe. Normal variations in actual oven temperatures, along with differences in the weight and dimensions of individual cuts of meat, mean that your meat may cook slower or faster than the stated time in a recipe. To avoid under- or over-cooking meat, your best bet is to use an instant read meat thermometer. It’s one of the most useful kitchen tools you can have on hand. If you don’t already have one, put an instant read meat thermometer on your Christmas list immediately! I use mine almost every day.

Here are a few tips for properly using an instant read meat thermometer:

  • Begin checking the temperature as you approach the expected finish time for your meat (typically a few minutes before the recipe’s stated time for smaller cuts; farther ahead for larger roasts).
  • Remove the meat from the heat before measuring the temperature. Do not measure the temperature while the meat is still in the oven, as the oven heat may skew the results.
  • Insert the thermometer into the center of the thickest part of the meat.
  • Make sure that the thermometer is not poking out the other end or touching bone.
  • Wait for the thermometer to register the temperature. Some thermometers will register the temperature immediately, while some will take a few seconds.
  • According to the USDA, the following are the recommended minimum safe temperatures for various foods:
    • Beef, Pork, Veal, and Lamb (steaks, roasts, and chops) – 145°F
    • Ground meats (this includes hamburger) – 160°F
    • Poultry – 165°F
    • Fish and Shellfish – 145°F
  • Keep your instant read meat thermometer pristinely clean and close at hand!

Antipasto Chicken

Ingredients

  • 1 8-ounce can tomato sauce
  • 1/4 cup tomato paste
  • 1/8 cup parmesan cheese, grated
  • 4 slices salami, chopped
  • 1/2 small onion, finely diced
  • 1 teaspoon garlic, minced
  • 1/4 cup sun-dried tomatoes
  • 1/4 cup olives (any kind), sliced
  • 3-4 boneless, skinless chicken breasts
  • Salt and pepper
  • 3-4 slices provolone cheese, chopped

*Marinated mushrooms, spicy peppers, or marinated artichokes would all make delicious additions.

Directions

Preheat oven to 375 degrees.

In a baking dish, combine the tomato sauce, tomato paste, parmesan cheese, salami, onion, garlic, sun-dried tomatoes, and olives. Sprinkle the chicken with salt and pepper, then press the chicken breasts into the tomato mixture. Turn once to coat on both sides. Bake for approximately 25-35 minutes*, until cooked through. Turn once, halfway through cooking. Once the chicken is cooked, sprinkle the provolone cheese over the top. Leave in the oven for just a few seconds to melt. *Cooking time will vary depending on the weight and dimensions of your chicken breasts. Use an instant read meat thermometer to determine doneness. Chicken is safely done at 165°F.

Slice and serve over pasta.

IMG_4333

GIVEAWAY WINNER!! We have a winner! Using http://www.random.org to select a number at random, out of the 15 entries received for the yarn wreath gift bag giveaway, the winner is #2 , Jennifer. Congratulations, Jennifer!! I’m going to send you an email at the address provided with your comment to get the information necessary to send you out your prize!! Thank you to everyone who shared their holiday tips and traditions.

Eggplant Parmesan Pizza (and a Giveaway!)

Yikes! Where’d the past week go? Think I can blame my absence on a Thanksgiving tryptophan-induced coma?? Seriously though, once the dishes were cleaned from our Thanksgiving dessert, I felt myself melt into an unproductive pile of mush. I just needed a little time to recover from the rush of Thanksgiving and gear up for the holiday rush. I’m ready now. Mostly.

It wasn’t a completely unproductive week though. I decided to try my hand at making one of those adorable yarn wreaths I’ve seen pictured online. I made one, admired it for a bit, then got sucked into a major crafting time warp. I awoke covered in bits of yarn and a web of those stringy glue gun remnants. I made sixteen yarn wreaths, complete with handcrafted felt flowers and tiny green leaves, over the course of six days. I barely remember making them. They just sort of appeared in a pretty pile on my dining room table. It’s kinda weird. Almost everyone I know is getting a wreath for Christmas…even one of you!

IMG_3875

On top of manic crafting, I’ve been overfilling my calendar with holiday events, shopping lists, and cookie baking schedules. Suffice it to say, this is gonna be a busy month. And busy months require easy dinners  – the sort of stuff you can easily prepare by throwing together a few basic ingredients, while still resulting in a tummy-warming winter meal. This eggplant parmesan pizza fits the bill perfectly. You could even make it with frozen pre-fried eggplant, if you wanted to keep it super, super simple, though frying your own eggplant takes minimal effort. That crisp fried eggplant gets scattered on a pizza shell (make your own or buy pre-made, like I did) along with pizza sauce, ricotta cheese, parmesan, and melty mozzarella for a simple, satisfying meal.

IMG_3884

Today’s Focus on Technique – Salting Eggplant

It is often recommended to salt eggplant prior to frying it. This technique is best applied to larger eggplants which have been sitting in the grocery case for a bit. Baby eggplants or those that have been freshly picked will most likely be wonderful without salting. The purpose of salting the eggplant is to draw out some of the bitter liquid which collects in larger, older eggplants. The end result is better tasting, firmer eggplant which will absorb less oil as it’s fried.

To salt your eggplant, start by cutting or slicing your eggplant, as desired. Arrange the pieces or slices in a single layer on a baking sheet. Sprinkle the eggplant slices with a good amount of salt. Allow it to rest for approximately 20-25 minutes. Beads of liquid will begin appearing on the surface. Thoroughly rinse the eggplant and pat dry.

IMG_3896

Eggplant Parmesan Pizza

Ingredients 

  • 1 eggplant, sliced into 1/4″ slices
  • Salt
  • 1/2 cup flour
  • 2 eggs, lightly beaten
  • 2 cups seasoned bread crumbs
  • Vegetable or olive oil, for frying
  • 1 pizza crust (store-bought or homemade)
  • 1/2 cup ricotta cheese
  • 1/2 cup pizza sauce
  • 1/4 cup parmesan cheese
  • 1 cup mozzarella cheese, shredded

*All measurements are approximate. Actual measurements will vary depending on the size of your pizza crust. I used a 12″ store-bought crust.

Directions

Arrange the eggplant slices in a single layer. Sprinkle with a good amount of salt. Allow to rest for about 20 minutes. Rinse thoroughly, then pat dry.

Dredge each slice in the flour, then dip in egg, then dredge in the bread crumbs. Press the bread crumbs into the eggplant so that it is thoroughly covered. Heat a thin layer (about 1/8″) of oil in a large fry pan over medium/medium-high heat. Fry the eggplant slices for a minute or two on each side, until golden brown and crispy. Adjust the heat, as necessary, to prevent burning. Drain the fried slices on paper towels. Chop into small pieces.

To assemble the pizza: Preheat oven to 375 degrees. Spread the ricotta cheese in an even layer over the pizza crust. Spread the pizza sauce on top of the ricotta (I like to use a smooth and thick, tomato paste based pizza sauce.) Sprinkle about 1/2 of the mozzarella cheese over the sauce. Arrange some of the eggplant pieces around the pizza. (You may have extra eggplant remaining.) Sprinkle with the parmesan cheese and remaining mozzarella cheese. Bake for about 15-18 minutes, until hot and melty.

IMG_4324

I come bearing gifts… Want to win one of the 8″ wreaths I made? Keep it for yourself or cross someone off your shopping list! I’ll even try to match the winner up with a color scheme of your choice! If you’d like to enter to win a wreath, leave a comment about your favorite holiday tradition (any holiday) or your top tip for enjoying a stress-free holiday season. The contest will end at 12:00 noon EST on Saturday, December 8, 2012, when I will randomly select one winner. One entry per person. US mailing addresses only, please. Good luck!

Cranberry Mango Sauce

My five year old has discovered my kryptonite…

You see, when bedtime arrives, Liam will begin spewing an endless stream of stories and questions in an attempt to delay the inevitable lights out. It’s his routine. He speaks so fast you may imagine he’s in training for a career in auctioneering. Math facts, dinosaur facts, sight words, stories about school, menu planning, favorite mythical creatures… The only escape is fast and brutal, even as he’s mid-sentence talking about the cunning swiftness of the velociraptor.

Good night. I love you. Lights out. 

Reindeer Liam

But the clever bugger has picked up on something… I can’t leave if he’s talking about God. I’m physically incapable of it. What am I, some sort of monster?!? Stop talking about God. Mommy needs to go downstairs and drink my wine! No, I can’t turn the lights out and walk away when the kid starts talking about God or heaven or angels or prayer. And the little stinker has figured it out.

So, when he senses that I’m about to put a quick kibosh on the nighttime story telling, he doesn’t miss a beat. Without even pausing for a breath, he slides right into the God talk. Questions and stories and ideas. It’s endearing. And also manipulative. Amongst a million other things, I’m so thankful for that clever kid and the opportunity to talk about important things with him, like dinosaurs, three-headed dogs, and God.

The countdown to Thanksgiving is on. If you’re hosting, it’s likely you’ve already started the preparations. I beat the Thanksgiving mayhem at my grocery store, by completing most of my shopping early yesterday morning. Just a few fresh items to pick up tomorrow and we’ll be set for a grand feast.

And this morning I started the cooking with this cranberry mango sauce; a unique twist on the ubiquitous cranberry condiment which graces most dining tables come Thanksgiving. For years, I’ve been making a cranberry orange sauce, which we’ve always enjoyed. But this year, I had mangos on my mind. I’d imagined that the mellow sweetness of a mango would be the perfect match for the cranberries’ tart bitterness. I was correct. The smooth mango puree wraps itself around the sharp flavor of the cranberries and gives the dish a satisfying flavor which will pair perfectly with that golden turkey.

Today’s Focus on Technique – Thanksgiving Turkey Safety

Send your guests home on Thanksgiving with a full, satisfied belly. Don’t send them home with food poisoning. Here are a few tips for safely preparing, serving, and storing the star of the show.

  • The safest way to thaw a frozen turkey is in the refrigerator. This technique can take 1-3 days for a small turkey or 5-6 days for a large turkey, so plan ahead. Turkeys that are defrosted in the fridge can be held in the refrigerator for a couple days before roasting.
  • A faster way to safely defrost a turkey is in a large pot of cold water. Wrap the turkey securely, then submerge completely in cold water. Change the water every 30 minutes or so, so that it remains cold throughout the defrosting process. Cook the turkey soon after it is defrosted. This process can take a few hours for a small turkey or up to 10-12 hours for a large turkey.
  • The microwave is another option for safely defrosting a turkey, assuming you can fit your turkey in your microwave. To prevent bacteria from multiplying, turkey which has been defrosted in the microwave should be cooked immediately following. Do not refrigerate or freeze it once it has been defrosted.
  • Never, ever, never defrost a turkey sitting on a counter at room temperature. The outside will defrost much faster than the interior, creating a perfect breeding ground for bacteria. Yuck!
  • Cook your turkey at a minimum temperature of 325 degrees. Any lower could result in the center of the turkey sitting at an unsafe temperature for too long during the cooking process.
  • Consider not stuffing your turkey. To be safe, every part of the turkey, including the stuffing, needs to reach 165 degrees. It can take a very long time for the stuffing to reach this safe temperature, since airflow is restricted within the turkey cavity. This usually means that you will need to continue cooking the turkey beyond the point that the turkey has reached a safe temperature, meaning an overcooked turkey.
  • If you do decide to stuff your turkey, stuff it loosely and use a food thermometer to check that it has reached at least 165 degrees before serving.
  • Use a food thermometer, inserted into the meatiest part of the breast and the innermost part of the thigh and wing, to check for doneness. Turkey is safely cooked at 165 degrees.
  • Do not allow your cooked turkey to sit at room temperature for longer than 2 hours. Get those leftovers in the refrigerator promptly, so you can safely enjoy all of those turkey salad and open-faced turkey sandwiches smothered with gravy!
  • Enjoy your leftover turkey, hot or cold, within 3-4 days.

*Check out the USDA website for more information about turkey safety, including time estimates for safely defrosting and cooking that big bird!

Cranberry Mango Sauce

Ingredients

  • 1 12-ounce bag fresh cranberries
  • 2/3 cup sugar
  • 1 ripe mango, pureed*
  • 1/3 cup water
  • 1 teaspoon orange zest
  • 1/4 teaspoon cinnamon
  • 1/8 teaspoon ginger

*See my photo guide on how to chop a mango HERE.

Directions

Rinse cranberries and remove any stems or overly mushy berries. Combine all ingredients in a saucepan over medium heat. Bring to a simmer. Lower heat and continue simmering for 10-15 minutes, stirring occasionally, until all cranberries have popped and the mixture has thickened. Remove from the heat and cool completely before serving.

Thanksgiving Inspiration

I learned something interesting about myself this week – I do not like corn bread stuffing. I love corn, corn muffins, corn bread, and corn fritters. I eat a ridiculous amount of corn when it’s in season. I even once made a sweet corn ice cream. But I do not like corn bread stuffing.

I guess it comes down to what you’re raised with – sort of how some families are the Crest kind of people and some families are the Colgate kind. Some families are loyal to Miracle Whip, while others will only use mayonnaise. Some families have corn bread stuffing at Thanksgiving and some families have white bread stuffing. Our family was always a Crest, mayonnaise, and white bread stuffing sort of family.

The four things I am most thankful for.

I didn’t realize how ingrained this inclination towards white bread stuffing was until I set about preparing a corn bread stuffing earlier this week. It should’ve been delicious, with crispy bits of bacon, tender dates, shallots, and celery. It was supposed to be a new recipe to feature in this post about Thanksgiving ideas. But I didn’t like it. I can’t even tell you if it was good or not, as far as corn bread stuffings go. I am just a white bread stuffing girl through and through and I couldn’t wrap my taste buds or my heart around that corn bread stuffing. I’m not sharing the recipe.

But I am going to share this round-up of wonderful, tried and true Thanksgiving ideas, in plenty of time to add them to your Thanksgiving menu…

Give thanks for good food, friends.

APPETIZERS

Cranberry Chipotle Meatballs

Corn and Bacon Fritters with Smoked Salmon

Bacon-Wrapped Dates stuffed with Bleu Cheese

THE MAIN EVENT

Herb-Roasted Turkey Breast with Pan Gravy (and tips for roasting a whole turkey)

Bacon and Cider Braised Turkey Drumsticks (and garlicky creamed spinach)

Spiced Sweet Potato Puree with Pecan Streusel

Sausage, Apple, and Leek Stuffing

Cranberry-Orange Sauce

Green Beans Almondine

Roasted Brussels Sprouts with Bacon and Walnuts

Hot Doughy Buns

DESSERTS

Chocolate Pecan Pie

Pumpkin Coconut Pie

A Few Variations on Apple Pie (in an all butter pie crust)

Caramel Apple Cake

Turkey-Shaped Sugar Cookies

Caramel Apple Tartlets

Spiced Mango Upside Down Cake

Cannoli Cheesecake

Secrets of An Avon Beauty Boss

Achieving Beautiful Dreams with Avon

The Gourmand Mom

Good food, seasoned with a dash of life

%d bloggers like this: