RSS Feed

Category Archives: Recipes

Tequila-Braised Chicken

It seems that I blinked and almost two years went by since I’ve written.

A lot has happened in two years.  We renovated and sold our old house, then bought another house, packed and moved.

We took the boys to Disney World, Myrtle Beach and assorted other weekend adventures. We took ourselves to Barbados.

We adopted the most perfectly precious puppy.

IMG_5183.jpg

The kids got bigger and busier. We got older (and also busier).

My little Avon hobby flourished into a unexpected thriving business, with hundreds of other representatives on my team. (That’s me in the red sweater below.)

Avon Recognition.jpg

We celebrated and we suffered. We gained and we lost. We laughed and we cried.

Basically, we’ve spent the past two years doing the whole life thing, with all of the celebrations and sorrows that brings.

And somewhere in the midst of all of that living, this little ol’ blog lost its place. Quite honestly, I was having a hard enough time garnering the mental energy to even figure out what to cook, let alone gathering the necessary ingredients, cooking it, photographing it, and then writing about it!

As our days became busier and our attention more scattered, we regretfully found ourselves in a routine of easy, not-typically-so-healthy convenience food.

IMG_5660.jpg

Enter “meal kit delivery” sites.

My lovely sister-in-law has been using a site called Plated for awhile now. Plated offers a weekly menu of meals to choose from. You select your meals a week ahead of time, then they ship you exact portions of the fresh ingredients you need to cook the meals, along with  bright, easy-to-follow recipe cards. On your delivery day, everything you need arrives on your doorstep, fresh and ready to be cooked.

After drooling over the pictures of the crave-worthy meals my sister-in-law was cooking with her husband, I decided to give it a try.

My one and only disappointment after receiving our first Plated box was that I didn’t have another box waiting on my doorstep, containing everything I needed to cook a delicious meal on all of the other nights that week! And the next week. And the week after that.

Turns out that there are a number of other sites that offer the same service as Plated. In the past couple months, we’ve also ordered from Blue Apron and become bigs fans of Home Chef, which has proven to be the best fit for feeding our whole family.

IMG_5664.jpg

Aside from the major convenience factor that Plated and other meal delivery kit sites offer, it’s also become much-needed fodder for food inspiration. Cooking each of the meals we’ve ordered through Plated, Blue Apron, or Home Chef, has stirred the culinary juices in my mind.

One delicious dish leads to an idea for another delicious dish. Change a bit here, add a bit over there, omit a bit over here, and voilá! You’ve got a new dish perfectly suited to your tastes.

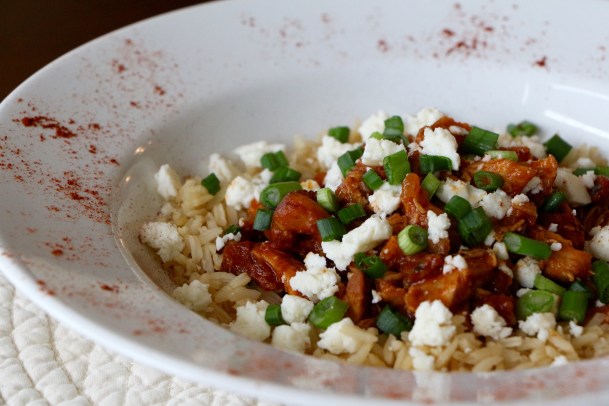
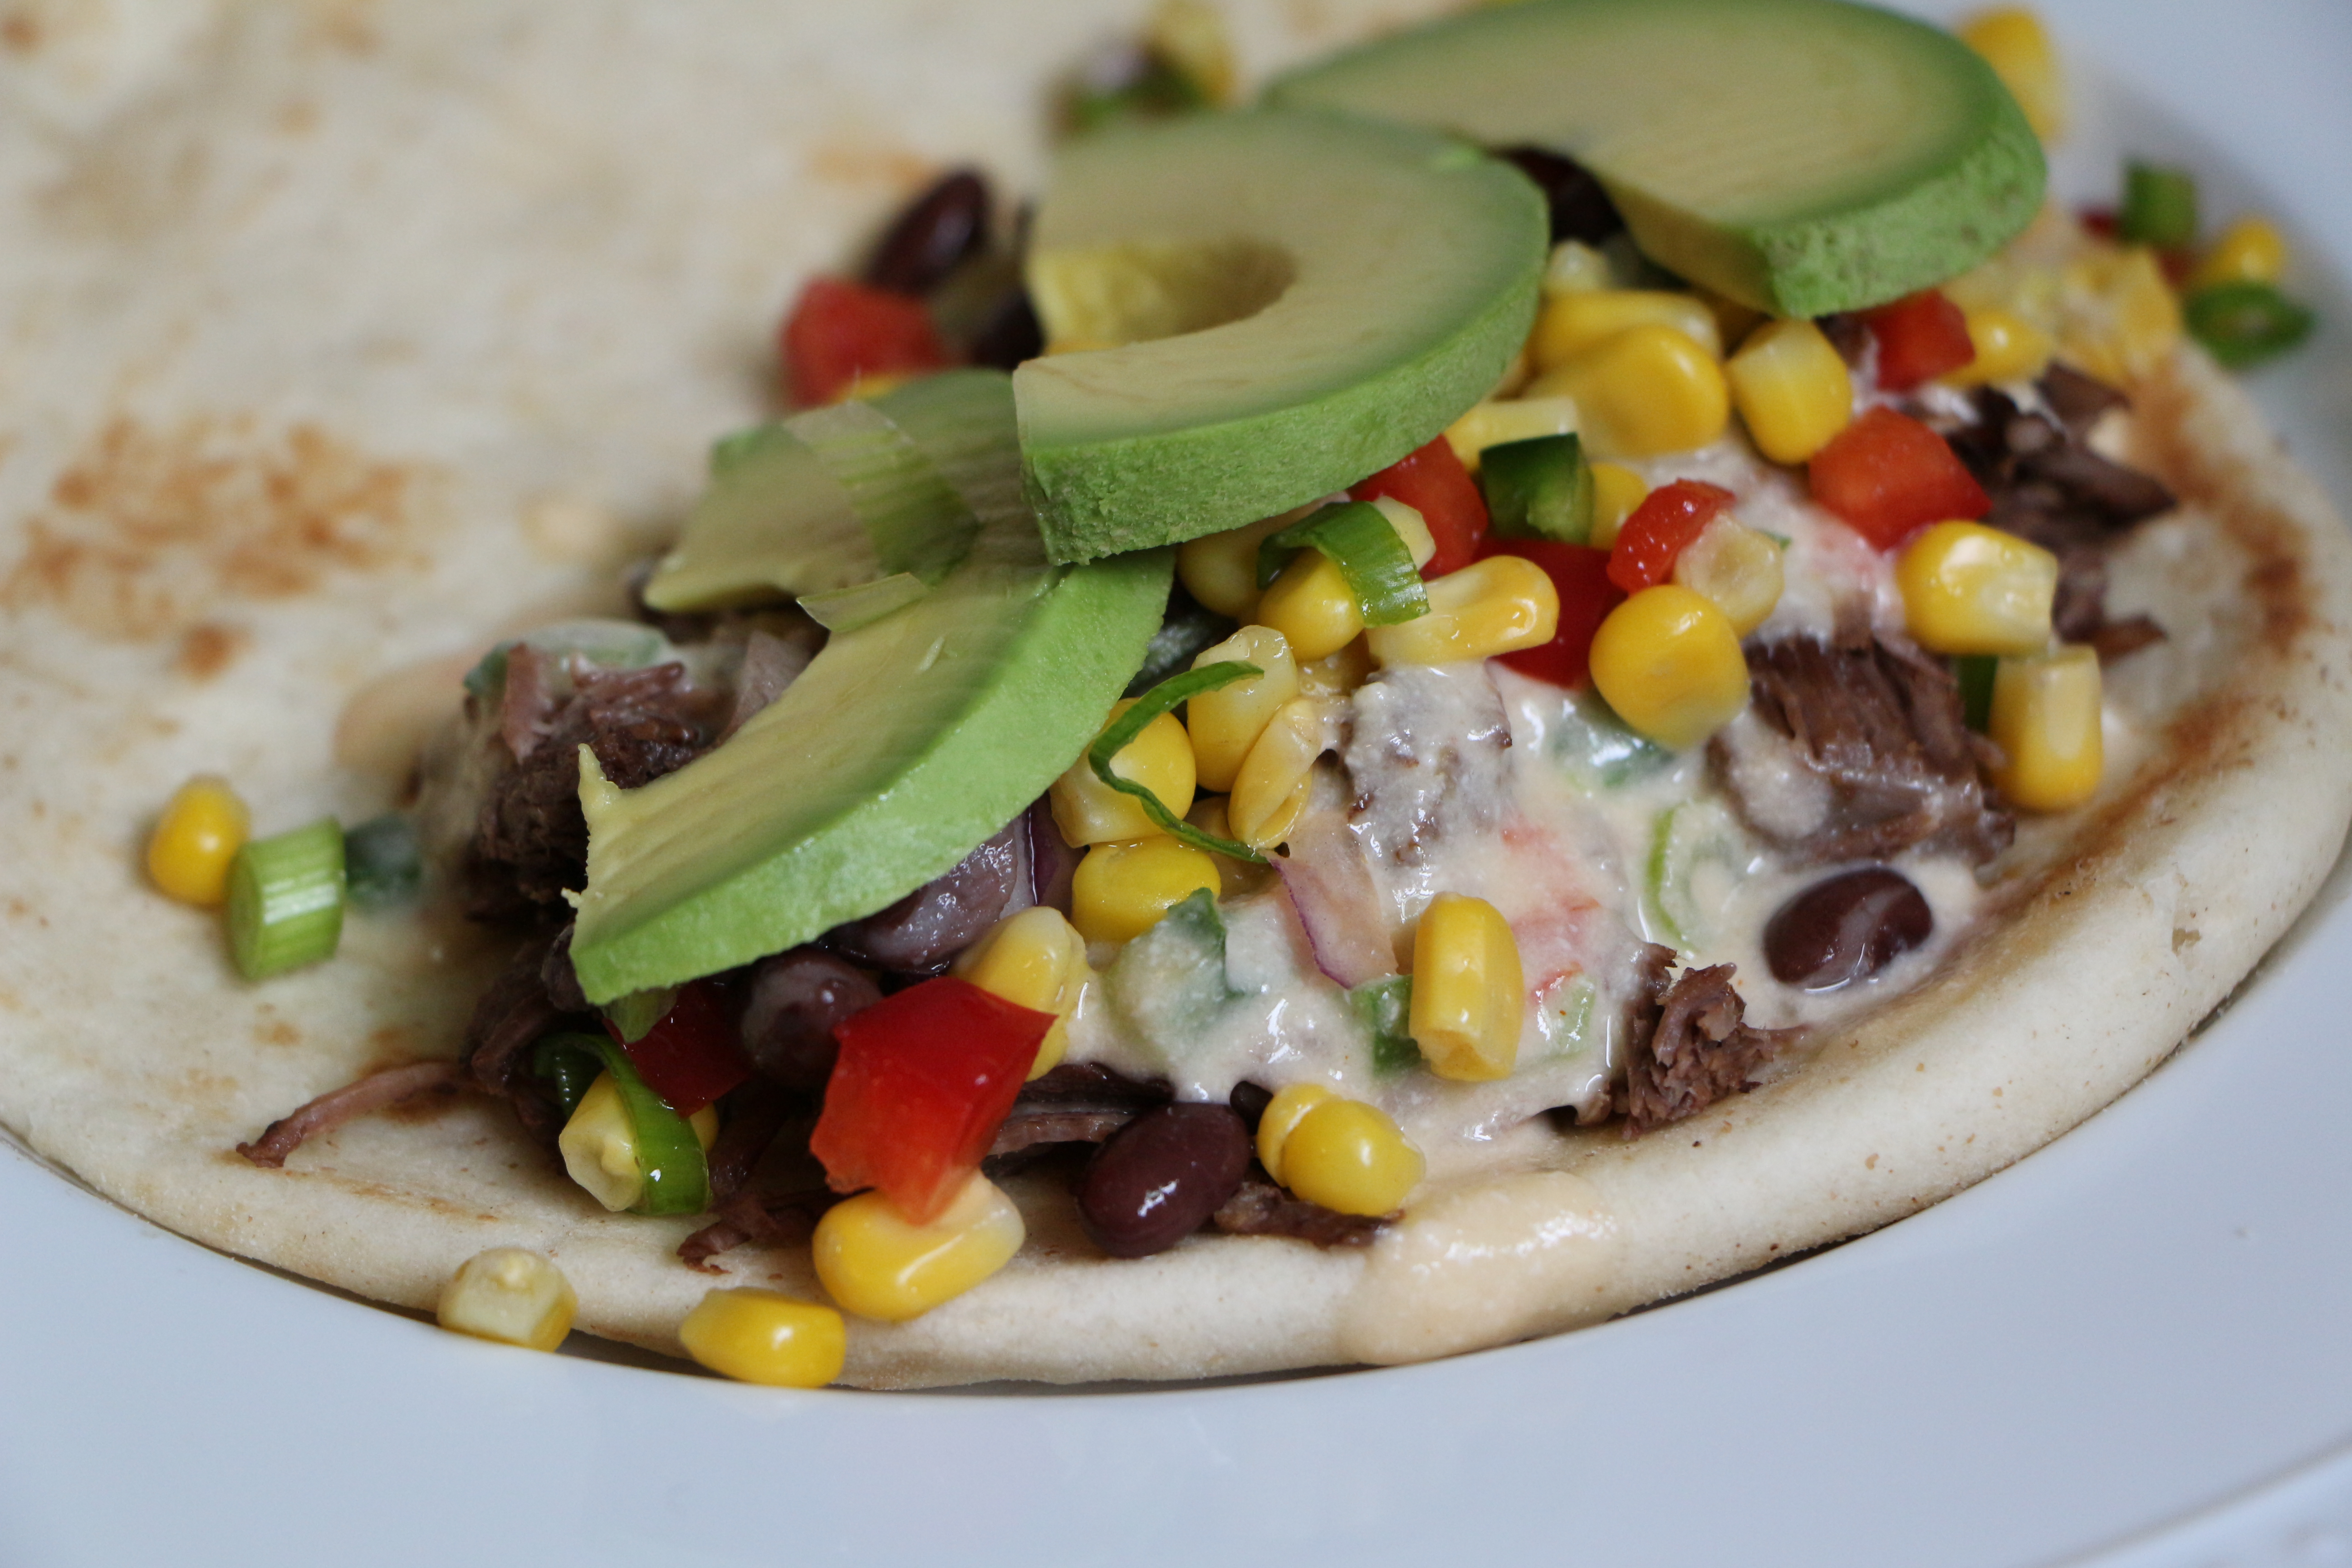
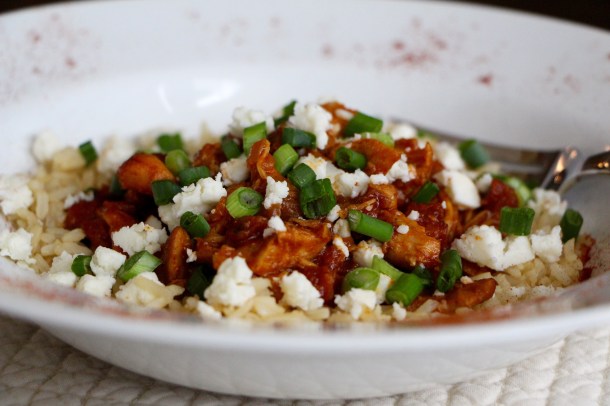
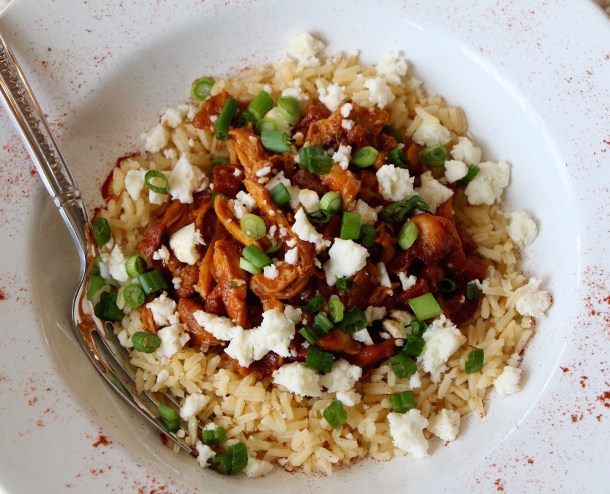
One of our favorite Plated meals so far was a recipe for Beer-Braised Chicken. The following recipe is my modified twist on the immensely flavorful dish. Boneless, skinless chicken thighs are coated in a fragrant blend of spices, then braised in a smokey chorizo-tomato based sauce, until tender and drenched with deliciousness.

Top with a Mexican cheese, like queso fresco, and enjoy over rice. This chicken would also work well in a sandwich or as filling for quesadillas.

Make a double batch for freezable leftovers!

Tequila-Braised Chicken

Ingredients

  • 2-3 tablespoons olive oil
  • 2 pounds boneless, skinless chicken thighs (about 8)
  • 2 teaspoons paprika
  • 1/2 teaspoon chili powder
  • 1/8 teaspoon ground cayenne pepper
  • 1 teaspoon kosher salt
  • 1/2 cup chorizo, diced*
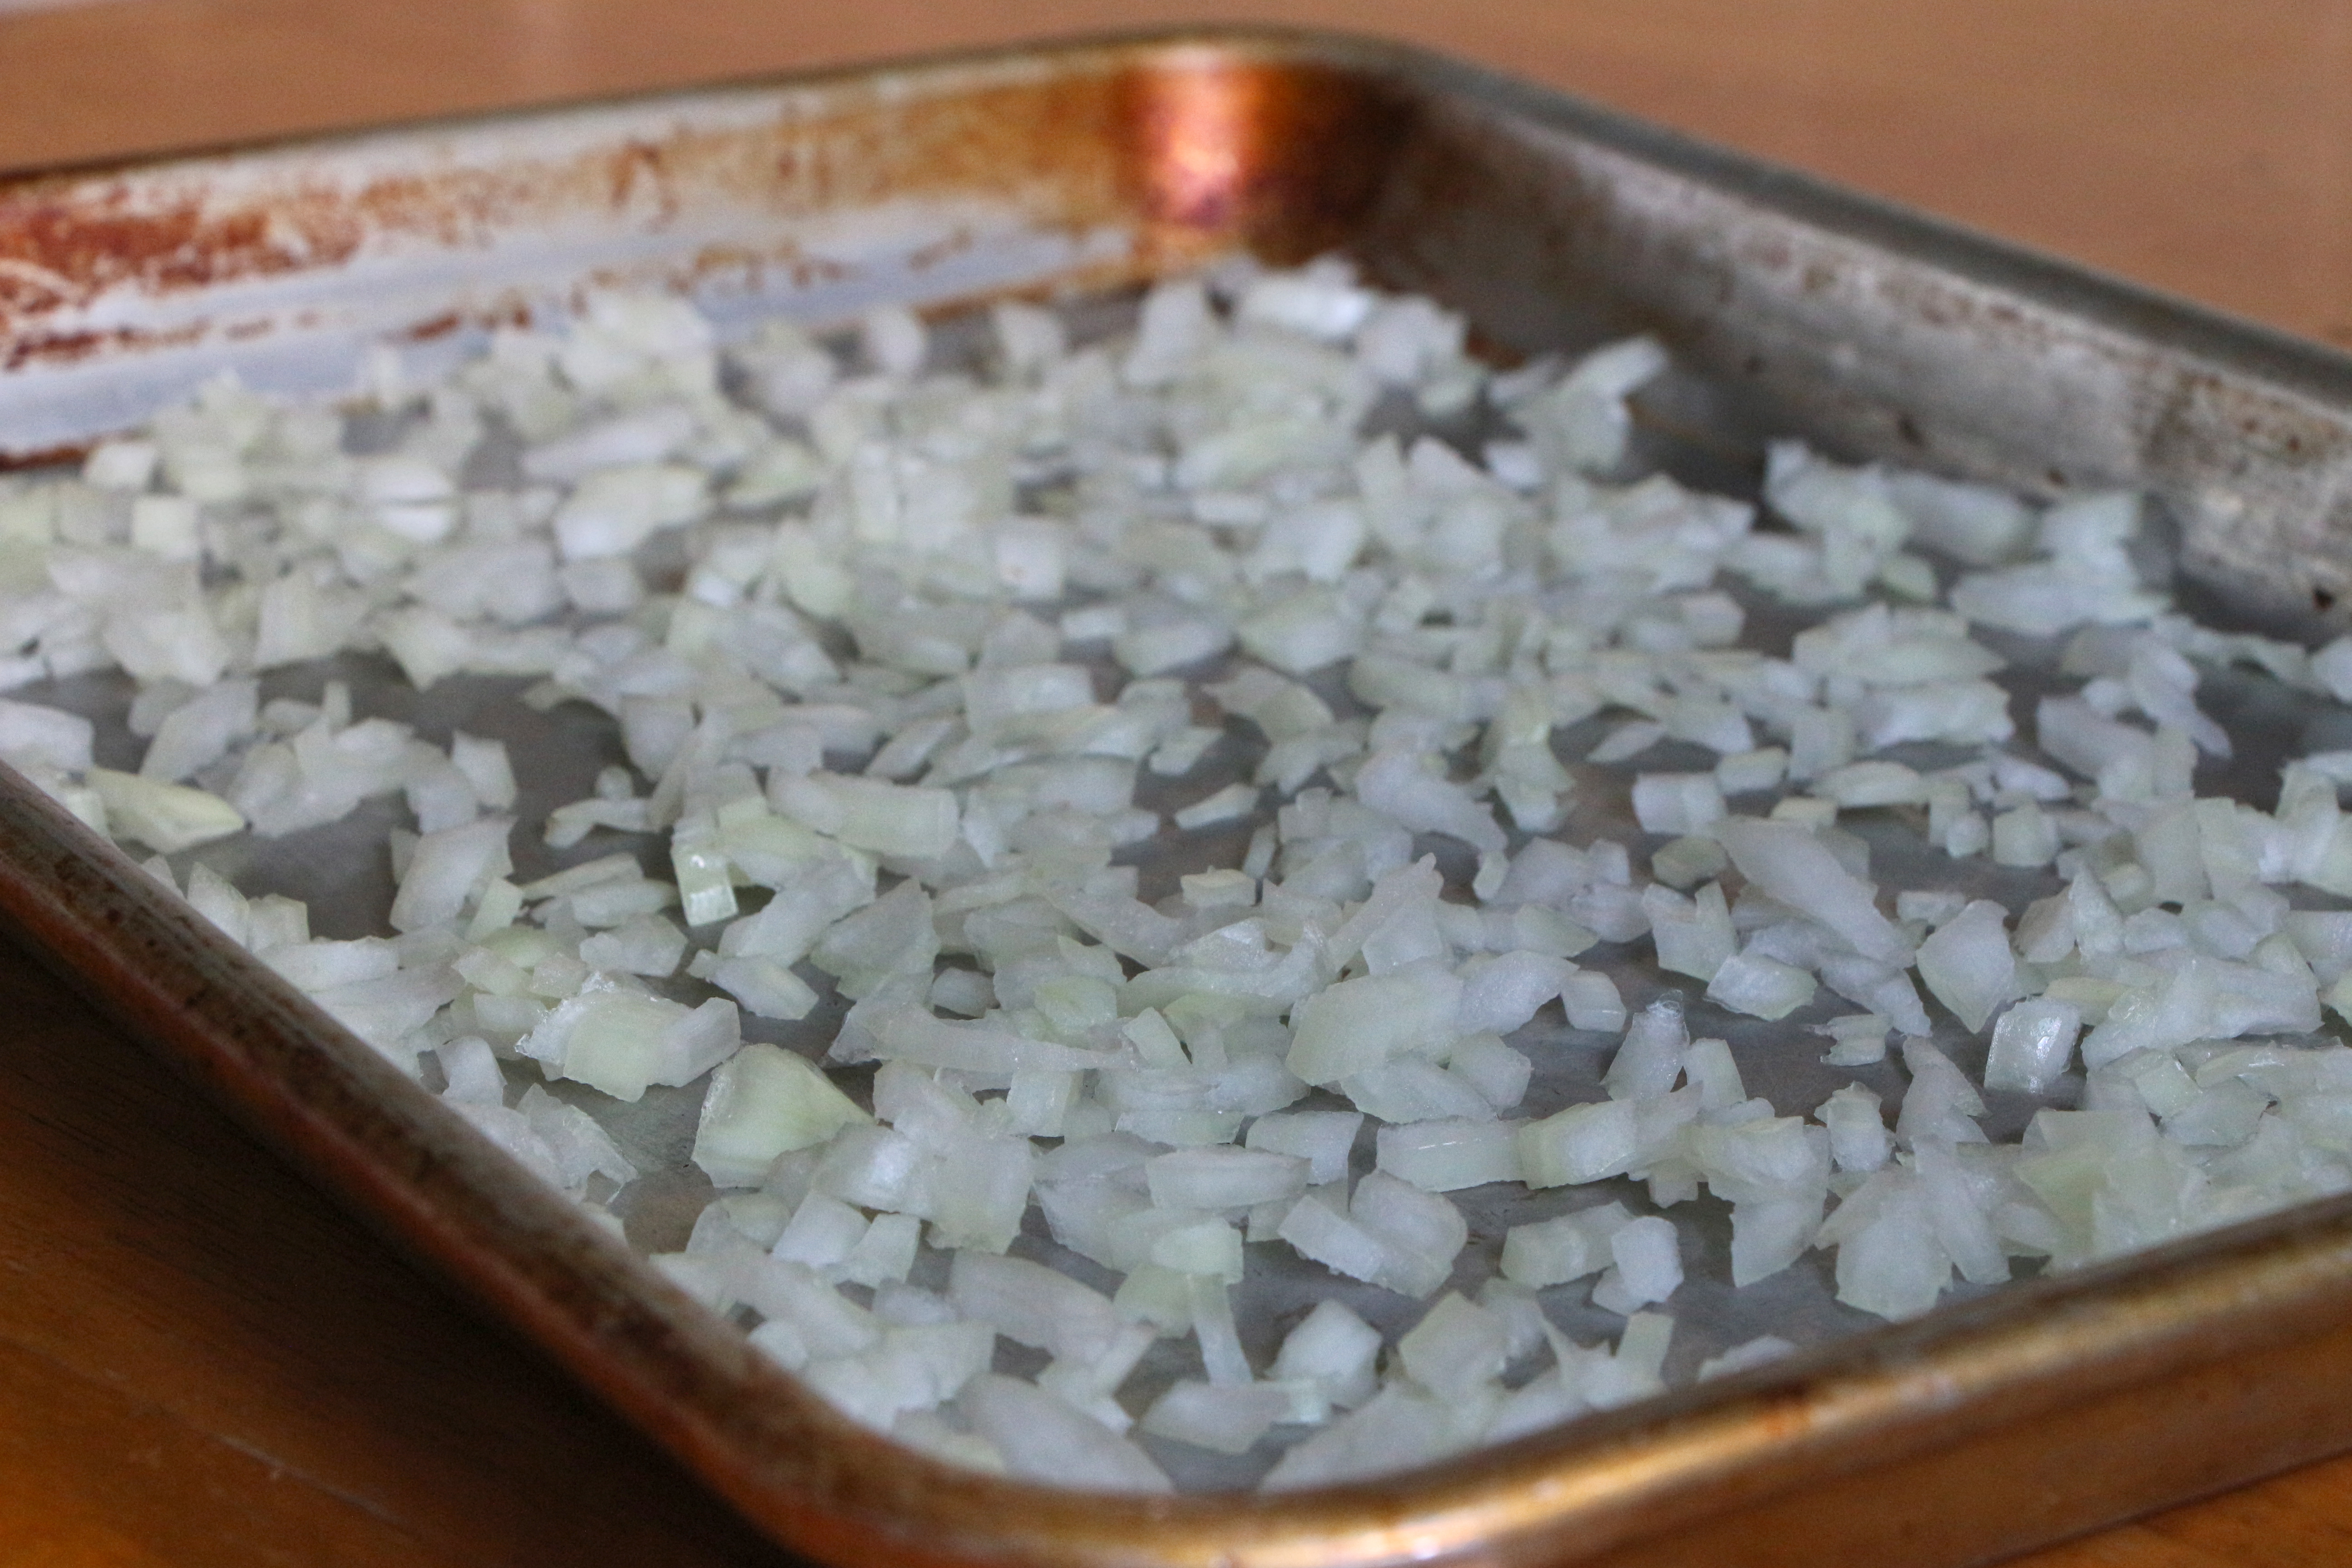
  • 1 medium cooking onion, finely diced
  • 1/4 cup fresh cilantro leaves, rough-chopped
  • 1 ounce tequila (optional)
  • Juice of 1 lime
  • 1 tablespoon Worcestershire sauce
  • 2 teaspoons brown sugar
  • 1/4 cup tomato paste
  • 1 1/2 cups chicken stock
  • 2-3 green onions, thinly sliced
  • 1/2 cup Mexican cheese (such as queso fresco), crumbled

*You can use sweet chorizo (dulce) or spicy (picante), depending on your preference for spiciness.

Procedure

Combine the paprika, cayenne, chili powder and salt in a small bowl. Pat the chicken thighs dry, then generously coat with the spice mixture. Heat the olive oil over medium-high in a wide saucepan. Once hot, add the chicken in a single layer. Sear for 1-2 minutes per side, until lightly-browned. Sear in batches, if necessary. Remove from the pan and set aside. (The chicken will not be fully cooked at this point.)

Reduce the heat to medium. Add the chorizo to the same pan you seared the chicken in. Cook for about 2-3 minutes. Add the onion and cilantro. Cook, stirring frequently, for about 5 minutes, until the onion is tender.

Carefully add the tequila (optional). Allow to cook for a minute, then add the lime juice, Worcestershire sauce, brown sugar, tomato paste, and chicken stock. Stir to combine, then raise the heat to high. Bring to a boil.

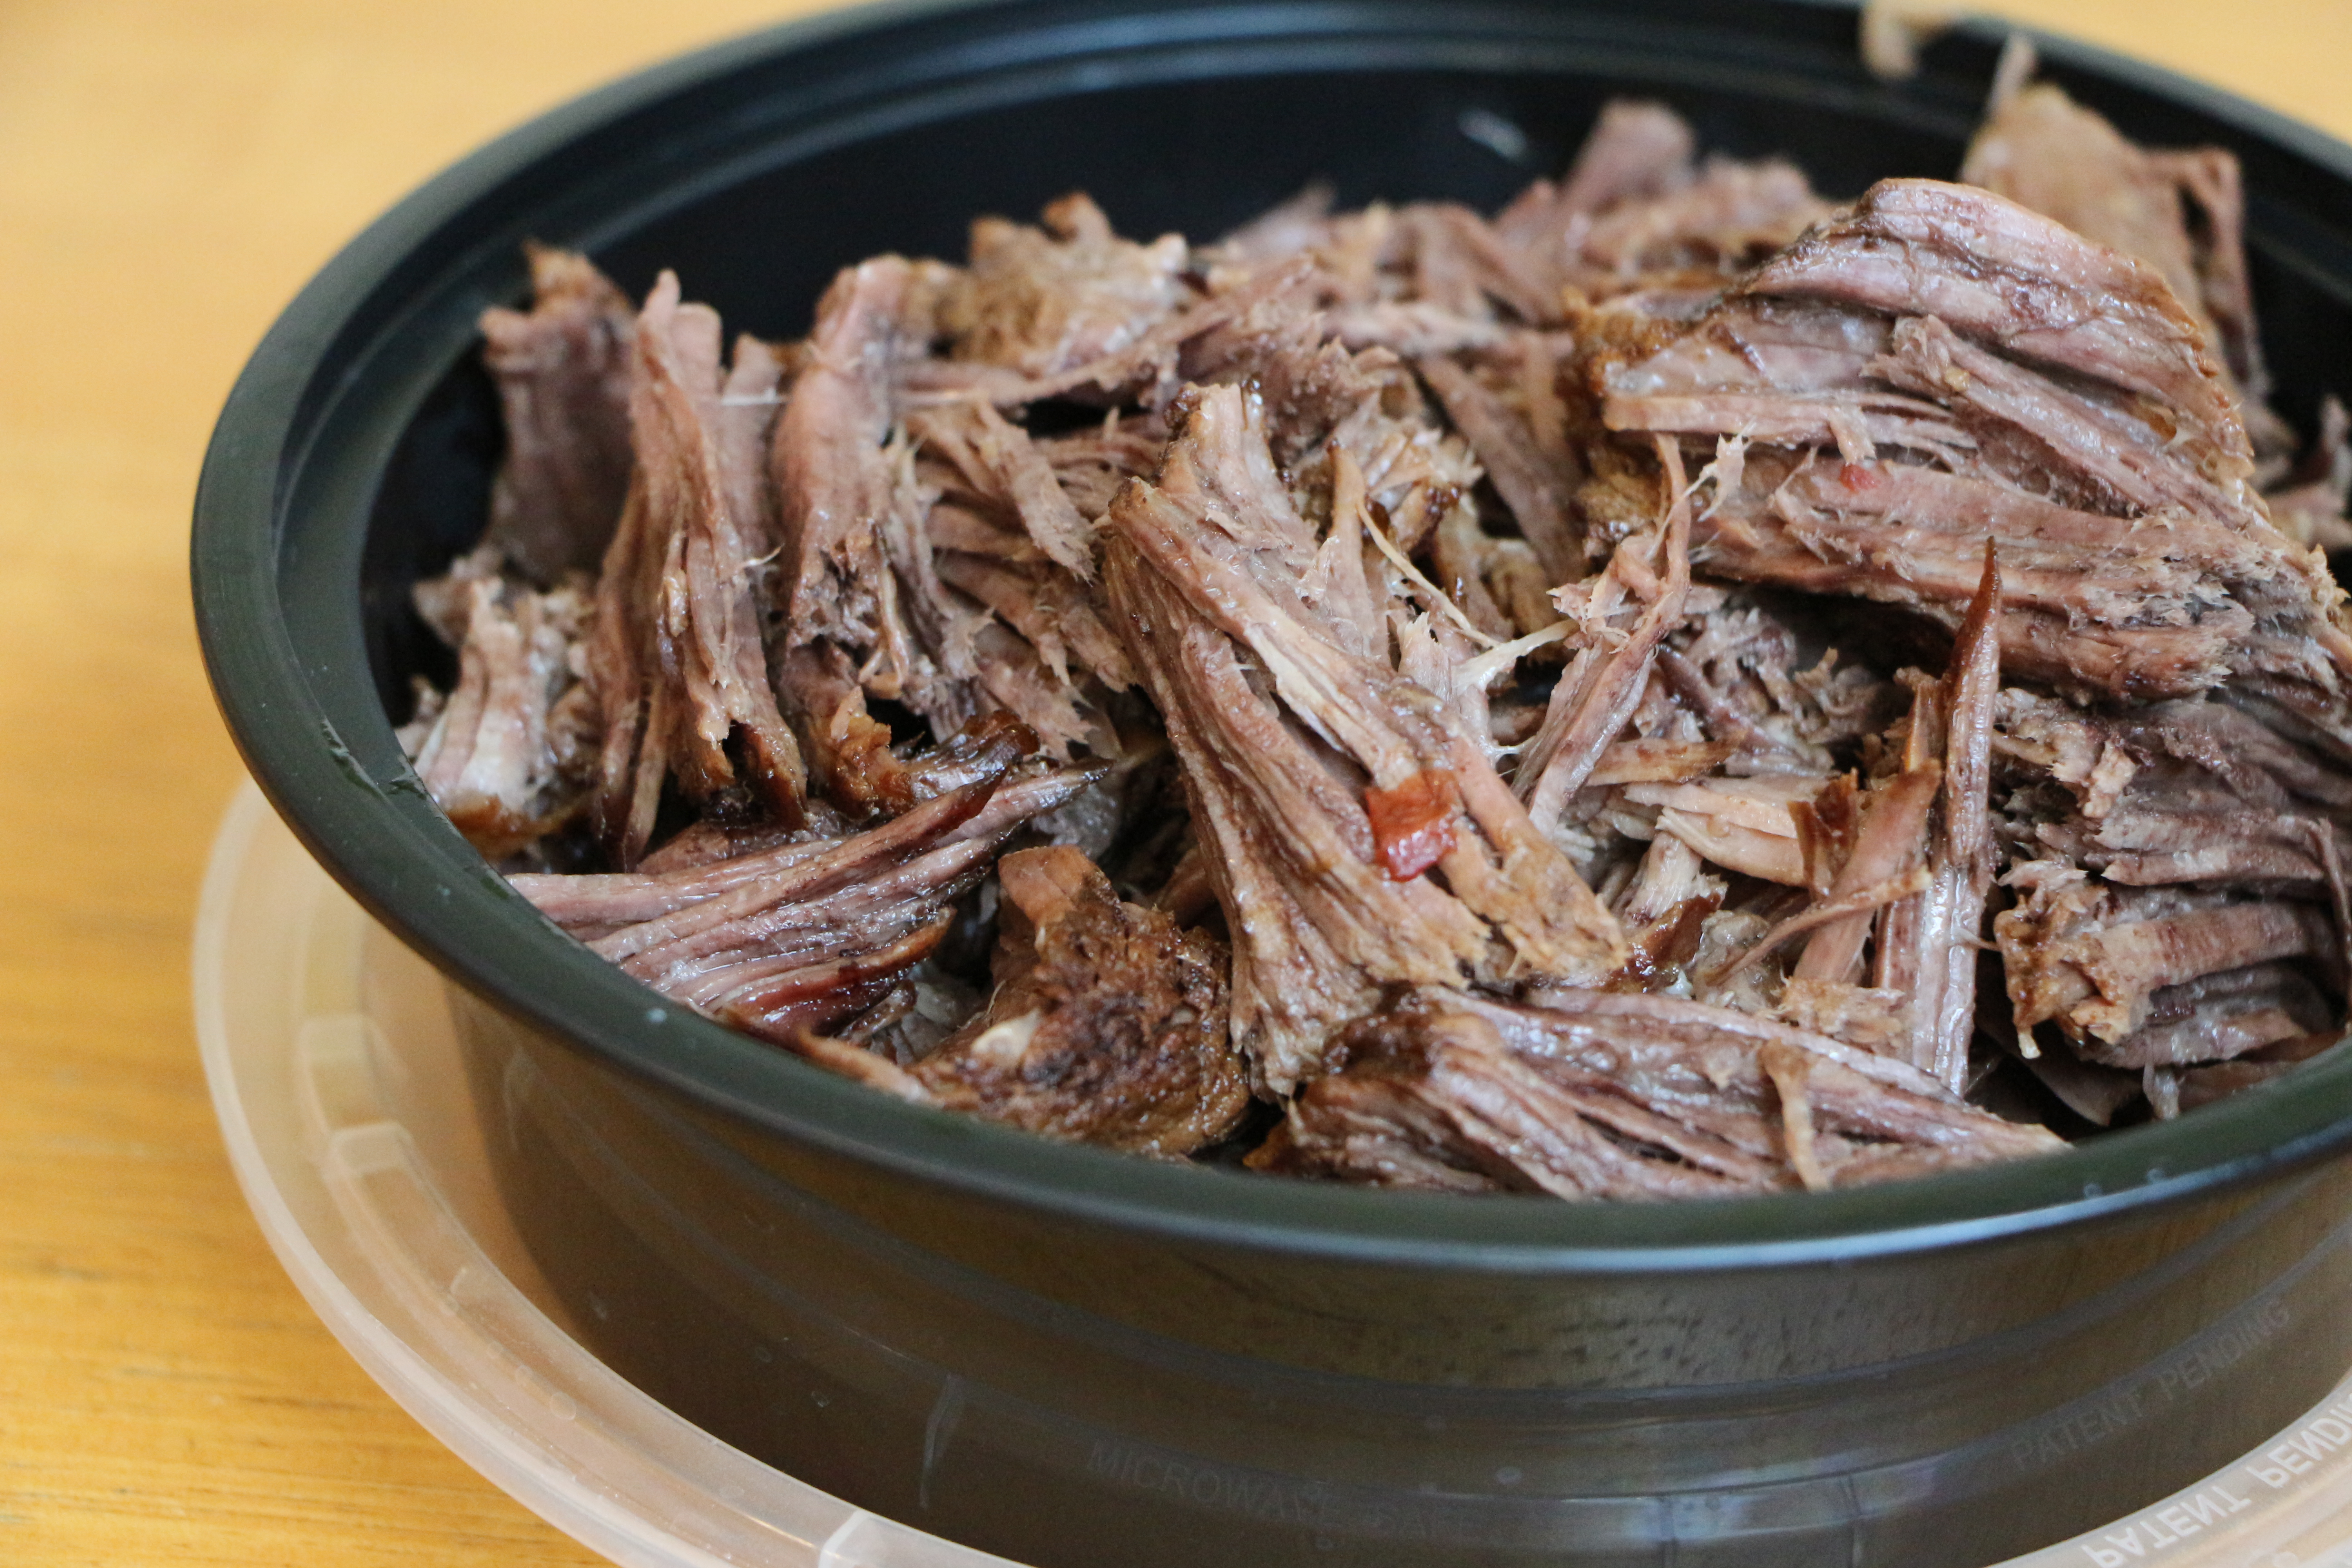
Once boiling, return all of the chicken to the pan. Reduce the heat to medium. Cover the pan, then allow it to cook for approximately 8 minutes, until chicken is cooked through. Remove the chicken from the pan and set aside to cool slightly.

Raise the heat to medium-high and allow the braising liquid to cook uncovered for about 3-5 minutes, until it’s reduced by about 1/2. Once the chicken is cool enough to handle, use a fork or your fingers to tear the chicken into bite-sized pieces.

Return the shredded chicken to the braising liquid. Stir to combine. Taste and adjust seasoning with additional salt and pepper, as desired.

Serve over rice. Garnish with green onion and Mexican cheese.

Serves about 4.

IMG_5631.jpg

Rainbow Cookie Cake

Is anybody else planning on getting their two-year-old a Harry & David fruit basket for Christmas this year??

I’m guessing I might be the only one, and yet, I’m 99.99% certain that it will be his favorite gift, by far. The kid is ridiculously in love with fruit.

IMG_1887

In fact, on Halloween, we stopped by my sister’s house to trick-or-treat. She handed each of the boys a piece of candy from the bowl of treats by her door, before remembering that she had an ultra-ripe Harry & David pear for my littlest guy. She ran into her kitchen to grab the foil-wrapped gem, then handed it to my little James, who literally threw the piece of candy over his shoulder like a piece of worthless garbage, in exchange for the tender pear.

I expect him to be as excited over his Harry & David fruit basket as the other boys will be over their massive Lego castle and Minecraft video game.

IMG_1898

When it comes to Christmas, I am like Walt Disney, carefully masterminding magical moments. While James revels in the magic of an assortment of unusually large, perfectly ripened fruit, I expect the other two boys to be doing giggling backflips over the two-foot-long gummy worm I plan to order or the giant rice krispie treat I found at Target.

IMG_1920

In the spirit of magical, over-sized treats, I think you’ll enjoy this oversized rainbow cookie cake. It’s like those addictingly delicious, almondy rainbow cookies, only it’s the size of an entire cake. It’s like one, giant rainbow cookie, and I wouldn’t blame you if you ate the whole darn thing.

I started with a recipe for rainbow cookies, then lighted it up just a bit with an additional egg, a bit more flour, and a teaspoon of baking powder. It’s got the dense lusciousness you expect to find in a rainbow cookie, just a bit more cake-like.

IMG_1915

This rich, chocolate-drenched cake is a must-have on any holiday table.

Rainbow Cookie Cake

Ingredients

  • 5 eggs, separated
  • 1 8-ounce can almond paste
  • 1 1/4 cups sugar
  • 2 1/2 sticks butter, softened to room temperature
  • 1 teaspoon almond extract
  • 2 1/2 cups flour
  • 1 teaspoon baking powder
  • 1/4 teaspoon salt
  • Green food coloring
  • Red food coloring
  • Yellow food coloring
  • Seedless raspberry jam
  • Apricot jam
  • 4 ounces semi-sweet chocolate
  • 1/4 cup heavy cream
  • Chocolate sprinkles

Directions

Preheat oven to 350 degrees. Spray three 9×5 inch loaf pans with baking spray.

Place the five egg whites into a clean bowl. Beat with an electric mixer until stiff peaks form. Set aside.

Use a fork to break up the almond paste into smaller pieces. In a large bowl, combine the almond paste and sugar with an electric mixer until there are no large lumps. Add the butter and beat until well combined. Add the egg yolks and almond extract and beat until blended.

In a separate bowl, stir together the flour, salt, and baking powder.

Gradually beat the flour mixer into the wet ingredients. The dough will be quite thick.

Stir one third of the beaten egg whites into the dough. This will slightly lighten the mixture. Then, fold in the remaining egg whites until well blended.

Divide the dough into three equal portions. Use a few drops of food coloring to color one portion red, another portion green, and the remaining portion yellow. *Gel food coloring has the best effect.

Use a spatula to spread each portion of dough into the three prepared baking pans.

Bake on the middle rack of your oven for 20-25 minutes, until the cakes are set and the edges just begin to turn golden.

Allow the cakes to cool for a few minutes in the pans, then carefully invert the cakes onto cooling racks. Cool completely.

Use a long serrated knife to level the cakes, removing as little cake as necessary.

Spread a layer of raspberry jam over the red layer. Place the yellow layer over the jam, then spread the apricot jam on top. Top with the red layer.

Chop the semisweet chocolate. Heat the heavy cream in a small saucepan or in the microwave, just until boiling. Pour the hot cream over the chocolate, then stir until smooth. Use a spatula to spread the chocolate ganache over the top and sides of the cake. Garnish liberally with chocolate sprinkles.

Refrigerate to set, but remove the cake from the fridge before serving, so it comes up to room temperature.

IMG_1949

Thanksgiving Menu Ideas

Hey, folks…

Reposting last year’s round-up of Thanksgiving ideas for a little menu-planning inspiration!

~Amy

APPETIZERS

Cranberry Chipotle Meatballs

Corn and Bacon Fritters with Smoked Salmon

Bacon-Wrapped Dates stuffed with Bleu Cheese

THE MAIN EVENT

Herb-Roasted Turkey Breast with Pan Gravy (and tips for roasting a whole turkey)

Bacon and Cider Braised Turkey Drumsticks (and garlicky creamed spinach)

Spiced Sweet Potato Puree with Pecan Streusel

Sausage, Apple, and Leek Stuffing

Cranberry-Orange Sauce

Green Beans Almondine

Roasted Brussels Sprouts with Bacon and Walnuts

Hot Doughy Buns

DESSERTS

Chocolate Pecan Pie

Pumpkin Coconut Pie

A Few Variations on Apple Pie (in an all butter pie crust)

Caramel Apple Cake

Turkey-Shaped Sugar Cookies

Caramel Apple Tartlets

Spiced Mango Upside Down Cake

Cannoli Cheesecake

Triple Ginger Apple Muffins

If an apple a day keeps the doctor away, then my little James is going to have the doctors bolting in the other direction. The kid eats, oh, anywhere from 5 – 10 apples a day. No joke.

IMG_0933

At one point, I would dole out his daily allotment of apples, spending a ridiculous percentage of my days washing, peeling, and slicing his favorite food. After eating 3 in a day, I’d determine he’d reached his daily apple limit and try to persuade him to eat some nice, delicious cookies or perhaps some potato chips instead.

This never ended well. In fact, our worst fights pretty much all came down to a disagreement over how many apples a two-year-old should reasonably eat in a day.

IMG_1028

But, you know, as parents, you have to pick your battles, and eventually, I simply decided that if the kid wants to eat apples from dawn to dusk, then so be it.

We now buy multiple sacks of apples each week, which I wash and leave in a giant mountain on the counter, for my little guy to snack on at will. My only remaining problem is finding half-eaten apples hidden within my slippers. True story.

IMG_0951

Naturally, being peak apple season up here in Central New York, we recently spent an afternoon at our favorite apple orchard, Beak and Skiff, where we rode a flatbed tractor up to the rows of ripe Cortland apples and picked until the bags were too heavy to carry.

James filled his bag, then refused to let anyone touch his precious, precious fruit. He walked row by row, dragging that bulging bag of apples behind his little apple-nourished body, shrieking if I even attempted to lighten his load.

IMG_1039

After riding the tractor back to the front of the orchard, we placed our loot on the scales and handed over $26 for our sweet bounty. (Note to self: It costs 16 cents more per pound to pick the apples yourself than to buy the same apples, from the same orchard at the local grocery store.)

I went through the bags of apples once we’d arrived home. To my utter lack of surprise, James’ bag contained at least 10 bucks worth of half-eaten apples.

IMG_0966

Some of what I found in James’ bag of apples…

Thankfully, most of Liam and Lucas’ apples were not already eaten, leaving plenty of freshly-picked apples for snacking and for making these outrageous muffins. Based on a basic not-too-sweet molasses muffin, accented with a triple dose of ground, fresh, and crystallized ginger, these spicy muffins barely made it to the next morning.

I recommend making a double batch.

IMG_1052

Triple Ginger Apple Muffins

Ingredients

  • 2 cups flour
  • 1/3 cup sugar
  • 1 teaspoon baking soda
  • 1/2 teaspoon salt
  • 1 teaspoon ground ginger
  • 1/2 teaspoon ground cinnamon
  • 1 6-ounce container vanilla or apple-cinnamon greek yogurt
  • 2 eggs
  • 1/3 cup vegetable oil
  • 1/3 cup molasses
  • 1 tablespoon fresh ginger, grated
  • 1/4 cup crystallized ginger, chopped
  • 1 1/2 cups apple, peeled and diced

Directions

Preheat oven to 325ºF. Prepare muffin tins with liners or by spraying with a nonstick baking spray.

Combine the flour, sugar, baking soda, salt, ground ginger, and cinnamon in a large bowl.  In a separate bowl, whisk together the yogurt, eggs, oil, and molasses. Stir in the fresh ginger.

Combine the wet ingredients with the dry ingredients until well blended. Stir in the crystallized ginger and the apple. The batter will be pretty thick.

Spoon the batter into the muffin tins, so that each tin is about 2/3 – 3/4 full.

Bake for 20-25 minutes.

Makes 12-15 muffins

IMG_1034

Easy Indoor Slider Burgers with Spicy-As-You-Like-It Special Sauce

Posted on

It’s burger season. It’s also unpredictable, chance-of-rain just about everyday season, which might just foil your grilling burgers plan, unless you’re like my dad who grills in snow, sleet, and rain. Weather is no more a deterrent for my father than it is for the mail man. I guarantee he’ll have ribs on the grill during the apocalypse. I like that about him.

I, however, am a fair-weather griller. Thankfully, burgers can still be enjoyed on rainy days with these simple, indoor burger sliders. The kids love these tiny tasty burgers. Who am I kidding? We all love these burgers. Hot dog buns, split into thirds make the perfect little slider buns. A dill pickle slice and spoonful of my spicy-as-you-like-it special sauce complete each perfect mini burger.

Here’s a step-by-step guide to making these tasty burgers, which may quickly become one of your easy go-to weeknight meals!

Step 1: Preheat oven to 425 degrees. Scatter 1/2 finely diced onion in an even layer at the bottom of a 9×13 baking dish or half-sheet pan. **Click HERE  for a step-by-step photo guide for dicing onions.

IMG_8548

Step 2: Crumble 1 pound of ground beef over the onion. **Use 80/20 ground beef. It makes a difference!

IMG_8554

Step 3: Press the meat into an even layer. Sprinkle with seasoned salt. (I used Old Bay seasoning.)

IMG_8555

Step 4: Bake for 18-20 minutes. While the burgers are cooking, divide 7-8 hot dog buns in half. Cut the bottom halves into thirds. Top each piece with a spoonful of special sauce and a dill pickle slice.

IMG_8557

Step 5: Once the meat has cooked, remove it from the oven. Pour off any excess juices. Top the meat with slices of American cheese. Place in the oven for another few seconds to melt the cheese.

IMG_8567

Step 6: Arrange the tops of the hot dogs buns on top of the meat. Cut through the buns and meat so that each bun is cut into thirds. **A pizza cutter makes a convenient cutting tool.

IMG_8569

Step 7: Pick up each bun and burger portion and place it on top of the prepared bottom buns. Enjoy!

IMG_8573

Spicy-As-You-Like-It Special Sauce

Ingredients

  • 1/2 cup mayonaisse
  • 1/2 cup ketchup
  • 1 tablespoon dill relish
  • 1/4 teaspoon onion powder
  • 1/4 teaspoon garlic powder
  • Tabasco, to taste
  • Salt and Pepper, to taste

Directions

Combine the mayo, ketchup, dill relish, onion powder, and garlic powder until well blended. Add a few dashes of tabasco sauce, then stir and taste. Continue adding tabasco, as desired. Season with salt and pepper, to taste.

Roasted Red Pepper Vinaigrette: One Simple Dressing, Two Amazing Salads (and a GIVEAWAY WINNER!)

Posted on

It was back in one of my undergraduate teacher education classes, that I was first introduced to the debate over nature vs. nurture. How much of our personality, strengths, challenges, and interests are a product of our individual biological makeups and how much is due to the environment in which we’re raised and the life events we experience?

From an educator’s point of view, I want very much to believe that nurture plays a more important role, because that idea acknowledges every child’s potential for success and a teacher’s ability to play a significant role in that. We teachers want to believe that given enough time, effective effort, and support, every one of our students can be successful. As educators, the idea of intelligence being a fixed, inborn characteristic would be limiting. So, as a matter of practice, we subscribe more heavily to the theory that nurture plays a more dominant role in human development.

IMG_8054

I have to admit though, watching my own boys grow and develop, it’s become a lot more evident to me that nature really does play a significant role. My three boys, all nurtured in the same environment, under very similar conditions, save for the automatic differences in birth order and changes that adding new members to the family have on a home environment. But, my three boys are just about as different as they can be, with their own individual strengths, interests, preferences, and challenges – traits which have been part of who they are since birth.

IMG_8425

My Liam is a creator, inventor, and planner. Hand the kid an old piece of cardboard, scissors, and a strip of painter’s tape and he’ll invent some revolutionary new technology which just might change the world. He’s also our head mischief-maker, in an ever-scheming, mad-scientist sort of way. He loves telling stories and doesn’t understand the reason for spaces between his words, either spoken or written. He’s a “What’s next?” sort of kid who wants to plow through the day filling it with as many experiences as possible. Liam doesn’t mind coloring, as long as he can do it fast and all with the same color.

Lucas is our character. He is silly and unabashedly honest with his emotions. The kid takes the stage and steals the show. Just last night, at his Irish step-dancing recital, he snuck out from behind the curtain before the show and spent a good five minutes flapping his arms and shaking his butt in front of the 100 or so people who’d gathered to watch the recital. After completing the first dance, while the rest of the dancers remained poised for the second dance, Lucas approached the front of the stage to shout to me about how much fun he was having. The curtain closed behind him. After spinning around and running nose first into the curtain, he giggled, then shuffled behind the curtain for his second dance. He feels things deeply, for better or worse. He likes his quesadillas with cheese only and “nothing I don’t like.” (If you’re sneaky about it, he will know.) He’s a songwriter, loves legos, and despises coloring.

Little James is a love. He requires copious amounts of hugs and kisses and snuggles, which he soaks up like a sponge and is generous in regifting to everyone he meets. He gives every child at the gym’s childcare a personal hug goodbye when we exit, and the gym cleaning lady gets one too. Sometimes he bites when he gets a bit to excited during a hug, sort of like a dolphin, which makes hugs a bit tense sometimes, but he’s irresistible. He thinks apples and corn on the cob are the best foods in the universe and he’s already trying to learn the alphabet – something the other boys had little interest in for most of their young lives. (His favorite letter is E.) James thinks coloring is the bee’s knees.

IMG_8055

They are who they are. And certainly, everything they experience throughout the rest of their lives will have an impact on who they will ultimately become, but it would be foolish to undervalue the unique people they were born as. I’ve learned that parenting, much like teaching, requires ongoing assessment of where our little people are in their lives, what natural talents and interests they possess, what motivates and what discourages them. Then, if we’re doing it right, we take all of that information and design little personalized plans that help nurture their existing strengths, expose them to other possible areas of interest, and teach strategies that might help them handle the areas of life which are more of a personal struggle.

So, do I treat all of my children the same? Absolutely not. I nurture each of my children in the way which seems to work best for them. We follow each of their natural leads and take it from there. Nature vs. nurture? I’m not sure. Ideally a bit of both, I guess, working harmoniously with each other to create unique, well-rounded, happy little people.

IMG_8427

Tomorrow, we welcome June. The weather is hot and soon my gaggle of small men will be off for a summer full of creating, destroying, laughing, crying, and loving. Our neighbors opened their pool yesterday and once again, I smacked myself in the head and thought, “Why the heck didn’t I start eating healthier months ago???” Somehow, I’m always too late for bathing suit season. But, the added bonus of the warm weather is that salads for dinner seem ever so much more crave-worthy. They’re light and fresh and have huge potential for deliciousness.

Here are two of my current favorite salads, both made with the same simple roasted red pepper vinaigrette. The dressing is light and flavorful, with a perfect balance of sweetness and acidity. The protein-rich toppings on these salads make either option a quick and easy, satisfying summer dinner.

Roasted Red Pepper Vinaigrette

Ingredients

  • 1/2 cup roasted red peppers (from a jar works just fine or roast your own)
  • 1/4 cup olive oil
  • 1/4 cup white balsamic vinegar
  • 1 teaspoon dijon mustard
  • 1 teaspoon garlic, minced
  • Salt and pepper

Directions

Combine all ingredients in a blender. Pulse until smooth. Taste and adjust seasoning with salt and pepper, as desired.

Salad Idea #1 – Spinach with Shrimp, Bacon, Corn, and Avocado – Chop the bacon and cook in a fry pan until crisp. Remove with a slotted spoon and drain over a paper towel. Cook large shrimp in the hot bacon fat for a minute or two on each side, until cooked through. Toss a generous serving of fresh baby spinach leaves in a bit of the roasted red pepper dressing. Top with the cooked bacon and shrimp, fresh avocado, and sweet corn.

Salad Idea #2 – Mediterranean – Toss romaine or butter lettuce in the roasted red pepper dressing. Top with garbanzo beans, kalamata olives, chopped sun-dried tomatoes and feta cheese crumbles.

IMG_7628

GIVEAWAY WINNER!! We have a winner! Using http://www.random.org to select a number at random, out of the 17 entries received for the $50 Shindigz gift card giveaway, the winner is #7, Jill fox. Congratulations, Jill!! I’m going to send you an email at the address provided with your comment to get the information necessary to fulfill your prize!! Thank you to everyone who entered!

‘Temple Run’ Indian-Spiced Meatballs with Raita (and a GIVEAWAY!!)

Posted on

Anyone play the game, Temple Run? You know, the video game for phones and tablets where this great big, manic, hybrid gorilla-vulture creature chases your character as you dodge fire, rushing waterfalls, and treacherous cliffs at the same time as trying to collect shiny medallions and green gems? That’s the one. We’re big fans of that game around here, bordering on obsession, to the point that I had to give it up for Lent to prevent myself from spending every second of my already minimal free time dodging fire and escaping gorilla beasts.

IMG_7368

Tiki Lantern Garland from Shindigz, for that exotic ‘Temple Run’ vibe.

Well, when my oldest son requested a Temple Run themed birthday party for his 6th birthday, I promptly replied, “No, they don’t make Temple Run party supplies. I’m not even sure how we’d do that. Think of another theme. How about pirates or rock ‘n’ roll or superheroes?” But, my son is not easily dissuaded once he’s stuck on an idea, so he persisted with his request. And I persisted with offering alternate ideas. Construction trucks, a luau, dinosaurs???

IMG_7387

Beginning of the ‘Temple Run’ obstacle course, complete with jungle entrance, terrifying flames and a rushing waterfall.

But after a bit of brainstorming with some friends, a vision for a Temple Run themed party started to evolve. We’d construct a Temple Run obstacle course in the backyard. There’d be fire and waterfalls and a cave. There’d be green gems and monkeys and tropical birds. There’d be a terrifying gorilla chasing our young party guests through the course, as they attempted to gather gold medallions and green gems to redeem for goody bag treats. Perhaps we’d need to ask parents to sign a waiver as they arrived with the party guests, sort of like those waivers of death they merrily hand you as you arrive at a bounce house party. (Kidding, sort of.) My husband was skeptical about this insane plan, but I’m just about as hard to dissuade as our six year old, once I’m set on an idea.

IMG_7379

Unfortunate temple runner who took a turn down the dead end, lured by the shiny gold medallions.

As if by fate, in the early stages of my party planning, I received an email from a party supply company, Shindigz, offering to send me a gift certificate to sample their products and services, in order to share my experience with all of you. It was kismet. It only took a few minutes of browsing their site to spark a million ideas. During a quick search for jungle party supplies, my plan for a Temple Run obstacle course became clear. I found green festooning in three different colors  to use to as tropical vines framing the perimeter of our course. Rolls of sheer gossamer fabric printed in a water pattern would create the perfect waterfall obstacle. A shimmery foil banner printed with flames would become our fire obstacle. Plastic gold medallions became the coins we needed to entice our temple runners – coins which they could later redeem for goody bag treats. Tropical birds and monkeys lent an exotic feel to my run of the mill backyard. We added tiki lantern garland and a hanging fiery pot to complete the atmosphere. The hardest part was narrowing down my wish list from Shindigz’ extensive collection of party supplies. I was so happy with everything I received and how fast it got to me, that I actually placed a second order for more festooning and a variety of streamers, which arrived just as quickly.

IMG_7469

The gorilla beast, right on Lucas’ tail, as he choose the faster route around the cave, instead of crawling through it.

Once the vision for our ‘Temple Run’ course was in place, all that was left to do was plan an appropriately themed menu. Admittedly, I was stuck for quite a while. I even tried researching the supposed setting for the Temple Run game, but came up empty handed. Then, I started thinking about Indiana Jones and the Temple of Doom. I certainly wasn’t about to go down the monkey brains and snake-stuffed snakes route for our menu, but then it occurred to me that Temple of Doom took place in India, which just happens to serve up some of my family’s favorite food. In fact, chicken tikka masala with naan is high on the list of the birthday boy’s favorite foods.

An Indian-themed buffet it would be. From that point, it was just a matter of selecting dishes that would appeal to both children and adults, as well as people who might not be so adventurous when it comes to trying new foods. The other top priority was ease of reheating during the party.

IMG_7471

Capture anyway, just before escaping through the waterfall exit!

This was the Indian-themed ‘Temple Run’ menu we settled on:

Chicken Tikka Masala
Naan*
Basmati Rice with Cinnamon, Cardamon, and Peas
Indian-Spiced Meatballs with Raita
Beef and Potato Samosas with Mango Chutney
Indian Chickpeas
Mango Lassis (Mango Yogurt Smoothies)
 
IMG_7326

We also served a large platter of fresh fruit as well as a plate full of peanut butter and jelly sandwiches, for anyone craving something a bit less adventurous. The PB&Js went largely untouched, as our Temple Run menu was enjoyed by most of our guests, big and small. I’ve linked to the recipes for the chicken tikka masala and naan in the menu above. (Rather than grill the naan, as in the linked recipe, I cooked them on a baking sheet, several inches under the broiler for about two minutes on the first side, a minute on the second. Worked like a charm!) I’ll be sharing the recipes for the Indian Chickpeas and Mango Lassis in the near future.

Today, I’m sharing the recipe for the Indian-spiced meatballs and raita. Raita is a refreshing yogurt dip, not too different from a Greek tzatziki sauce. It’s frequently served as a cooling counterbalance to spicy Indian dishes, and while these meatballs are not overly spicy, the raita makes a perfect dip. (Kids love to dip stuff. Trust me.) I added these meatballs to the menu mostly to appeal to our younger guests, but they were a notable hit with the bigger guests too!

IMG_7400

Chicken tikka masala, spicy and mild, to please all taste buds!

A GIVEAWAY!!! My friends at Shindigz are offering a $50 gift card to one lucky reader, to give you a chance to enjoy their wide variety of part supplies. With graduation and summer barbecue season just around the corner, I’m sure that gift card would come in handy! To enter the drawing for the gift card, simply leave a comment below sharing what you think is the #1 factor which makes a memorable party! The winner will be selected using Random.org on Friday, May 31, 2013 at 12:00pm EST. One entry per person. 18 years or older. US mailing addresses only, please. Good luck!!

IMG_7409

Indian-Spiced Meatballs

Ingredients

  • 1 small or 1/2 medium onion, very finely diced
  • 1/2 teaspoon garlic, minced
  • 1/2 tablespoon fresh ginger, grated
  • 1/2 teaspoon curry powder
  • 1 teaspoon garam masala
  • 1/2 teaspoon salt
  • 1/8 teaspoon cayenne pepper
  • 2 eggs, lightly beaten
  • 1/2 cup bread crumbs
  • 1 pound ground beef

Directions

Preheat oven to 375 degrees. Wipe a baking sheet with a little oil or spray with nonstick cooking spray.

Combine the chopped onion, garlic, ginger, curry powder, garam masala, salt, cayenne pepper, eggs and bread crumbs (everything except the meat) in a large bowl, until evenly blended. Add the meat. Use your hands to combine the mixture, just enough to evenly disperse the ingredients.

Form the mixture into balls, about 1 1/2″ in diameter. Place them on the prepared baking sheet. Bake for about 20 minutes, until cooked through.

Makes about 24 small meatballs

IMG_7408

Cucumber Mint Raita

Ingredients

  • 1 large seedless cucumber
  • 1 1/2 cups plain yogurt
  • 1/8 cup fresh mint leaves, finely diced
  • Salt and pepper

Directions

Use a box grater to finely grate the cucumber. Squeeze the cucumber gratings to remove as much liquid as possible. (If you have a piece of cheesecloth available, it’s useful to place the cucumber gratings inside the cheesecloth, then squeeze to remove the excess liquid.) Combine the cucumber, yogurt, and chopped fresh mint. Season with a pinch of salt and pepper.

IMG_7480

Green Gem Ringpop Cupcakes

Disclaimer – Shindigz provided me with  $100 gift card to sample their products and services in order to share  my experience with you. All opinions expressed in this post are completely my own. 

Chipotle Shredded Beef Flatbread Sandwiches

Posted on

My husband’s band was out of town for a gig on Saturday night, leaving me to get up early with the kids on Mother’s Day, as they eagerly attempted to prepare me my traditional, once-a-year breakfast-in-bed. My breakfast tray featured a half-eaten chocolate donut, sitting on top of a frozen pancake, which was elegantly placed on the foil wrapper from the plastic tub of the Frosted Flakes they prepared for me. (My boys prepare a classy breakfast tray.) They decided to toast only half of the bagel and gave up on spreading the too-thick cream cheese. The baby stayed occupied during the breakfast preparation by dipping an Elmo spoon into my cup of orange juice, taking small sips, then repeating. I enthusiastically ate all of my perfectly imperfect breakfast, of course.

IMG_6951

Following breakfast, the three boys proceeded to spin cyclones of chaos around the house in a flurry of special day excitement equivalent to that of Christmas morning. I spent a good part of the morning chasing after them, picking up garbage and toys from the floor, in a fruitless attempt at maintaining some semblance of order. At some point, caught between equal parts desire to live in a tidy house and lack of desire to pick up any more toys or fight with the kids to do it, compounded by my longing for a restful Mother’s Day, I fell apart. I sat on the stairs and had myself a good cry, equal parts disappointed that my day wasn’t going as I envisioned it would and angry at myself for being unable to just settle into the chaotic messiness of the morning.

Being a mom isn’t easy and it’s not always fun, not even on Mother’s Day, but what else can you do besides keep on keeping on. So, I stood up, waited for my eyes to be not so red, dressed the kids and brought them to Home Depot to purchase gardening supplies. When we got home, we planted a small fruit and vegetable garden in the backyard. We needed something to do to keep busy and the boys like dirt, plain and simple. I took a picture of our new little garden.

IMG_7785

The nature of the moments we capture on film lend themselves towards the good times: achievements, celebrations, vacations, something beautiful, or something funny; a graduation from school, a birthday party, an escape to Barbados, a stunning rainbow, a hand-made quilt, smiling faces, evidence of loving and of being loved, a garden. We share these images and it paints a portrait of an idyllic life, filled with joyful events and beautiful moments.

And life is beautiful, but it is far from the perpetually blissful existence that any one person’s photo album might suggest. We just don’t capture the ugly, frustrating, tearful moments on film, because those are the moments we are simply getting through. We’re not picking up the camera when the kids are fighting, because we’re busy playing referee. We’re not picking up the camera when the baby is smearing yogurt on the wall, because we’re busy grabbing paper towels. We’re not picking up the camera when the entire load of folded laundry has just been dumped on the floor, because we’re busy refolding it. We’re not picking up the camera when the house is covered in toys and the kids are all in time-out for refusing to pick them up, because we’re sitting on the stairs crying in frustration over something that shouldn’t be nearly as frustrating as it somehow feels in that moment.

IMG_6941

The experience of being a mom is a lot like planting that little fruit and vegetable garden. Successfully done, the plants will grow and thrive and produce photo-worthy, sweet fruits and nourishing veggies. I’ll proudly share those photos with family and friends, evidence of my gardening prowess. What the photos will not show however, are my tears of frustration that led to the trip to Home Depot, my dirt stained knees, the sun burn on the back of my neck, the muscle aches from cutting through the roots of an old tree as I prepared the garden bed, or the dirt collected under my fingernails. Yet all of those things were part of the experience.

My point is this… We share the fruit. We don’t often share the pains it took to get there. Being a mom can be messy and ugly. Like planting a garden, it’s hard work, but every so often, we get to harvest our fruit. Those are the moments we capture on film to remember why we do what we do, day in and day out. In between those moments, we’ve got tears on our face and dirt under our nails. As moms, we have a tendency to look at photos of other mom’s gardens and wonder why our own garden doesn’t seem as bountiful, forgetting that in between harvesting their fruit, that mom has got tears on her face and dirt under her nails too. We’re all living this perfectly imperfect life together.

I hope every mom out there had a beautiful Mother’s Day with a few perfect moments of bliss. Keep on keeping on. Your garden is growing and thriving as a result of everything you do in all of the moments between the photo-worthy ones.

IMG_6955

I’ve been hanging on to this recipe for a while and now seems like the right time to share this tasty treat. This is a multi-component recipe which takes a bit of time to assemble, but everything can be prepared ahead of time. The best part about the components of this dish is that you can mix and match the pieces in a million ways. Enjoy the corn and bean relish as part of this sandwich or with a bowl of tortilla chips or used as a bed for shrimp burgers. Enjoy the queso drizzled over a hamburger, tossed with macaroni or straight-up with chips. The tender, spicy beef is fantastic on this sandwich, but would stand alone beautifully too, served with a side of mashed potatoes.

IMG_6962

Chipotle Shredded Beef Flatbread Sandwiches

Ingredients

  • 4-6 flatbreads
  • 1 ripe avocado, sliced (Click here for a photo guide on slicing avocado)

For the Chipotle Braised Beef

  • 2 tablespoons olive oil
  • Approximately 3-lb beef chuck roast
  • 1 can chipotles in adobo (only use a few for a less spicy result)
  • 1/2 red onion, coarse chopped
  • 3 cloves garlic, smashed
  • 2-3 cups beef broth
  • Salt

For the Corn and Bean Relish

  • 1 1/2 cups sweet corn kernels  (defrosted frozen corn kernels will do the trick)
  • 1 15-ounce can black beans, drained and rinsed
  • 1/2 red onion, finely diced (Click here for a photo guide on dicing onions)
  • 1 red bell pepper, ribs and seeds removed, finely diced
  • 1 teaspoon garlic, minced
  • 2-3 green onions, chopped
  • 1/4 cup fresh cilantro, chopped
  • Juice from 1/2 lime
  • Salt and pepper, to taste

For the Homemade Queso

  • 2 tablespoons butter
  • 1 poblano pepper, ribs and seeds removed, finely diced
  • 1 jalapeno peppers, ribs and seeds removed, finely diced
  • 1/2 red onion, finely diced
  • 1 teaspoon garlic
  • 1 1/2 tablespoons flour
  • 1 cup milk
  • 1 cup Mexican cheese blend, shredded
  • 1 tomato, finely diced
  • Salt and cayenne pepper, to taste

Directions

For the Chipotle Braised Beef – Preheat oven to 325 degrees. Trim the chuck roast of any excess exterior fat. Season generously with salt. In a large dutch oven or oven safe pan, heat olive oil over medium/medium-high heat. Place the meat in the pan and brown on all sides, about 2-3 minutes per side. Add the beef broth, red onion, garlic, and as many chipotles as desired (I used all of them). The beef broth should come almost to the top of the meat, but not cover it. Bring the liquid to a simmer, then cover the pan and place it in the oven. Cook for 3.5 hours. Remove from the oven and allow to cool slightly. Using your fingers or a fork, pull the tender beef into small pieces, discarding any fatty bits.

For the Corn and Bean Relish – Combine  the corn, black beans, red pepper, green onions, red onion, garlic, and cilantro in a medium sized container. Squeeze half a lime over the mixture and toss to combine. Season with salt and pepper, as desired.

For the Queso – In a saucepan, melt the butter over medium heat. Add the peppers, onion, and garlic. Cook for about 5 minutes, until tender. Sprinkle the flour over the mixture and stir to coat. Cook for another minute or two. Gradually add the milk and whisk to combine. Bring the mixture to a gentle simmer and cook for a few minutes until the milk thickens. Turn the heat down to low and add the cheese. Stir until the cheese has melted into the sauce. Stir in the chopped tomato. Season with salt and cayenne pepper, to taste.

To Assemble the Sandwiches – Warm the flatbreads for a few minutes in a 350 degrees oven. In the center of each flatbread, place a generous mound of the braised beef. Drizzle the beef with warm queso. Top with the corn salsa and slices of fresh avocado.

Makes 4-6 Sandwiches

Spectacular Spinach Salad

Posted on

Process for Vacuuming a Room Without Kids:

Step 1: Remove vacuum cleaner from closet.
Step 2: Plug in the vacuum.
Step 3: Turn on the vacuum.
Step 4: Use the vacuum to suck debris and animal hair from the floor.
Step 5: Unplug and return the vacuum to the closet.
 
Approximate Time Required: 5 minutes

IMG_7030

Process for Vacuuming a Room With Kids:

Step 1: Remove vacuum cleaner from closet.
Step 2: Rehang all of the jackets which the baby pulled from the closet while you were removing the vacuum.
Step 3: Negotiate an argument over the remote between the two other kids.
Step 4: Plug in the vacuum.
Step 5: Instruct oldest kid to return the salamander to the outdoors and to stop squishing him.
Step 6: Replug the vacuum which the baby unplugged, while you were trying to save the salamander’s life.
Step 7: Return all vacuum accessories to their proper places.
Step 8: Turn on the vacuum.
Step 9: Begin vacuuming the room, while the baby rides on top of the vacuum, switching it off at intervals of 5 seconds.
Step 10: Turn the vacuum back on. Repeat as often as necessary in order to vacuum first half of room.
Step 11: Pause to console the child who is literally crying over spilt milk.
Step 12: Clean up the milk.
Step 13: Unravel the vacuum cord from the baby’s neck.
Step 14: Resume vacuuming the second half of the room.
Step 15: Revacuum the first half of the room after the baby spills goldfish on the floor, then crushes them riverdance-style.
Step 16: Instruct the children to put clothes on before playing outside.
Step 17: Accept that the vacuuming task is futile. Try again tomorrow.
 

Approximate Time Required: Unknown – This task has never been successfully completed.

IMG_7032

The actual experience, when sandwiched between twenty other equally impossible ‘simple’ tasks, is only remotely comical in writing. Experiencing it is a heart-pounding, curl-into-a-ball-and-cry-with-frustration, exercise in futility. (Yes, attempting to vacuum a room has brought me to tears more times than I’d care to admit.) If only I could learn to accept this loss of control over accomplishing simple tasks. Each day feels like a mad rush of tasks, errands, and chores, yet there is scarce evidence of the work accomplished by the end. Even the process of writing this simple blog post has been overly complicated by a million micro interruptions of the salamander, spilt milk, and crushed goldfish variety.

But recently I have managed to find the most perfect peace in a somewhat unusual place…the gym. Many people dread going to the gym. For me, the gym’s bright, sterile environment invokes the same calm as a dimly lit spa with soothing water features. I feel my heart rate decelerate when I walk through those doors, because my gym offers childcare. So, every day, I have been shuffling the little ones off to the gym, where I claim one hour to use as I please. One precious hour, where I am the master of my time, to select a task and complete it with minimal interruptions. One hour where I can choose to move slowly between the strength training machines or to let my heart race with the endorphins of a good run as compared to the cortisol of home stress. That hour may not make vacuuming a room any less stressful, but at least I had that one blissful hour.

And truly, as completing any task is basically impossible anyway, that one hour removed from my daily duties, has made little to no difference with respect to the condition of my house. Now, if that daily hour manages to make a difference with respect to the condition of my waistline, that will be the icing on the cake.

IMG_7033

Thankfully, the kids actually love going to the Kids Korner at the gym. There are novel toys and video games (which are a bit more violent than anything I allow in our home, thus exciting in an illicit way) and other kids to socialize with. So, in addition to my daily weekday gym escape, we’ve been taking a family trip to the gym each weekend. A post-gym stop at Panera for lunch, where we pick up salads and smoothies and other sorts of yummy feel-good food, has become part of our weekend routine.

I’ve been crushing on Panera’s Spinach Power Salad ever since they introduced it to the menu. I could eat it everyday, but that be bad for my wallet. So, I’ve come up with my own version of a salad inspired by Panera’s tasty offering. My salad features the same fresh baby spinach, topped with sauteed mushrooms and onions, crispy bacon, protein-rich eggs, and crispy garlic-pepper onion straws, tossed in a simple vinaigrette made with sweet caramelized onions and a touch of honey. It’s a near perfect combination of flavors and textures, the sort of thing which makes a healthful salad feel like a treat.

Today’s Focus on Technique – Mustard as an Emulsifier

I add a touch of mustard to almost every vinaigrette I make. In addition to adding a satisfying hint of flavor, mustard has the ability to act as an emulsifier, binding the oil and vinegar, so that the dressing is less likely to separate. This secret superpower of mustard occurs as a result of the  ground mustard seed’s particles’ ability to coat tiny droplets of oil, allowing them to mix harmoniously with the vinegar or lemon juice in a dressing. It doesn’t take a lot, but has the best overall result with ground mustard powder or a good quality prepared mustard.

Spinach Salad with Bacon, Eggs, Mushrooms and Caramelized Onion Vinaigrette

Inspired by Panera’s Spinach Power Salad

Ingredients

  • 8 slices bacon, cooked to crisp, crumbled
  • 3 eggs, hardboiled and chopped
  • 9-12 cups baby spinach leaves

For the sauteed mushrooms and onions

  • 1-2 tablespoons olive oil
  • 1 large sweet onion, thinly sliced
  • 2 cups baby bella (cremini) mushrooms, sliced
  • Salt and pepper

For the dressing

  • 1/2 cup caramelized onions (from the sauteed onions)
  • 1/4 cup white balsamic vinegar
  • 1/4 cup olive oil
  • 1 teaspoon dijon mustard
  • 1 tablespoon honey
  • Salt and pepper

For the crispy onions

  • 1 large sweet onion, very thinly sliced
  • 1 cup buttermilk
  • 1 cup flour
  • 1-1 1/2 teaspoons salt
  • 1 teaspoon garlic powder
  • 3/4 teaspoon black pepper
  • Vegetable oil, for frying

Directions

For the sauteed mushrooms and onions: Heat the olive oil in a pan over medium heat. Add the onion. Cook for 10-15 minutes, stirring frequently, until tender and golden. Remove the onions from the pan. Set 1/2 cup aside for the dressing. Save the remaining onions for topping the salad. Add a touch more oil to the pan, if necessary. Add the mushrooms and cook for about 7-10 minutes, until tender and golden. Season with a sprinkle of salt and pepper.

For the caramelized onion vinaigrette: In a blender or food processor, combine the caramelized onions, vinegar, oil, mustard, and honey. Blend until well combined. Season with salt and pepper.

For the crispy garlic-pepper onion straws: Soak the sliced onions in the buttermilk for 30 minutes or so. In a separate bowl, combine the flour, salt, garlic powder, and pepper. In a large fry pan, heat about 1 inch of vegetable oil at medium/medium-high heat for a few minutes, until it’s good and hot. In small batches, remove some of the onions from the buttermilk, shake to remove excess, then toss in the flour mixture until well coated. Scatter the onions in the oil. If the oil is hot enough, they should sizzle instantly and cook to golden and crispy in about two minutes. Remove the onions with a slotted spoon and drain over a paper towel. Repeat with remaining onions.

To assemble the salad: Toss a generous serving of spinach leaves (3-4 cups) with a bit of the dressing. Top the salad with the sauteed onions and mushrooms, chopped boiled egg, bacon, and the crispy garlic-pepper onions.

Makes 3-4 large salads

IMG_7044

Pasta with Ham and Mushrooms in a Creamy Spinach Ricotta Sauce

Posted on

If you celebrate Easter, it’s likely that come Sunday, you may find yourself with an excess of boiled eggs, some ham, and maybe even some candy. With that in mind, I’ve gathered up a few tasty ideas on how to make delicious use of those leftovers, including a brand new, super-simple recipe for pasta with ham and mushrooms in a creamy, cheesy spinach ricotta sauce.

What to do with Leftover Boiled Eggs…

Creole Deviled Eggs

029

Deviled Egg Salad

img_5869

Pasta with Bacon, Eggs, and Spinach

img_5924

What to do with Leftover Candy…

Cadbury Creme Crepes

img_3593

What to do with Leftover Ham…

Ham and Corn Chowder

img_5965

Grilled Peach and Prosciutto Salad with Creamy BBQ Dressing (use sliced ham in place of prosciutto)

img_9310

Grilled Brie, Prosciutto and Apricot Sandwiches (use ham in place of prosciutto)

img_4685

Chicken Cordon Bleu Panini

img_3708

Pasta with Ham and Mushrooms in a Creamy Spinach Ricotta Sauce

Ingredients

  • 1-2 tablespoons olive oil, plus more if necessary
  • 1/2 medium onion, finely diced
  • 1 teaspoon garlic, minced
  • 2 cups baby bella mushrooms, sliced
  • 2 cups ricotta cheese
  • 1 1/2 cups milk
  • 1 cup parmesan cheese, grated
  • 1 6-ounce bag baby spinach leaves, chopped
  • 2 cups leftover ham, diced
  • Salt and pepper, to taste
  • 1 pound pasta, cooked al dente
  • Additional parmesan cheese and crushed red pepper, for garnish

Directions

Heat the olive oil in a large pan over medium heat. Add the mushrooms. Cook for 7-10 minutes until tender and lightly caramelized. Remove the mushrooms from the pan and set aside. Add a touch more olive oil to the pan, if necessary, then add the onion. Cook for 5-7 minutes until tender and golden. Add the garlic and cook for another 1-2 minutes. Add the ricotta cheese, milk, and parmesan cheese. Cook for a few minutes, stirring frequently, until hot and well blended. Add the mushrooms, ham and spinach. Gently simmer for a few minutes until the spinach is wilted. Taste and season with salt and pepper, as desired. Pour the sauce over cooked pasta and toss to combine. Garnish with crushed red pepper and additional parmesan cheese, if desired.

IMG_6410

The Gourmand Mom

Good food, seasoned with a dash of life