RSS Feed

Category Archives: Eggs

Spectacular Spinach Salad

Posted on

Process for Vacuuming a Room Without Kids:

Step 1: Remove vacuum cleaner from closet.
Step 2: Plug in the vacuum.
Step 3: Turn on the vacuum.
Step 4: Use the vacuum to suck debris and animal hair from the floor.
Step 5: Unplug and return the vacuum to the closet.
 
Approximate Time Required: 5 minutes

IMG_7030

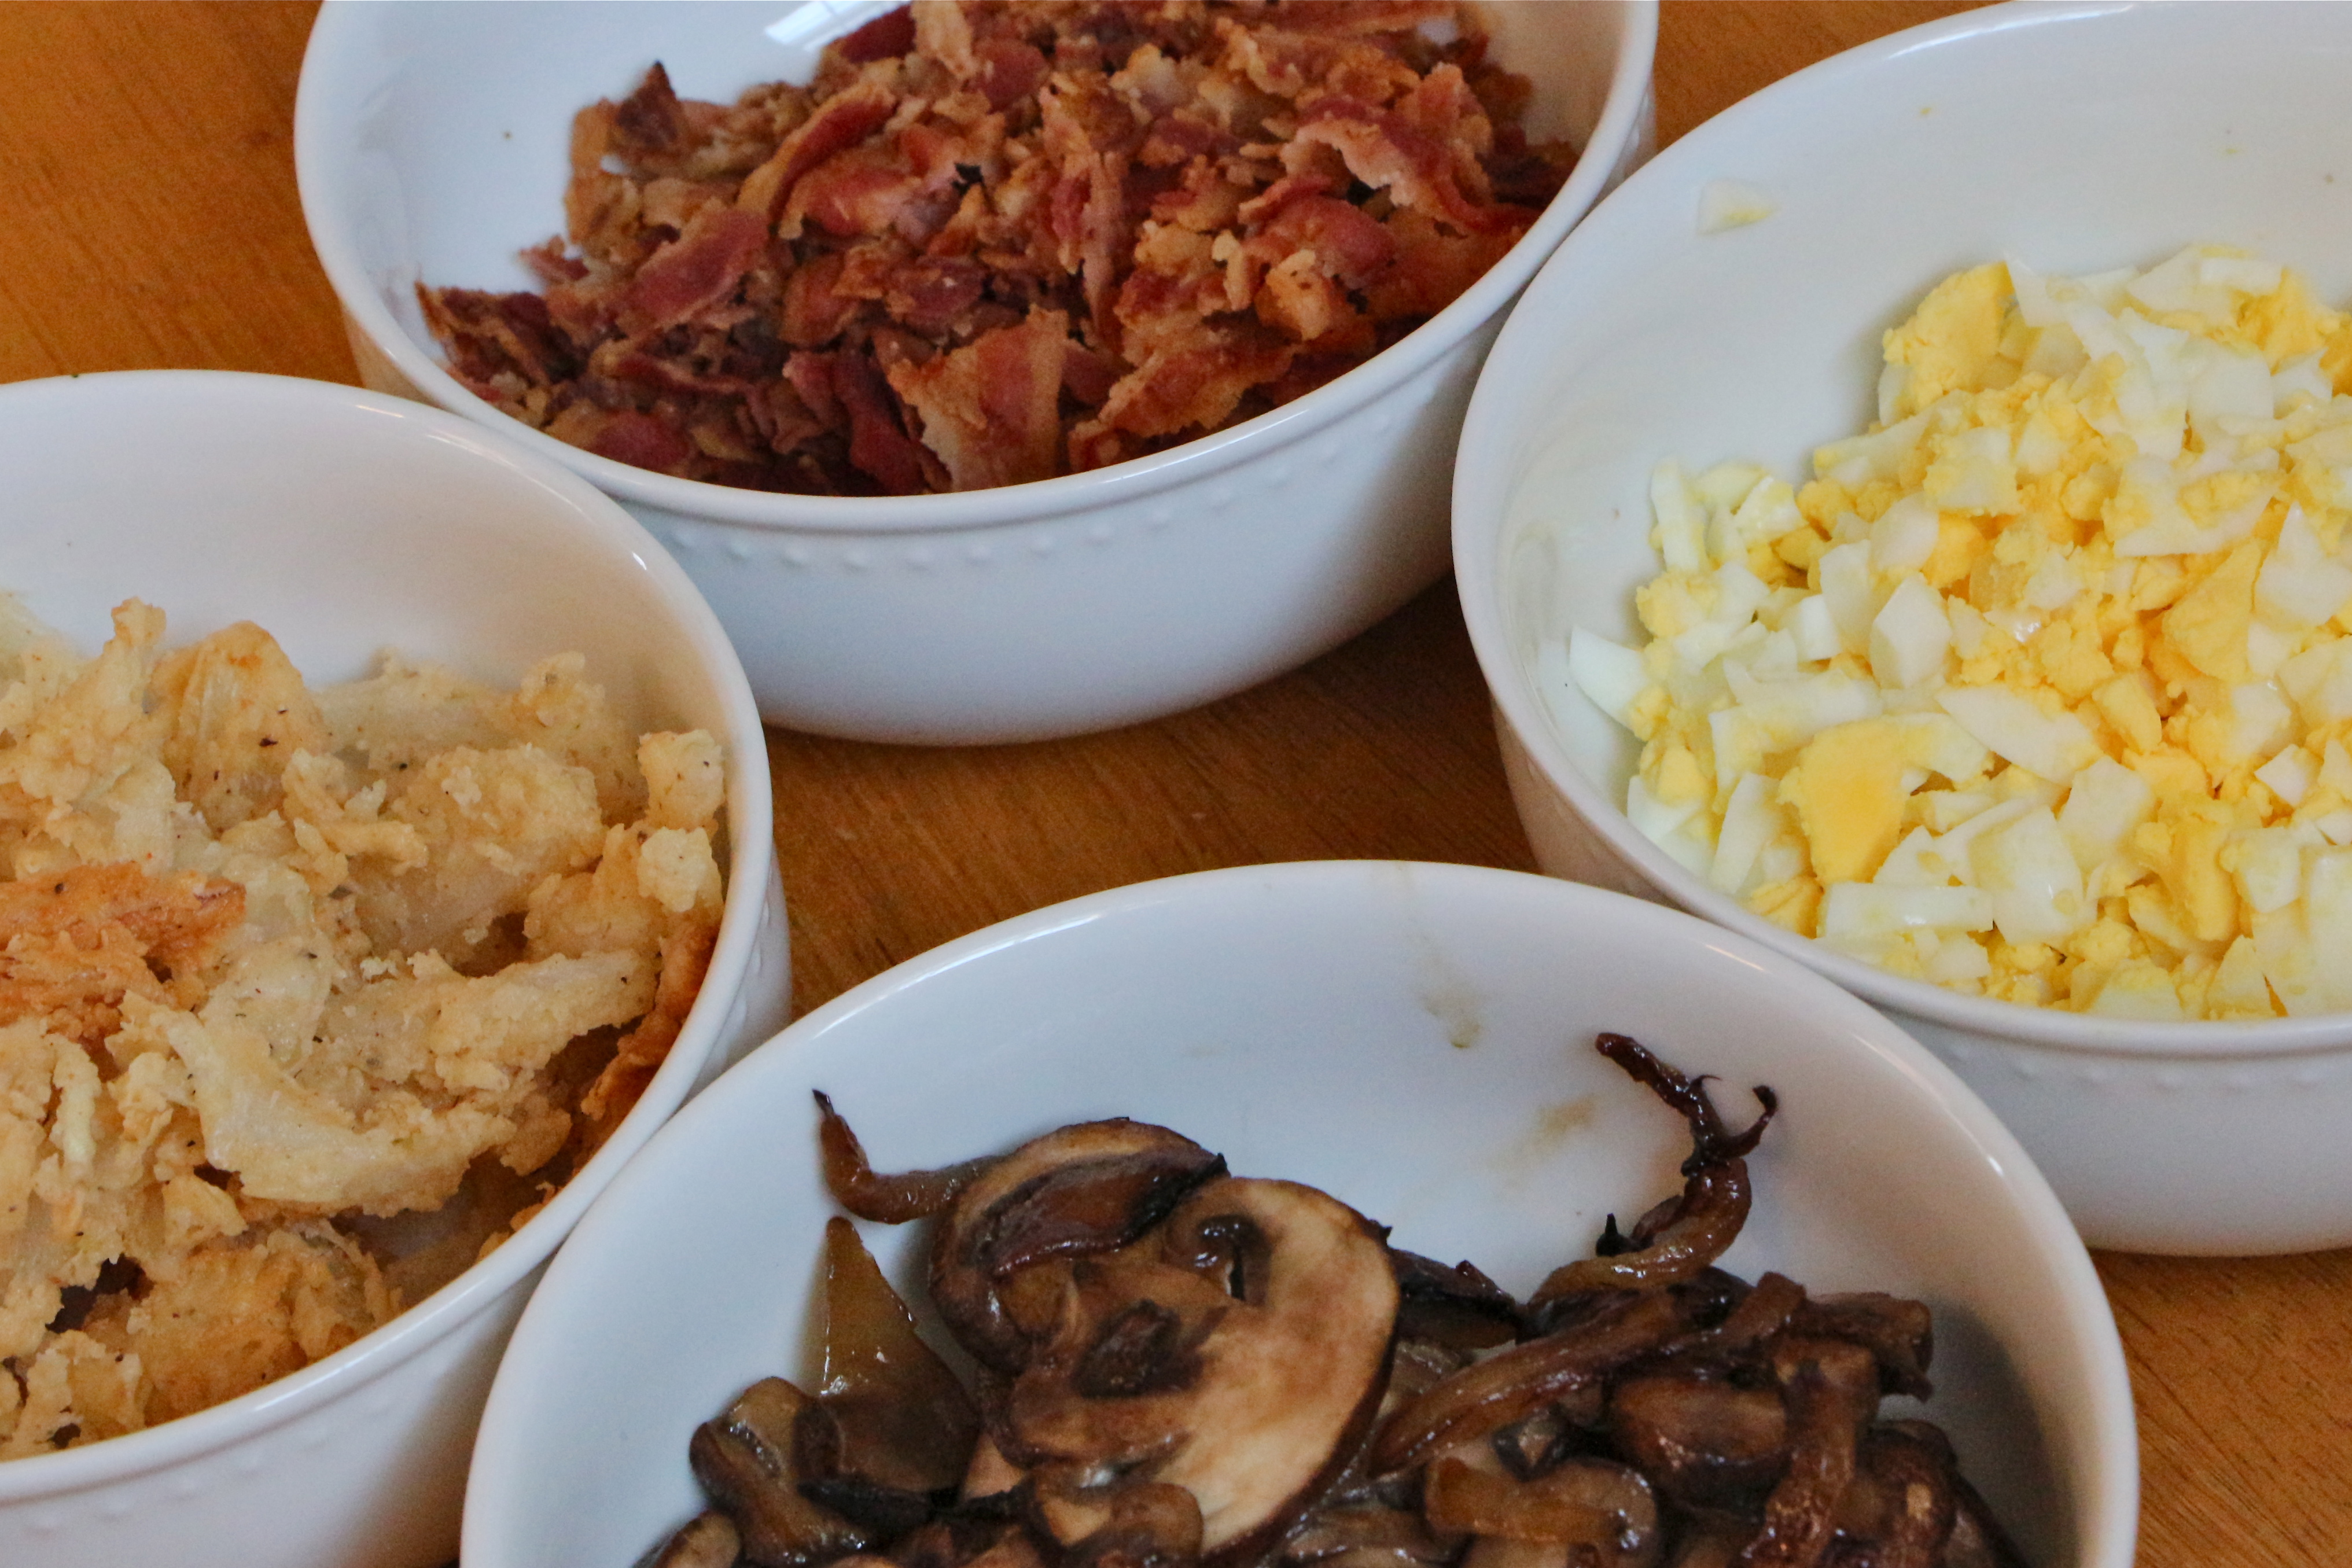
Process for Vacuuming a Room With Kids:

Step 1: Remove vacuum cleaner from closet.
Step 2: Rehang all of the jackets which the baby pulled from the closet while you were removing the vacuum.
Step 3: Negotiate an argument over the remote between the two other kids.
Step 4: Plug in the vacuum.
Step 5: Instruct oldest kid to return the salamander to the outdoors and to stop squishing him.
Step 6: Replug the vacuum which the baby unplugged, while you were trying to save the salamander’s life.
Step 7: Return all vacuum accessories to their proper places.
Step 8: Turn on the vacuum.
Step 9: Begin vacuuming the room, while the baby rides on top of the vacuum, switching it off at intervals of 5 seconds.
Step 10: Turn the vacuum back on. Repeat as often as necessary in order to vacuum first half of room.
Step 11: Pause to console the child who is literally crying over spilt milk.
Step 12: Clean up the milk.
Step 13: Unravel the vacuum cord from the baby’s neck.
Step 14: Resume vacuuming the second half of the room.
Step 15: Revacuum the first half of the room after the baby spills goldfish on the floor, then crushes them riverdance-style.
Step 16: Instruct the children to put clothes on before playing outside.
Step 17: Accept that the vacuuming task is futile. Try again tomorrow.
 

Approximate Time Required: Unknown – This task has never been successfully completed.

IMG_7032

The actual experience, when sandwiched between twenty other equally impossible ‘simple’ tasks, is only remotely comical in writing. Experiencing it is a heart-pounding, curl-into-a-ball-and-cry-with-frustration, exercise in futility. (Yes, attempting to vacuum a room has brought me to tears more times than I’d care to admit.) If only I could learn to accept this loss of control over accomplishing simple tasks. Each day feels like a mad rush of tasks, errands, and chores, yet there is scarce evidence of the work accomplished by the end. Even the process of writing this simple blog post has been overly complicated by a million micro interruptions of the salamander, spilt milk, and crushed goldfish variety.

But recently I have managed to find the most perfect peace in a somewhat unusual place…the gym. Many people dread going to the gym. For me, the gym’s bright, sterile environment invokes the same calm as a dimly lit spa with soothing water features. I feel my heart rate decelerate when I walk through those doors, because my gym offers childcare. So, every day, I have been shuffling the little ones off to the gym, where I claim one hour to use as I please. One precious hour, where I am the master of my time, to select a task and complete it with minimal interruptions. One hour where I can choose to move slowly between the strength training machines or to let my heart race with the endorphins of a good run as compared to the cortisol of home stress. That hour may not make vacuuming a room any less stressful, but at least I had that one blissful hour.

And truly, as completing any task is basically impossible anyway, that one hour removed from my daily duties, has made little to no difference with respect to the condition of my house. Now, if that daily hour manages to make a difference with respect to the condition of my waistline, that will be the icing on the cake.

IMG_7033

Thankfully, the kids actually love going to the Kids Korner at the gym. There are novel toys and video games (which are a bit more violent than anything I allow in our home, thus exciting in an illicit way) and other kids to socialize with. So, in addition to my daily weekday gym escape, we’ve been taking a family trip to the gym each weekend. A post-gym stop at Panera for lunch, where we pick up salads and smoothies and other sorts of yummy feel-good food, has become part of our weekend routine.

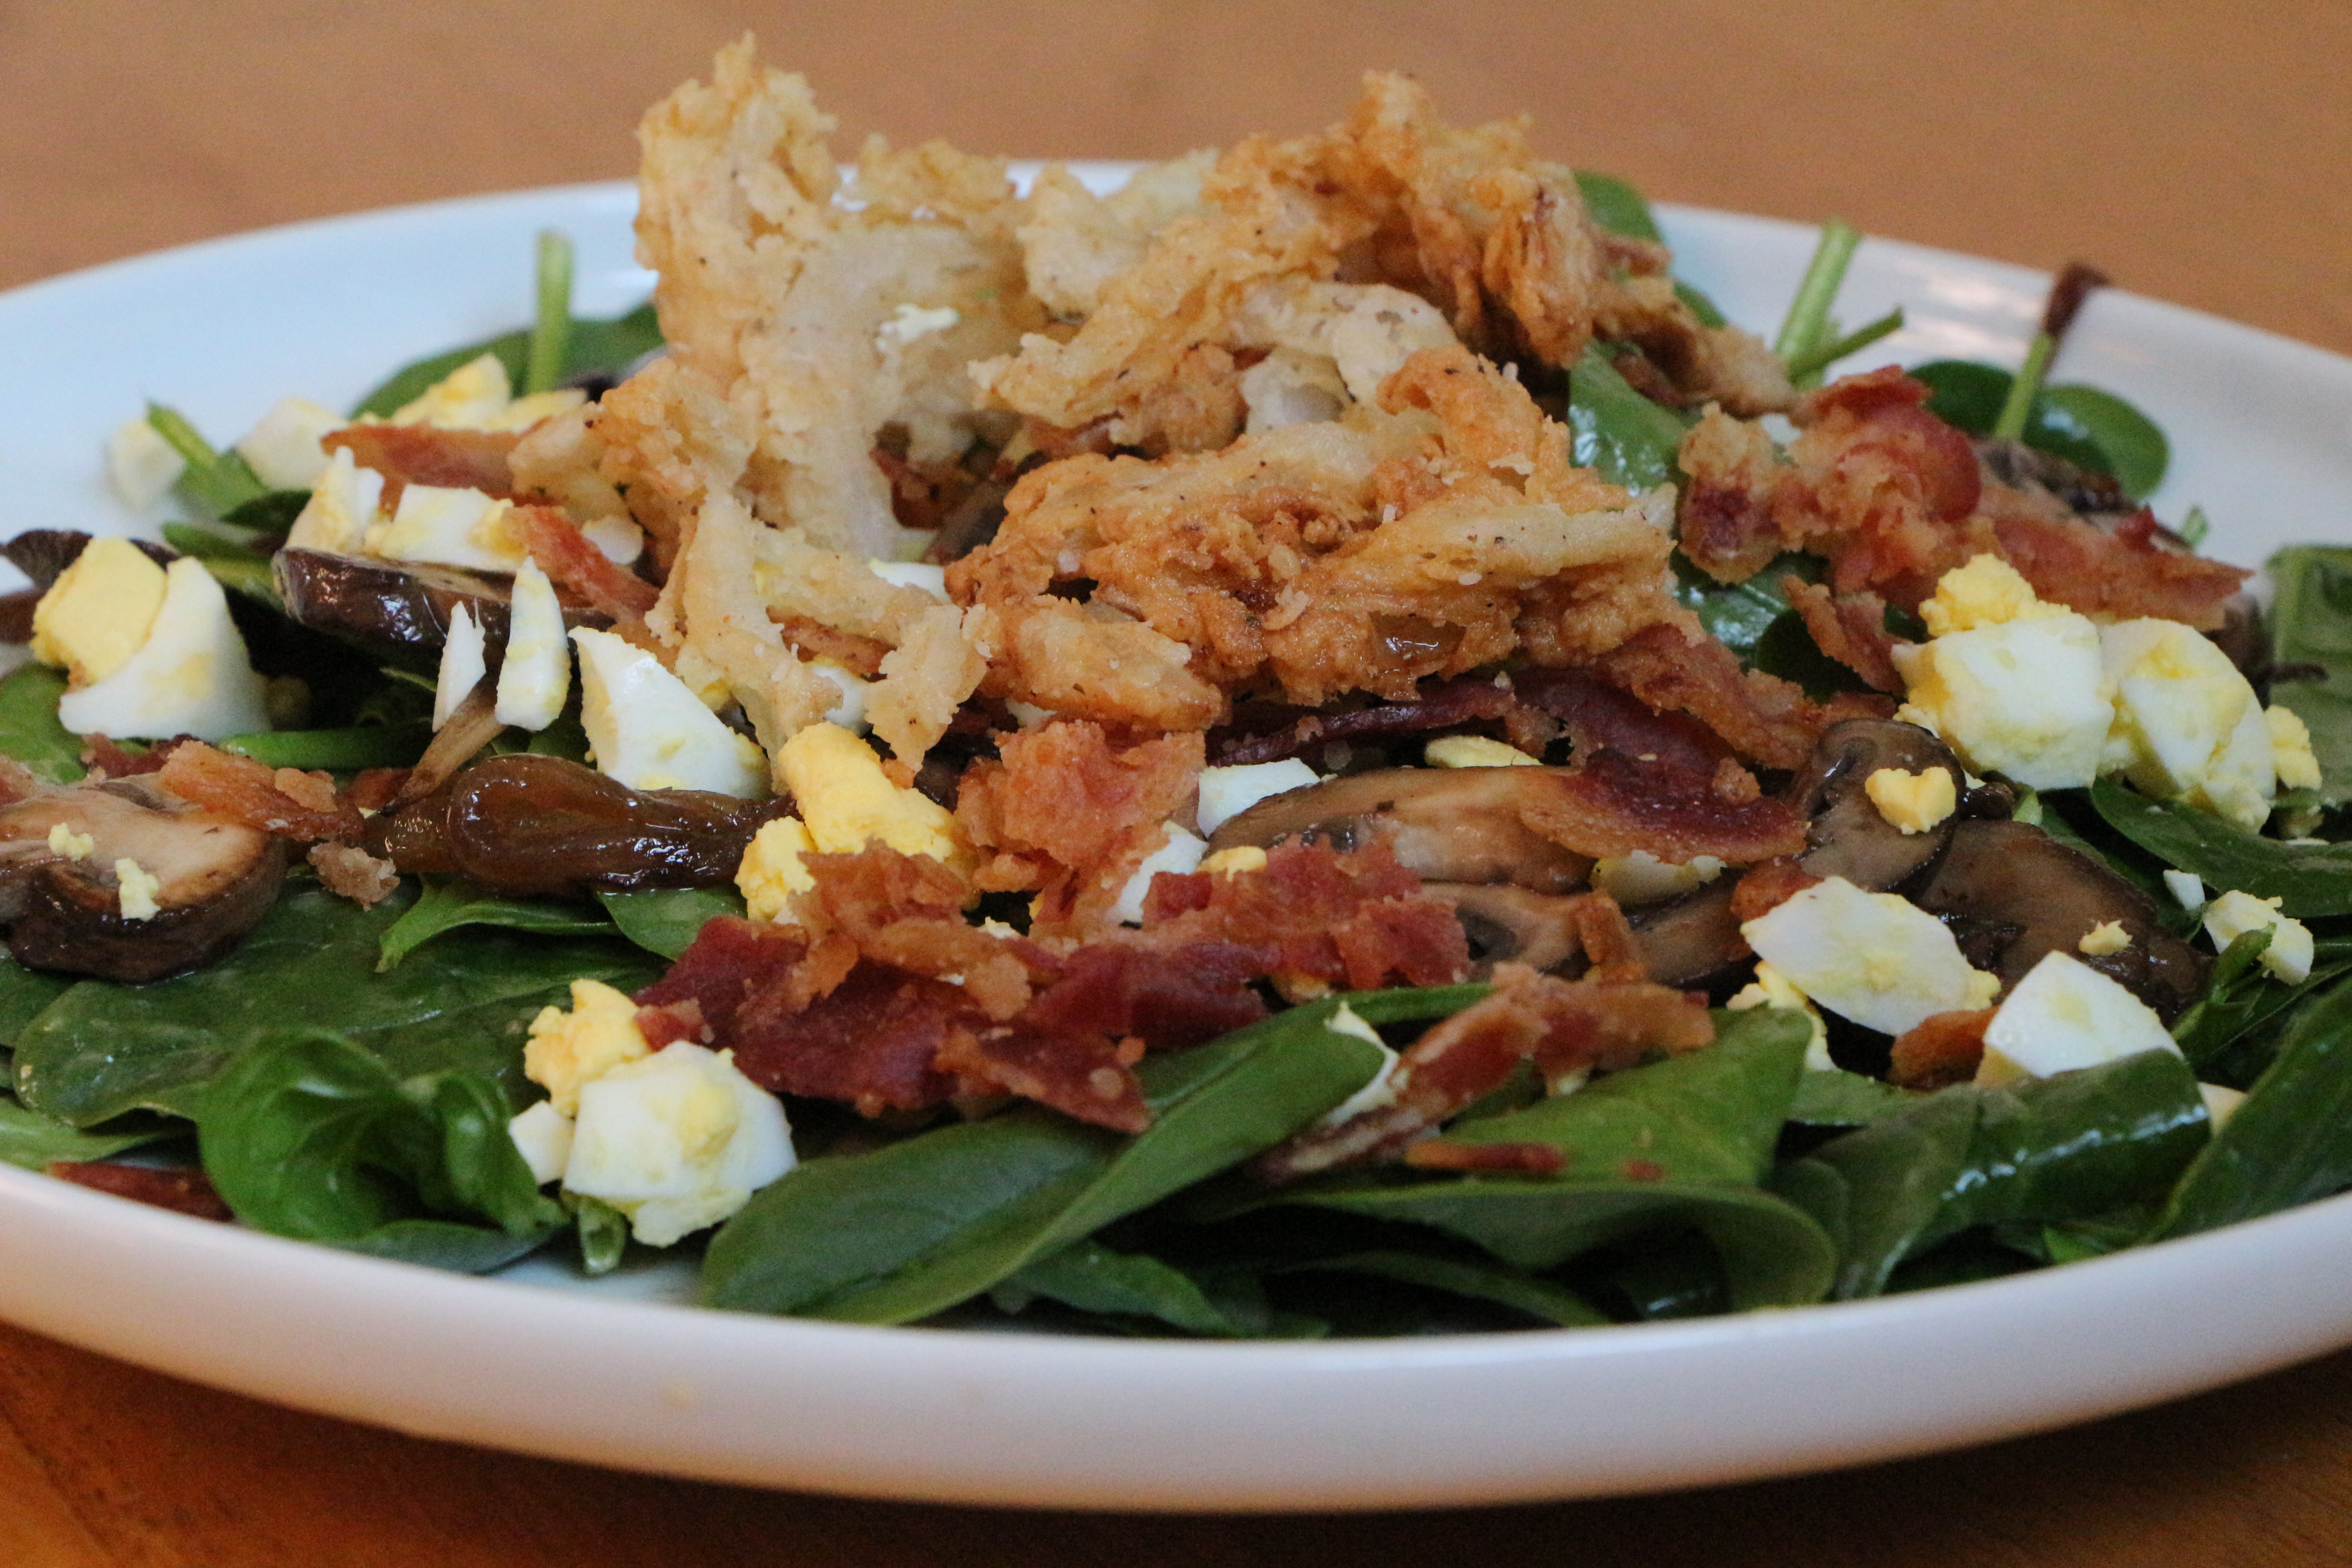
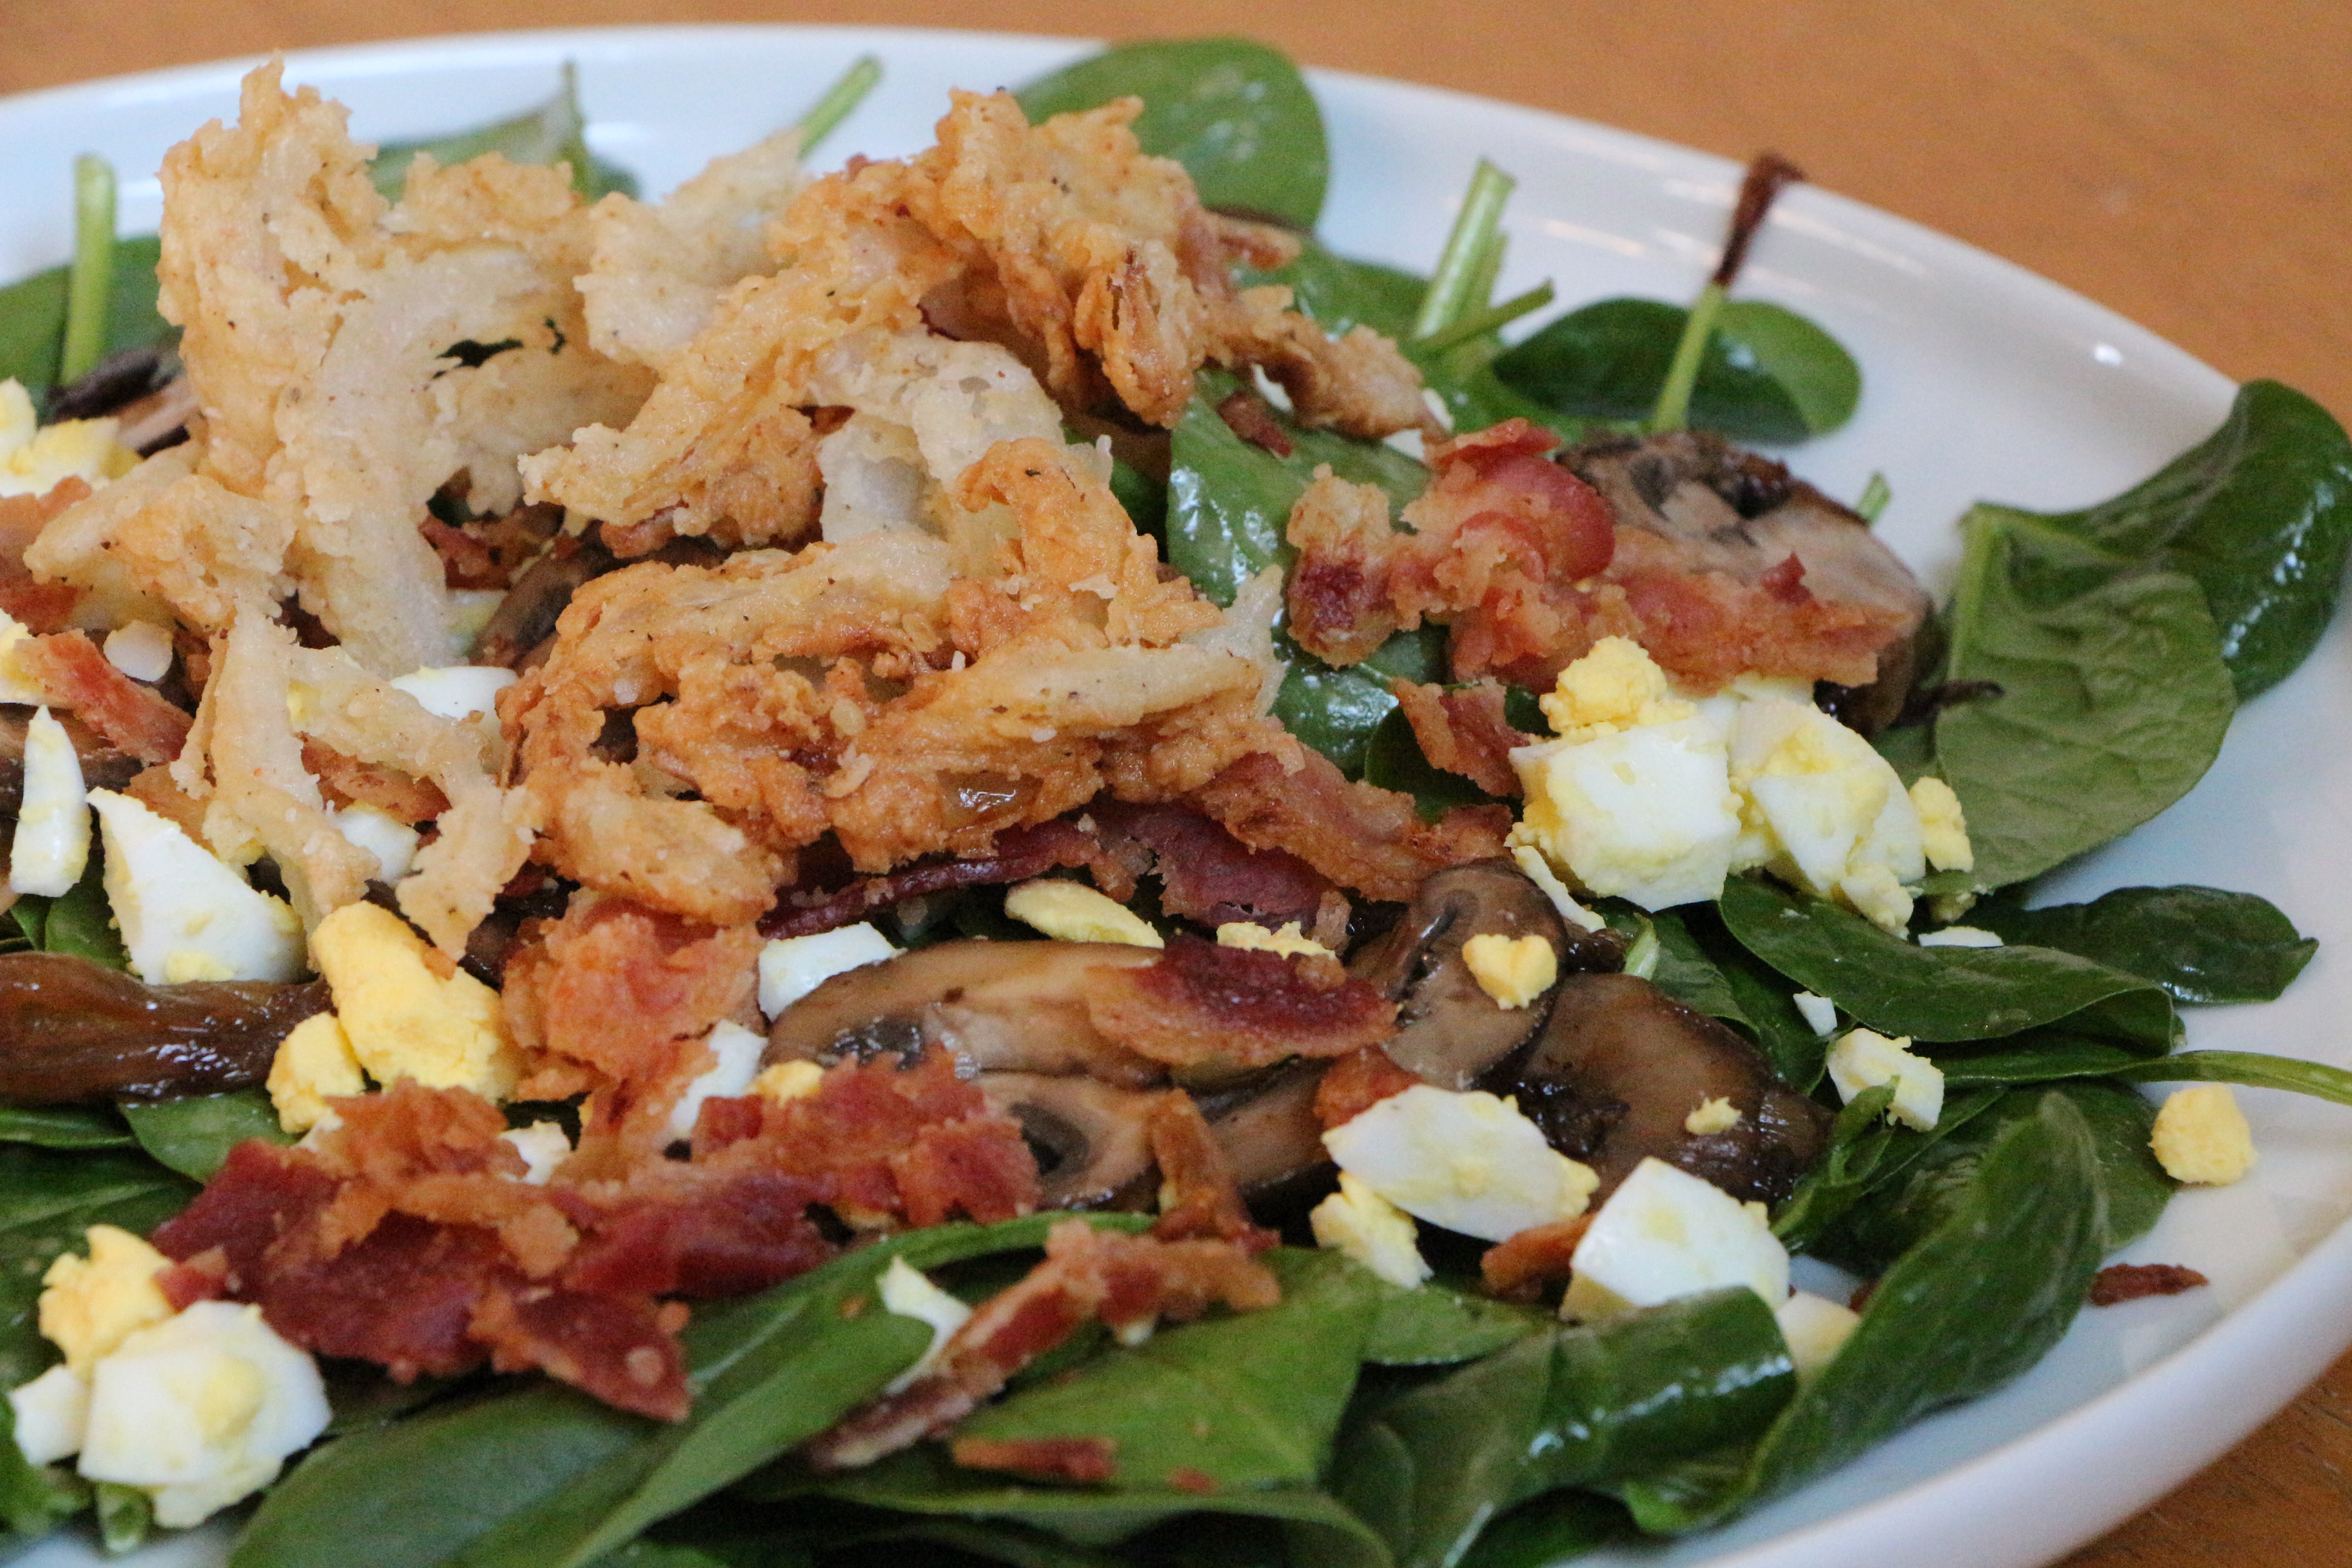
I’ve been crushing on Panera’s Spinach Power Salad ever since they introduced it to the menu. I could eat it everyday, but that be bad for my wallet. So, I’ve come up with my own version of a salad inspired by Panera’s tasty offering. My salad features the same fresh baby spinach, topped with sauteed mushrooms and onions, crispy bacon, protein-rich eggs, and crispy garlic-pepper onion straws, tossed in a simple vinaigrette made with sweet caramelized onions and a touch of honey. It’s a near perfect combination of flavors and textures, the sort of thing which makes a healthful salad feel like a treat.

Today’s Focus on Technique – Mustard as an Emulsifier

I add a touch of mustard to almost every vinaigrette I make. In addition to adding a satisfying hint of flavor, mustard has the ability to act as an emulsifier, binding the oil and vinegar, so that the dressing is less likely to separate. This secret superpower of mustard occurs as a result of the  ground mustard seed’s particles’ ability to coat tiny droplets of oil, allowing them to mix harmoniously with the vinegar or lemon juice in a dressing. It doesn’t take a lot, but has the best overall result with ground mustard powder or a good quality prepared mustard.

Spinach Salad with Bacon, Eggs, Mushrooms and Caramelized Onion Vinaigrette

Inspired by Panera’s Spinach Power Salad

Ingredients

  • 8 slices bacon, cooked to crisp, crumbled
  • 3 eggs, hardboiled and chopped
  • 9-12 cups baby spinach leaves

For the sauteed mushrooms and onions

  • 1-2 tablespoons olive oil
  • 1 large sweet onion, thinly sliced
  • 2 cups baby bella (cremini) mushrooms, sliced
  • Salt and pepper

For the dressing

  • 1/2 cup caramelized onions (from the sauteed onions)
  • 1/4 cup white balsamic vinegar
  • 1/4 cup olive oil
  • 1 teaspoon dijon mustard
  • 1 tablespoon honey
  • Salt and pepper

For the crispy onions

  • 1 large sweet onion, very thinly sliced
  • 1 cup buttermilk
  • 1 cup flour
  • 1-1 1/2 teaspoons salt
  • 1 teaspoon garlic powder
  • 3/4 teaspoon black pepper
  • Vegetable oil, for frying

Directions

For the sauteed mushrooms and onions: Heat the olive oil in a pan over medium heat. Add the onion. Cook for 10-15 minutes, stirring frequently, until tender and golden. Remove the onions from the pan. Set 1/2 cup aside for the dressing. Save the remaining onions for topping the salad. Add a touch more oil to the pan, if necessary. Add the mushrooms and cook for about 7-10 minutes, until tender and golden. Season with a sprinkle of salt and pepper.

For the caramelized onion vinaigrette: In a blender or food processor, combine the caramelized onions, vinegar, oil, mustard, and honey. Blend until well combined. Season with salt and pepper.

For the crispy garlic-pepper onion straws: Soak the sliced onions in the buttermilk for 30 minutes or so. In a separate bowl, combine the flour, salt, garlic powder, and pepper. In a large fry pan, heat about 1 inch of vegetable oil at medium/medium-high heat for a few minutes, until it’s good and hot. In small batches, remove some of the onions from the buttermilk, shake to remove excess, then toss in the flour mixture until well coated. Scatter the onions in the oil. If the oil is hot enough, they should sizzle instantly and cook to golden and crispy in about two minutes. Remove the onions with a slotted spoon and drain over a paper towel. Repeat with remaining onions.

To assemble the salad: Toss a generous serving of spinach leaves (3-4 cups) with a bit of the dressing. Top the salad with the sauteed onions and mushrooms, chopped boiled egg, bacon, and the crispy garlic-pepper onions.

Makes 3-4 large salads

IMG_7044

Advertisement

Pasta with Ham and Mushrooms in a Creamy Spinach Ricotta Sauce

Posted on

If you celebrate Easter, it’s likely that come Sunday, you may find yourself with an excess of boiled eggs, some ham, and maybe even some candy. With that in mind, I’ve gathered up a few tasty ideas on how to make delicious use of those leftovers, including a brand new, super-simple recipe for pasta with ham and mushrooms in a creamy, cheesy spinach ricotta sauce.

What to do with Leftover Boiled Eggs…

Creole Deviled Eggs

029

Deviled Egg Salad

img_5869

Pasta with Bacon, Eggs, and Spinach

img_5924

What to do with Leftover Candy…

Cadbury Creme Crepes

img_3593

What to do with Leftover Ham…

Ham and Corn Chowder

img_5965

Grilled Peach and Prosciutto Salad with Creamy BBQ Dressing (use sliced ham in place of prosciutto)

img_9310

Grilled Brie, Prosciutto and Apricot Sandwiches (use ham in place of prosciutto)

img_4685

Chicken Cordon Bleu Panini

img_3708

Pasta with Ham and Mushrooms in a Creamy Spinach Ricotta Sauce

Ingredients

  • 1-2 tablespoons olive oil, plus more if necessary
  • 1/2 medium onion, finely diced
  • 1 teaspoon garlic, minced
  • 2 cups baby bella mushrooms, sliced
  • 2 cups ricotta cheese
  • 1 1/2 cups milk
  • 1 cup parmesan cheese, grated
  • 1 6-ounce bag baby spinach leaves, chopped
  • 2 cups leftover ham, diced
  • Salt and pepper, to taste
  • 1 pound pasta, cooked al dente
  • Additional parmesan cheese and crushed red pepper, for garnish

Directions

Heat the olive oil in a large pan over medium heat. Add the mushrooms. Cook for 7-10 minutes until tender and lightly caramelized. Remove the mushrooms from the pan and set aside. Add a touch more olive oil to the pan, if necessary, then add the onion. Cook for 5-7 minutes until tender and golden. Add the garlic and cook for another 1-2 minutes. Add the ricotta cheese, milk, and parmesan cheese. Cook for a few minutes, stirring frequently, until hot and well blended. Add the mushrooms, ham and spinach. Gently simmer for a few minutes until the spinach is wilted. Taste and season with salt and pepper, as desired. Pour the sauce over cooked pasta and toss to combine. Garnish with crushed red pepper and additional parmesan cheese, if desired.

IMG_6410

Irish Mocha Chip Ice Cream

Posted on

Well, hello there! Long time, no see.

IMG_5145

I hadn’t intended to abandon the blog for any length of time, but life sort of sucked me into its unpredictable time warp. Between the kids and appointments and work and all of the other business of being a family of five, the weeks just flew by. Oh, and I joined a local gym, which has a ‘Kids Korner’, that the kids actually love going to. Ninety bucks bought me up to two hours of time for myself, every day, forever. Best childcare deal out there, folks. I’ve rarely missed a day since I joined. The getting in shape aspect almost feels like the bonus of going, not the very purpose itself.

IMG_6057

But, it’s come to my attention that one of my favorite holidays is rapidly approaching. So, I’ve pulled myself out of life’s time warp in order to bring you an appropriately Irish themed recipe. This is one for the grown-ups, as it’s chock full of caffeine and festively spiked with a bit of Irish Cream. Interestingly, it was my five year who inspired the whole ice cream idea, while I was pondering aloud about some Baileys twist on panna cotta or chocolate mousse. “It should be an ice cream,” he insisted. And with the approaching spring season peppering our days with warmer weather, he was right-on with that suggestion. I may need to reward him with a decaf, alcohol-free version of this recipe soon.

IMG_6102

The look your child may make when you prepare an ice cream, just for grown-ups.

If you’re looking for some more traditional Irish ideas, like Corned Beef and Cabbage, Irish Soda Bread, Shepherd’s Pie or even a low-carb twist on Cottage Pie, check out last year’s St. Patty’s Day recipe round-up HERE.

Have fun and most importantly, be safe, in all of your St. Patty’s Day festivities!

Today’s Focus on Technique – The Difference Between Ice Cream and Frozen Custard

The main difference between ice cream and frozen custard (also known as French-style ice cream or French custard ice cream) is the addition of egg yolks. Technically, to be considered a frozen custard, it must contain at least 1.4% egg yolks by weight. The USDA has lengthy documents which define all of the characteristics of ice cream, frozen custard, gelato, sherbet and something called mellorine, but basically, the difference between ice cream and frozen custard comes down to the egg yolks. The egg yolks in a frozen custard add a rich, silky creaminess to the end result. When adding the egg yolks to the ice cream mixture, it is important to temper the eggs by very gradually adding the hot cream mixture to the yolks. This allows the temperature of the eggs to rise to meet the temperature of the hot cream mixture without scrambling the eggs. The egg mixture is then returned to the pan and gently heated until the eggs are cooked to a safe temperature. For more info on tempering eggs into hot liquids, click here. I haven’t calculated the percent weight of egg yolks in the following recipe, but I’d venture to say it falls technically in the family of frozen custards.

IMG_6146

Irish Mocha Chip Ice Cream

Adapted from Emeril’s Coffee Ice Cream 

Ingredients

  • 1 1/2 cups heavy cream
  • 1 1/2 cups whole milk
  • 2/3 cup sugar
  • 1 1/2 tablespoons instant coffee granules
  • 1 1/2 tablespoons unsweetened cocoa powder
  • 3-4 tablespoons Baileys Irish Cream*
  • 4 egg yolks
  • 2/3 cup mini chocolate chips

*TIP – When cooking with liquors or liqueurs that you don’t frequently use, see if your liquor store carries the mini bottles (like they have on airplanes), to avoid having leftovers go to waste. 

Directions

Combine the cream, milk, sugar, coffee, and cocoa powder in a medium saucepan. Bring to a gentle boil over medium heat, stirring until sugar, coffee and cocoa are dissolved. Remove from the heat.

In a medium bowl, lightly beat the egg yolks with a fork. In a slow steady stream, gradually whisk about 1 cup of the hot mixture into the egg yolks. Then, gradually add the egg mixture to the remaining mixture in the pan. Cook the mixture over medium-low/low heat, stirring frequently, for 5-8 minutes, until it just begins to bubble. (You can use an instant read thermometer to check that the mixture is at least 170ºF.) Remove from the heat. Cool slightly at room temperature, then transfer to a bowl and cover with plastic wrap, pressing down against the surface to prevent a skin from forming. Refrigerate until completely chilled, about 2-3 hours. Stir in the Baileys Irish Cream and chocolate chips just before freezing in the ice cream maker.

Transfer the cooled mixture to your ice cream maker. Freeze according to your ice cream maker’s instructions. The ice cream will still be semi-soft (and lusciously creamy) coming out of the ice cream maker. It will harden a bit further after a few hours in the freezer.

*This recipe would make a perfectly delicious mocha chip ice cream without the Bailey’s. You could also use decaf instant coffee grounds if you’d prefer to skip the caffeine.

IMG_5140

Huevos Rancheros Pizza

Back in the spring, I strong-armed a couple of my friends into taking Irish step dancing lessons with me. (I actually didn’t need to twist their arms too hard.) We three became the unlikeliest bunch of dancers you could imagine. It was a blast. We clobbered away through a few classes, along with an (almost) equally novice classmate, before the weather became too hot to continue in our dance space. At that point, we broke for the summer, with the intention of resuming classes come fall.

IMG_5639

Well, fall rolled around and I sent an email to our instructor expressing our eagerness to continue. But we never heard back. After a few months with no reply, we’d become fully convinced that we’d been silently dumped as a result of our utter hopelessness in the field of Irish dancing. We couldn’t really blame her. We truly are a hopeless bunch. But then, just as we were about to pack away our dancing shoes, I received a message explaining an email switch, along with an invitation to resume classes. We accepted, of course.

This time though, there are a few other adults in our class and a second instructor. Apparently, our new classmates danced all throughout their childhood and teen years. They’re just picking up where they left off, which is someplace lightyears ahead of the rest of us. While we practiced basic skips, intently concentrating on not running into each other, one of our new classmates gracefully danced circles around us, quite literally. It feels oddly like being stuck in the ‘guppies’ group, aside out advanced classmates in the ‘shark’ group. They’re reading War and Peace, while we struggle through Ted in a Red Bed. Us four clumsy guppies stick as close together as we can without kicking each other. It’s a level of comfort thing. We huddle close together, executing every drill as a unified group, in a fruitless attempt not to draw too much attention to ourselves.

IMG_5642

It’s a ridiculously fun time, swimming in our guppy group. I haven’t laughed so hard in a long while. Graceful, we are not. Skillful, we are not. Coordinated, we most definitely are not. But for all we lack in ability, we more than make up for it with enthusiasm. We will probably never have the graceful, swift-footed skills of our river-dancing role models, but we’re certainly having fun with it. And that’s what it’s all about, isn’t it??

The added bonus is that our weekly lesson and all the practice in between burns a bucketload of calories. Now, if I were smart, I’d save those burned calories and let them work their magic on a bit of weight loss. Oh, but I love food too much and the dancing leaves me ravenously hungry. So, I choose to ‘spend’ my burned calories on fun food, like this Mexican-inspired huevos rancheros pizza. Truth be told, this pizza is fully inspired by nothing more than my desire to cook a pizza with eggs baked into it. It starts with a cornmeal crust, in place of the corn tortillas which would typically be used in huevos rancheros. The homemade crust is then topped with beans, taco sauce, Mexican cheese, chiles, and tomatoes. Fresh eggs are then carefully cracked on top of the pizza before baking for a stunning and unique twist on pizza.

IMG_5656

Today’s Focus on Technique – Cooking with Baker’s Yeast

Baker’s yeast is a single cell organism, commonly used as a leavening agent in many breads, pretzel doughs, and pizza doughs. As the yeast feeds on the sugars in the dough, it releases carbon dioxide, which becomes trapped within the dough, causing it to rise and expand. The most common types of yeast used in baked goods are active dry yeast and rapid rise yeast. Rapid rise yeast is made up of smaller particles, which touch a greater surface area of the dough and typically require half as much time to rise. Many people feel that the long rise time required for active dry yeast recipes results in a more flavorful dough.

Typically, many yeast dough recipes begin by proofing the yeast. Proofing is simply a process of dissolving the yeast in lukewarm water. After a few minutes, the yeast should begin to foam, proving that it is alive and ready to work its leavening magic. If the yeast doesn’t foam, it’s time to buy some new yeast. The magic temperature for proofing yeast is somewhere between 110-115°F. To assure you’ve got the right temperature, it’s helpful to use an instant-read thermometer. I usually stick the thermometer in hot water from the tap, then wait until it reduces to the right range before adding the yeast.

Yeast doughs rise best in a draft-free area, on the warmer side of room temperature (around 70°F). If your house is chillier than that, allow extra time for rising. If time is an issue, I sometimes find it helpful to preheat the oven for a bit, then place the bowl of rising dough on top of or near the oven. You don’t need to keep the oven on throughout the rise time; just long enough to release a little extra heat near the rising dough.

** Lots of other interesting information about yeast can be found HERE.


Huevos Rancheros Pizza

Ingredients

  • 2/3 cup refried beans
  • 1/3 cup taco sauce
  • 2 cups shredded Mexican blend cheese
  • 2-3 tablespoons red onion, finely diced
  • 2-3 tablespoons green chile (fresh or canned), finely diced
  • 5-6 grape tomatoes, thinly sliced
  • 1/3 cup chorizo, chopped (optional)
  • 3 eggs
  • Additional taco sauce or hot sauce for drizzling (optional)
  • Cornmeal Pizza Dough (recipe from www.marthastewart.com)

Directions

Preheat oven to 450°F.

Prepare the cornmeal pizza dough according to the recipe found HERE, except do not divide the dough into smaller portions. Roll the entire dough into one large (approximately 12″) crust. Transfer the rolled dough to a baking sheet, which has been sprinkled with a bit of cornmeal.

Spread the refried beans onto the crust, leaving a 1/2″-1″ lip around the edge. Drizzle the taco sauce over the beans. Scatter about 1/2 of the cheese over the sauce, then sprinkle with the onion, chile, tomatoes, and chorizo. Scatter with the remaining cheese.

Use your fingers to create three shallow wells in the pizza toppings. Carefully crack an egg into each well.

Bake for approximately 15 minutes, until the toppings are hot and melty and the eggs are cooked to your desired doneness.

**Be aware that the egg whites and yolks will maintain a bright, glossy appearance as they bake. In this case, touching the eggs to check for doneness is a more reliable indicator than their appearance. (I made the mistake of relying on appearance and cooked my eggs past the cooked white/runny yolk I was aiming for. The yolks in the photos with this post are actually fully cooked, even though they appear runny.)

IMG_5659

Pumpkin Pie Frozen Custard

Our weather is forecast to hit 69 degrees tomorrow. It will probably be the last ‘warm’ day for a long while, as winter is already breathing its frosty breath down our necks. In the meantime we’ll appreciate whatever remaining moderate weather we have left. It won’t be long before we’re slicing cinnamon-spiced pumpkin pies at our Thanksgiving tables. But right now I’m still desperately trying to hold onto whatever remains of the warm season before we plunge into the winter abyss.

So, I thought, why not marry the autumny flavors of  pumpkin pie with my favorite warm weather treat…ice cream?? What more perfect way could there be to acknowledge what may well be the last day we can go without our winter coats, than with a rich and creamy pumpkin pie frozen custard, flavored with vanilla, ginger, nutmeg, and a generous dose of cinnamon. Your ice cream maker will thank you for giving it one last whirl before it’s tucked away for the season.

Frozen custard differs from ice cream in that it contains egg yolks. The egg yolks add an extra creaminess to the frozen treat. The following recipe would also work well without the eggs, so if you or a loved one have an egg allergy, just omit them and call it ice cream. The half-and-half will contribute a good amount of creaminess, but you can substitute light cream or heavy cream for an even richer result.

Focus on Technique – Tempering Eggs

Tempering eggs is a process by which egg yolks are gradually brought up to a higher temperature, by very slowing incorporating hot liquid. This is done to prevent the eggs from scrambling when they are incorporated into hot liquid…cause who wants to eat custard with the texture of scrambled eggs, right??? Tempering the egg yolks helps them to maintain a smooth, silky consistency. Egg yolks may be tempered for use in custards, puddings, sauces, or souffles.

To temper egg yolks, start by lightly beating the eggs with a fork. Then, take some of your hot liquid and very gradually, starting with just a few drips at a time, incorporate some of the hot liquid into the eggs, whisking constantly. After the first few drips, you can increase to a slow stream. Continue incorporating the hot liquid until the egg mixture is about the same temperature as the mixture you will be adding it to. Then, you can safely add the egg mixture to the remaining hot liquid and bring to a gentle simmer for a couple minutes to ensure the yolks are cooked.

Pumpkin Pie Frozen Custard

Ingredients

  • 1 1/2  cups half and half
  • 1/2 cup milk
  • 1 cup pumpkin puree (canned or fresh)
  • 1/2 cup sugar
  • 1 1/2 teaspoons vanilla
  • 1/2 teaspoon cinnamon
  • 1/8 teaspoon nutmeg
  • 1/8 teaspoon ginger
  • Pinch of salt
  • 2 egg yolks, lightly beaten

Directions

Combine the milk, pumpkin puree, sugar, vanilla, cinnamon, salt, nutmeg, and ginger in a saucepan. Bring the mixture to a simmer over medium heat, whisking frequently. Once the mixture begins to simmer, reduce the heat. In a separate bowl, lightly beat the egg yolks. Gradually whisk about 3/4 cup of the hot mixture into the egg yolks, starting with a very slow drizzle. Gradually whisk the tempered egg mixture into the remaining mixture in the pot. Bring to a very gentle boil over medium heat, whisking constantly for 2-3 minutes. Allow the mixture to cool for several minutes at room temperature, then refrigerate until completely chilled. Pour the mixture into your ice cream maker and freeze according to your maker’s instructions.

Chocolate Peanut Butter Chocoflan

Posted on

I lied to you a little, about the whole not needing a wine rack because we drink our wine too fast. That statement is mostly true. We buy our regular wine in the big 1.5 liter bottles. It’s sold two for twenty bucks and it’s pretty darn tasty for that price. We are not wine snobs, as you can tell. I mean, we appreciate a fine wine, but we’ll gladly drink the cheap stuff too, as long as it doesn’t taste like grape juice mixed with well vodka. We pick up a few of those big bottles each week and we drink them promptly. Wine storage isn’t really a concern for us.

But we do actually have a small collection of wine in our wine cellar…errr, I mean the basement storage room, right next to the bins of Christmas decorations and miscellaneous crafting supplies. There are probably ten or so bottles down there; mostly wines we were given as gifts, a few mementos from our wedding, and some we picked up on wine tours. For the most part, they are white wines, which are spared from drinking due to our preference for red and the fact that they live unchilled in our basement.

There was a bottle of red down there. Was. I hadn’t forgotten about it. Many a night, I’ve thought about that bottle of wine. We bought it on a wine tour in Virginia, one weekend that we spent at this great little spa hotel. The concierge paired us with another couple and we shared a limo as we toured some the area’s wineries. We tasted several wines that day, including one with an aroma of tobacco that one of our new wine tour friends described as smelling of Colonial Williamsburg. Oddly, we all knew exactly what she meant. None of us purchased that wine. But we also tasted a delicious red called Ameritage Reserve at Pearmund Cellars; a blend of their best malbec, petite verdot and cabernet sauvignon. We were told it would be an ideal wine for aging. So we bought it and we aged it…for 9 years. We probably would have aged it forever if I hadn’t reminded my husband of its existence last night.

But, we were about to start the final episode of Downton Abbey’s second season and we’d exhausted our big bottle of cheapo red. We’d already watched two episodes that evening and were feeling quite regal by that point, as if we were destined for a life of fine wine. We do have a bottle of red, I heard myself say. Well, crack it open, was my husband’s response. And then we cracked open the bottle of 9 year old red. The cork practically crumbled as I pulled it from our precious aged wine. We traded in our standard drinking tumblers for actual wine glasses and took a sip. It was beautiful. It tasted as elegant as the halls of Downton Abbey. I may or may not have spoken with an English accent for the remainder of the evening.

It’s going to be hard to go back to drinking our budget wine this evening.

That wine was a special treat. No regrets.

I’ve got a treat for you too. Sometime in the weeks before our little Mexican fiesta, I picked up a Better Homes and Gardens magazine which featured all Mexican recipes. As I was flipping through the mag, I came across a recipe for a minted cake with a layer of dulce de leche flan on the top. Honestly, the combination of mint and dulce de leche did nothing to excite my taste buds, but in the description of this recipe, it mentioned something called chocoflan. Chocolate cake and creamy, caramelly flan??  Yup. I could get behind that idea. I found a recipe for chocoflan on the Food Network website and made it for my fiesta.

As far as baking goes, this is a pretty cool cake to make. The flan mixture gets poured over the cake mixture and sometime during the baking, the cake rises to the top, while the flan gently cooks in the bottom of the bundt pan. I followed the original recipe exactly as written, as I often do when I’m baking something unfamiliar. Baking is a much more exact process than cooking, so it’s a bit more important not to play around too much with ingredients and procedures until you have a better sense of what you’re working with. So, when the recipe instructed me to ‘giggle a little’, I giggled as told, even though I’m guessing the actual intention was to jiggle the cake.

The end result is delicious and show-stoppingly gorgeous. The cake is rich and dense, almost like a brownie. The flan is as decadent and satisfying as that aged wine; a perfect complement to the chocolatey cake. Though perfect as is, I toyed around with the recipe on my second attempt, substituting creamy melted peanut butter and warm fudge sauce for the dulce de leche in the original recipe. A handful of peanut butter chips, added to the cake batter, spreads peanut buttery flavor throughout the rich dessert.

This cake doesn’t really fall in line with my desire to lose a few pounds, but man is it worth the splurge! Just cut yourself a really, really skinny slice!

Chocolate Peanut Butter Chocoflan

Adapted from Marcela Valladolid’s Chocoflan

 Ingredients

For the Cake

  • 10 tablespoons butter, softened (plus additional butter for pan)
  • 1 cup sugar
  • 1 egg
  • 1 3/4 cups flour
  • 3/4 teaspoon baking powder
  • 3/4 teaspoon baking soda
  • 1/3 cup cocoa powder
  • 1 1/4 cups buttermilk
  • 1/3 cup peanut butter chips

For the Flan

  • 1 (12-ounce) can evaporated milk
  • 1 (14-ounce) can sweetened condensed milk
  • 4 ounces cream cheese, softened to room temperature
  • 3 eggs
  • 1 tablespoon vanilla extract

Garnish

  • 1/3 cup peanut butter, melted
  • 1/3 cup prepared fudge sauce, warmed
  • 1/4 cup chopped peanuts

Directions

Preheat oven to 350 degrees.

Rub the inside of a 12-cup bundt pan with butter to prevent sticking.

To prepare the cake: Using an electric mixer, beat the butter and sugar together until light and fluffy. Add the egg and beat for another minute. In a separate bowl, combine the flour, baking powder, baking soda and cocoa powder. Beat a third of the flour mixture into the butter mixture, followed by half of the buttermilk, followed by another third of the flour mixture, then the remaining buttermilk, and ending with the remaining flour mixture. Stir in the peanut butter chips. Spread the cake mixture in an even layer on the bottom of the prepared bundt pan.

To prepare the flan: Combine all flan ingredients in a blender and blend until well-combined. Pour the flan mixture over the cake batter. (Don’t worry if the cake batter mixes a bit with the flan. They will separate during baking.)

Cover the bundt pan with foil. Place the bundt pan inside a larger roasting pan or large skillet. Carefully fill the roasting pan or skillet with about an inch or so of hot water. (The hot water bath will help the flan custard to cook gently.)

Place the pan on the middle oven rack and bake for about 90 minutes*, until the top of the cake is firm and a toothpick inserted comes out clean. Carefully remove the pan from the oven, remove the bundt pan from the water bath, and cool for at least an hour at room temperature. Then, give the bundt pan a little jiggle to ensure the cake and flan are loosened. Place a large serving plate over the top and invert the cake onto the serving plate. Refrigerate for several hours before serving.

To garnish, drizzle the top of the cake with the melted fudge sauce and peanut butter. Sprinkle with the chopped peanuts.

*The original recipe calls for a cooking length of one hour, but it actually takes a good 90 minutes, as I’ve noted in my adaptation of the recipe.

Water bath set-up

Breakfast and Brunch Recipe Round-Up

Posted on

I recently shared a recipe for a Bacon, Egg, and Cheese Bagel Casserole, as an option for a special Father’s Day breakfast in bed. Just in case that idea doesn’t float your boat, here’s a round-up of previously posted breakfast ideas. Any of these would make a spectacular Father’s Day breakfast for the dad in your life or a great addition to your next brunch buffet!

Cinnamon-Raisin Donut Bread Pudding

Carrot Cake Pancakes with Cream Cheese Glaze

Potato and Chorizo Frittata

Fluffernutter Bread Pudding

Nutella and Strawberry Stuffed French Toast with Raspberry Coulis

Sausage, Biscuit, and Gravy Casserole

Eggs Benedict

Birthday Cake (Sprinkles) Pancakes

Cinnamon French Toast Bake

PB&J French Toast

Roasted Vegetable and Goat Cheese Quiche

Strawberry-Stuffed French Toast

Chocolate Chip Bacon Pancakes

Quiche Lorraine


Mother’s Day Cinnamon Raisin Donut Bread Pudding

Posted on

I get breakfast in bed once a year. On Mother’s Day. My breakfast in bed day is coming soon!! (For the record, my husband also gets breakfast in bed when Father’s Day rolls around.)

Last year, I got my breakfast in bed at the hospital, since I’d given birth to our third son the night before. But the year before that, my husband made me a delicious bacon, egg, and cheese bagel sandwich. It was fantastic. The boys came dancing into the room, buzzing with excitement over serving me breakfast in bed. They’d mostly just watched their daddy preparing the meal, but they took full credit for it.

They may not have made that bagel sandwich, but even young kids are quite capable of preparing some pretty fantastic stuff in the kitchen (with a little help, of course). And there’s really nothing like that aura of pride which emanates from a child who just accomplished something awesome.

With that in mind, I’ve come up with a Mother’s Day breakfast-in-bed recipe which is so simple that even preschoolers can complete almost every step on their own, with just a bit of adult direction. It starts with donuts, chopped into chunks, which are then sprinkled with raisins. Next, a mixture of half and half, sugar, eggs, vanilla, and cinnamon gets poured over the donuts. As it bakes, the donuts absorb the sweet, creamy mixture forming a lusciously decadent donut bread pudding.

This is good stuff, people. Make it for yourself if no one is going to make it for you. But, if you’ve got some kids who’d like to surprise you for Mother’s Day, here’s a step by step photo guide for them to follow.

Note to helper grown-up: It’s a good idea to gather all ingredients and supplies ahead of time, so you can move through the steps quickly. Young kids have a tendency to get distracted, lose interest, or start eating the donuts if you take too long between steps.

Step 1: Wash your hands. Then, ask a grown-up to preheat the oven to 350 degrees.

Step 2: Use a paper towel to spread one tablespoon of softened butter all around a medium-sized baking dish.

Step 3: Using a child-safe knife, carefully chop 7 or 8 cake-style donuts into chunks. You can use plain, powdered, cinnamon, or apple-cider donuts. (We used a variety pack of plain/powdered/cinnamon Entermann’s donuts.)

Step 4: Arrange the chopped donuts in a baking dish.

Step 5: Sprinkle the raisins overs the donuts.

Step 6: Pour 2 cups of half and half into a large bowl or measuring cup.

Step 7: Add 1/2 cup sugar.

Step 8: Add 1 teaspoon of vanilla.

Step 9: Add 1 teaspoon of cinnamon. Throw a pinch of salt in there too!

Step 10: Ask a grown up to help you crack 4 eggs into a dish. Then, pour the eggs into the half and half mixture.

Step 11: Whisk the half and half mixture until it’s well blended.

Step 12: Pour the mixture over the donuts. Make sure you pour some over every donut.

Step 13: Gently press down on the donuts so they drink up the half and half mixture.

*The key to a great bread pudding is not to over-soak the bread (donuts, in this case). The donut chunks should be mostly submersed in the liquid, but not swimming in it. A few donuts peaking out of the top will help a nice crust to form on the top when it bakes.

Step 14:  Ask a grown-up to help you put the baking dish in the oven. Bake for 50-55 minutes.

The bread pudding should look like this before it bakes.

Step 15: Ask a grown-up to help you take it out of the oven. Sprinkle it with powdered sugar. Serve warm.

*If desired, the bread pudding can be made the day before and reheated in the morning.

While the bread pudding is cooking, cut up some fresh fruit. It will trick Mommy into thinking she’s eating a healthy meal when it’s sitting next to her main course of donut pudding. (Mommies like to think they’re eating healthy.)

Cook a huge batch of bacon, because mommies like bacon.

Ask a grown-up to pour a glass of sparkly champagne or sparkling white grape juice for Mommy, because it’s a special day. A cup of hot coffee would be nice too.

Arrange everything nicely on a platter with a fresh flower or two and a handmade card. Your mommy will be in Mother’s Day heaven!

Cinnamon Raisin Donut Bread Pudding

Ingredients

  • 1 tablespoon butter, softened
  • 7 or 8 cake-style donuts, chopped into chunks (plain, powdered, cinnamon, apple cider)
  • 3/4 cup raisins
  • 2 cups half and half
  • 1/2 cup sugar
  • 4 eggs
  • 1 teaspoon vanilla
  • 1 teaspoon cinnamon
  • Pinch of salt

Directions

Preheat the oven to 350 degrees. Lightly grease the inside of a medium sized baking dish with the softened butter. Chop the donuts into chunks (about 1″ square). Arrange the donut chunks evenly in the baking dish. Sprinkle the raisins on top. Combine the half and half, sugar, eggs, vanilla, cinnamon, and salt in a large bowl or measuring cup. Whisk to combine. Pour the mixture over the donuts and raisins. (Try not to over-soak the donuts.) Gently press down on the donuts so they are mostly submerged in the liquid. Bake for 50-55 minutes. Sprinkle with powdered sugar. Serve warm.

Spinach, Bacon, and Egg Pasta Salad

Posted on

So…big news here. You are now reading a food blog written by a real, bonafide tooth fairy. That’s right, folks. I earned my wings. And boy are they sparkly!

Thursday night, we put the boys down to bed like usual. My husband handles the two older boys while I tend to the baby. Once everyone was tucked in, my husband headed out for band practice. I poured myself a glass of wine and settled onto the couch to watch the American Idol results show. The baby whimpered for a few minutes, as is his routine, then drifted off the sleep. The two older boys, who share a room, were up to mischief.

Some nights, the boys chat quietly before peacefully falling asleep. Some nights, antics involving a lot of mysterious banging and shouting ensue, before they crash into dreamland. Thursday was one of those nights. I’d already been in their room more than once to put the kibosh on the chaos (which was messing with my plan to relax on the couch with wine and Ryan Seacrest for the evening). So, when I heard the screaming again, I was not happy. I marched up the stairs and threw open the door, wearing my meanest Mommy face, to find the two boys excitedly jumping around, which left me feeling even less pleased.

But then, my first born…my sweet, little almost-five-year-old, says, “Today was the day!” as he held out his hand holding his first lost tooth. How had I not noticed the gaping hole in his mouth? The first tooth to come in was the first to come out. I remember when that tooth came in. When did he become such a kid??

Then

We hugged. We jumped around. We cheered. I told him how very proud I was of him and instructed him to stop growing up so fast. We took some photos and washed his mouth with salt water before climbing back into bed, with his tooth tucked securely under his pillow (in a little baggie to make it easier for the tooth fairy to find). I instructed the kids to go to sleep so that the tooth fairy could make her visit, then turned out the lights, leaving the boys snuggled in their beds, whispering about the tooth fairy. The last thing I heard, as I walked from their room, was my big kid telling his younger brother, “She’s very tiny.”

Now

I went downstairs and put on my wings. I placed three gold dollar coins into a baggie with a sprinkle of glitter for good fairy measure. There’s magic in this sort of stuff. And just before putting myself to bed, I snuck into my big kid’s room and swapped the tooth baggie for the baggie of gold coins and glitter. He’s been walking around with his goofy grin and baggie of treasure ever since.

Tonight, I’ll swap my fairy wings for bunny ears and a cotton tail. In the morning the boys will awake to a basket of candy and an egg hunt. We’ll be coloring eggs today. For the next few days, we’ll enjoy the colored hard-boiled eggs in deviled egg salad and this delicious pasta salad; another tasty option for using up all of those cooked eggs. I ate a ridiculous amount of this pasta salad this week. Seriously, I barely shared. A classic combination of spinach, bacon, and boiled eggs gets tossed together with al dente pasta and a sweet honey balsamic dressing…delicious!

Happy Easter folks!

Spinach, Bacon, and Egg Pasta Salad

Ingredients

  • 1 pound small pasta
  • 1 red bell pepper, ribs and seeds removed, finely diced
  • 8 slices bacon, chopped
  • 6 hard-boiled eggs, chopped
  • 1 1/2 – 2 cups baby spinach leaves, chiffonade*

For the dressing

  • 1/3 cup olive oil
  • 1/2 cup balsamic vinegar
  • 3 tablespoons honey
  • 2 tablespoons dijon mustard
  • 1/2 teaspoon crushed red pepper
  • 1/4 teaspoon garlic powder
*Click HERE for my chiffonade how-to photo guide.

Directions

Cook the pasta al dente, according to package directions. Strain and rinse with cold water. Set aside.

To prepare the dressing, whisk (or shake) together the olive oil, balsamic vinegar, honey, mustard, crushed red pepper, and garlic powder until well blended.

Combine the pasta, dressing, red bell pepper, bacon, and spinach in a large container. Toss to combine. Taste and adjust seasoning with salt and pepper, if desired.

Refrigerate until serving. Serve cold.

Deviled Egg Salad

Posted on

I have an easy time getting behind the whole Santa Claus thing. The spirit of good ol’ St. Nick practically courses through my veins. As a tradition, it makes sense to me. I can make the connections between Santa Claus and the true meaning of Christmas. And I’m all about sharing the tradition of Santa with my children for as long as they choose to believe.

I have a much harder time getting behind the idea of a giant man-bunny, like the ones sitting at the mall waiting to take pictures with sweet children dressed in their Easter best. I admit, I just don’t really get it. I just don’t understand the connection between the Easter bunny and Jesus rising from the dead. I can’t connect the dots.

Santa makes sense to me. (Even the tooth-fairy makes sense.) A candy-giving, egg-hiding rabbit does not.

So, around here, our discussions of Easter have focused mainly on the true reason for the holiday. We’re low-key on the rabbit stuff. Sure, we’ll color eggs, the Easter bunny will hide them, and there will be an Easter basket waiting in the morning. (There will even be animal crackers hiding under the green cellophane grass, just like there always were in my Easter basket.) But our celebration on Sunday will be more of a religious one.

Regardless of your feelings on fuzzy rabbits, if your family celebrates Easter, the odds are that you will be left with dozens of colored hard-boiled eggs come Sunday morn. Please heed the USDA’s advice and do not leave hard-boiled eggs unrefrigerated for more than two hours…the last thing anyone needs on Easter is food poisoning. Either sneak around in the early morn to hide those eggs or hide plastic eggs and leave those pretty colored eggs in the fridge.

And if you’re looking for an easy, delicious use of those purdy eggs, give this tasty deviled egg salad recipe a try. It’s a classic egg salad, with the addition of dijon mustard and pickle relish for a deviled egg flare. (Be careful though..if you’re not watching, your spouse might steal the last of it for his lunch. For real…it happened to me.)

Deviled Egg Salad

Ingredients

  • 1 dozen hard-boiled eggs
  • 1/3 cup mayonnaise
  • 2 tablespoons dijon mustard
  • 2 tablespoons sweet relish
  • 1 tablespoon parsley
  • 1 /2 teaspoon paprika
  • Salt and pepper, to taste

Directions

Peel the eggs, cut in half, and remove the yolks. Place the yolks in a medium sized bowl. Chop the egg whites and place in a separate bowl. Use a fork to smash the egg yolks, then combine with mayonnaise, mustard, relish, parsley, and paprika until smooth. Stir in the chopped egg whites. Taste and season with salt and pepper, as desired.

The Gourmand Mom

Good food, seasoned with a dash of life

%d bloggers like this: