RSS Feed

Tag Archives: food photography

Crab Cake Eggs Benedict

Posted on


My four year old, James, and I are in the midst of an intense, ongoing biblical debate regarding the book of Genesis, more specifically the story of creation.

James was taught in school that God created everything. And in four-year-old speak, everything means EVERYTHING.

IMG_6346 (1).jpg

“Mommy,” he said to me, as we were walking through the Target parking lot, “Did you know that God created everything?”

“That’s right,” I replied,”Isn’t that amazing?”

“He made the trees and the grass and the sky,” he continued.

“Yup, and beautiful flowers and animals too,” I added.

“And He made the shopping carts and the cars and Target,” he further elaborated.

I paused for a moment to consider my reply, then said, “Well, not exactly. But He did give us smart brains and strong bodies to be able to create things like shopping carts, cars, and Target.”

James simply replied, “No.”

“No” as in, “No, Mother! You are unequivocally incorrect. God most certainly did create shopping carts, cars, and Target.” (Side note: He might be right about the Target thing.)

This theological back and forth has become a part of our daily conversations over the past few weeks, with God’s personal creations ranging from kindles to Paw Patrol hoodies to Marvel movies.

In James’ version of the creation story, God clearly went right back to work after his rest on the 7th day.
IMG_6333.jpg

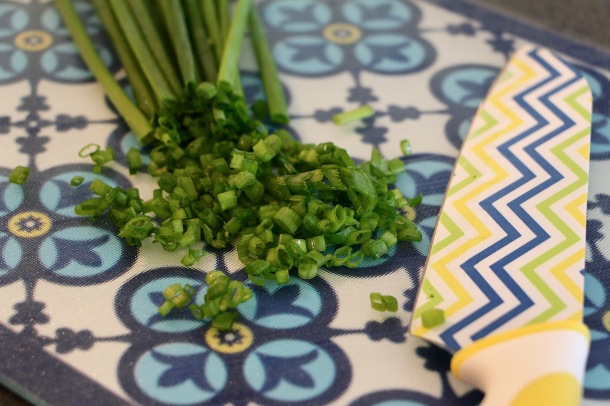
7″ Santoku Knife from Avon’s 16-Piece Multi-Pattern Knife Set and beautiful Serafina Collection Glass Cutting Board from Avon!

Perhaps then, it was on the eighth day that God created Crab Cake Eggs Benedict??

If pressed to answer the age old question of, “If you were stranded on an desert island and had to live on only one food for the rest of your life, what would it be?” there’s a pretty decent chance that Crab Cake Eggs Benedict would be my reply.

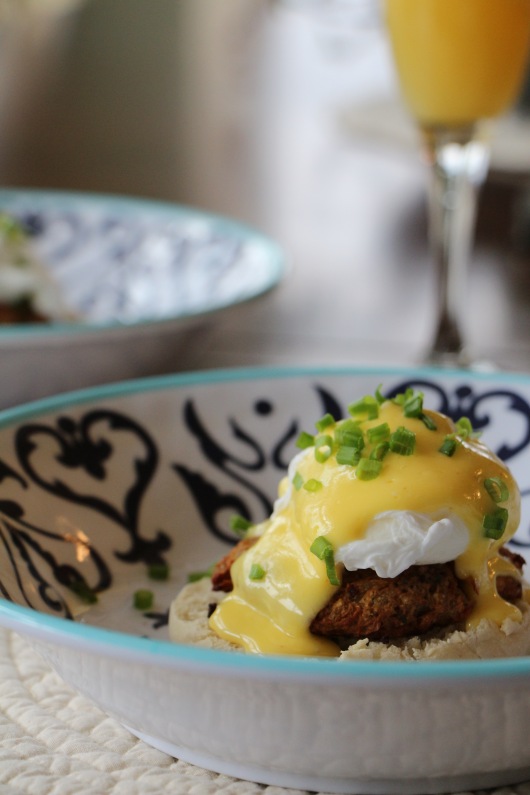
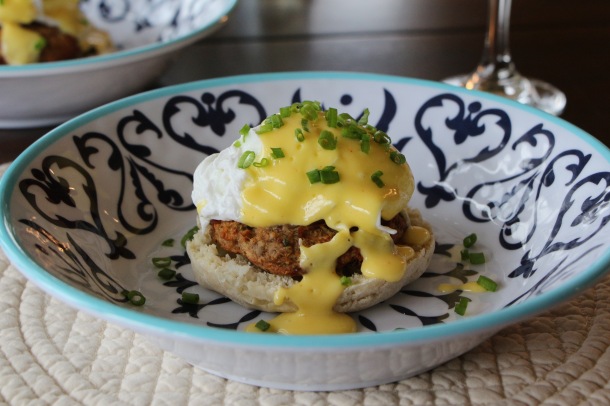
This is traditional Eggs Benedict, with a simple (and quite elegant) twist. In lieu of the standard Canadian bacon, I substitute one of my spectacular broiled crab cakes, loaded with decadent jumbo lump crab meat. A perfectly poached egg is nestled on top of the crab cake, then drizzled with a generous spoonful of homemade hollandaise sauce. A sprinkling of fresh chives completes the dish.
IMG_6347 (1).jpg

Crab Cake Eggs Benedict in Azul Collection Melamine Bowl from Avon!

Not too long ago, I felt strongly that a hollandaise sauce should always be made using the classic culinary technique involving the whisking of egg yolks with fresh lemon juice, as they gently cook, over a bain marie, while carefully adding precisely the right amount of clarified butter for the mixture to emulsify into a luscious and creamy sauce. It’s a finicky process, but one I was proud to have learned.

Then, I had a life-changing moment.

Out of a desire to minimize the number of messy pots and pans I was juggling during my Easter brunch,  I decided to try the blender method. I’m not sure I’ll ever mess with bain-marie hollandaise again. The blender preparation is so incredibly simple, and as far as I can tell, produces a perfect, delicious hollandaise every time, which seems miraculously resistant to the common fussiness of hollandaise.

God may not have created Paw Patrol hoodies or shopping carts, but I’m pretty sure he created Crab Cake Eggs Benedict made with blender hollandaise sauce.

And He was pleased with what he tasted. 

Crab Cake Eggs Benedict

Ingredients

  • 4 English muffins, halved and toasted
  • A few chives, finely chopped

For the Crab Cakes:

  • 1 pound jumbo lump crab meat
  • 1/2 cup Panko bread crumbs (or regular bread crumbs or cracker crumbs)
  • 1 Egg, beaten
  • 2 Tbsp mayonnaise
  • 2 tsp Old Bay or Creole seasoning
  • 1 tsp dijon mustard
  • 1 tsp garlic, minced

For the Hollandaise:

  • 4 egg yolks
  • 1 tablespoon warm water
  • 2 tablespoons lemon juice
  • 2 sticks salted butter
  • 1/8 teaspoon cayenne pepper

For the Poached Eggs:

  • 8 eggs
  • 1 tablespoon white vinegar

Procedure

To Make the Crab Cakes:

Preheat broiler. Combine all ingredients, except the crab meat, in a bowl. Mix until well blended. Gently fold the crab meat into the other ingredients, taking care not to break up the chunks too much. Use your hands to form eight equal sized balls of the crab mixture. Place the balls on a baking sheet and gently flatten into patties, approximately the same size as the English muffins. Place under the broiler and cook for about 10 minutes until completely heated through.

To Prepare the Hollandaise Sauce:

Add the egg yolks, warm water, lemon juice, and cayenne pepper to a blender. Blend at medium speed for about 30 seconds or so, until frothy and slightly lightened in color. Meanwhile, melt the butter in the microwave until completely melted and hot. Turn the blender speed to low, and begin drizzling in the hot melted butter, in a slow steady stream. Blend for a few more seconds once all of the butter has been added. Taste and adjust seasoning with additional salt and/or cayenne pepper, as desired. Set prepared sauce in a warm location (near the stove, for example) until ready to use.

To Poach the Eggs:

Bring a few inches of water to a boil in a large saucepan. Add the vinegar. Reduce the heat to a gentle simmer. Carefully crack each of the eggs into separate ramekins, small dishes, or cups, being careful not to break the yolks. Carefully place each egg in the water, by lowering the ramekin to the edge of the water and letting the egg slip in. Use a spoon to gently nudge the whites closer to the yolk. Allow the eggs to cook for 3-5 minutes, depending on desired doneness. Remove the eggs with a slotted spoon and place on a paper towel to drain.

TIPS: Poach eggs in small batches (four at a time) to make it easier to keep track of cooking time. Eggs can be poached a few hours ahead of time, then stored in a bowl of cold water in the refrigerator, until ready to use. To reheat, slip the eggs into a pot of simmering water for about 30 seconds up to 1 minute to reheat.

To Compose the Dish:

Place a crab cake onto each toasted English muffin half. Set a poached egg on top of each crab cake. Drizzle with a generous spoonful of the hollandaise sauce. Garnish with chopped chives.

Makes 4 Servings (2-each)

The adorable (and quite effective) Santoku Knife (part of a 16-piece multi pattern set), Serafina Glass Cutting Board, and Azul Collection Melamine Bowl (part of a 4-piece set) are all available through my AVON web store HERE! Get 20% off orders of $50 or more with the code: WELCOME
IMG_6337.jpg

Shaved Brussells Sprouts, Bacon, and Potato Hash

Posted on

Physicists define entropy as: a measure of the disorder or randomness in a closed system; inevitable and steady deterioration of a system or society.

Sometimes my home feels like a case study in entropy.

IMG_5758.jpg

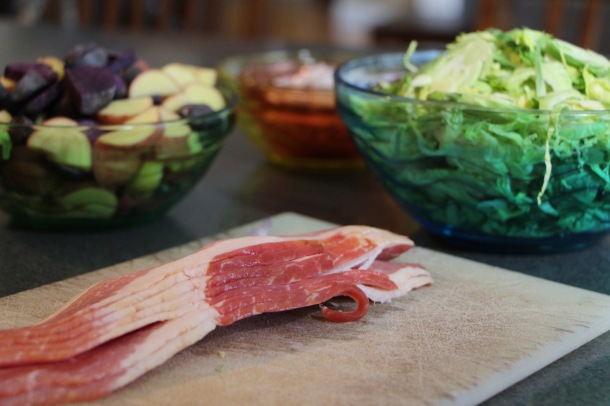
Ingredients prepped in gorgeous glass nesting bowls from Avon


A few years ago, I returned home from a grocery shopping trip with the three boys to find that our senile labrosaurus rex (aka: enormous 11-year-old yellow lab) had emptied the entire contents of the trash, chewed it to smithereens, and scattered the remains throughout the main floor of the house.

It was a true masterpiece of canine art; the grand finale of his life’s work.

And there I stood, arms full of groceries, three small people whirling around me, surrounded by millions of filthy bits of trash.

IMG_5797.jpg

So, I stuck the baby in his highchair with a nutritious pre-dinner amuse bouche of oreo cookies. Then I enlisted the older boys’ help in picking up the living room, while I handled unpacking the perishable groceries and picking up the kitchen mess. Under the circumstances, we were all handling the situation with impressive zen.

And then, as I began loading the gallon of milk into the fridge, I lost my grip and it began to fall towards the floor. I reacted with ninja-like reflexes and caught the milk before it crashed to the trash-covered floor. A momentary triumph, until I realized that in the process of catching the milk, I’d knocked one of the fridge door shelves with my elbow, sending the shelf and its contents crashing to the floor to mingle with the dog’s trash mess.

IMG_5809.jpg

I took a deep breath, then grabbed some paper towels and got down on the ground to begin cleaning up the broken glass, sticky hoisin sauce, and olives, which had married themselves with the kitchen mess.

Once most of the trash was picked up and the floor dry, I ran the vacuum to ensure no bits of glass remained to injure small bare feet. Then, I finished unpacking the groceries, fed the boys, and sat down to take a breath. It was then that I noticed the piercing pain coming from my toe, which had been impaled by a bit of glass.

I cleaned up my toe, then poured myself a glass of wine. A very big glass of wine.

IMG_5814.jpg

At the time, it seemed like such a noteworthy series of chaotic events. Little did I know that such series of entropic events would become so normal they’d barely merit any attention at all. In my almost 9 years as a parent, I’ve come to realize that chaos ebbs and flows. There are periods of time where the demands of family life feel so impossibly insurmountable, no super hero could possibly win this war. And then, just when I’m ready to waive the white flag, things magically return to some semblance of normal, even if chaos is the new normal.

I’d be lying if I said that experience has taught me to thrive on chaos or to go with the flow. I rarely go with the flow. What I have learned though is that the roaring flow of chaos is always peppered with islands of blissful peace. You just have to hang on until you can get yourself onto one of those islands for a brief reprieve.

And in between the islands of peace, there is wine.

IMG_5827 (1).jpg

The final dish, served in Italian-Inspired Serving Bowl from Avon

This brussels sprouts recipe is inspired by a side dish which accompanied a pan-roasted chicken recipe from Plated. Combined with potatoes, it makes an easy all-in-one veggie and starch side dish for just about any meal. I served it alongside a simple halibut piccata, but I could easily eat a whole bowl of this on its own. This recipe has a high likelihood of turning just about anyone into a raving brussels sprouts fan.

Shaved Brussels Sprouts, Bacon, and Potato Hash

Ingredients

  • 2 cups fingerling potatoes, cut into small pieces
  • 6 slices bacon, chopped
  • 1 shallot, thinly sliced
  • 2 cups brussels sprouts, very thinly sliced or shaved
  • Olive oil, about 1 tablespoon
  • Salt and pepper

Procedure

Place potatoes in a medium sized pot. Cover with cold, generously salted water. Bring to a boil over high heat. Cook for about 5 minutes, under just fork tender. Drain and set aside. In a large pan, cook bacon over medium/medium-high heat until crisp. Remove bacon using a slotted spoon and set aside. Leave the rendered bacon fat in the pan. Add the shallot to the pan with the bacon fat. Cook for 4-5 minutes, over medium heat, until tender and golden. Add about a tablespoon of olive oil to the pan, if little bacon fat remains. Add the brussels sprouts and potatoes. Cook over medium high heat for about 5-7 minutes, until the potatoes begin to brown. Return bacon to the pan. Season with salt and pepper, to taste.

IMG_6008 (1).jpg

Tequila-Braised Chicken

It seems that I blinked and almost two years went by since I’ve written.

A lot has happened in two years.  We renovated and sold our old house, then bought another house, packed and moved.

We took the boys to Disney World, Myrtle Beach and assorted other weekend adventures. We took ourselves to Barbados.

We adopted the most perfectly precious puppy.

IMG_5183.jpg

The kids got bigger and busier. We got older (and also busier).

My little Avon hobby flourished into a unexpected thriving business, with hundreds of other representatives on my team. (That’s me in the red sweater below.)

Avon Recognition.jpg

We celebrated and we suffered. We gained and we lost. We laughed and we cried.

Basically, we’ve spent the past two years doing the whole life thing, with all of the celebrations and sorrows that brings.

And somewhere in the midst of all of that living, this little ol’ blog lost its place. Quite honestly, I was having a hard enough time garnering the mental energy to even figure out what to cook, let alone gathering the necessary ingredients, cooking it, photographing it, and then writing about it!

As our days became busier and our attention more scattered, we regretfully found ourselves in a routine of easy, not-typically-so-healthy convenience food.

IMG_5660.jpg

Enter “meal kit delivery” sites.

My lovely sister-in-law has been using a site called Plated for awhile now. Plated offers a weekly menu of meals to choose from. You select your meals a week ahead of time, then they ship you exact portions of the fresh ingredients you need to cook the meals, along with  bright, easy-to-follow recipe cards. On your delivery day, everything you need arrives on your doorstep, fresh and ready to be cooked.

After drooling over the pictures of the crave-worthy meals my sister-in-law was cooking with her husband, I decided to give it a try.

My one and only disappointment after receiving our first Plated box was that I didn’t have another box waiting on my doorstep, containing everything I needed to cook a delicious meal on all of the other nights that week! And the next week. And the week after that.

Turns out that there are a number of other sites that offer the same service as Plated. In the past couple months, we’ve also ordered from Blue Apron and become bigs fans of Home Chef, which has proven to be the best fit for feeding our whole family.

IMG_5664.jpg

Aside from the major convenience factor that Plated and other meal delivery kit sites offer, it’s also become much-needed fodder for food inspiration. Cooking each of the meals we’ve ordered through Plated, Blue Apron, or Home Chef, has stirred the culinary juices in my mind.

One delicious dish leads to an idea for another delicious dish. Change a bit here, add a bit over there, omit a bit over here, and voilá! You’ve got a new dish perfectly suited to your tastes.

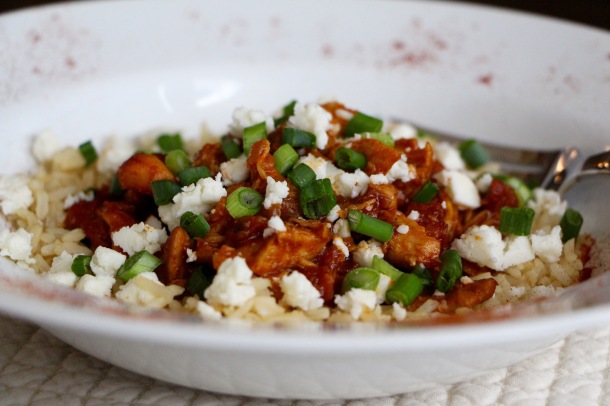
One of our favorite Plated meals so far was a recipe for Beer-Braised Chicken. The following recipe is my modified twist on the immensely flavorful dish. Boneless, skinless chicken thighs are coated in a fragrant blend of spices, then braised in a smokey chorizo-tomato based sauce, until tender and drenched with deliciousness.

Top with a Mexican cheese, like queso fresco, and enjoy over rice. This chicken would also work well in a sandwich or as filling for quesadillas.

Make a double batch for freezable leftovers!

Tequila-Braised Chicken

Ingredients

  • 2-3 tablespoons olive oil
  • 2 pounds boneless, skinless chicken thighs (about 8)
  • 2 teaspoons paprika
  • 1/2 teaspoon chili powder
  • 1/8 teaspoon ground cayenne pepper
  • 1 teaspoon kosher salt
  • 1/2 cup chorizo, diced*
  • 1 medium cooking onion, finely diced
  • 1/4 cup fresh cilantro leaves, rough-chopped
  • 1 ounce tequila (optional)
  • Juice of 1 lime
  • 1 tablespoon Worcestershire sauce
  • 2 teaspoons brown sugar
  • 1/4 cup tomato paste
  • 1 1/2 cups chicken stock
  • 2-3 green onions, thinly sliced
  • 1/2 cup Mexican cheese (such as queso fresco), crumbled

*You can use sweet chorizo (dulce) or spicy (picante), depending on your preference for spiciness.

Procedure

Combine the paprika, cayenne, chili powder and salt in a small bowl. Pat the chicken thighs dry, then generously coat with the spice mixture. Heat the olive oil over medium-high in a wide saucepan. Once hot, add the chicken in a single layer. Sear for 1-2 minutes per side, until lightly-browned. Sear in batches, if necessary. Remove from the pan and set aside. (The chicken will not be fully cooked at this point.)

Reduce the heat to medium. Add the chorizo to the same pan you seared the chicken in. Cook for about 2-3 minutes. Add the onion and cilantro. Cook, stirring frequently, for about 5 minutes, until the onion is tender.

Carefully add the tequila (optional). Allow to cook for a minute, then add the lime juice, Worcestershire sauce, brown sugar, tomato paste, and chicken stock. Stir to combine, then raise the heat to high. Bring to a boil.

Once boiling, return all of the chicken to the pan. Reduce the heat to medium. Cover the pan, then allow it to cook for approximately 8 minutes, until chicken is cooked through. Remove the chicken from the pan and set aside to cool slightly.

Raise the heat to medium-high and allow the braising liquid to cook uncovered for about 3-5 minutes, until it’s reduced by about 1/2. Once the chicken is cool enough to handle, use a fork or your fingers to tear the chicken into bite-sized pieces.

Return the shredded chicken to the braising liquid. Stir to combine. Taste and adjust seasoning with additional salt and pepper, as desired.

Serve over rice. Garnish with green onion and Mexican cheese.

Serves about 4.

IMG_5631.jpg

Julia Child’s Beef Bourguignon

Posted on

Julia Child was one of America’s first (and dare I say greatest ) culinary celebrities, in a time long before shows like The Next Food Network Star or Top Chef sought to discover such talent. She was just a woman with a passion for good food, which led her down the gastronomical path that ultimately brought her into America’s kitchens. It was her passion for food which led her on the journey. It was her charm, relatability, and contagious adoration of food which grabbed the attention of adoring fans all around the world.

Julia changed the way home cooks thought about food. She knew that good food wasn’t exclusive to restaurant kitchens, prepared by professional chefs. She made expert culinary techniques accessible to everyone, in a manner which could inspire even the most novice cook to jump in head first. Because Julia understood that we learn best through trial and error. She understood that there is no such thing as a bad cook, only cooks who needed more practice. And she understood that even the most experienced cooks encountered the occasional kitchen disaster. She’d say, “Cooking is like love; it should be entered into with abandon or not at all.”  

Julia viewed food as one of the greatest pleasures in life, a pleasure worth the small sacrifice of a wider waistline. (Who needs to be a size 4 anyway???) She embraced cooking as an art form akin to ballet. And she cooked with the same inspired strokes of an artist to create timeless gastronomical masterpieces. But she was often criticized by nutrition-minded individuals for her use of rich ingredients, like butter and cream, which in excess could lead to health problems. To those criticisms, she responded, “Everybody is overreacting. If fear of food continues, it will be the death of gastronomy in the United States. Fortunately, the French don’t suffer from the same hysteria we do. We should enjoy food and have fun. It is one of the simplest and nicest pleasures in life.”  

I love this woman. And having lived to be two days short of 92 years old, a lifespan which she attributes to a regular diet of gin and red meat, I’d say she knew what she was talking about. Well-prepared food is a pleasure to be enjoyed, even within the framework of a healthy lifestyle.

Julia understood what really mattered. She knew that good food needn’t be complicated with elaborate presentation. She would say, “You don’t have to cook fancy or complicated masterpieces – just good food from fresh ingredients.” That’s all it really takes, isn’t it? It’s like this beef bourguignon, perhaps her most famous recipe and the subject of her very first televised episode of The French Chef on PBS. It’s a stew (with a fancy name that’s fun to say). But it’s a stew all the same, certainly not something most would consider fine dining. And yet, it’s probably one of the most delicious dishes you’ll ever eat.

I started making beef bourguignon a few years ago as our Christmas dinner. I suppose it’s become our tradition at this point. We entertain a large crowd on Christmas and for a few years, I experimented with various menus, all delicious, but the beef bourguignon stuck. It’s enjoyed by everyone at the table and best yet, can be fully prepared the day before. In fact, it’s even better after sitting in the fridge overnight!

In honor of what would have been Julia’s 100th birthday (August 15), I prepared her infamous beef bourguignon. (I certainly wasn’t going to cook the roast suckling pig.) Beef Bourguignon is normally a recipe I would save for the colder months when it’s lovely to have the house warmed with the slow-cooking oven and flooded with the rich aromas of the dish. But when I think of Julia, I think of beef bourguignon, and so it had to be.

The original recipe can be found in Julia’s first book, Mastering the Art of French Cooking. She was a wise woman who fully recognized that some of the recipes contained in the book may require stretching one’s budget, waistline, time, and schedule, but such are the sacrifices we make in the name of something wonderful to eat. Like many of the dishes in her book, this dish takes some time, but there’s no step too complicated for even the most novice chef. Heed Julia’s advice and cook with abandon. As with many of the world’s greatest pleasures, anything worth having is worth the work it takes to get there.

While I waited for my beef bourguignon to finish cooking, I turned on some music and danced in the kitchen with my boys. Then I poured myself a glass of wine and spread some creamy brie onto slices of French baguette. I’m pretty sure Julia would have approved.

Happy 100th, Julia and Bon Appétit!!

Julia Child’s Beef Bourguignon
Boeuf a la Bourguignonne

(In my own words. Very slightly modified from the original.)

Ingredients

  • 1/2 pound bacon, chopped
  • 1 tablespoon olive oil
  • 3 pounds lean stewing beef (cut into approximately 2″ chunks)
  • 1 carrot, sliced (or 10-15 baby carrots, coarse chopped)
  • 1 onion, chopped
  • 1 teaspoon salt
  • 1/4 teaspoon pepper
  • 2 tablespoons flour
  • 3 cups full-bodied red wine
  • 2 – 3 cups beef stock
  • 1 tablespoon tomato paste
  • 2 cloves garlic, smashed
  • 1/2 teaspoon thyme
  • 1 crumbled bay leaf (optional)

For the brown-braised onions (Oignons Glacés à Brun)

  • 1/2 bag frozen white pearl onions, defrosted and patted dry
  • 1 1/2 tablespoons butter
  • 1 tablespoon olive oil
  • 1/2 cup beef stock or beef broth
  • Salt and pepper

For the sautéed mushrooms (Champignons Sautés au Beurre)

  • 1 pound mushrooms, quartered
  • 4 tablespoons butter
  • Salt and pepper

Directions

Gather and prepare your ingredients prior to cooking. Chop the bacon, chop the beef, chop the veggies, smash the garlic… Preparing your ‘mise en place’ will help things go smoothly once you’ve fired up the stove.

Preheat oven to 450 degrees.

Arrange the beef chunks in a single layer on a tray lined with paper towels. Use additional paper towels to thoroughly pat the beef dry.

*Damp beef will not brown properly.

*Julia recommends chuck beef for stew meat. I usually use the precut ‘stew beef’ from my grocery store. It saves me a few minutes of prep time, which is invaluable when you’re cooking while three young boys threaten to tear the house (or each other) apart.

In a large dutch oven pan, heat the olive oil over medium heat. Add the bacon and cook for several minutes, until the bacon is browned and has released most of its fat. Use a slotted spoon to remove the bacon, leaving the fat in the pan.

*Julia’s recipe calls for a 6 ounce piece of chunk bacon, cut into lardons. Regular sliced bacon will work just fine!

*Any large, stove and oven-safe pan with a tight fitting lid will do the job. I use a 9-quart Le Creuset enameled  cast iron french oven pan.

Over medium/medium-high heat, brown the beef in the bacon fat for a minute or two on each side. Do not overcrowd the pan. The beef should quickly develop a nice caramelized brown on the surface. Turn the beef to brown on all sides, then remove with a slotted spoon and set aside. Repeat until all of the beef has been browned.

*You do not want to steam or boil the beef. If your beef is not browning properly, it is either due to the heat not being high enough, the pan being over-crowded (which lowers the heat of the bacon fat), or the beef being too damp. Try adjusting each of these conditions.

Once all of the beef has been browned, add the carrots and onions to the pan. Cook for a few minutes until they develop a golden brown color. Then, carefully pour out the excess bacon fat, leaving the veggies in the pan.

Add the beef and bacon back into the pan. Toss with salt and pepper. Then, sprinkle the flour over the mixture and toss again. Place the pan, uncovered, on the middle rack of the preheated oven for 4 minutes. Toss the mixture, then cook for 4 more minutes.

Remove the pan from the oven and reduce the heat to 325 degrees.

Add the wine*, beef stock, tomato paste, garlic, and thyme. Add just enough beef stock to barely cover the beef.

*Julia recommends Beaujolais, Cotes du Rhone or Burgundy. I use whatever dry red I have on hand, usually Merlot, Cabernet Sauvignon, or Pinot Noir. Use something you enjoy drinking. While you’re at it, go ahead and pour a glass. Julia wouldn’t mind. In fact, I think she would have encouraged it. Cheers!

Bring to a simmer on top of the stove. Then, cover the pan, and place it in the oven. Cook, covered, for about 3 hours. Adjust the temperature slightly, if necessary, so that the liquid maintains a gentle simmer throughout the cooking time.

While the beef is cooking, prepare the onions and mushrooms.

For the onions:

Heat the butter and oil in a sauté pan over medium heat. Add the onions and cook for about 10 minutes, occasionally shaking the pan to allow the onions to roll around in the pan and brown on all sides. Then, add the beef stock. Bring to a simmer, then lower the heat. Cover and simmer slowly for about 15-20 minutes. Check the pan towards the end of the cooking time. Most of the liquid should have evaporated and formed a brown glaze around the onions. Season with salt and pepper. Set aside.

*Julia’s recipe calls for fresh, peeled white onions, about 1″ in diameter. Since my grocery store does not regularly carry the small onions, I use about 1/2 a bag of frozen white pearl onions. The added convenience is that they’re already peeled! Just be sure to defrost completely and pat dry before sauteeing. Fresh onions will require longer cooking time, about 40-50 minutes.

For the mushrooms:

Heat the butter in a sauté pan over medium-high heat. Add the mushrooms. Cook for  about 10 minutes, stirring frequently.

*The mushrooms will at first appear to absorb the melted butter, but will eventually release the butter and their own liquid. As the liquid evaporates, the mushrooms will acquire a golden brown color.

Season with salt and pepper, then set aside.

Once the beef has finished cooking, carefully pour the mixture through a sieve or strainer. Allow the sauce to collect in a large measuring cup (the 4-cup kind) or glass bowl. Return the beef and bacon to the dutch oven pan. Discard the carrot and onion pieces.

Arrange the brown-braised onions and sauteed mushrooms over the beef.

Allow the sauce to rest for a few minutes. The excess fat will rise to the surface as it rests. Use a spoon to collect and discard the excess fat. Repeat until much of the excess fat has been discarded.

You should have about 2 – 2 1/2 cups of sauce. If you have much more than this, pour the sauce into a small saucepan and simmer uncovered until it’s reduced a bit. It should be quite flavorful and thick enough to lightly coat the back of a spoon. Taste and adjust the seasoning with salt and pepper, as desired. Pour the sauce over the beef, mushrooms, and onions.

Serve over boiled potatoes or hot-buttered noodles. Julia recommends a side of buttered peas as an appropriate veggie side.

This dish reheats exceptionally well. Simply bring to a gentle simmer on the stovetop for a few minutes, until all components are heated through.

If you’ve got 30 minutes to spare, you can watch Julia cooking her beef bourguignon during the first episode of The French Chef  HERE.

Mother’s Day Cinnamon Raisin Donut Bread Pudding

Posted on

I get breakfast in bed once a year. On Mother’s Day. My breakfast in bed day is coming soon!! (For the record, my husband also gets breakfast in bed when Father’s Day rolls around.)

Last year, I got my breakfast in bed at the hospital, since I’d given birth to our third son the night before. But the year before that, my husband made me a delicious bacon, egg, and cheese bagel sandwich. It was fantastic. The boys came dancing into the room, buzzing with excitement over serving me breakfast in bed. They’d mostly just watched their daddy preparing the meal, but they took full credit for it.

They may not have made that bagel sandwich, but even young kids are quite capable of preparing some pretty fantastic stuff in the kitchen (with a little help, of course). And there’s really nothing like that aura of pride which emanates from a child who just accomplished something awesome.

With that in mind, I’ve come up with a Mother’s Day breakfast-in-bed recipe which is so simple that even preschoolers can complete almost every step on their own, with just a bit of adult direction. It starts with donuts, chopped into chunks, which are then sprinkled with raisins. Next, a mixture of half and half, sugar, eggs, vanilla, and cinnamon gets poured over the donuts. As it bakes, the donuts absorb the sweet, creamy mixture forming a lusciously decadent donut bread pudding.

This is good stuff, people. Make it for yourself if no one is going to make it for you. But, if you’ve got some kids who’d like to surprise you for Mother’s Day, here’s a step by step photo guide for them to follow.

Note to helper grown-up: It’s a good idea to gather all ingredients and supplies ahead of time, so you can move through the steps quickly. Young kids have a tendency to get distracted, lose interest, or start eating the donuts if you take too long between steps.

Step 1: Wash your hands. Then, ask a grown-up to preheat the oven to 350 degrees.

Step 2: Use a paper towel to spread one tablespoon of softened butter all around a medium-sized baking dish.

Step 3: Using a child-safe knife, carefully chop 7 or 8 cake-style donuts into chunks. You can use plain, powdered, cinnamon, or apple-cider donuts. (We used a variety pack of plain/powdered/cinnamon Entermann’s donuts.)

Step 4: Arrange the chopped donuts in a baking dish.

Step 5: Sprinkle the raisins overs the donuts.

Step 6: Pour 2 cups of half and half into a large bowl or measuring cup.

Step 7: Add 1/2 cup sugar.

Step 8: Add 1 teaspoon of vanilla.

Step 9: Add 1 teaspoon of cinnamon. Throw a pinch of salt in there too!

Step 10: Ask a grown up to help you crack 4 eggs into a dish. Then, pour the eggs into the half and half mixture.

Step 11: Whisk the half and half mixture until it’s well blended.

Step 12: Pour the mixture over the donuts. Make sure you pour some over every donut.

Step 13: Gently press down on the donuts so they drink up the half and half mixture.

*The key to a great bread pudding is not to over-soak the bread (donuts, in this case). The donut chunks should be mostly submersed in the liquid, but not swimming in it. A few donuts peaking out of the top will help a nice crust to form on the top when it bakes.

Step 14:  Ask a grown-up to help you put the baking dish in the oven. Bake for 50-55 minutes.

The bread pudding should look like this before it bakes.

Step 15: Ask a grown-up to help you take it out of the oven. Sprinkle it with powdered sugar. Serve warm.

*If desired, the bread pudding can be made the day before and reheated in the morning.

While the bread pudding is cooking, cut up some fresh fruit. It will trick Mommy into thinking she’s eating a healthy meal when it’s sitting next to her main course of donut pudding. (Mommies like to think they’re eating healthy.)

Cook a huge batch of bacon, because mommies like bacon.

Ask a grown-up to pour a glass of sparkly champagne or sparkling white grape juice for Mommy, because it’s a special day. A cup of hot coffee would be nice too.

Arrange everything nicely on a platter with a fresh flower or two and a handmade card. Your mommy will be in Mother’s Day heaven!

Cinnamon Raisin Donut Bread Pudding

Ingredients

  • 1 tablespoon butter, softened
  • 7 or 8 cake-style donuts, chopped into chunks (plain, powdered, cinnamon, apple cider)
  • 3/4 cup raisins
  • 2 cups half and half
  • 1/2 cup sugar
  • 4 eggs
  • 1 teaspoon vanilla
  • 1 teaspoon cinnamon
  • Pinch of salt

Directions

Preheat the oven to 350 degrees. Lightly grease the inside of a medium sized baking dish with the softened butter. Chop the donuts into chunks (about 1″ square). Arrange the donut chunks evenly in the baking dish. Sprinkle the raisins on top. Combine the half and half, sugar, eggs, vanilla, cinnamon, and salt in a large bowl or measuring cup. Whisk to combine. Pour the mixture over the donuts and raisins. (Try not to over-soak the donuts.) Gently press down on the donuts so they are mostly submerged in the liquid. Bake for 50-55 minutes. Sprinkle with powdered sugar. Serve warm.

Spicy Beef and Bean Stew

You know those little dolls…the ones where you press their belly and they repeat a series of silly little things, like Mama, Feed me, and Goo goo gah gah?

Well, my three-year-old is just like that, only his sound bytes are more like I love you so much, I don’t like you, and I’m freezing cold.

For the record:

My four-year-old’s soundtrack is something like, I’m thirsty, I have an idea…, and How about we…

Daddy’s goes something like, What’s for dinner?, I’m getting a beer, d’ya need anything?, and things like It’s a fact of life. Dogs don’t like to be disturbed while they’re eating and neither does Daddy.

And Mommy’s is a bit like, Why in the world would you do that?, This room looks like a tornado blew through it, and Serenity now!

It’s the I’m freezing cold one that I can’t wrap my head around. The kid stubs his toe…I’m freezing cold. I tell him that he can’t have another cookie…I’m freezing cold. It’s time to get dressed for school…But, I’m freezing cold.

I tell him, You keep saying that. I do not think it means what you think it means.

A typical conversation with my little man goes something like this:

Hey buddy, it’s time to clean up your toys.

I can’t.

Why can’t you clean up your toys?

It’s just that…I don’t like you.

Ok, that’s fine, but you still need to clean up your toys.

But, I’m freezing cold.

Well, put on a hoodie and then clean up your toys.

**Insert Cry. Scream.Wail.** (Him, not me. Ok, sometimes me too.)

Mommy?

Yes, buddy?

I just love you so much.

I love you too. Now…Clean. Up. Your. Toys. This room looks like a tornado blew through it.

It IS winter time though, so if you’re freezing cold, it’s probably with good reason. And I’ve got just the thing to warm you up! Winter is the time for foods which fill our bellies and leave us feeling all toasty and satisfied. January also happens to be National Soup Month. So, it’s the perfect time for this Spicy Beef and Bean Stew, made with tender, slow-cooked beef and fresh jalapeño peppers. The broth gets its thickness from a puree of white beans, rather than the typical butter/flour roux. This is a rich and satisfying stew, which also happens to be extra-rich in protein and lower in high glycemix index carbs than traditional flour-thickened meat and potato stews!!

Spicy Beef and Bean Stew

Ingredients

  • 2 tablespoons olive oil
  • 1 small onion, finely diced
  • 2 teaspoons garlic, minced
  • 2 jalapeño peppers, ribs and seeds removed, finely diced
  • 1.5 – 2 pounds stew beef
  • 1/2 cup marsala wine (optional, but recommended)
  • 1 quart beef stock
  • 2 tablespoons tomato paste
  • 1 teaspoon salt
  • 2 (15.5 ounce) cans cannellini beans
  • 1 (15.5 ounce) can black beans, drained

Directions

Preheat oven to 325 degrees. In a large ovensafe saucepan or dutch oven, heat olive oil over medium heat. Add the onion and cook for 3-5 minutes, until tender. Add the garlic and jalapeño peppers. Cook for 2-3 minutes more, stirring frequently. Raise the heat to medium high and add the beef. Brown the beef on all sides. Add the marsala wine and allow it to simmer for a minute. Then, add the beef stock, tomato paste, and salt. Stir to combine. Bring to a simmer, then cover with a  tight fitting lid and place the pan on the middle oven rack. Cook for 2 hours. While the beef is cooking, puree one can of the cannellini beans and their liquid in a blender or food processor. Set aside. Drain the other two cans of beans. After two hours, remove the cover. Stir in the pureed beans and the whole beans. Cook, uncovered, for 20 minutes more. Remove from the oven. Taste and adjust seasoning with salt and black pepper, as desired.

Serves 4-6

Diet Day: 12   Weight loss: 7    Motivation: Strong and steady

Smoked Salmon and Cucumber Salad

Posted on

Recently, we picked up one of those Kinect sensors for the Xbox 360. We figured it would provide for some active fun for the boys during the cold, indoor winter months and even get us big kids moving a bit more to help out with our fitness goals. Some of the games in Kinect Adventures really get that heart rate pumping! And I’m waiting on my copy of Dance Central 2 to arrive, so I can totally bust out my sweet dance moves (in complete private, when nobody else is around).

The Kinect sensor is pretty amazing. And utterly frightening too. It’s got a little motorized camera which tracks and responds to your movements. If you move, the camera moves to find you. It can scan your body and create an animated version of your image on the tv…wearing the same clothes you’re wearing. Creepy. And it takes pictures of you while you play. It even responds to voice commands, like “Xbox, stop.” and “Xbox, play Golden Girls.” and “Xbox, make my dinner.”

Ok, so the Xbox doesn’t know how to make my dinner. Yet. But I’m sure that software upgrade is just around the corner. Seriously, the robot revolution is upon us. Are you prepared?

The other day, as I was trying to teach the kids not to wander aimlessly in front of other people while they’re playing with the Kinect, I found myself saying, You can’t walk in front of people because it confuses the Kinect. It’s not smart like us and it can’t figure out who it’s supposed to be tracking when there are too many people moving around.

And as soon as the words came out of my mouth, I wanted to eat them. The Xbox just heard me, questioning its intelligence. I swear I heard the little camera eye move to focus closer on me in that moment, recording and passing judgement on me as an enemy of the robot uprising. I’m doomed. I instantly started fumbling my words, trying to make my insult to the Kinect seem less degrading. I love you, Xbox. Please don’t annihilate me.

But since the Xbox is not about to prepare my meals anytime soon, I suppose that leaves me to do it… Hubby and I are still going strong with our lower carb diets. Today marks Day 8 of our diet and I’m down…drumroll, please…6 pounds!! Not a bad start, if you ask me. The weight won’t continue to come off at a rate of six pounds per week (nor should it), but it’s certainly a motivating start. The best part is that we have been dining on some pretty fantastic food this week. Like this smoked salmon and cucumber salad which is the stuff that dreams are made of. So fresh and simple. So insanely delicious!

Enjoy! (And beware. Kinect is watching.)

Smoked Salmon and Cucumber Salad

Ingredients

  • 4 ounces smoked salmon
  • 1 large seedless cucumber
  • 2-3 small tomatoes, halved and sliced into small pieces
  • 1/4 red onion, very thinly sliced
  • 2 tablespoons non-pareil capers
  • Creme fraiche, for garnish (can substitute sour cream)

For the Fresh Dill Vinaigrette:

  • 1/8 cup olive oil
  • 1/8 cup white balsamic vinaigrette (plus a touch more)
  • 1/2 teaspoon dijon mustard
  • 1 tablespoon fresh dill leaves, torn
  • 1/8 teaspoon salt
  • Pepper, to taste

Directions

To prepare the vinaigrette, whisk together the olive oil, vinegar, mustard, dill, salt and pepper until well combined. Cut the cucumber in half, then use a mandolin slicer or a very sharp knife to very thinly slice the cucumber, lengthwise, into ‘ribbons’. Place a mound of the cucumber ribbons in the center of each plate. Scatter the onions and tomatoes over the cucumber. Tear the salmon into small pieces and scatter over the salad. Place a larger piece of salmon in the center. Sprinkle the capers over the salad. Drizzle each salad with the dill dressing. If desired, garnish the center piece of salmon with a small dollop of creme fraiche or sour cream.

Serves 2

Diet Day: 8   Weight Loss: -6   Motivation: High!

Top Ten Gourmand Mom Recipes

As I’ve mentioned before, I’m greatly entertained by reading through the search terms which lead people to this little blog. It often leaves me puzzling over how the terms “Christmas money wreath” or “dog with running shoes” brought people here. What in the world have I been writing about? Of course, most of the time, people are just looking for recipes and, as it turns out, some of those recipes are quite popular!

Here, I’ve compiled a list of the top ten most viewed Gourmand Mom recipes. Then, if you scroll down a bit further, you’ll see ten of my personal favorites. (Clicking on the recipe titles will bring you straight to the recipe.)

What’s your favorite recipe? Tell me about it!

Top Ten Gourmand Mom Recipes

(according to page views)

Crab Stuffed Jalapeno Poppers  – Coming in at #10, these spicy little appetizers are a fresh and flavorful alternative to the kind you’ll find in the frozen food section of your grocery store!

A Better Caramel Apple Cake – Yum! This recipe is the result of experimenting with a delicious recipe I found in the Food Network magazine! Who knew that a bit of boiling water would make such a big difference?? With apple season reaching its peak, now’s a great time to give this one a try!

Almost Perfect Fontina Chops – This recipe is inspired by a Bonefish Grill dish, which is apparently a big favorite, since I get a few search hits every day from people looking for this recipe. This version is not intended to be a copycat recipe; it’s just a delicious dinner inspired by the popular Bonefish dish.

 Independence Day Berries and Cream – Mixed Berry Mousse and Vanilla Bean Panna Cotta – My love for panna cotta began with this sweet treat. Mmmm….fresh berry mousse with sweetened cream! Mmmm…

Strawberry Spinach Salad with Goat Cheese and Almonds – The fresh ingredients do all of the hard work in this simple and delicious salad!

Hawaiian Garlic Shrimp – This is another recipe that gets a ton of search hits. The people want Hawaiian garlic shrimp…and with good reason! It’s delicious! Next time, I’d veer away from the traditional preparation and cook these babies with the shells removed to get more of the buttery garlic in my mouth and less on my fingers.

Chicken Wing Dip – Coming in at #4 is Chicken Wing Dip. It’s practically a classic and totally crave-worthy. Oh dear, just thinking about it makes me want to throw batch in the oven. Must. Have. Chicken Wing Dip.

Pumpkin Gingersnap Parfait – Perfect season for these tasty treats. Some may prefer to sweeten the pumpkin a touch more in these easy treats. For me, they’re just right!

Sweet Honey Cornbread – This one scored most of its hits when it landed on WordPress’ Freshly Pressed section for a day. It’s a great cornbread recipe; sweet, tender, and super easy to make!

And the #1 Most Viewed Gourmand Mom recipe is (drumroll, please)…

Chocolate Peanut Butter Cream Pie  – This luscious pie wins the top spot by a landslide. Somehow it’s found itself within the StumbleUpon community. I’m really not quite sure how StumbleUpon works, but it sure drives a ton of traffic to this delicious recipe!

Ten of My Personal Favorite Recipes

Greek Lamb Burgers with Tzatziki Sauce – This burger takes the cake as far as my husband is concerned! It’s become his meal of choice for birthdays, anniversaries, and any other excuse he can come up with!

The World’s Greatest Penne ala Vodka – I can’t claim credit for the creation of this recipe, but it’s definitely on my list of all-time favorites!! Seriously the best vodka sauce I’ve ever tasted!

Sausage, Bean, and Rapini Soup – This incredibly satisfying dish is in our regular dinner rotation. It freezes well, so make it in a huge batch to keep on hand for an easy dinner. Make it as brothy as you prefer and serve with a nice piece of French bread!

Chicken Salad Sandwich – Waldorf Style – There’s something incredibly satisfying about the combination of sweet, savory, and crunch in this chicken salad. It’s on my go-to list of easy weeknight dinners!

Grilled Honey Garlic Baby Lamb Chops – I want to slather this honey garlic sauce on everything. I think I could live on this honey garlic sauce.

Cheddar and Garlic Biscuits – I first made these biscuits during a major craving for Red Lobster’s Cheddar Bay Biscuits. I searched online for a copycat recipe and found a ton of Bisquick-based recipes. Wanting to make fresh biscuits from scratch, I combined the elements from a basic, buttery drop biscuit with the seasoning of the Red Lobster biscuit. They’re perfect. Everyone cheers when these are on the menu!

Salmon, Cucumber, and Orzo Salad in Lemon-Dijon Vinaigrette – This was initially intended as a pantry meal, if you will; something quick and easy using a few leftover ingredients I had on hand. It became an instant favorite. There’s something incredibly satisfying about the combination of flavors and textures in this simple dish!

BBQ Beef Chili – This hybrid chili/bbq beef dish makes my mouth water. Serve it with the cornbread from the Top 10 list!

Corn and Bacon Fritter Cakes – I just posted about these recently. I want to eat them for breakfast, lunch, and dinner everyday, topped with smoked salmon and creme fraiche. The best part is that they reheat really well. In fact, they may even be better reheated than straight out of the pan. Pop them in the oven for about 10 minutes at 400 degrees and they’re perfect! (P.S. A dollop of sour cream would make a fine substitute for the creme fraiche!)

Pizza Dragon and Chairs of Stock (Steak Bordelaise Pizza) – My brother in law goes nuts for this pizza! He’s still trying to figure out how to package it and sell it, since he’s convinced it will make me millions. This pizza is a steak dinner on a pizza crust. It takes a little time to get all of the components together, but everything can be prepared ahead of time and it’s worth the trouble!

Do you have a favorite Gourmand Mom recipe? Any other recipe you’d like to see here? Tell me about it!

Mac & Chitos, Anyone??

Posted on

I’ve said it before and I’ll say it again…I love macaroni and cheese; any type of cheese, baked or creamy, imaginative or traditional, fresh or frozen. It barely matters. I love them all. In fact, I don’t think I’ve ever met a macaroni and cheese I haven’t enjoyed for one reason or another. But, I do have my favorites; some for the combination of cheese, some for the addition of interesting ingredients, and some for purely sentimental reasons.

One of my favorite macaroni and cheeses in the whole world is easily my Grandma’s. It is the macaroni and cheese I grew to know and love as a child. I’d know it blindfolded by its smell, taste, and texture. It’s a spoonful of perfect comfort. My grandma, (or Bunger, as she’s lovingly known within the family) uses a familiar combination of Cheez Whiz, cheddar, and American cheese. Crunchy corn flakes complete the comforting dish.

The secret might be in the Cheez Whiz, but I suspect otherwise. Though she didn’t mention it when I called for the recipe, I’m pretty sure the secret ingredient is a hefty dose of love! So, don’t forget to throw some in!

It should be noted that when I called my grandma for the recipe, she couldn’t give me any exact measurements. Like many familiar family favorites, she cooks the dish by instinct; a little of this, a little of that, and a little more of this until it’s right. And you just know it’s right when it is. The recipe which follows is my attempt at putting precise measurements to my grandma’s recipe. It may not be exactly like hers, but it’s pretty close!

Bunger’s Baked Macaroni and Cheese

Ingredients

  • 2 pounds elbow macaroni
  • 3 cups milk
  • 1 15-ounce jar Cheez Whiz or other cheese dip/sauce
  • 1 8-ounce package shredded mild cheddar or 2 cups shredded Velveeta cheese
  • 2 eggs
  • 1/4 teaspoon garlic powder
  • Pepper
  • 8 tablespoons butter (1 stick), divided
  • 2 cups cornflakes, crushed
  • 12 slices American cheese or Velveeta cheese

Directions

Preheat oven to 350 degrees.

Cook pasta according to package directions. Strain, toss with two tablespoons of butter, and set aside.

In a separate pot, bring the milk and one tablespoon of the butter to a simmer over medium heat. Turn the heat down to low to maintain a gentle simmer. Slightly warm the Cheez Whiz for a few seconds in the microwave. Add the Cheese Whiz and shredded cheese to the simmering milk. Stir until melted and well combined. Crack the two eggs into the Cheez Whiz jar. Close the jar and shake vigorously to whip the eggs. (I’m pretty sure there’s a little magic in this step!) Slowly pour the whipped eggs into the milk and cheese mixture. Stir to combine. Add the garlic powder and pepper. Cook for a few minutes over low/medium-low heat.

Pour the cheese sauce over the macaroni and toss to combine. Divide the cheesy macaroni between two large (13×9 inch) baking dishes. Cover the top of the macaroni with the American cheese slices and the crushed corn flakes. Melt the remaining five tablespoons of butter and drizzle over the top of the cornflakes.

Bake for about 25-30 minutes until hot and bubbly around the edges.

Makes 2 Large Baking Dishes…one for dinner, one for the freezer!*

*Freeze the extra dish prior to baking. Defrost and bake before serving.

After making this dish, you’ll probably find yourself with a bit of leftovers. And I’ve got the best way to use them! Recently, an old friend of mine from college posted a picture of her newest culinary creation; a macaroni and cheese burrito! I’ve always thought that Sara was one of the funniest people I know. I’m now convinced that she is also one of the smartest! A burrito filled with macaroni and cheese and crispy fried onions for crunch; a Mac & Chito, if you will! Pure genius!

To prepare yourself a gourmet Mac & Chito, preheat your oven to 350 degrees. Place a slice of American cheese in the center of a burrito-sized flour tortilla. Place a scoop of warmed macaroni and cheese on top of the cheese. Sprinkle with a generous quantity of fried onion pieces, such as French’s French Fried Onions. Wrap the tortilla burrito style (fold the top and bottom over the macaroni, then roll). Partially wrap the burrito in foil and bake for about 10 minutes, until thoroughly heated.

Chorizo and Asparagus in a Deconstructed Hollandaise

Posted on

I love eggs. I love ’em boiled, fried, scrambled, or poached. I love ’em with hot sauce or just a touch of salt and pepper. I love them stuffed as cheesy omelets or served on top of a huge pile of corned beef hash. Deviled eggs, egg salad, and potato salad with chunks of chopped boiled eggs warm my heart. And I go gaga for bacon, egg, and cheese bagel sandwiches, most especially when they come from any bagel shop in NYC.

I love eggs. I love a slightly runny yolk with a thoroughly cooked white. I anxiously await the burst of the yolk between two halves of an English muffin and find particular pleasure in wiping up the drippings with a corner of bread. I love the little bits of scrambled egg which are tossed in fried rice. Oh, and quiche…I love quiche. Egg pie, perfectly genius. And don’t even get me started on Eggs Benedict! Oh, incredible,edible egg…you make my heart swoon!

Of all the ways I love eggs, there is nothing I love more than finding an egg in an unexpected place; in the middle of a pizza, on a burger, or set atop a mound of crispy fries. Or how about gracing a pile of perfectly roasted asparagus??

I like to think of this dish as asparagus in a deconstructed hollandaise sauce. Asparagus and hollandaise sauce are a classic pairing. Hollandaise sauce is traditionally made by creating an emulsion of egg yolks, lemon juice, and butter. A dash of salt and sprinkle of cayenne pepper complete the sauce’s seasonings. It’s a rich, buttery sauce which has a tendency to be a bit finicky to prepare. (Click here to see my step by step photo guide on how to make Hollandaise sauce.)

Today’s dish combines all the elements of asparagus with a classic hollandaise sauce, without the fuss. We’ll fry our eggs sunny-side up in a generous amount of butter, leaving the yolks smooth and runny for optimal dippability. Then, we’ll set the eggs atop piles of roasted asparagus, drizzled with a touch of fresh lemon juice. Slices of spicy chorizo sausage complete the dish.

Chorizo with Asparagus and a Deconstructed Hollandaise

Ingredients

  • 2 smoked chorizo sausages
  • 1 large bunch of asparagus
  • 1-2 tablespoons olive oil
  • Salt and pepper
  • 1 lemon
  • 1 tablespoon butter
  • 2 eggs

Directions

Preheat oven to 375 degrees.

Place the chorizo sausages in a baking dish and cook for 25-30 minutes, until thoroughly heated through. Slice the chorizo before serving.

Rinse the asparagus and trim off the tough end. (A little trick for determining how much to cut is to hold one asparagus spear by the ends and bend. The point where the asparagus snaps is generally a good place to trim off.) Toss the asparagus in a bit of olive oil and season with salt and pepper. Arrange the spears in a single layer on a baking sheet. Place them in the oven for the last 10-12 minutes of the sausage’s cooking time.

To cook the eggs, heat butter in a nonstick or cast iron pan over medium heat. Crack two eggs into the pan, being careful not to break the yolks. (If desired, you can first crack the eggs into a small bowl or ramekin to ensure that the yolk remains unbroken and then carefully transfer to the pan.) Cook for a few minutes, without flipping, until the whites are cooked, but the yolk remains runny. Season with a dash of salt.

To serve, arrange several asparagus on a plate. Drizzle with a squeeze of fresh lemon juice. Carefully place the fried egg on top of the asparagus and arrange the chorizo slices on the plate. Garnish with fresh lemon slices.

Serves 2


The Gourmand Mom

Good food, seasoned with a dash of life